Watch video: Create a vintage effect in Photoshop Elements
With the photographic market being flooded with super-sharp lenses and high-resolution cameras, we’ve become accustomed to seeing amazingly clean images even with entry level bodies.
Contrast that to old film images that are optically imperfect, and full of grain and funky colors – but this is all part of their throwback appeal, and it's a look that's all the rage right now on social media.
So here's how to edit your digital image files to add some of these imperfections back in, using Adobe’s Photoshop Elements 2020 – although you can still follow along using the same techniques if you're running the full version of Photoshop CC.
You will learn how to replicate the three main traits of old film images: adding film grain, creating a sepia tone to make the colors look faded, and how to add a vignette to darken the corners and lead the viewer’s eye towards the middle of the image.
By the end you’ll be a master of layers, creating selections and how to adjust the brightness of a layer using Levels – useful skills for a whole host of Photoshop and Elements editing tasks.
01 Open your image and duplicate it
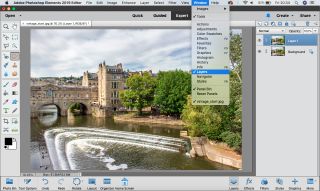
Bring up Photoshop Elements and go to File>Open then navigate to the image on your hard drive you want to use, or the provided Vintage_start.jpg start file. Now go to Window>Layers to see the Layers panel and hit Ctrl (PC) / Cmd (Mac) +J to duplicate your layer.
02 Add some realistic film grain
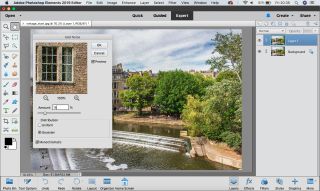
On your duplicated layer we’re going to add some grain to make it look authentically aged. Go to Filter> Noise>Add Noise and then in the panel that appears set the Amount to 15%, the Distribution to Gaussian and make sure Monochromatic is ticked, then hit OK.
03 Create a color fill layer
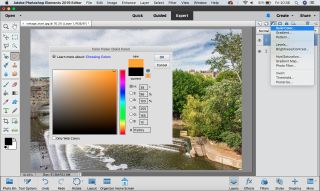
Head back over to the Layers panel, this time clicking the Create new adjustment or fill layer icon and choosing Solid Color from the list. Now you can set the Color Picker to an old vintage colour value like our orange (R:225, G:165, B:10) and hit OK.
04 Blend in your vintage tone of choice
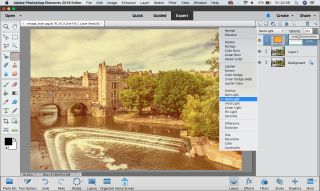
Staying in the Layers panel, click on the drop-down box that says Normal by default. This is your Blending Mode and you’ll want to set it to Hard Light to see the colour come through. Then reduce the layer opacity until the colour is subtle enough for your liking.
05 Make an elliptical selection
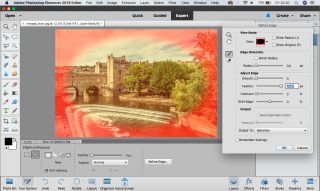
Grab the Elliptical Marquee Tool from the toolbox and drag it evenly over a central portion of the image, then click Refine Edge. Increase the Feather value to soften the edge of the selection – we used 120px but this will differ from image to image. Hit OK to apply.
06 Turn your selection into a vignette
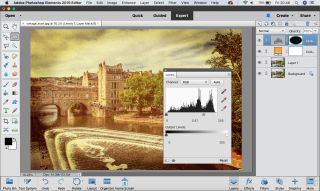
Click Create new fill or adjustment layer icon in the layers panel and choose Levels. The selection has been applied to the Levels Layer Mask so hit Ctrl/Cmd+I to invert it and drag the Midtones slider in the Levels panel to the right to darken the corners.
Read more:
The best photo editing software: image editors for novices through to pros
The best photo-editing laptops in 2020: top laptops for photographers
The best ultrawide monitor for photo editing in 2020
Get the Digital Camera World Newsletter
The best camera deals, reviews, product advice, and unmissable photography news, direct to your inbox!

Deputy Editor on PhotoPlus: The Canon Magazine, Dan also brings his technical wizardry and editing skills to Digital Camera World. He has been writing about all aspects of photography for over 10 years, having previously served as technical writer and technical editor for Practical Photography magazine, as well as Photoshop editor on Digital Photo.
Dan is an Adobe-certified Photoshop guru, making him officially a beast at post-processing – so he’s the perfect person to share tips and tricks both in-camera and in post. Able to shoot all genres, Dan provides news, techniques and tutorials on everything from portraits and landscapes to macro and wildlife, helping photographers get the most out of their cameras, lenses, filters, lighting, tripods, and, of course, editing software.