Photoshop tutorials: 100 editing tips
Our biggest and best-ever collection of Photoshop tutorials, tips, tricks and editing techniques
Photoshop tutorials are all over the internet, ready to help you edit your images in all sorts of ways – from simple crops to incredibly complex techniques involving layers, masks and more.
Here, we've picked out some top tips covering every area of Adobe Photoshop CC's enormous photo editing capabilities, from raw processing to retouching, from layers to luminance. They are a mixture of video walkthroughs, image editing examples and quick-fire tips, shortcuts and modifier keys to make your Photoshop editing as fast, efficient and productive as possible.
We've split our tips up to sections so that you can jump to the tips you're most interested in straight away, or you can simply scroll or swipe down this article to see all our Photoshop tips.
Sometimes menus, buttons and dialog options can be quite small and hard to make out, especially on a small display – but you can click on the gadget in the top right hand corner of these images to zoom in on a larger version.
We hope you find these Photoshop tips useful. We've kept them short, sharp and to the point – so let's get going!
How to get Photoshop
If you don't yet have Photoshop but you'd like to try it out to see what all the fuss is about, you can get a 7-day trial version of the Adobe Creative Cloud Photography Plan. Find out how the Adobe Photography Plans work to make sure that you choose the best option.
If you want to subscribe to a plan or just download the trial version, you can choose any of the options in the panel below. We've put a simple guide together on how to download Photoshop.
Get the Digital Camera World Newsletter
The best camera deals, reviews, product advice, and unmissable photography news, direct to your inbox!
Videos
1. Speedy skin softening with Texture
The new Texture adjustment in Camera Raw or Lightroom works wonders over skin. Grab the adjustment Brush and dial in a negative value, then paint over skin for a nice softening effect that retains the texture of the skin, while smoothing out any imperfections and rough patches.
2. Lift skin tones quickly
Often skin tones will benefit from a gentle lift to the luminance of the red, yellow or orange color range. a simple way to do this is with the Targeted Adjustment tool in Camera Raw. simply grab the tool, right-click and choose luminance, then drag upwards slightly over the subject’s skin to lift it.
3. Create a contact sheet
A contact sheet can be a quick and easy way to display a set of photos on a single print or image file. open Bridge and cmd/ctrl-click to select your photos, then go to Tools > Photoshop > Contact Sheet iII. Use Thumbnail to control how many images go on each sheet.
4. Enhance macro textures with ease
The Texture command in Camera Raw and Lightroom is perfectly suited to boosting the sharp details in macro photos. This is down to the way it targets a narrow band of mid-frequency detail without affecting high or low frequencies. This means it doesn’t affect the soft areas of the image or amplify noise: only the in-focus crisp details are enhanced.
5. Make impossible-to-save-over templates
Sometimes you might want to make templates to use over and over, such as this simple three-image page template. The problem is, you might accidentally save over the template after editing it, rendering it useless. However, if after saving the template as a PSD you add 't' to the end of the file name (so it reads PSDt), Photoshop will always open a new ‘untitled’ file rather than the original file, meaning there’s no chance of accidentally saving over it.
6. Add punch with B&W and a blend mode
A Black and white adjustment layer can be useful for adding punch to your color photos. Simply set the Blending mode to soft light and opacity to around 20-50%. For portrait images, try tweaking the red and yellow sliders to fine- tune the look of the skin.
7. Extrude any object to 3D
You can turn any simple flat shape or path into a 3D object by going to 3D > new3D extrusion from. Once done, you can use the 3D panel to add materials to the object, rotate the view, add lighting and much more.
8. Have fun wIth symmetry painting
This fun feature is great for drawing patterns and interesting shapes. Grab the Brush tool, then click the butterfly icon in the tool options at the top to choose from different symmetrical painting options. then simply start painting — try adjusting the brush tip settings in the Brush panel for interesting scatter effects.
9. Save time with Select Subject
This time-saving tool analyzes your image and attempts to select the subject for you. Rarely does it do a perfect job, but that’s not the point. Complex selections are usually a several-step process, and this gets you started quickly. You can then go on to improve the results with the powerful Select and Mask command.
10. Have Lightroom select your best photos
Lightroom for web has an intriguing Best photos button that uses AI to analyze a set of photos and pick the best one for you. A slider to the top right of the interface makes the command more or less choosy in picking the favorites. As a machine-learning tool, it’s surprisingly (or scarily) on the ball with its choices.
10 shortcuts
11 When using any brush-based tool, press the ] and [ keys to resize the brush tip. Shift + ] or [ changes hardness.
12 Press Cmd/Ctrl+J to duplicate your current layer or – if you have an active selection – to copy the selected area to a new layer.
13 To make a merged copy of all your visible layers, highlight the top layer in the stack, then press Cmd/Ctrl+Shift+Alt+E.
14 The 0-9 number keys quickly set a brush opacity – 1 for 10%, 2 for 20% and 0 for 100%. press two keys quickly for a specific value, like 5-6 for 56%.
15 When no opacity-based tool is selected, the 0-9 number keys change the opacity of the current layer.
16 Cmd/Ctrl+F brings up the useful Photoshop finder – begin typing for quick access to any tool or command you want.
17 D resets your foreground and background colors to black and white, and X flips the two around.
18 Press Alt+Backspace to fill a layer with your foreground color, and Cmd/ Ctrl+Backspace for the background color.
19 Hold Cmd/Ctrl+Space and drag right or left to zoom in or out over the image. Cmd/ Ctrl+0 fits the entire image on-screen.
20 To make a layer group, Cmd/Ctrl-click to highlight several layers in the layers panel (or Shift-click between top and bottom), then press Cmd/Ctrl+G.
10 Modifiers
21. Brush tool modifier
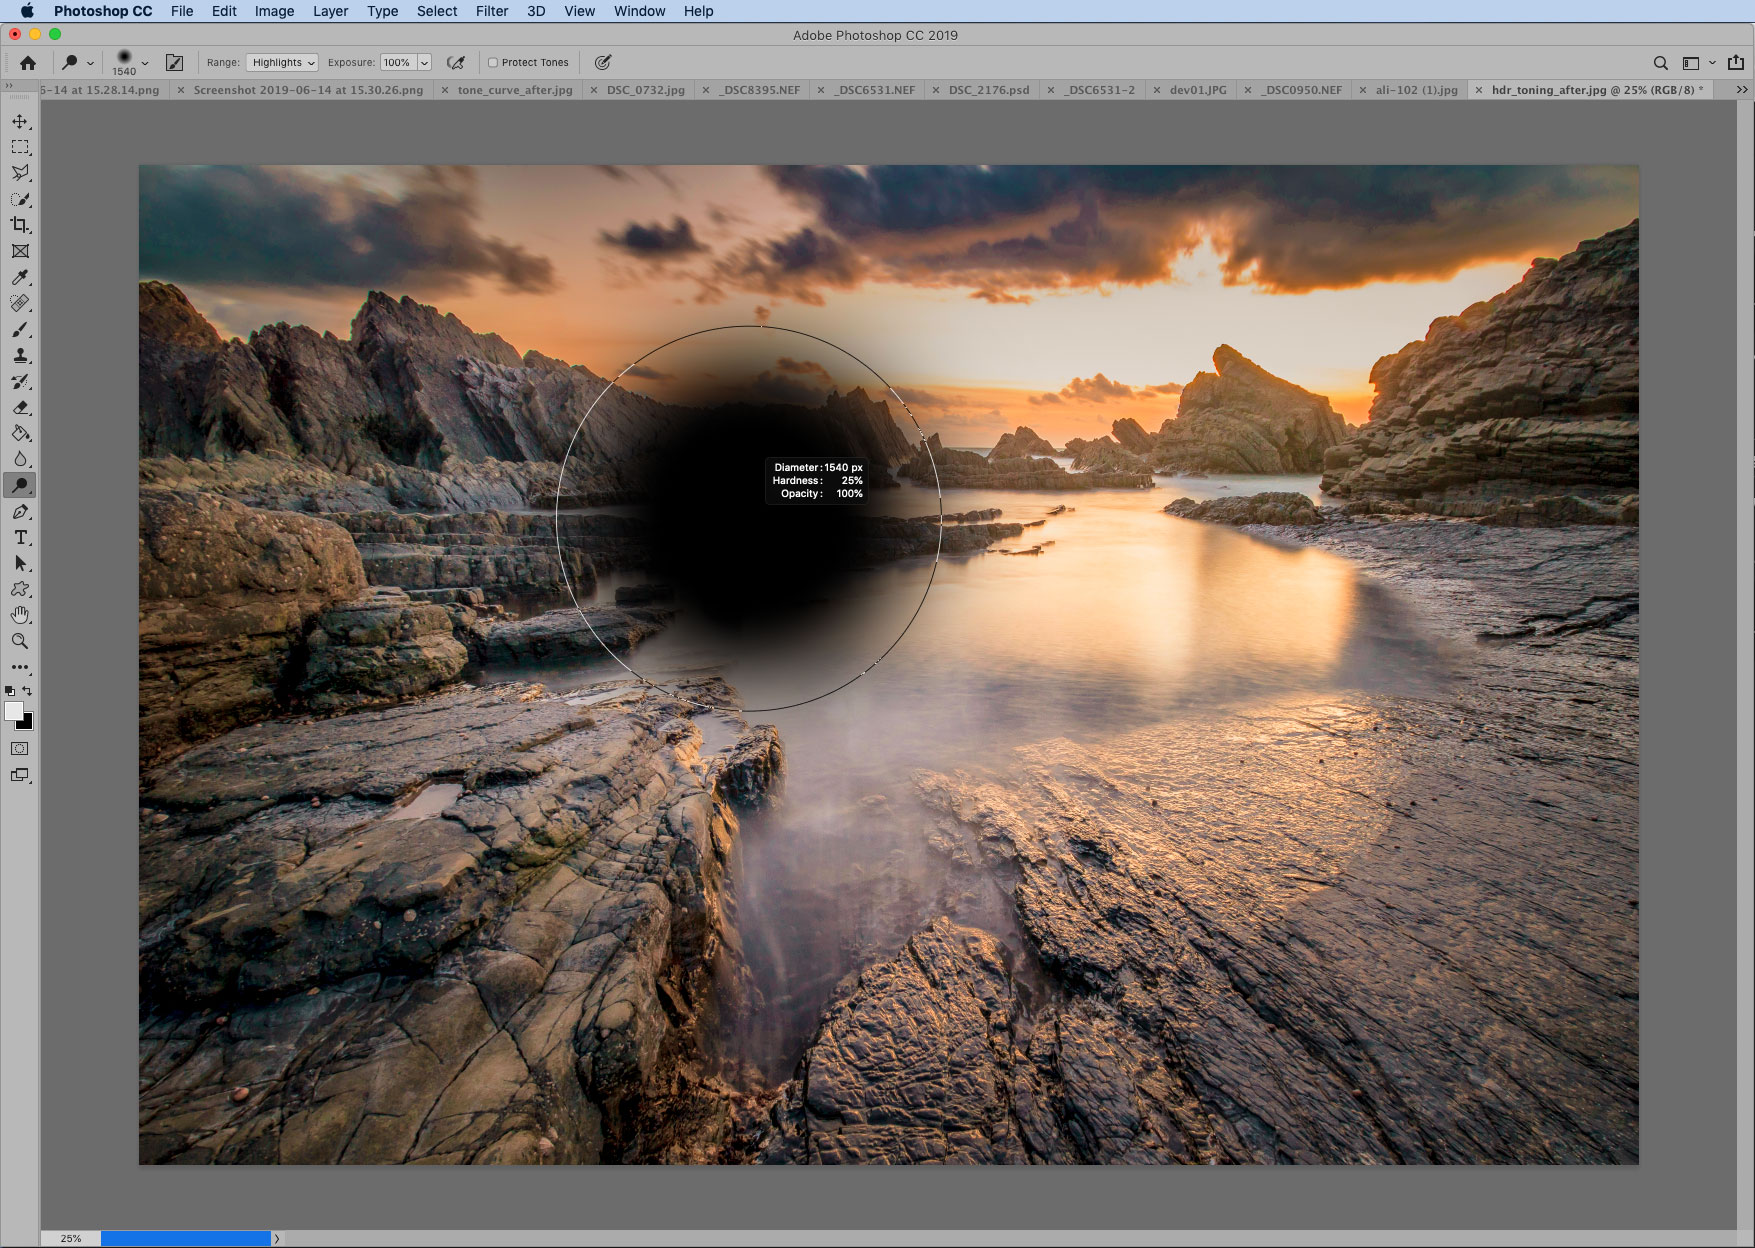
While you’re using the Brush tool, hold Ctrl+Alt and drag up, down, left, right to alter the size and hardness of the brush quickly.
22. Quick copy modifier
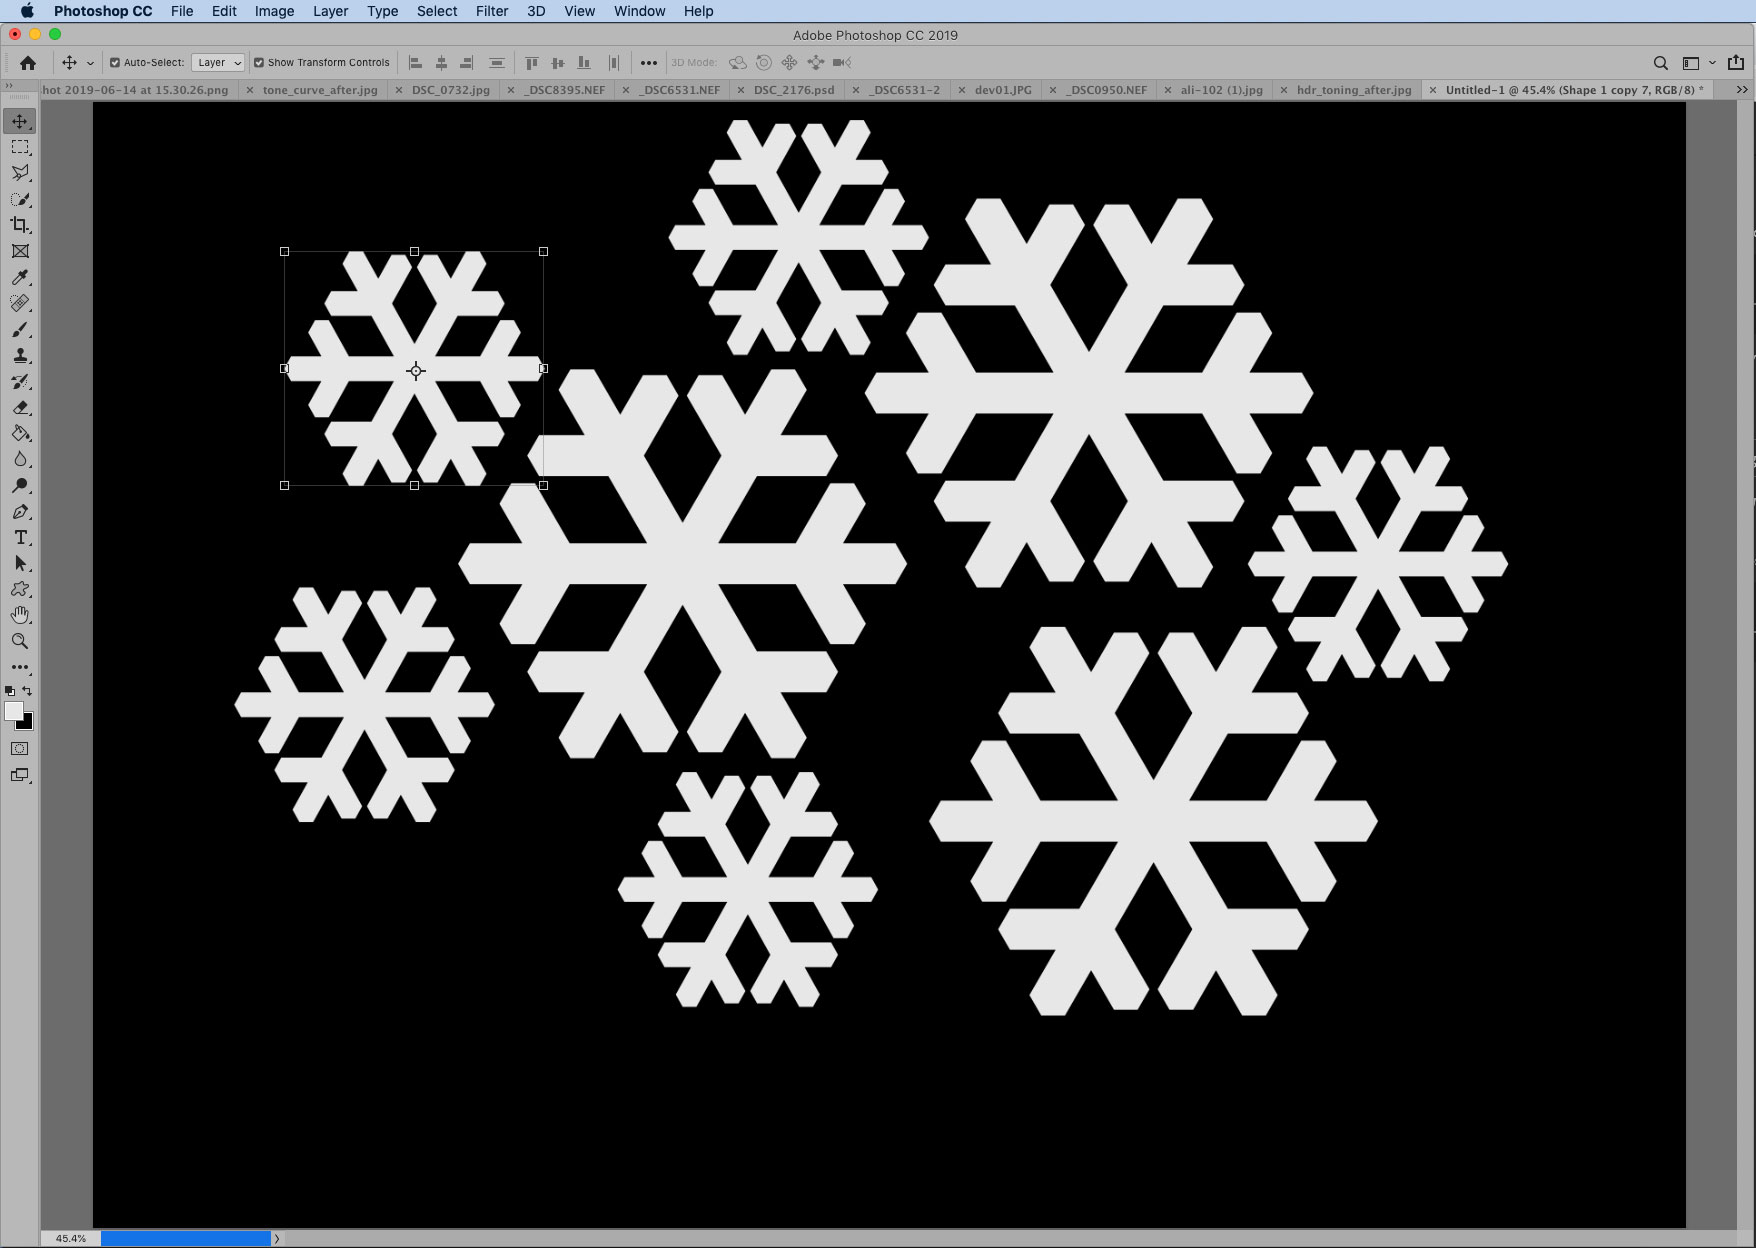
Holding Alt while dragging any layer, selection, text, shape or layer style allows you to make a quick copy of it.
23. Mask view modifier
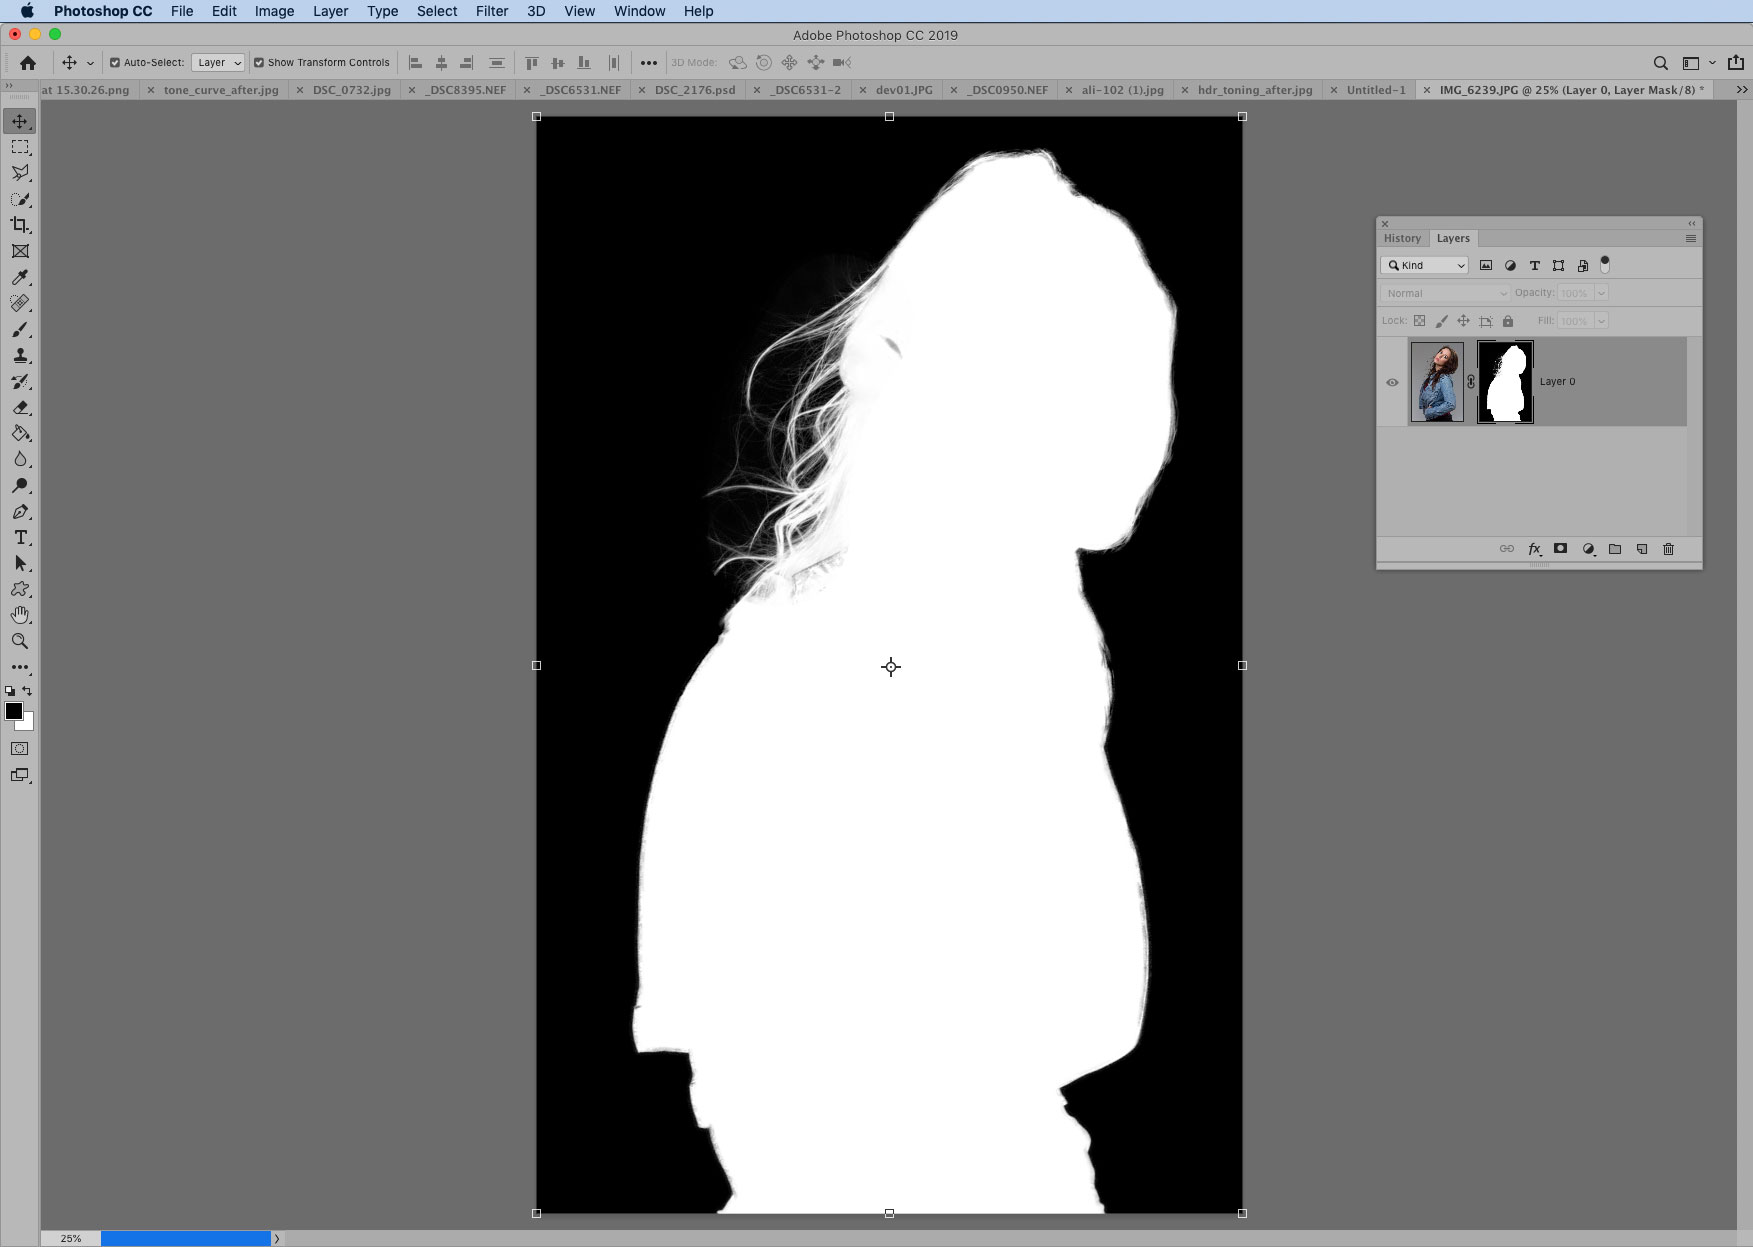
Alt-click any layer mask thumbnail to toggle on or off a handy black-and- white mask view.
24. Mask disabling modifier
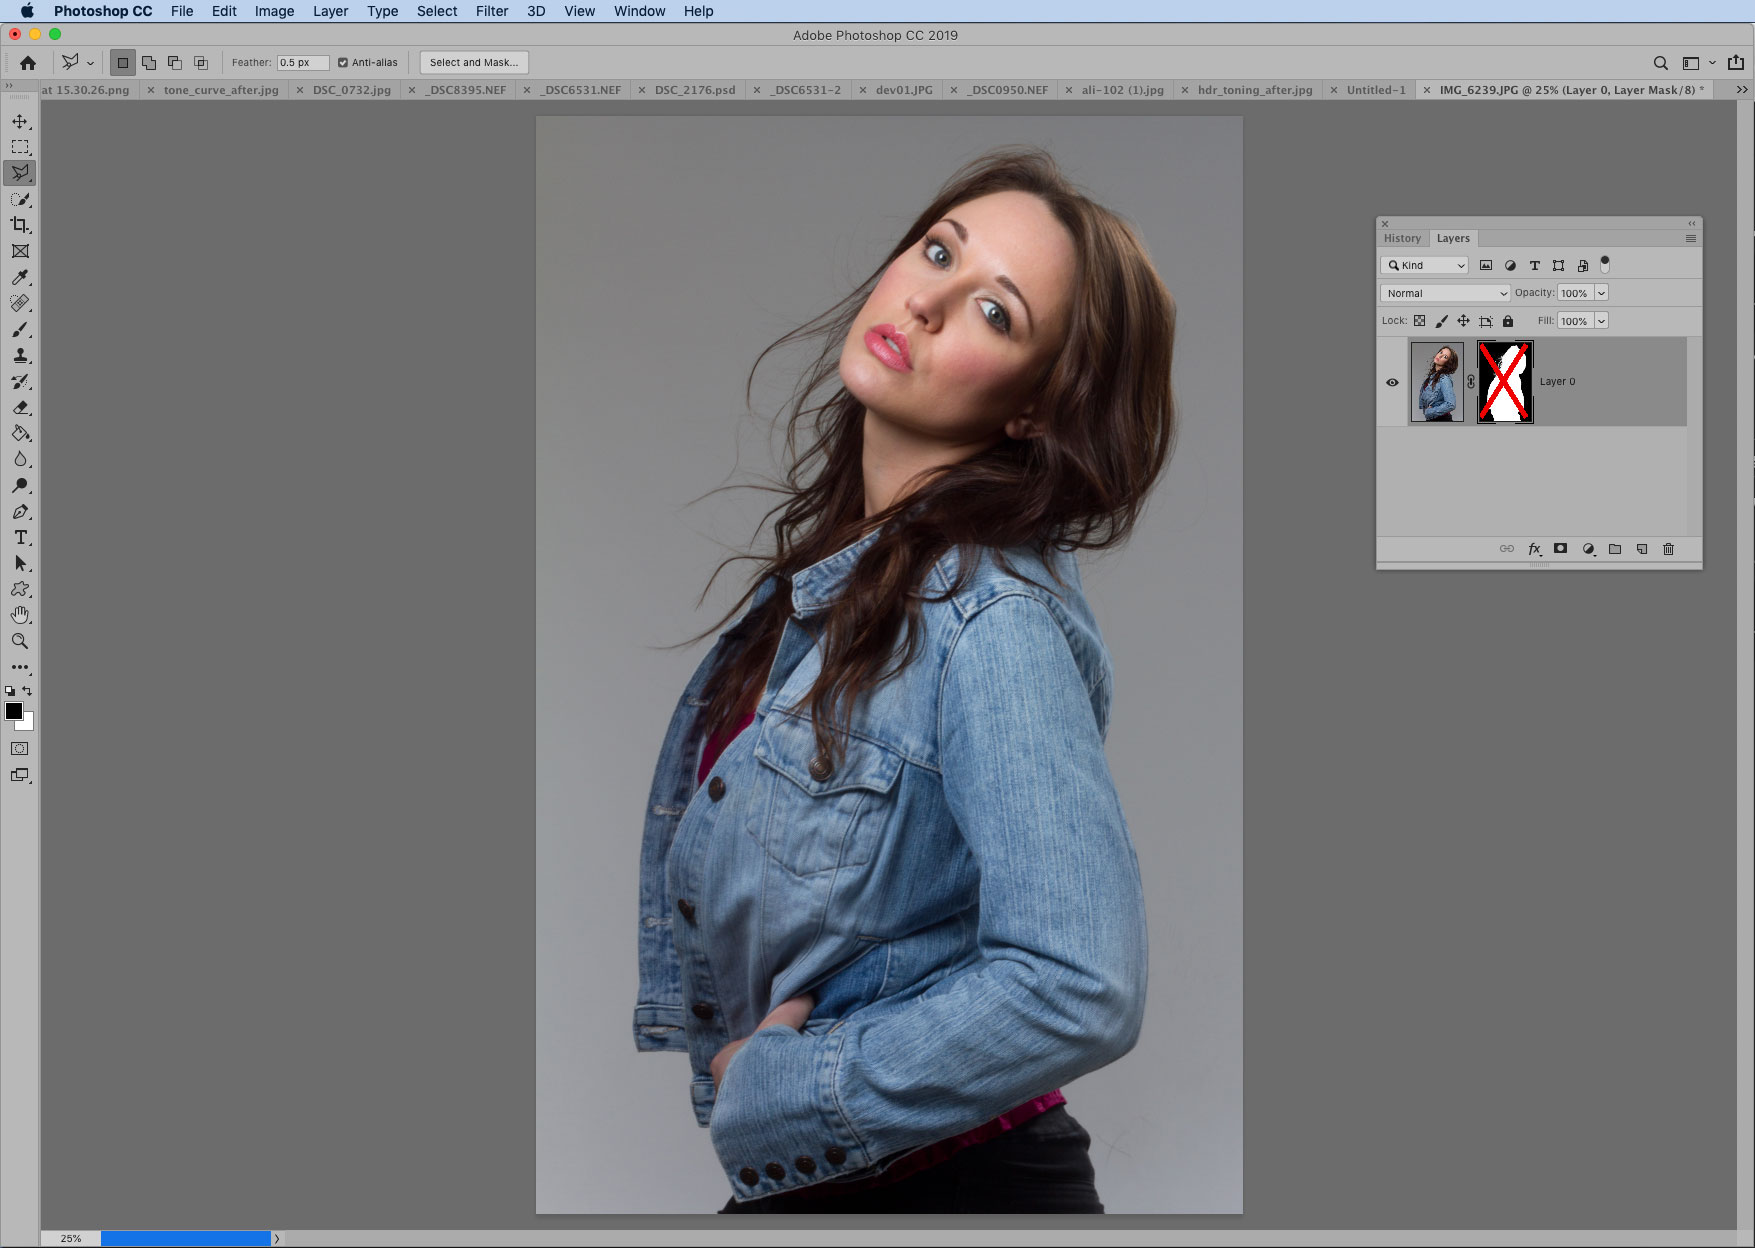
Shift-click a layer mask thumbnail to disable it, and shift-click again to enable.
25. Hide other layers modifier
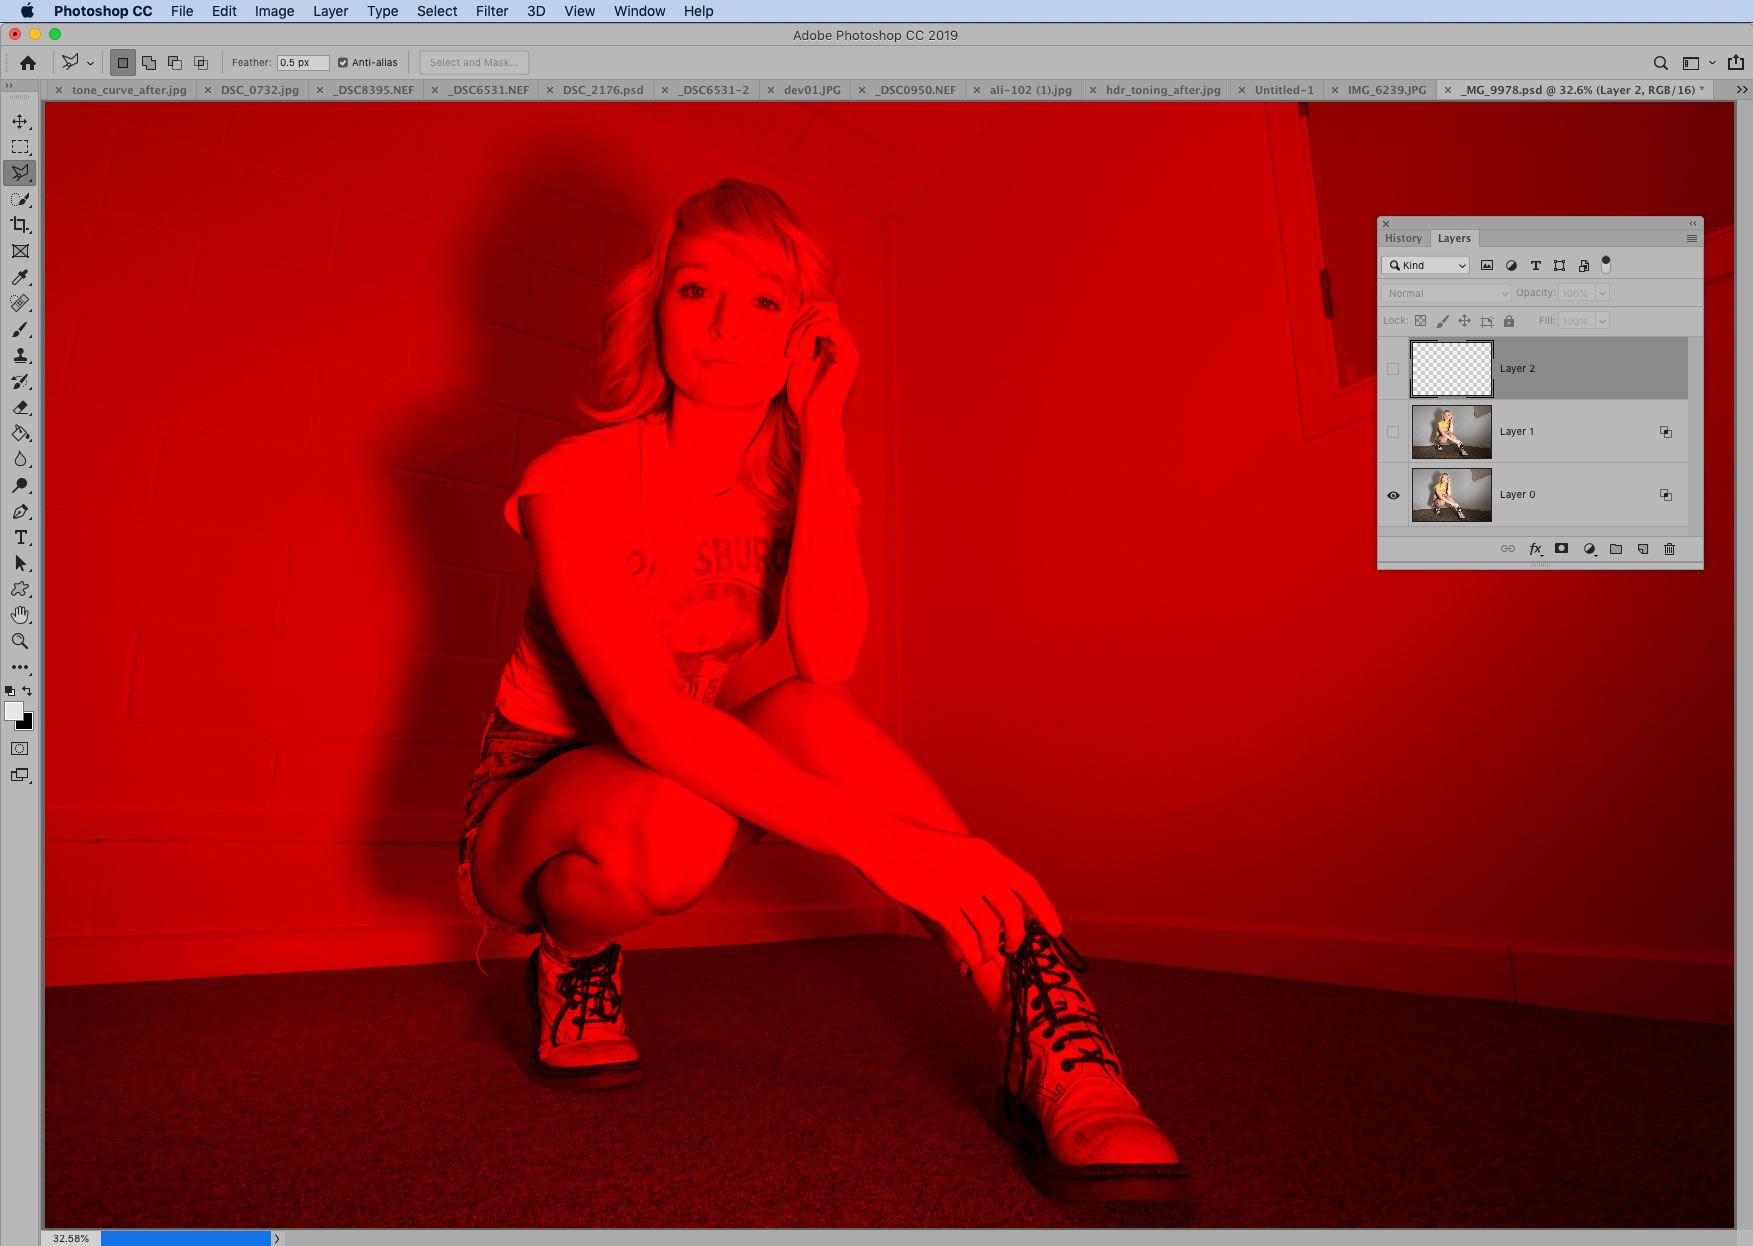
Alt-click the eye icon on any layer to hide all other layers, and Alt-click it again to reveal the rest.

26 Cmd/Ctrl-click any layer, mask, channel, shape or text to load its shape as a selection.
27 Alt-click the layer mask thumbnail for a black mask that hides everything, rather than a ‘reveal all’ white one.
28 Add Shift into any tool letter shortcut – like j for the healing tools – to cycle between the set of tools.
29 When you use the Dodge and Burn tools, hold Alt to temporarily switch them.
30 When split toning in Camera Raw or Lightroom, hold Alt while dragging either the Hues or the Balance slider to temporarily view Saturation at 100%.
Blending modes
31. Hand-color old photos
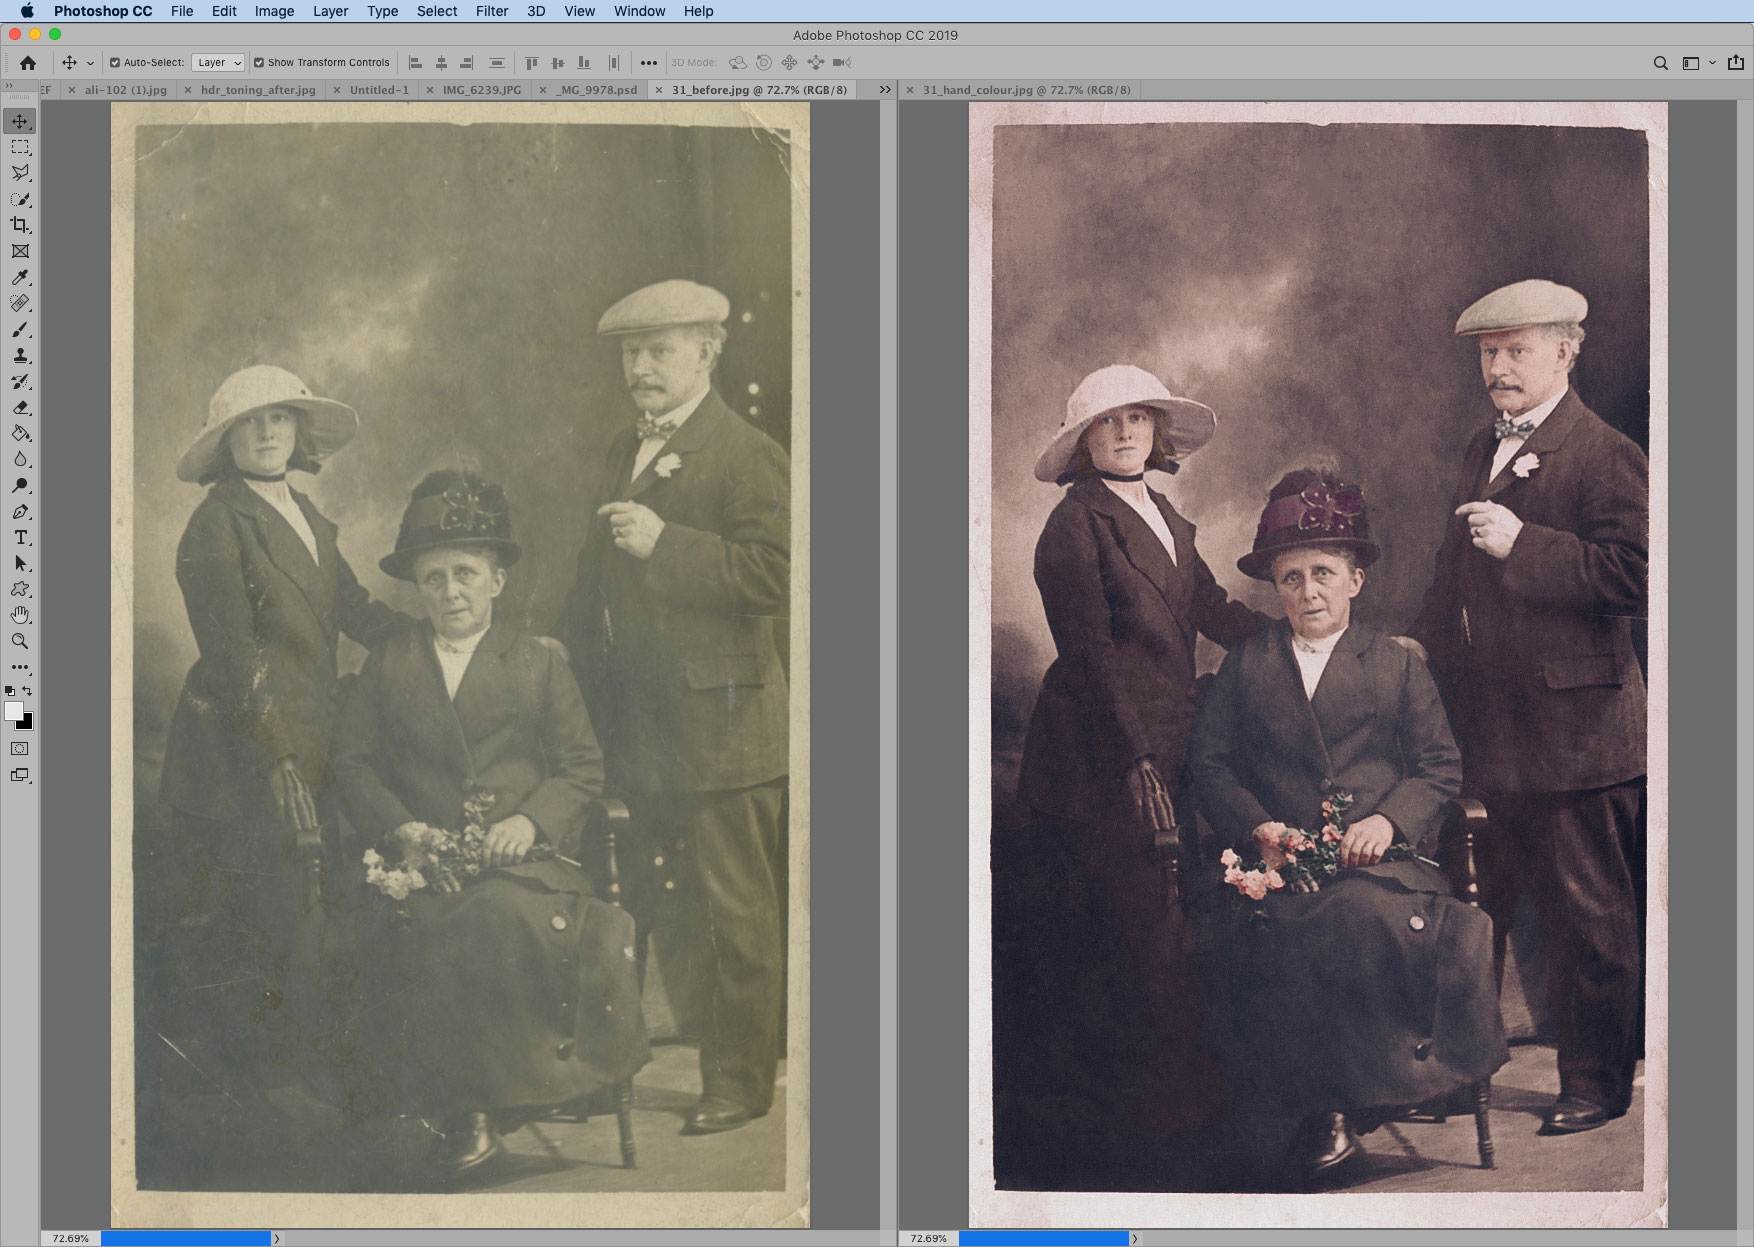
To hand-color old monochrome photos, simply make a new layer and set it to the Color Blending mode, then grab the Brush tool, choose a color and start painting over the image. Voilà!
32. Get the double exposure look
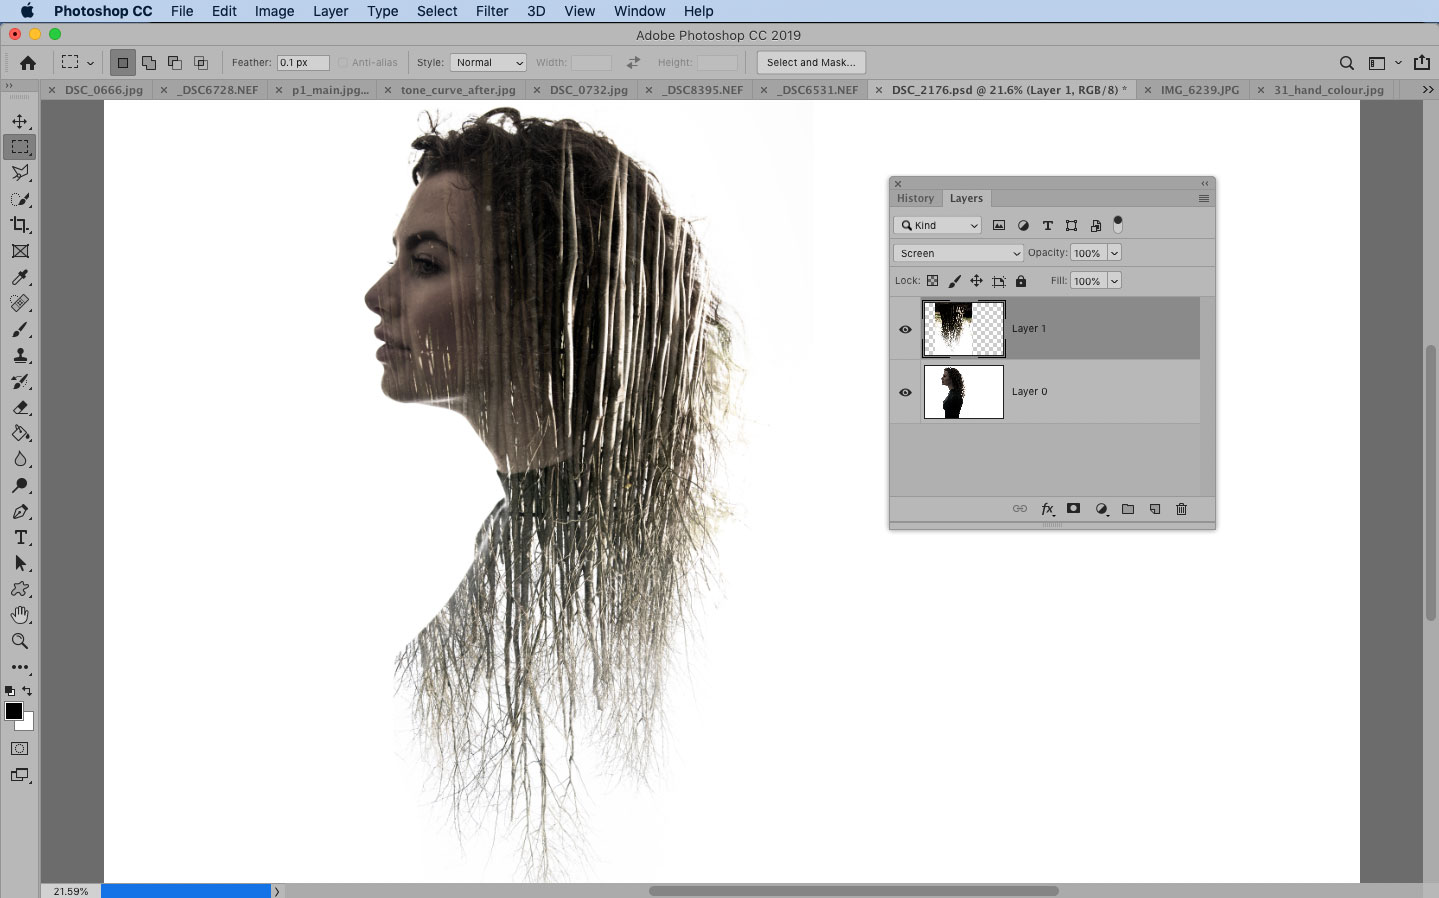
For a simple double exposure effect reminiscent of the classic film effect, drag one image onto another with the move tool, then set the Blending mode to Screen.
33. Make a starry sky
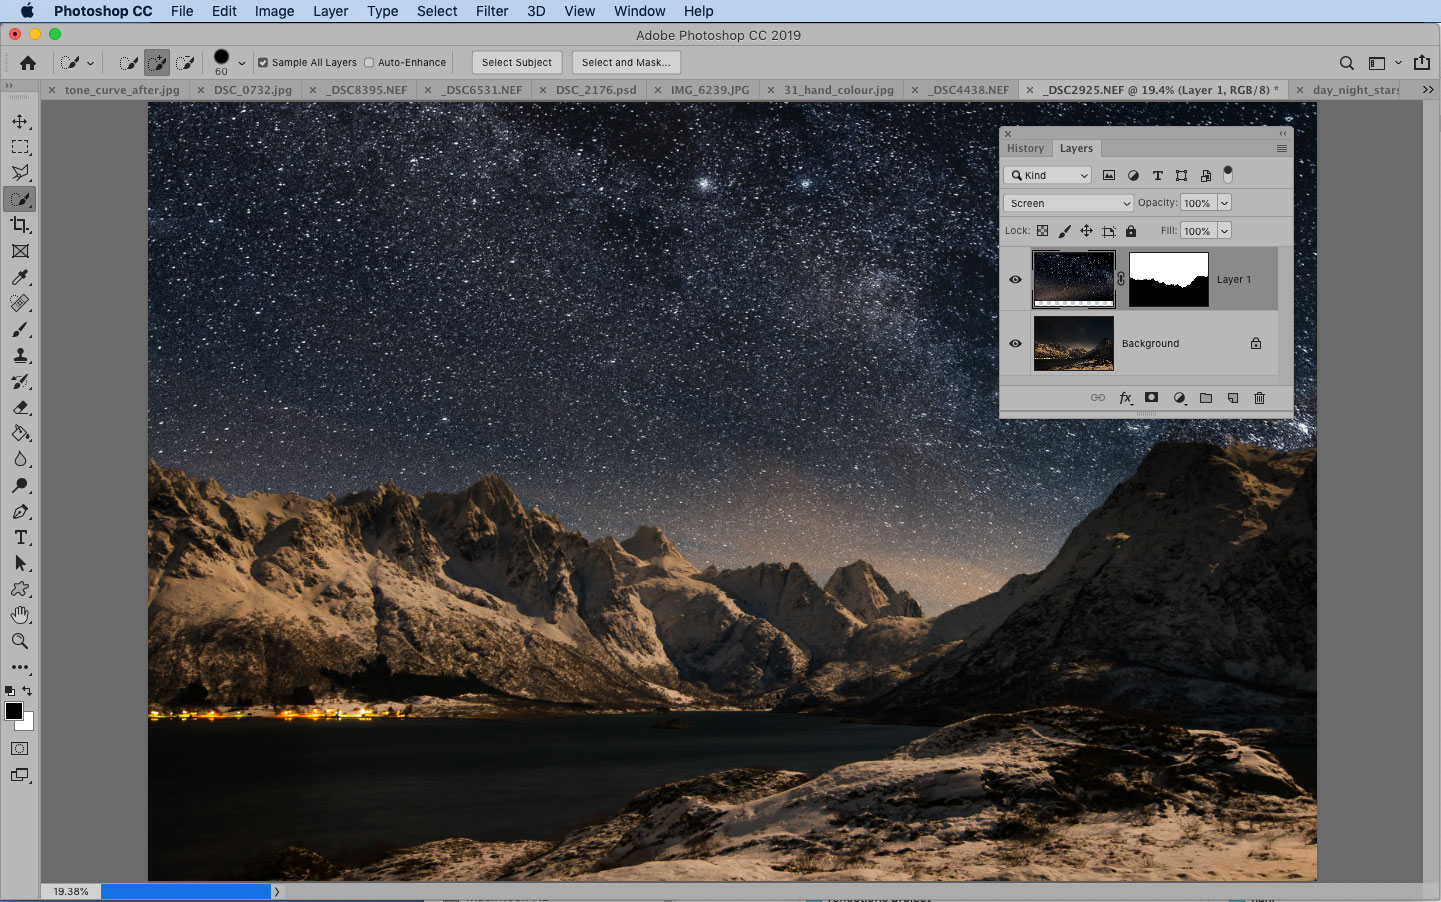
To add stars to a night-time sky, make a rough selection of the night sky with the Lasso Tool, and copy and paste it into another image. change the Blending mode to Lighten. If necessary, darken the layer with Levels and add a mask to control what is visible.
34. Use B&W for color changes
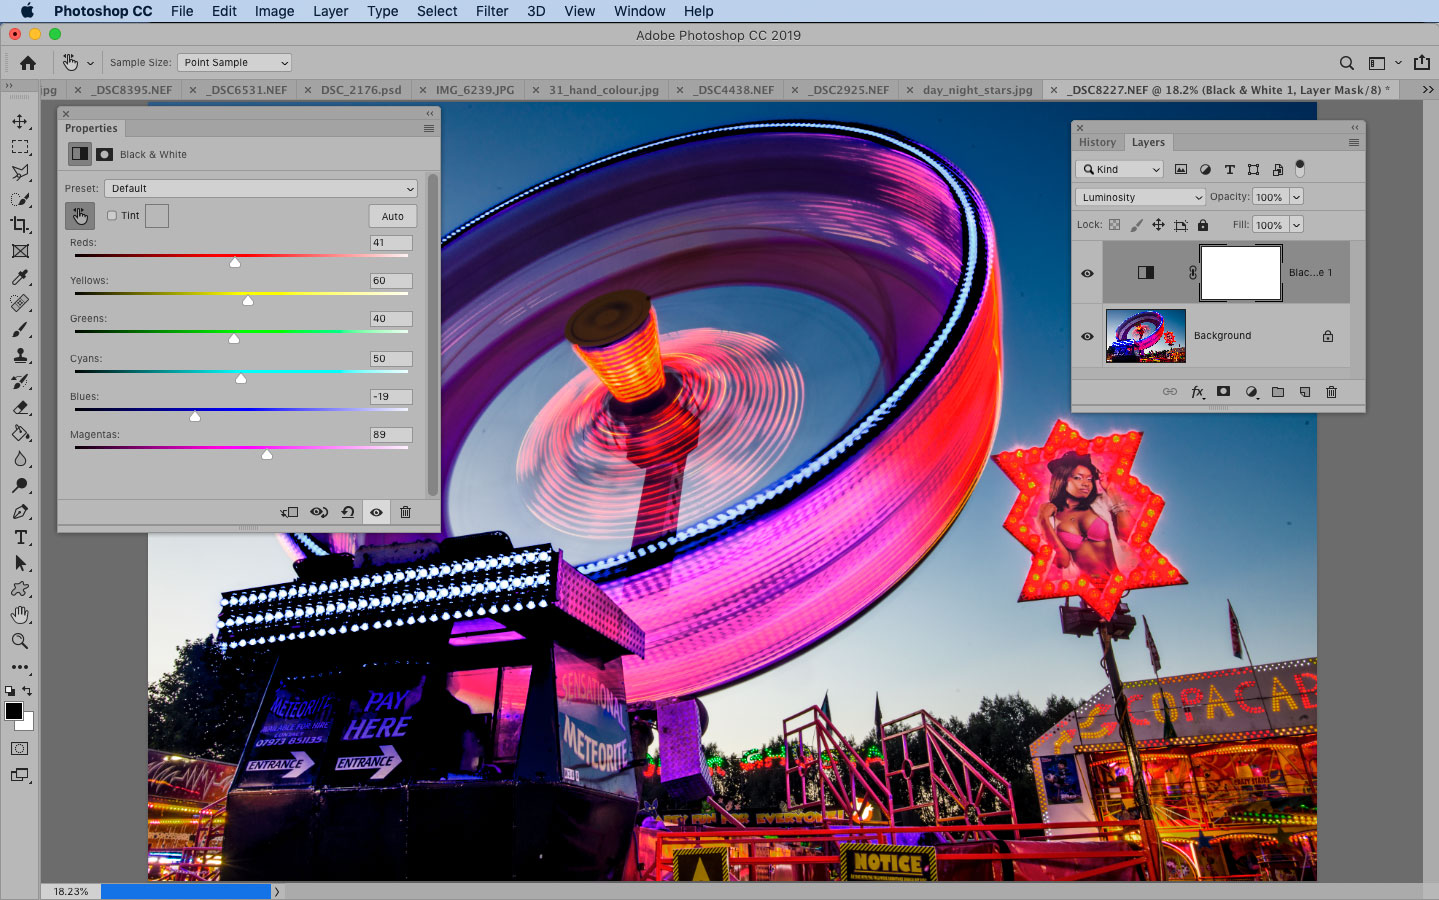
To control the brightness of different colors, add a Black & White adjustment layer, then set the Blending mode to Luminosity. Now simply drag the B&W sliders to change the color image.
35. Rough up your photos wIth textures
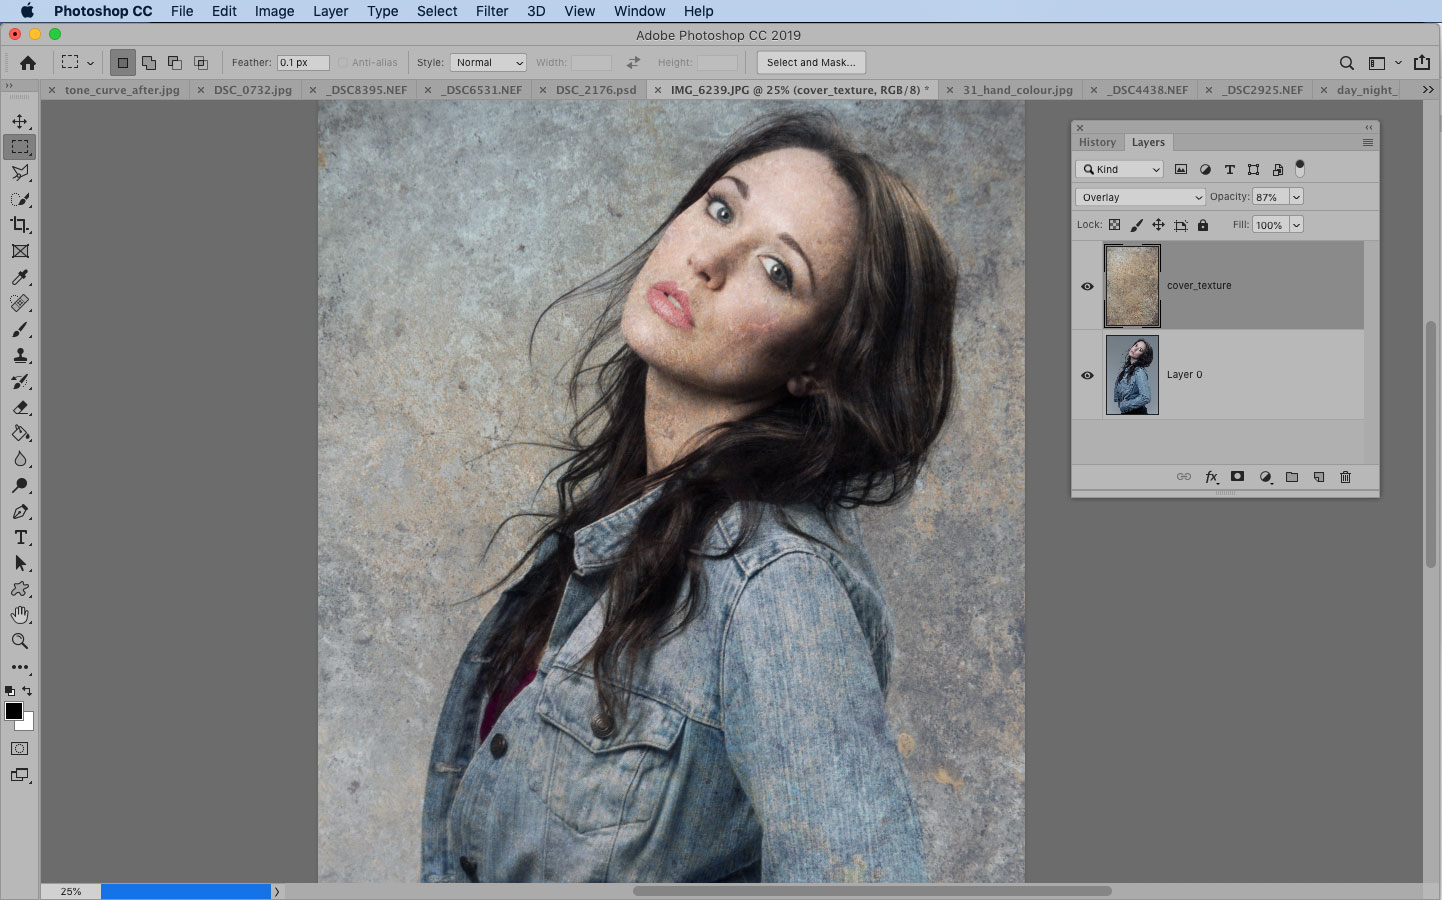
To blend textures. with your photos, try using the Overlay or Soft Light Blending modes. if neither of these work, try Multiply or Screen. experiment with layer opacity to affect the strength of the texture.
36. Make a dodge and burn Layer
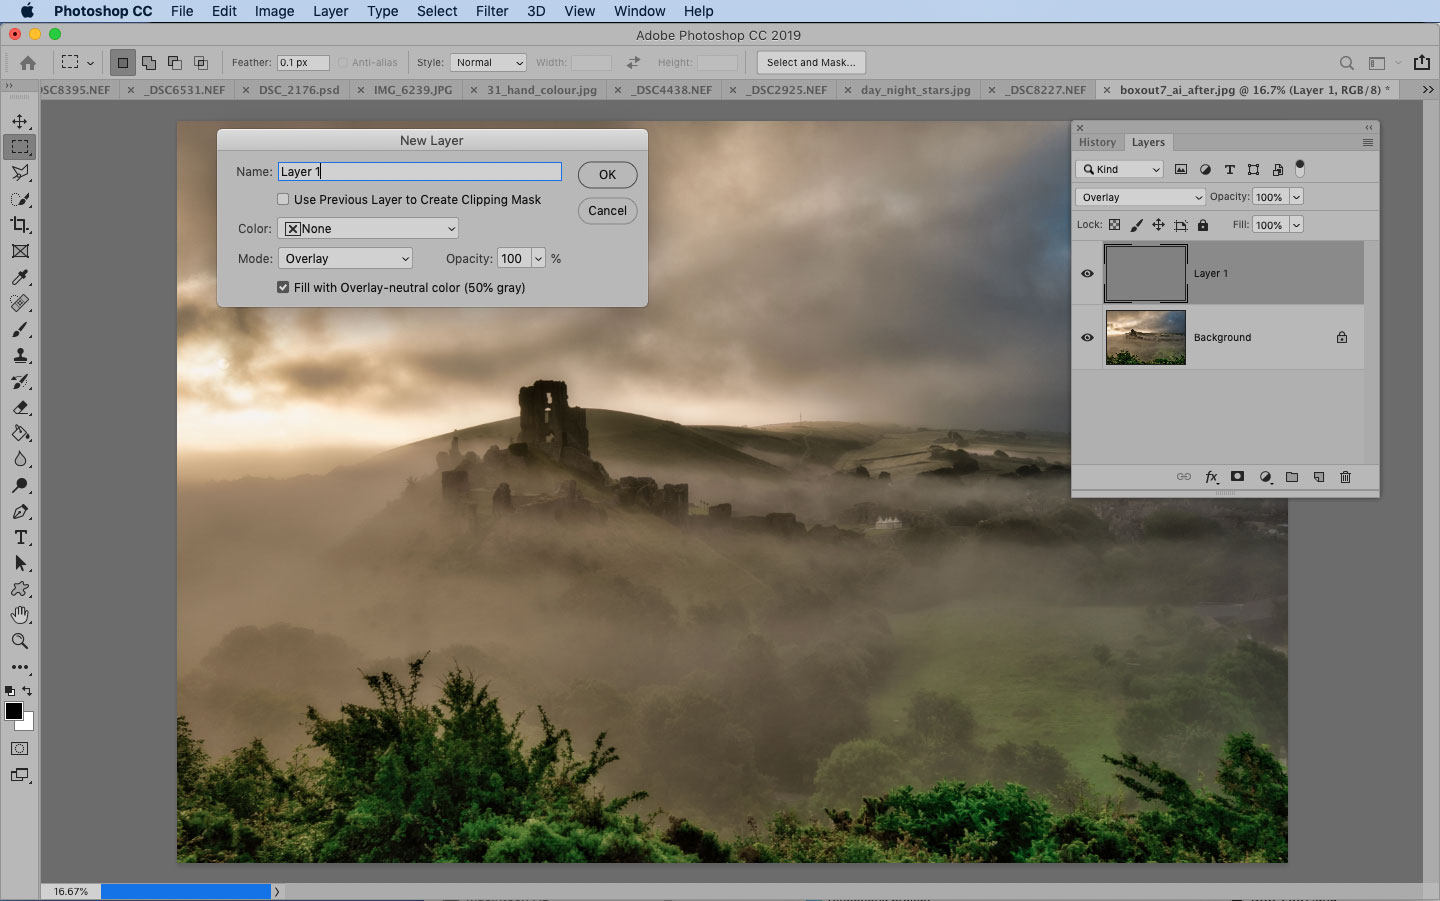
Alt-click the New Layer icon in the Layers panel; then, in the New Layer dialog, set the mode to Overlay and check Fill With. Now you can dodge and burn on this layer to affect all the layers underneath.
37. Powerful sharpening with High Pass
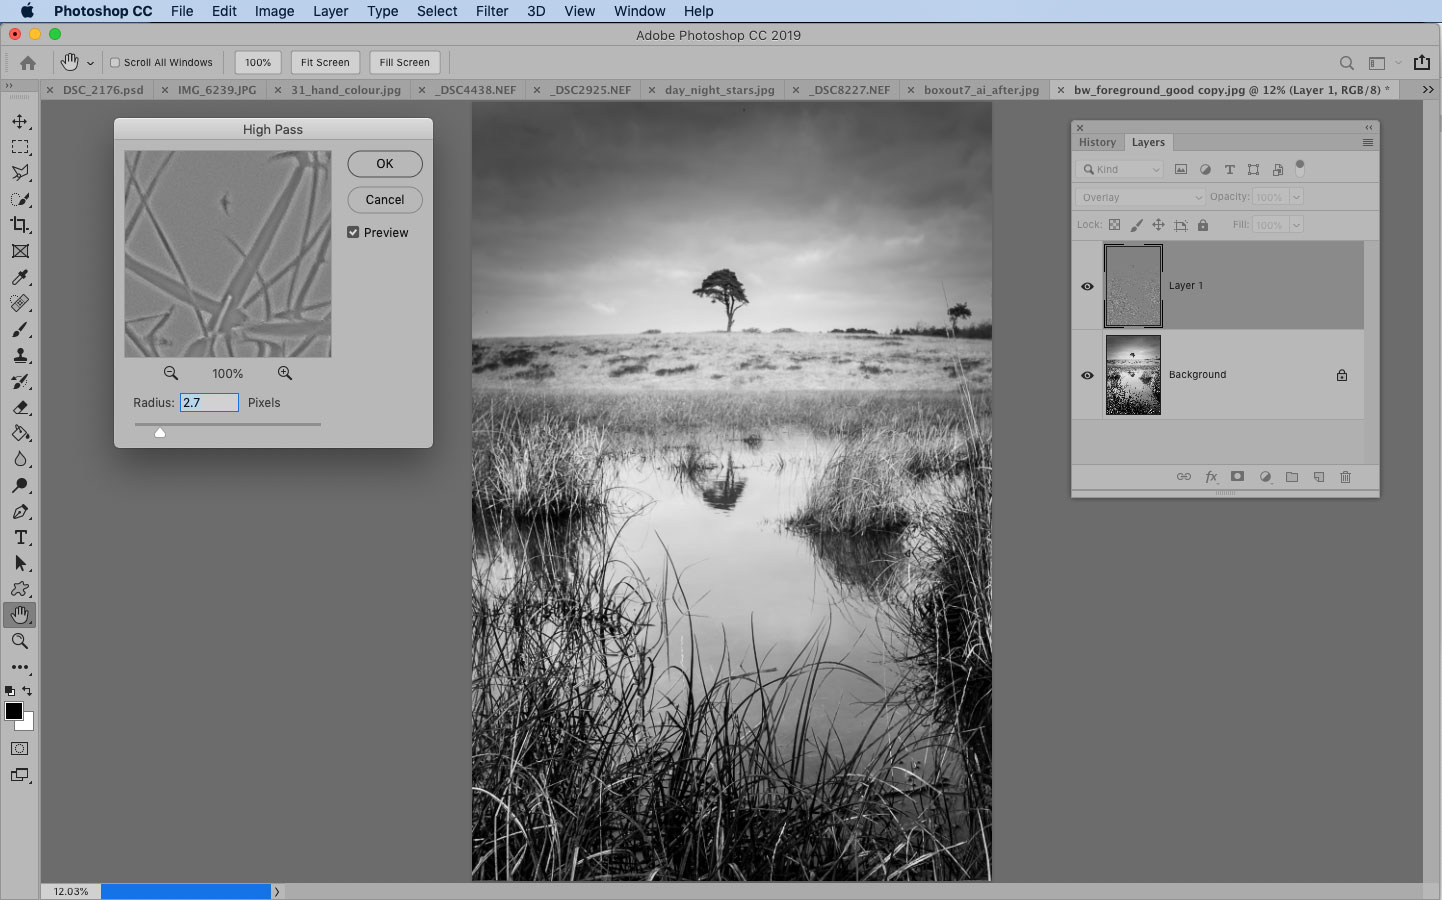
Duplicate your layer with Cmd/Ctrl+J, then set the Blending mode to Overlay. Go to Filter > Other > High pass and adjust Radius to make a clever sharpening effect.
38. Blending mode opposites
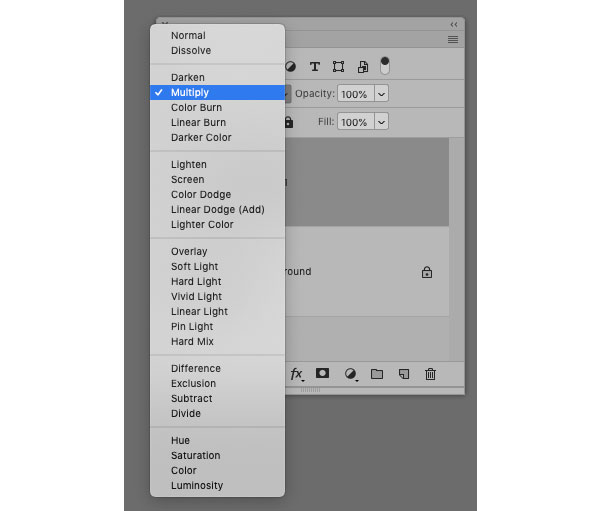
Several Blending Modes have an opposite counterpart. Lighten/Darken are opposites, as are Screen/Multiply, Darker Color/Lighter Color and Linear Burn/Linear Dodge.
39. Layer fill or opacity?
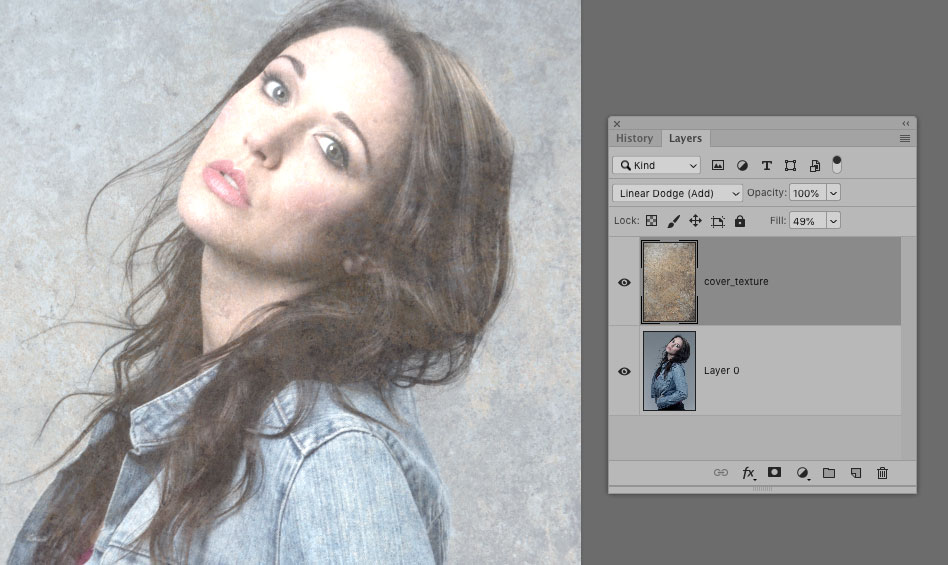
Layer Opacity and Layer Fill settings can have different results when used in combination with certain Blending Modes like Color Burn. Using Fill often gives better results.

40 Often it’s not immediately obvious which Blending Mode will work best for you. Press Shift and the plus or minus keys to cycle up or down through the entire list, enabling you to compare results quickly.
Tool skills
41. Disable Rich Tool Tips
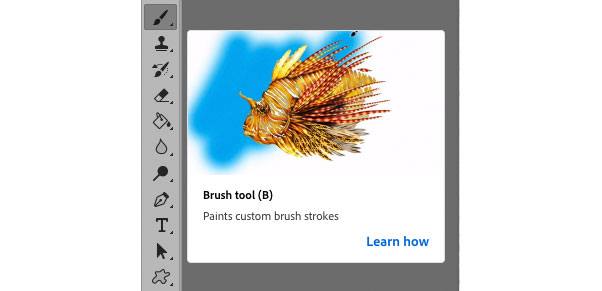
These are animations that explain how certain tools work. They can be useful for beginners, but quickly become annoying if you already know how the tool works. You can simply go to Preferences > Tools to enable/disable Rich Tool Tips, though.

42 Use spring-loaded tool shortcuts
Most tools in Photoshop are ‘spring- loaded’, which means if you press and hold the relevant keyboard shortcut for a tool you’ll temporarily switch to it, then when you release you’ll go back to your previous tool.

43. Try content-aware croppIng
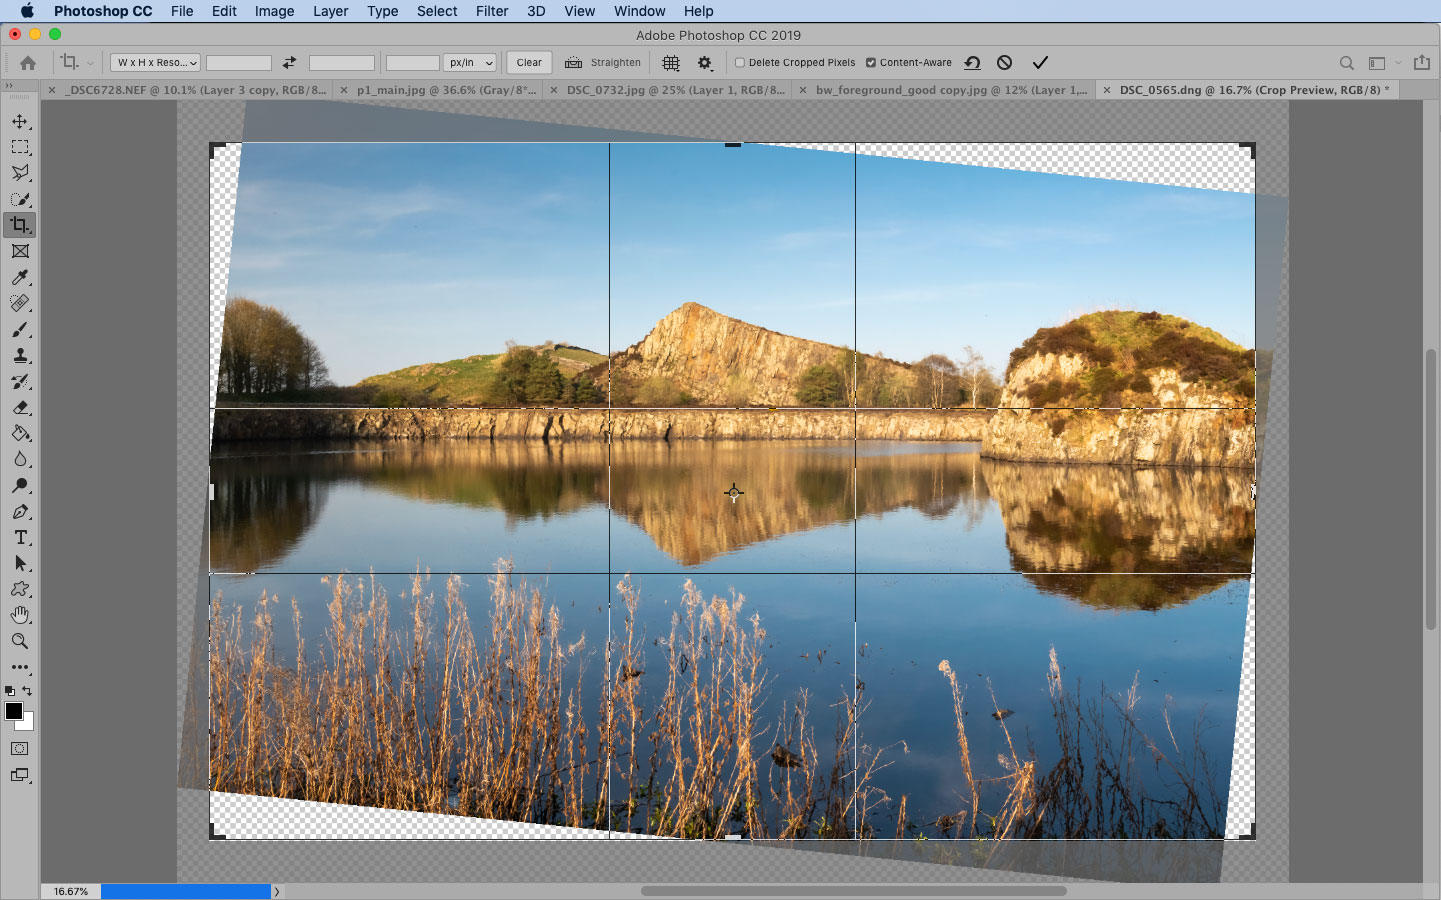
When you use the Crop tool, you can check Content-Aware in the tool options, then crop outside of the original image bounds. Photoshop will attempt to fill in the missing areas based on the surrounding details.

44 Commit quickly
Previously you’d need to press return or double-click to apply a transform or commit type, but thanks to recent updates, you can now apply these things simply by clicking away from the active area.

45. Use the Clone tool on Lighten
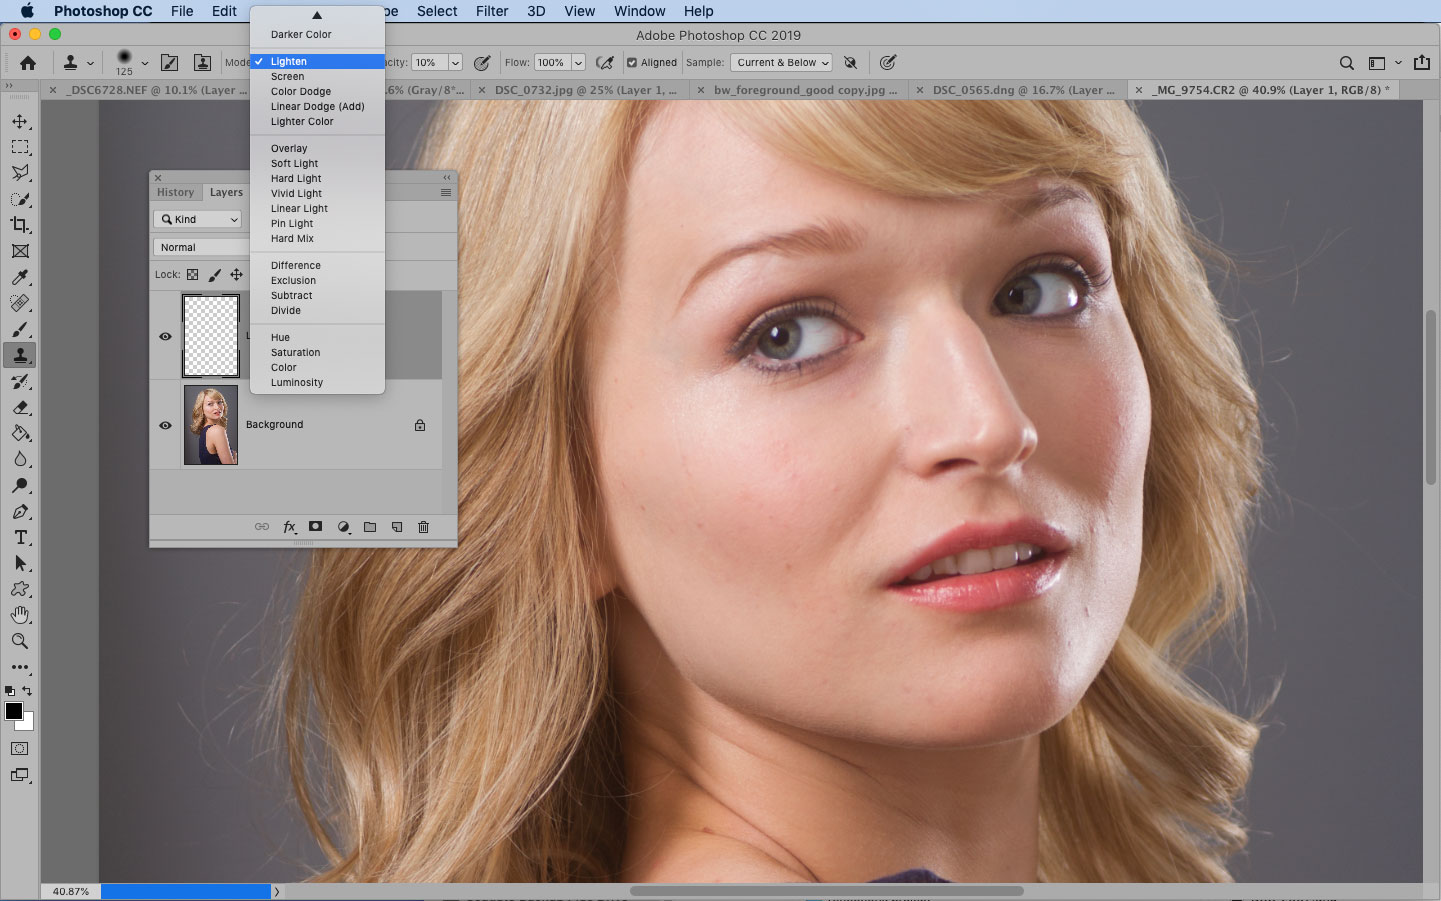
If you need to quickly smooth out rough patches in skin or tone down eye bags, try using the Clone tool set to the Lighten Blending Mode. It’s best to use a low opacity around 10-20% for good results.
46. Dodge your backgrounds to full white
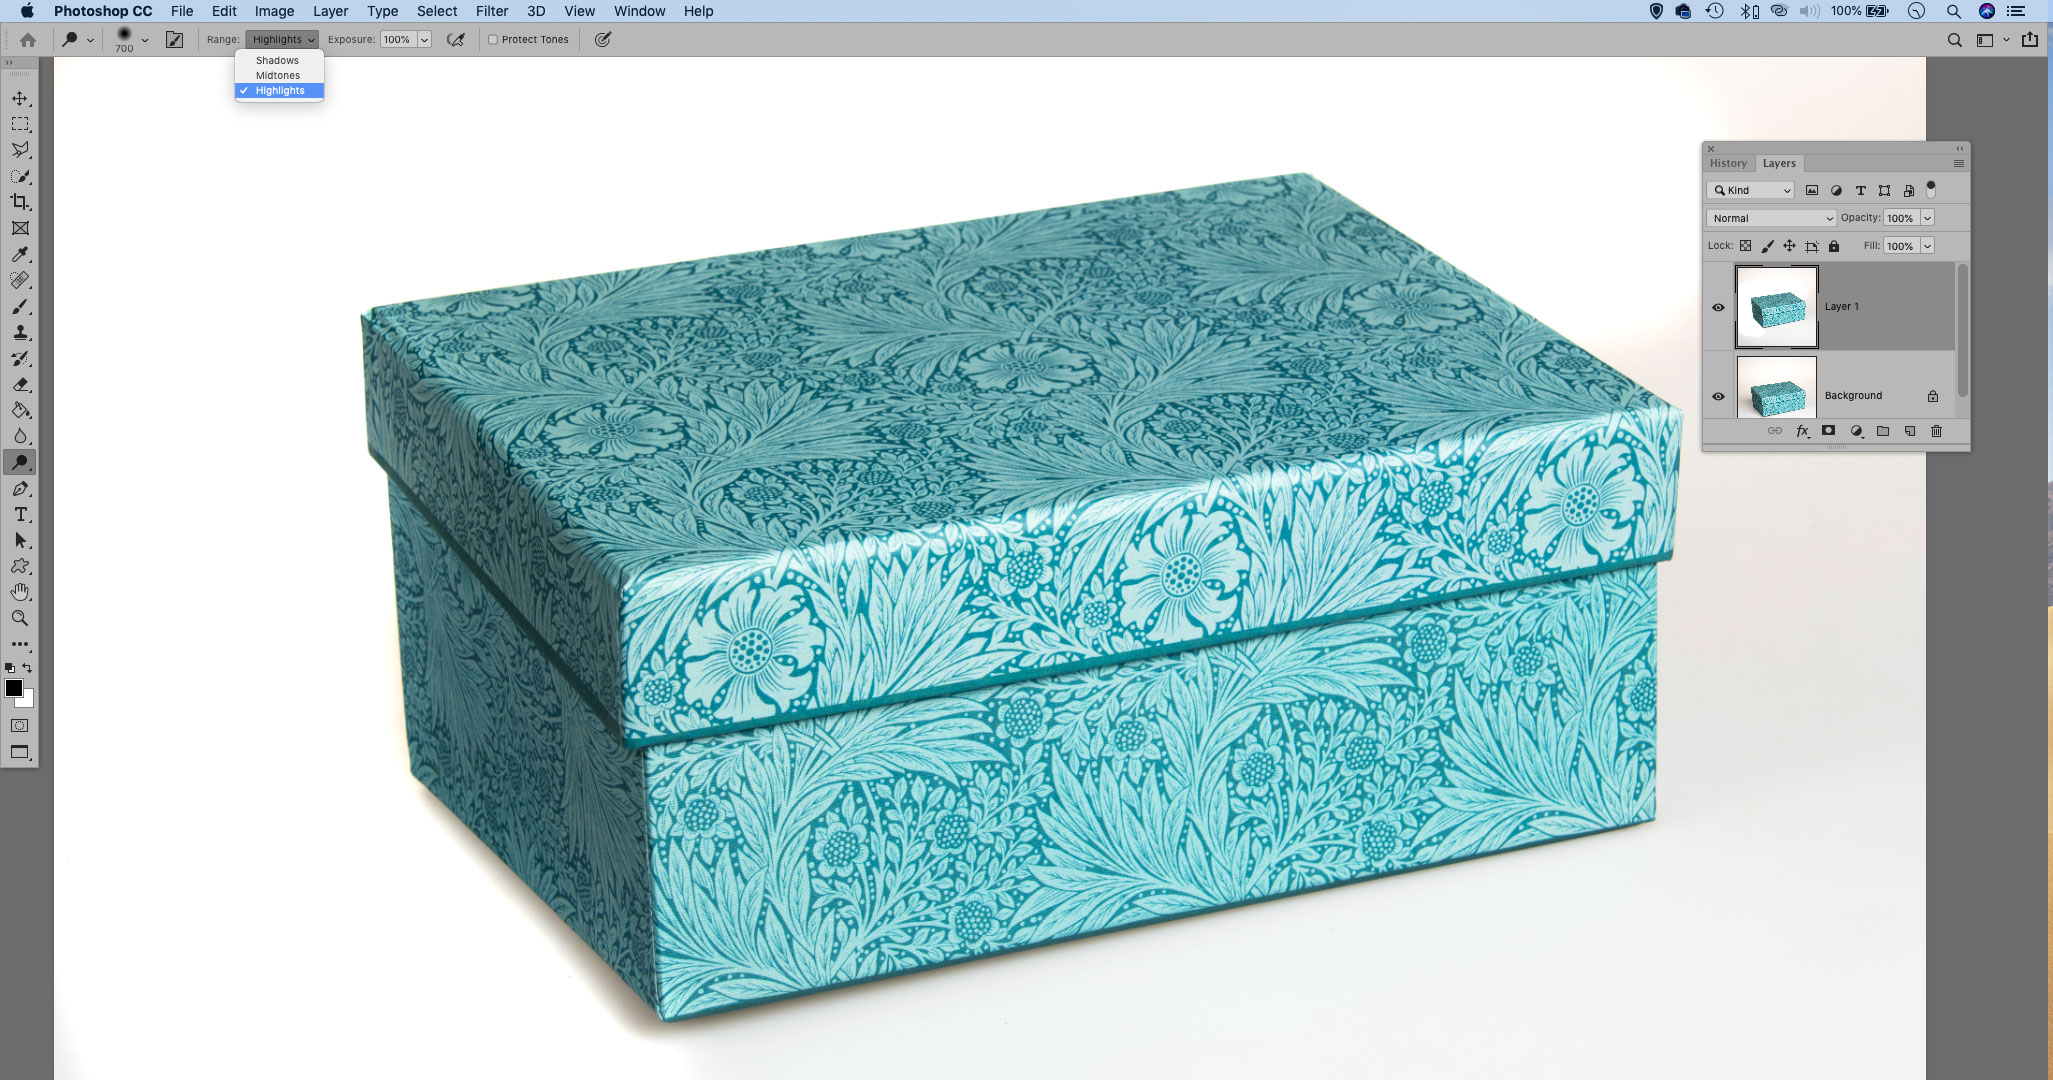
When you’ve shot an object against a white background, you’ll often want to blow it out to full white. If any light areas still hold detail, grab the Dodge tool, set it to Range: Highlights and uncheck Protect Tones, then paint over the backdrop.
47. Pen Tool essentials

Here are a few essential Pen Tool shortcuts: drag to add curved lines and alt-click points to remove the outer handle, allowing you to make sharp corners. Cmd/Ctrl-drag to move anchor points or control handles.

48 Use healing tools non-destructively
Several tools – like the Healing Tools, Clone Tool and Sharpen Tool – have a handy Sample All Layers option in the toolbar, meaning you can make your edits on a separate empty layer while sampling those below. Now it’s easy to change your mind later.

49. Make your own brushes
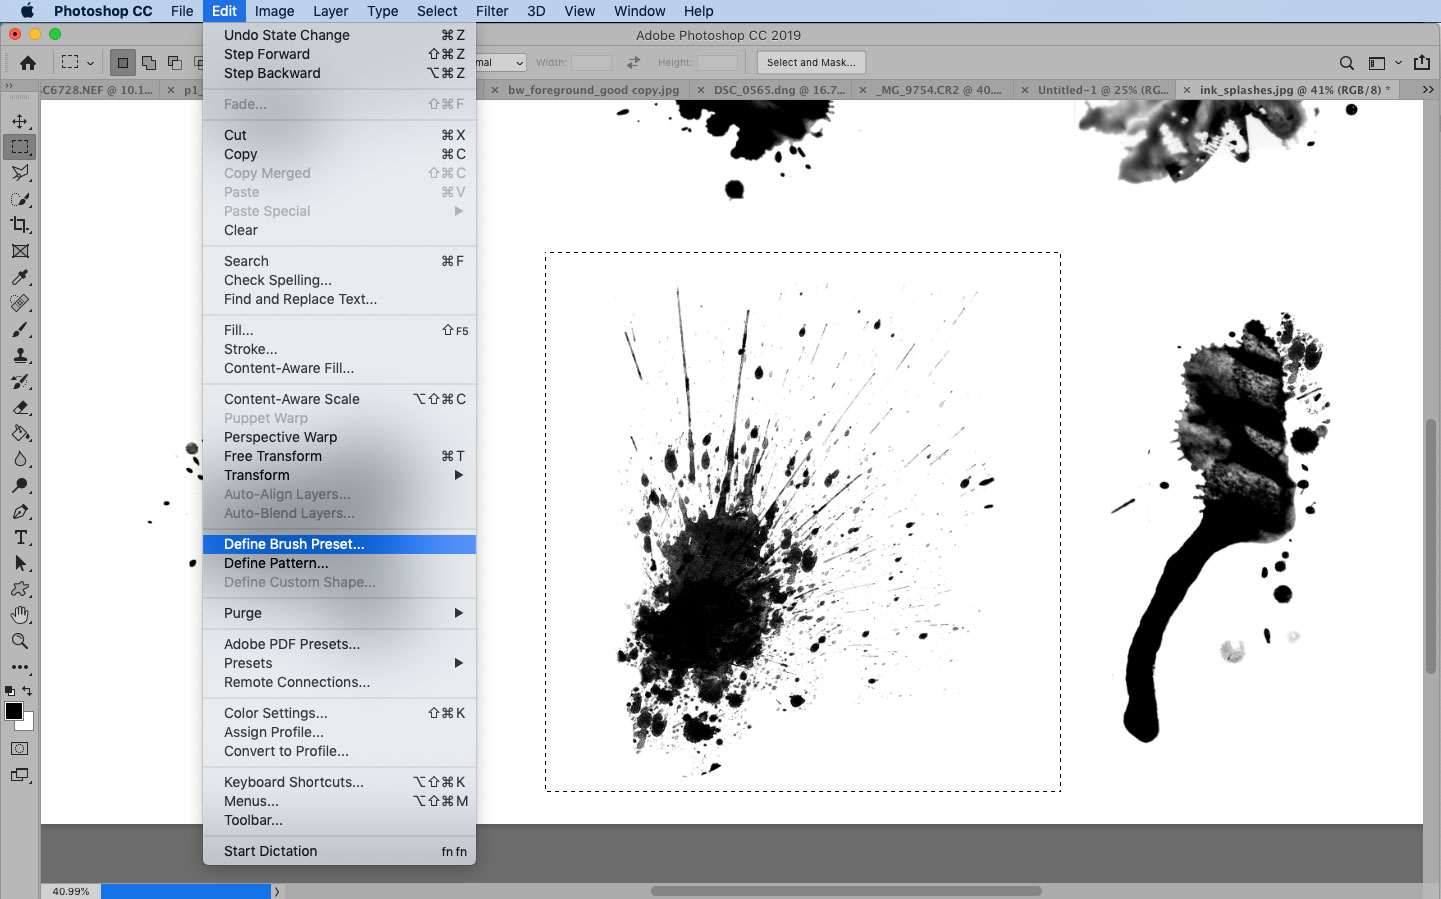
The Brush Tool has hundreds of tips to choose from, and you can also make your own. Simply make a black-on-white shape and select around it with the Marquee tool, then go to Edit > Define Brush Tip. The new tip will be selected next time you use the Brush tool.
50. Hide unwanted Photoshop tools
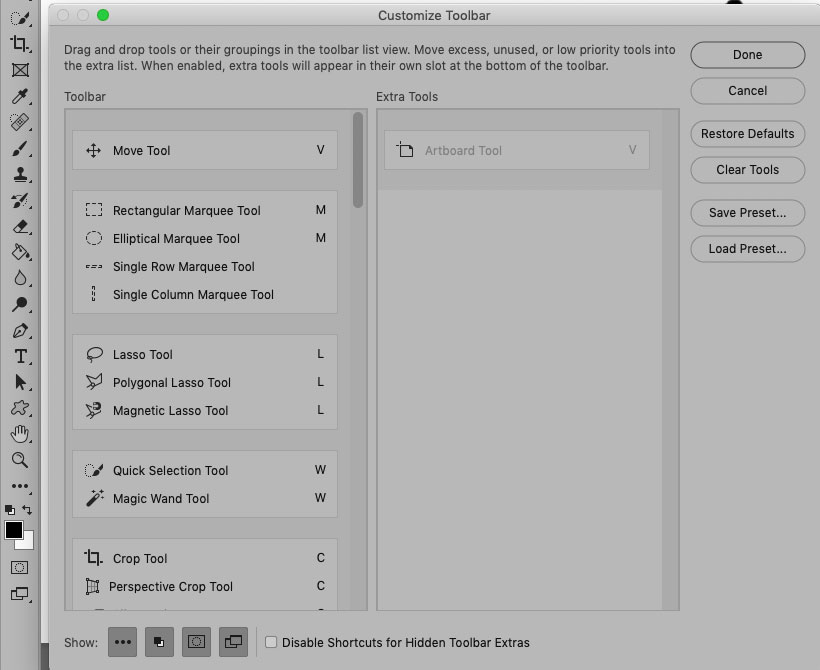
The Edit Toolbar option at the bottom of the Tools Panel (the three-dot icon) lets you tidy away the tools that you never use in its ‘extra tools’ section. Simply drag your little-used tools to here, then access them through this dialog if you need them.
Camera Raw
51. Sharpening standards
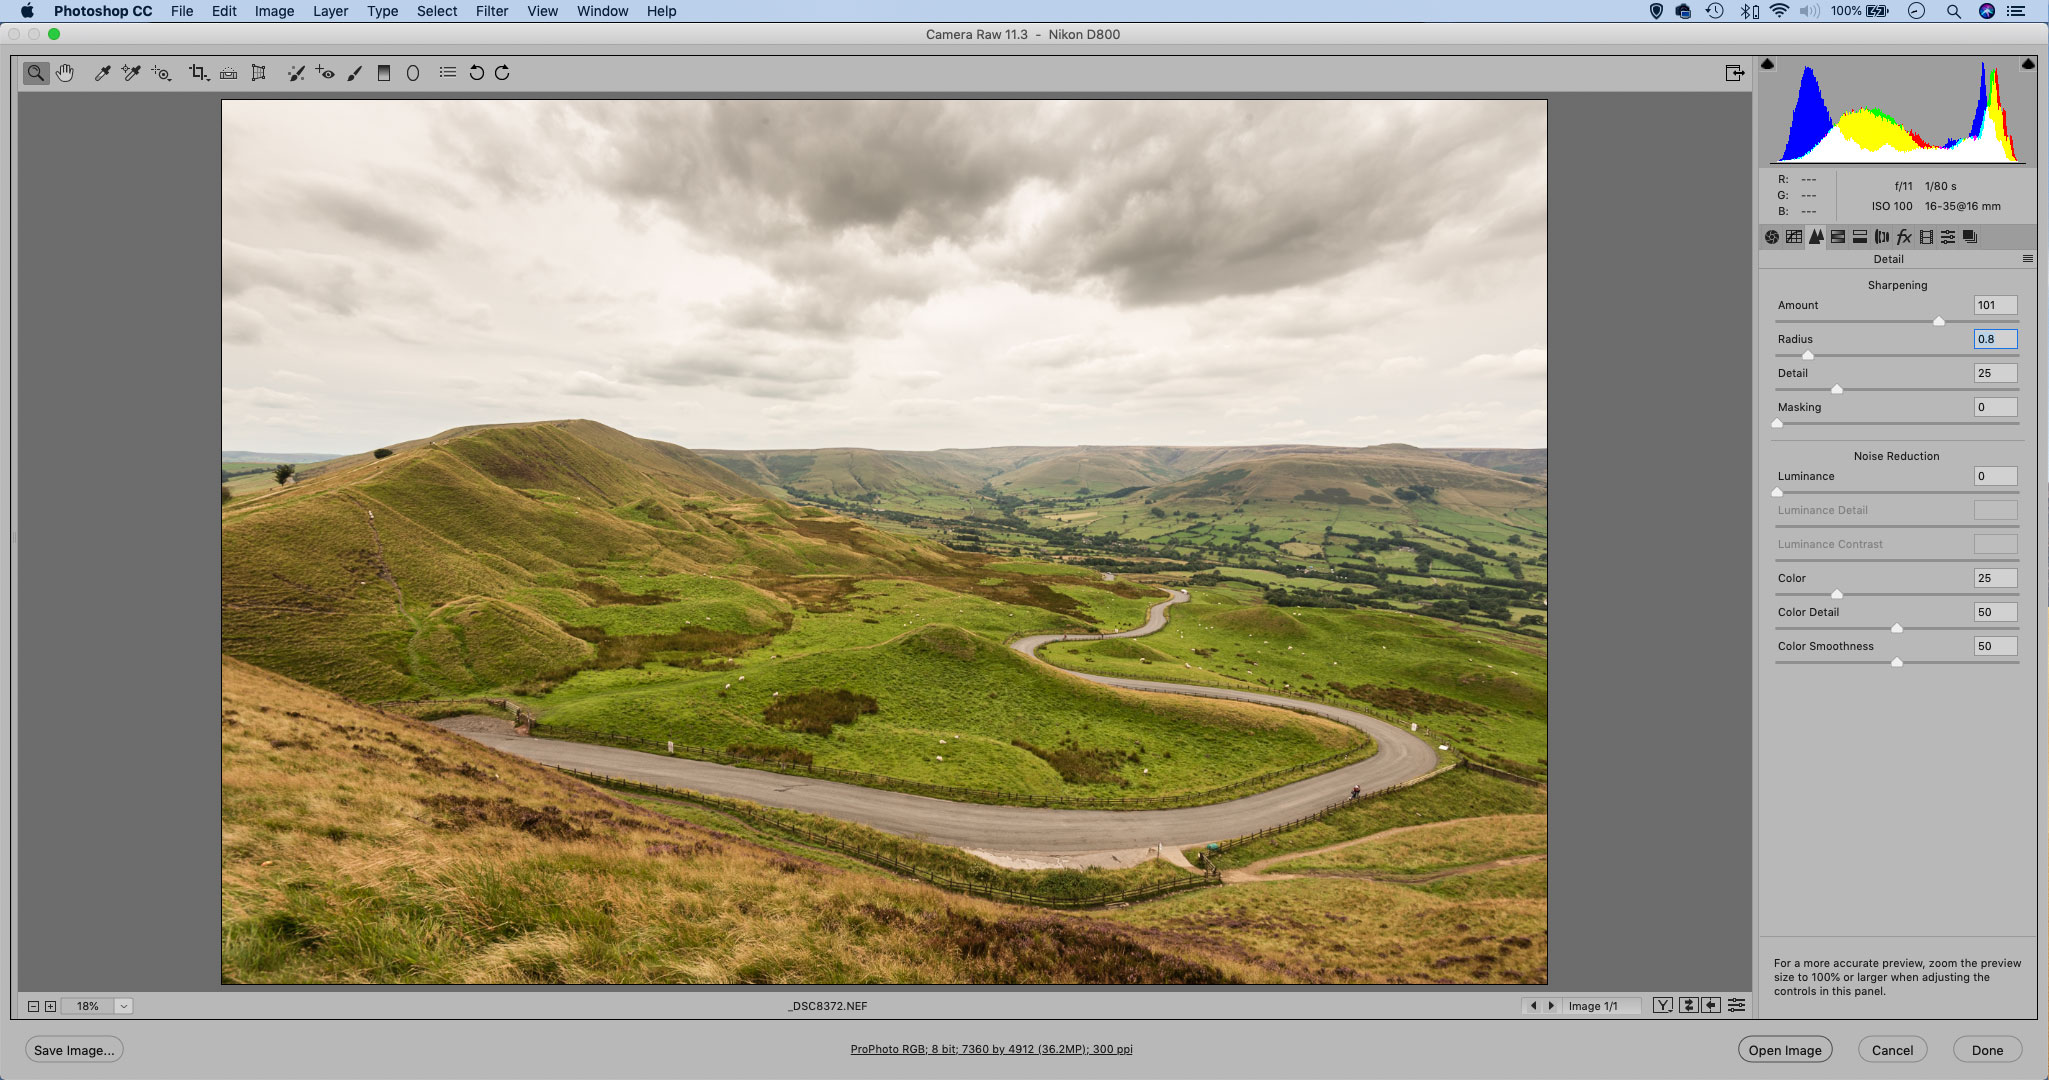
There are no default or standard settings for sharpening with the Camera Raw Detail panel – it depends on image resolution and content. But as a rule of thumb, with detailed images like landscapes you typically want a fairly high Amount of 100-150 and a low Radius of 0.8-1.2. With less detailed images like close-up portraits or macro, a higher Radius and lower Amount is a good starting point.
52. Use the plus/minus icons

When you make a local adjustment with the Graduated Filter, the Adjustment Brush or the Radial Filter, it’s usually best to begin by clicking the plus or minus icon next to one of the sliders to on the right: this simultaneously loads a starting-point adjustment and resets all the other sliders to their defaults. You can then go on to fine-tune the sliders to suit your adjustment.
53. Target and adjust colors quickly
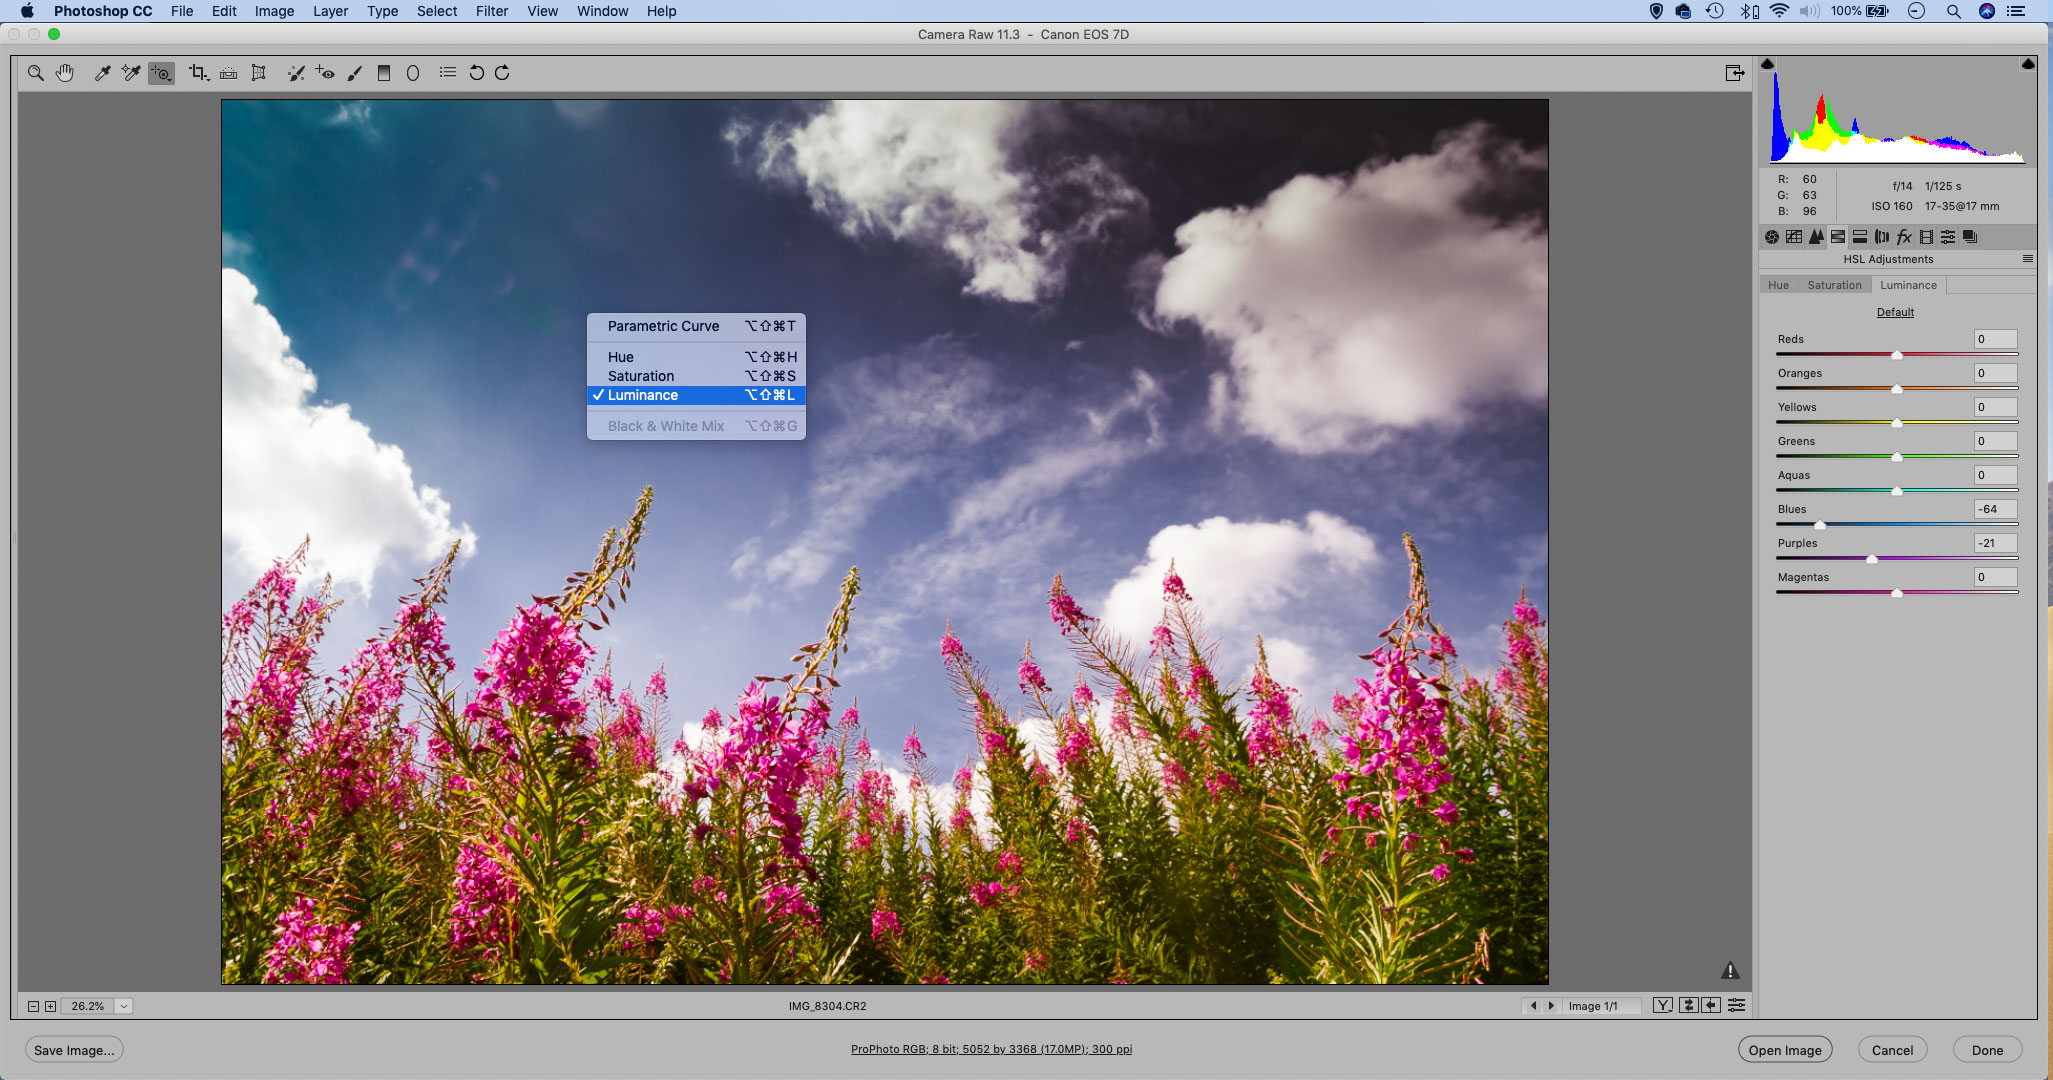
Right-click with the Targeted Adjustment Tool to choose Hue, Saturation or Luminance from a pop-up menu, then drag over the image to change the targeted colors based on the selected parameters. Here for example, we’re able to target Luminance and drag down on the blue sky to darken it.
54. Improve fine details
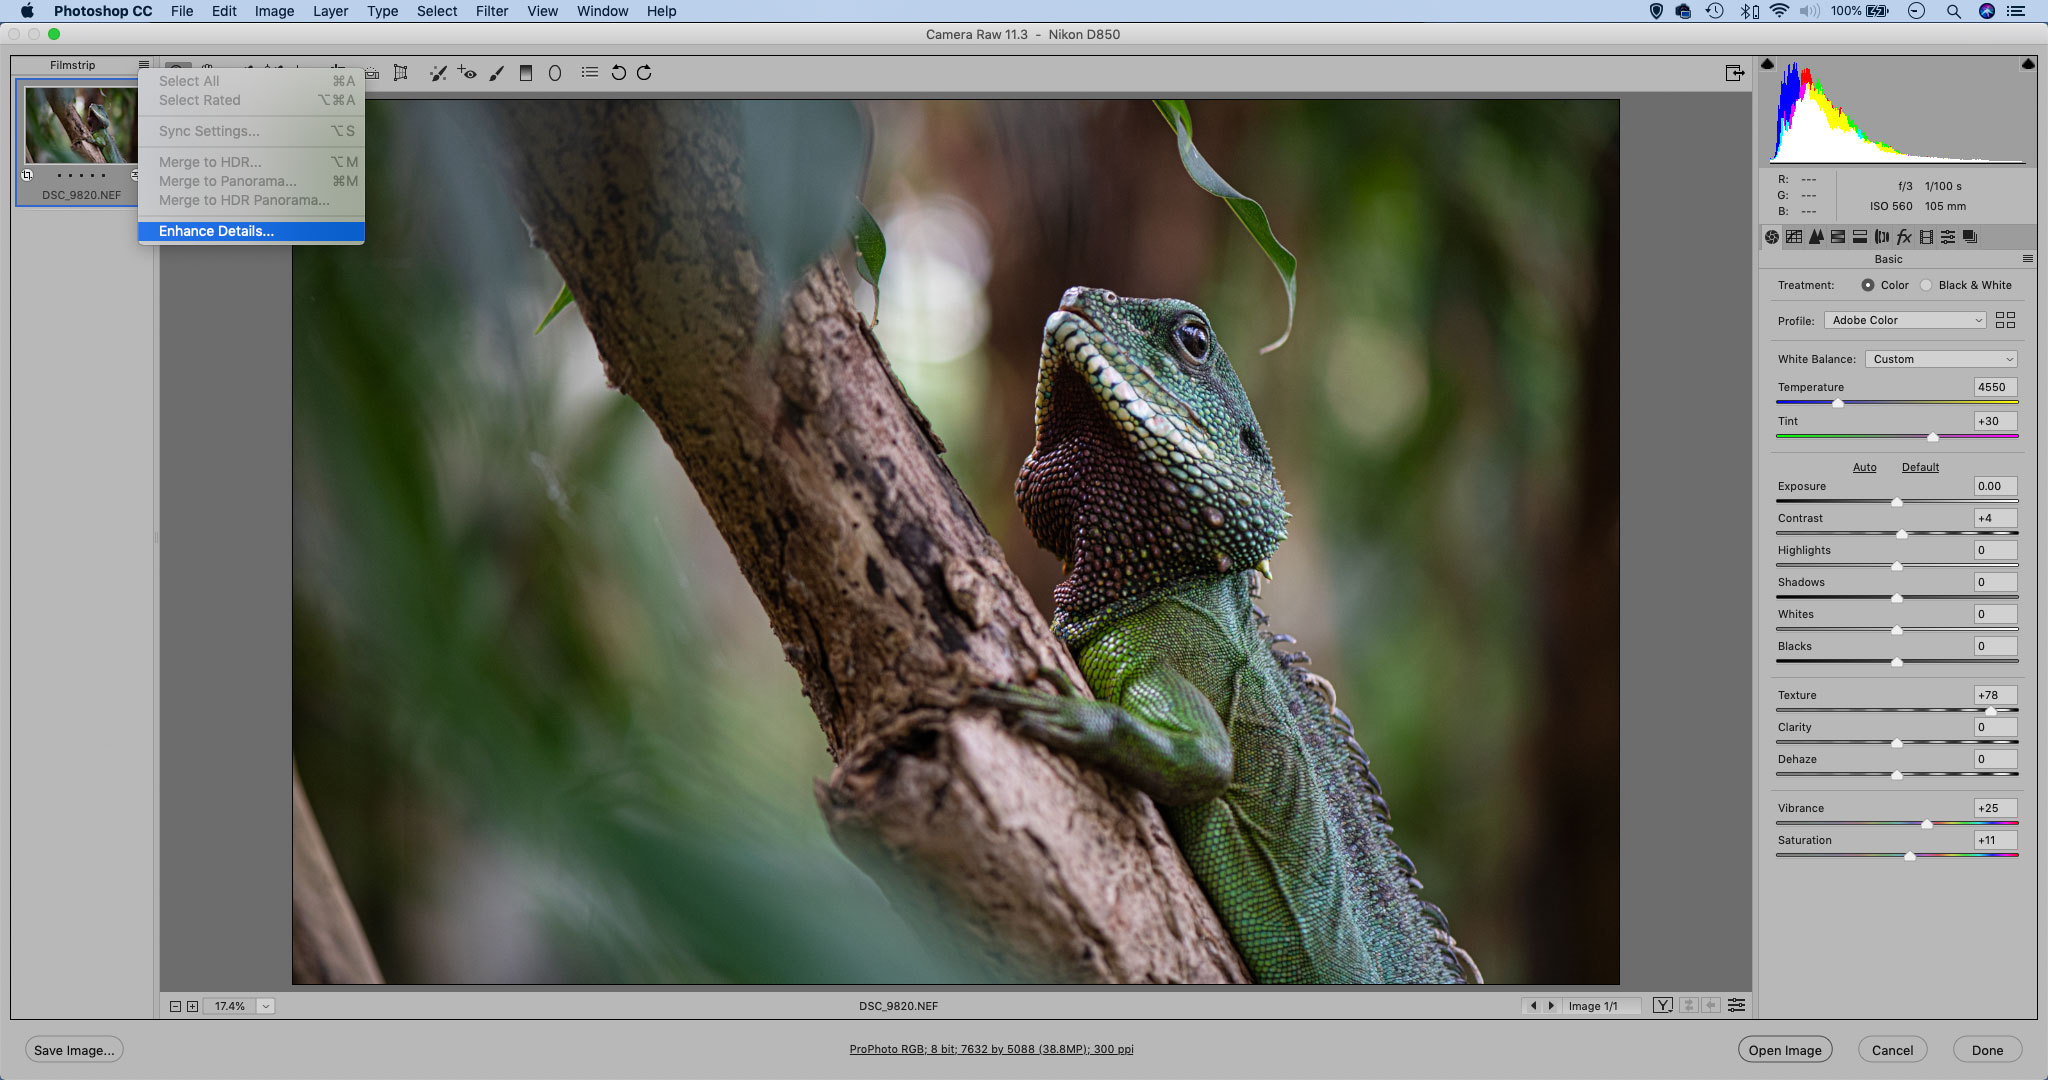
Choose Enhance Details from the Filmstrip dropdown menu, and Photoshop will apply advanced demosaicing, which corrects artifacts and addresses color discrepancies in your photos. This can sometimes result in finer detail and less noise, but often there will be no discernible difference.
55. Open raw images as Smart Objects
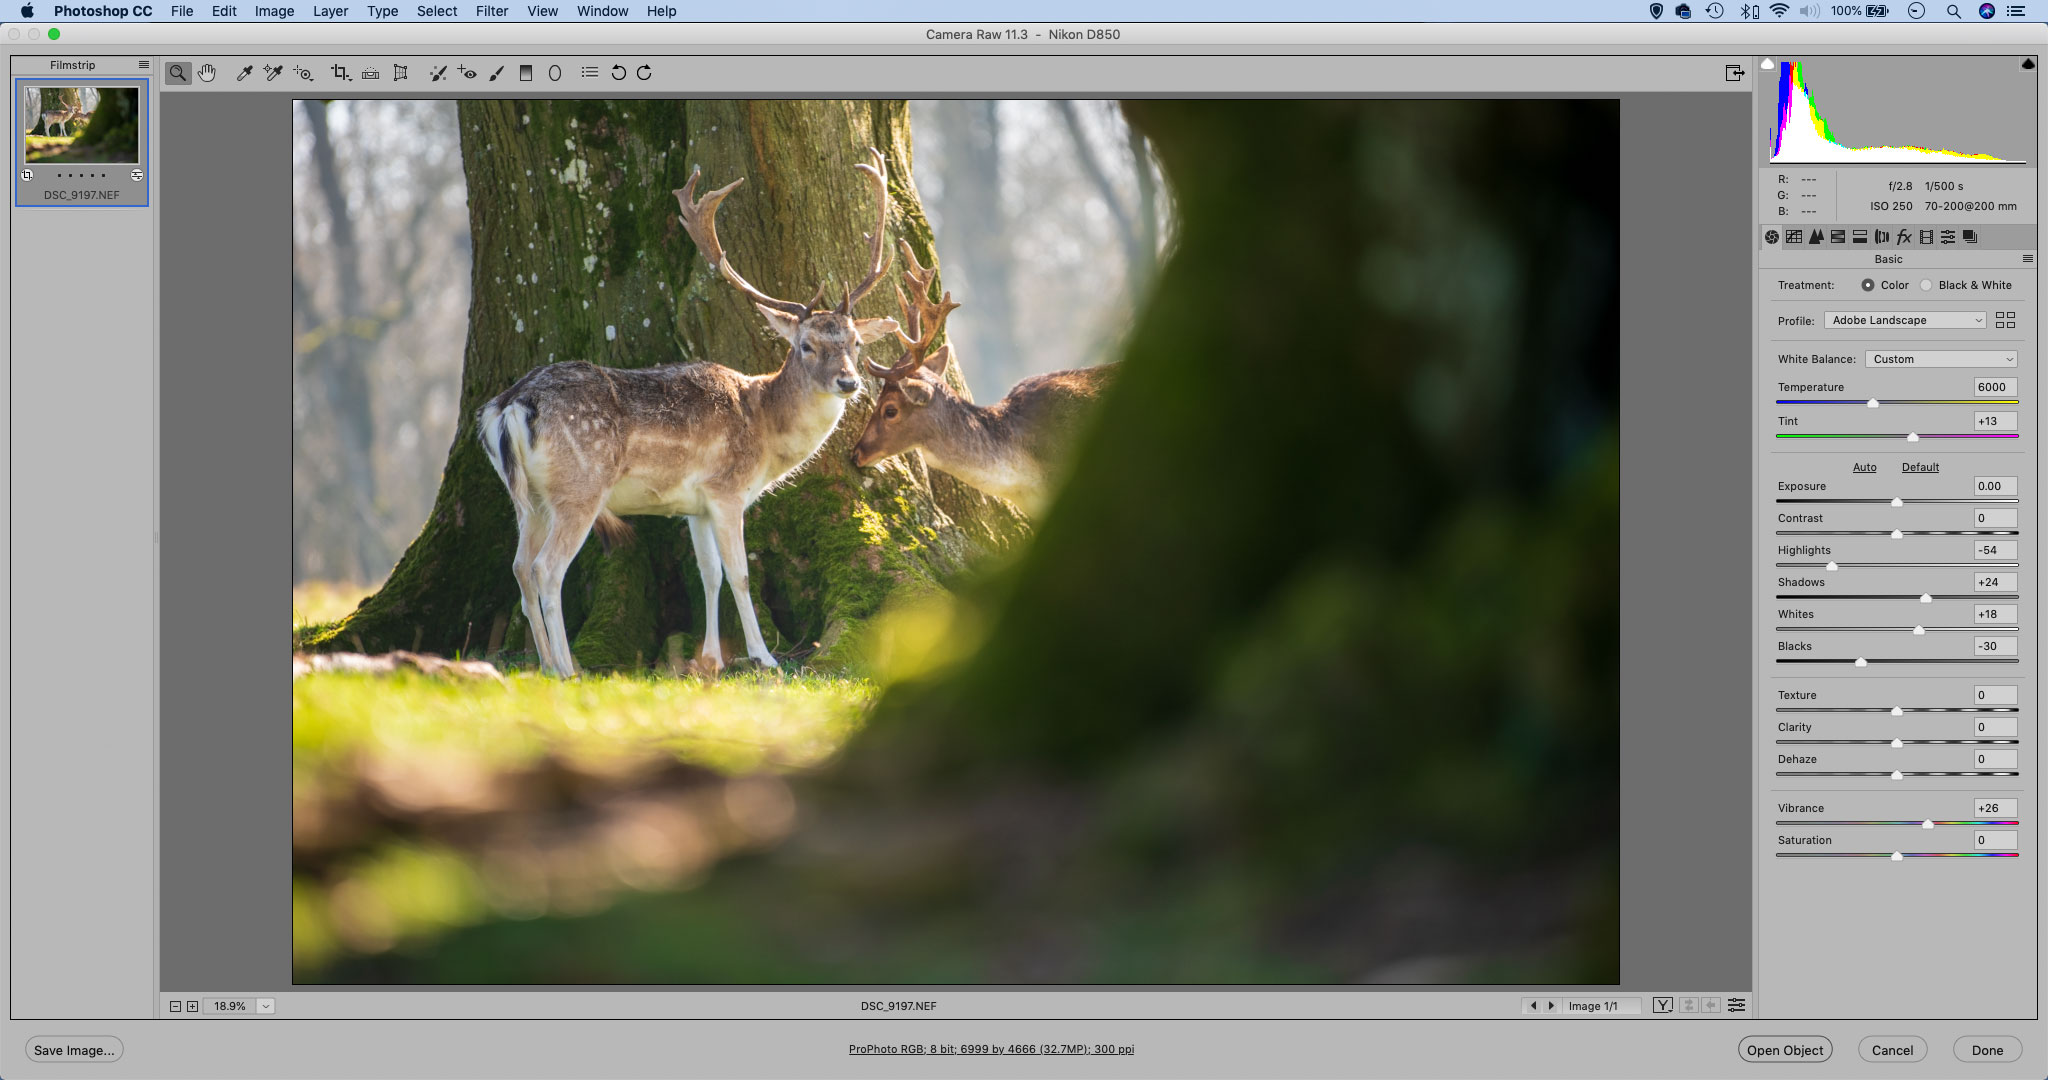
Hold Shift, and the Open Image button in the bottom-right of the Camera Raw interface will change to Open Object. Use this to open the image in Photoshop as a Smart Object. Now you can bring the image back to Camera Raw at any time by double-clicking the smart object thumbnail in the layers panel.
56. Double-dose toning with a grad
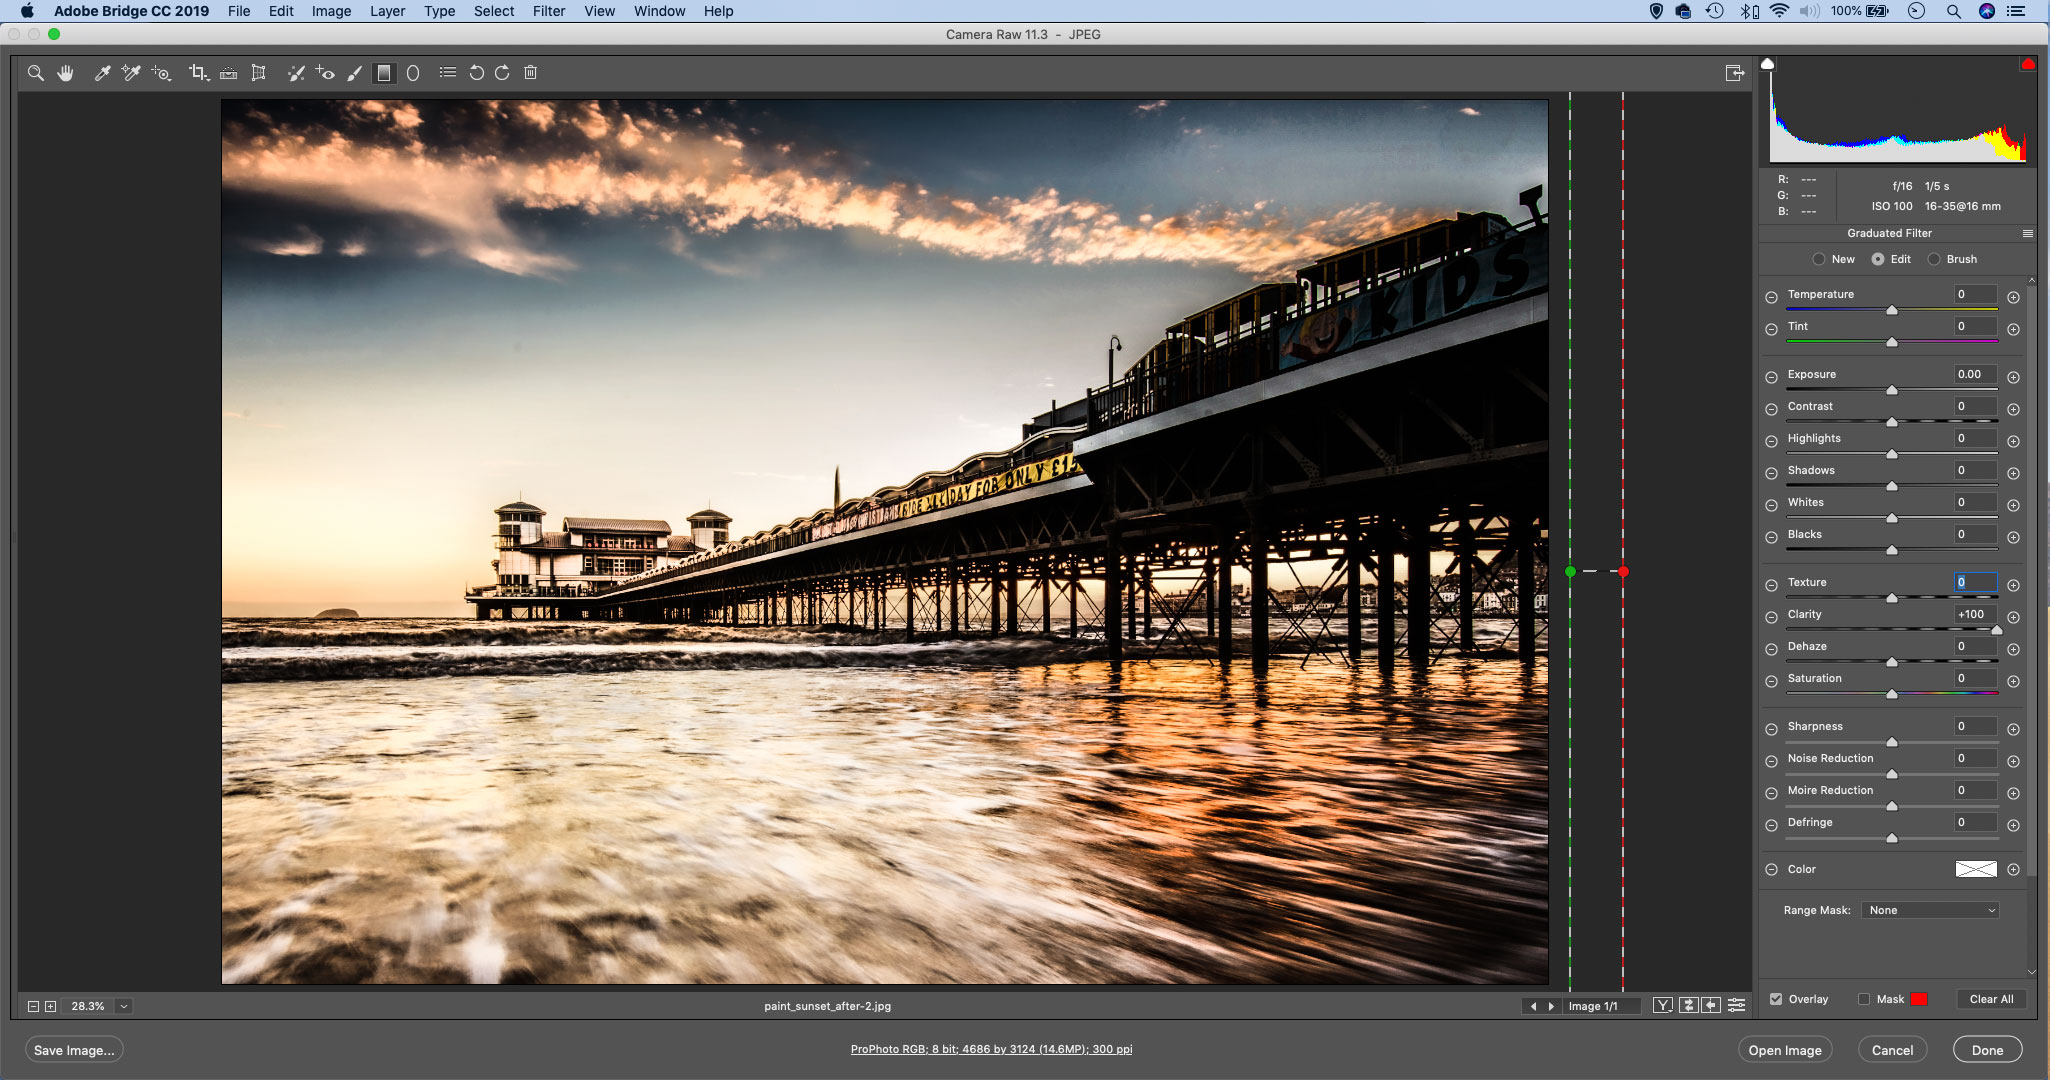
Sometimes you can take a tonal slider right up to 100%, but still feel that the image needs more of that effect. If you want to take a tonal slider beyond its limits – perhaps to add 200% Clarity – add a Graduated Filter, start at the edge then drag away from the image so that the adjustment covers the entire frame, then adjust the tool sliders to suit.
57. Copy and paste raw edits in Bridge
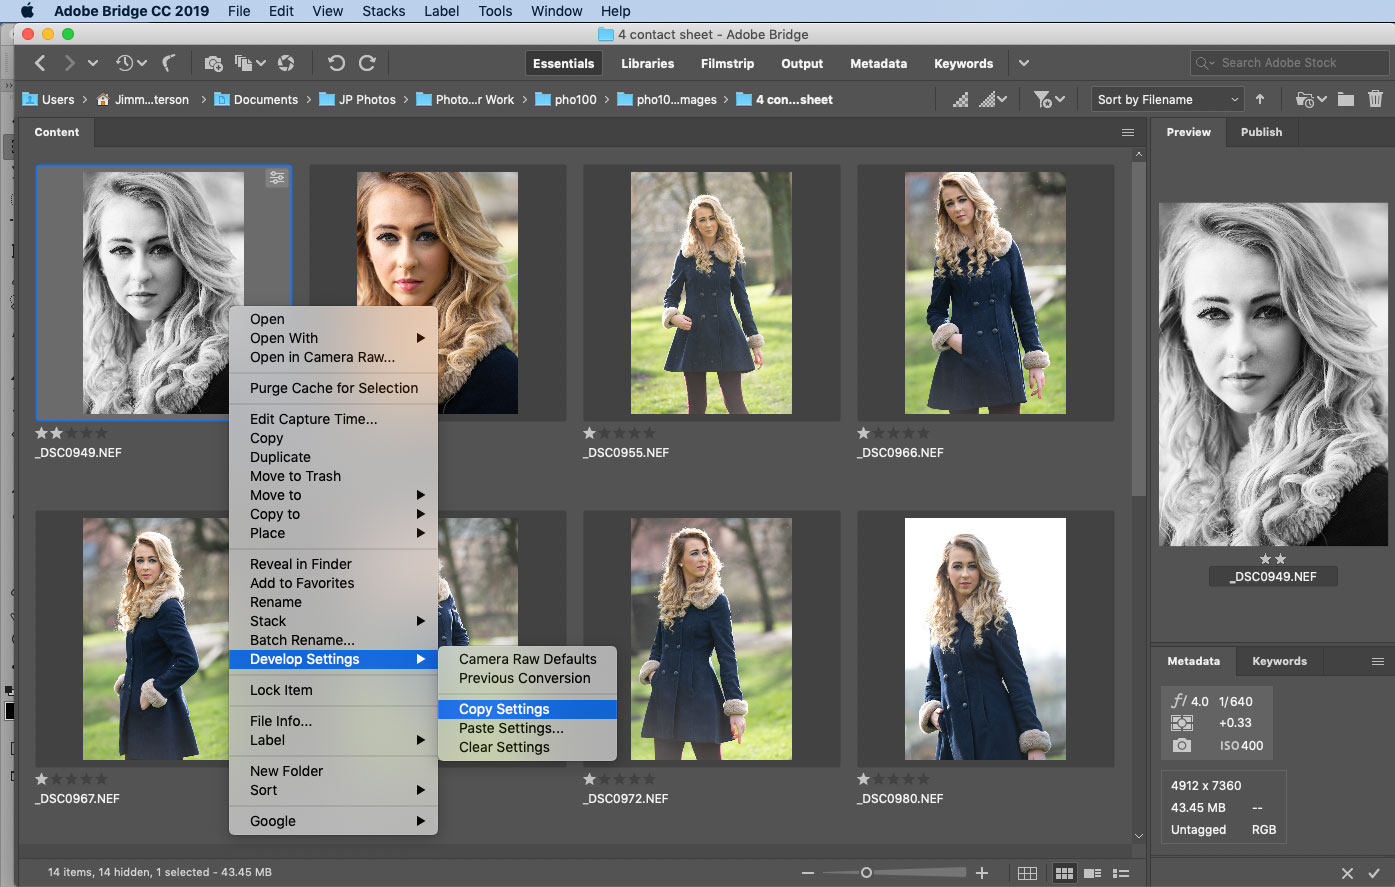
You can copy settings made in Camera Raw from one image to another – or a set – without opening the images. Simply go to the edited file in Bridge, right-click it and choose Develop Settings > Copy Settings. Highlight the images you’d like to copy the effect to, right-click them and choose Develop Settings > Paste Settings.
58. Alter your view with Alt
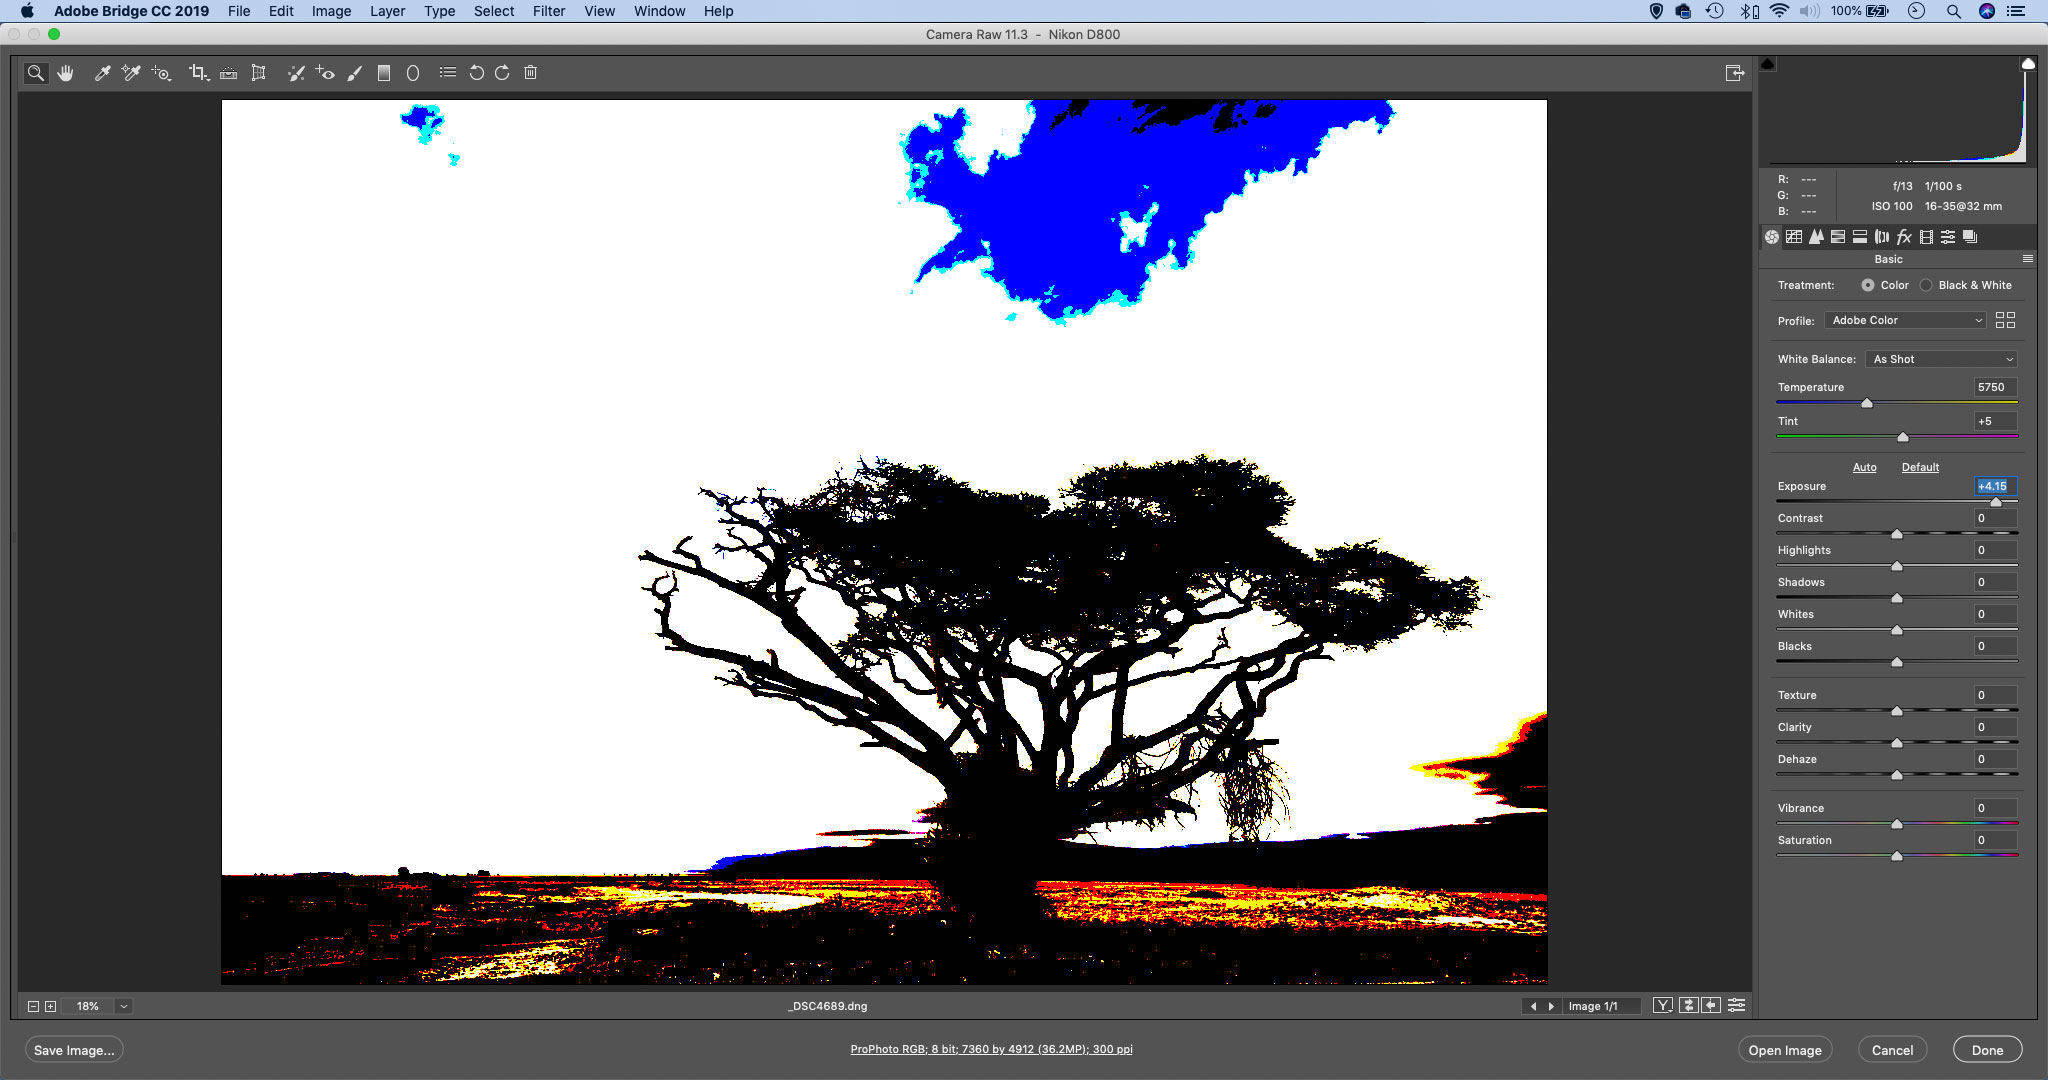
In the Camera Raw/Lightroom Basic panel, holding Alt changes the view of various sliders. With the Exposure, Highlights, Shadows, Whites or Blacks sliders it gives you a grayscale view that displays clipping.
59. Only sharpen the parts that need it
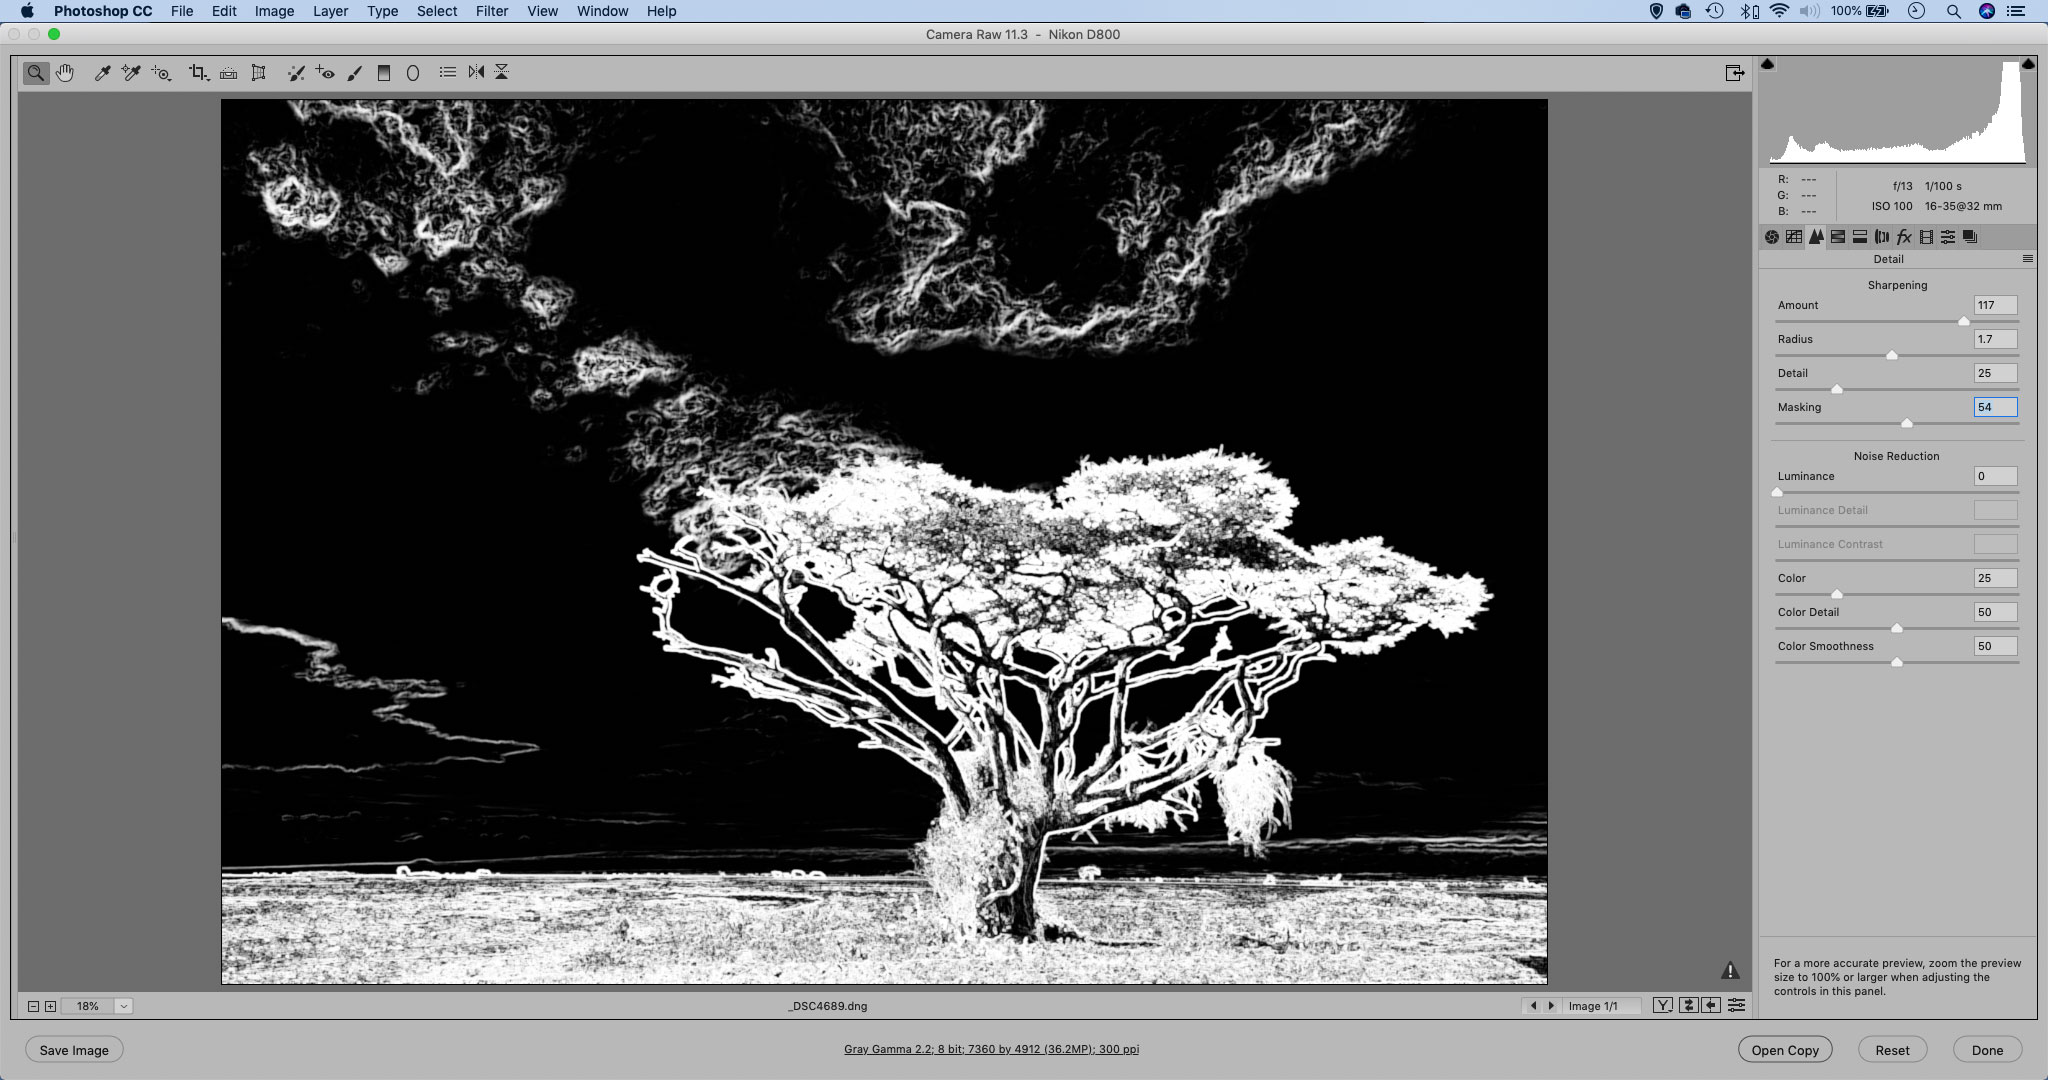
The Masking slider in the Detail panel can be hugely useful for restricting sharpening just to the detailed areas that need it – excluding soft or out-of-focus areas where sharpening is not only unnecessary, but might also amplify image noise. After applying sharpening to your image with the Amount and Radius sliders, hold down Alt and drag the Masking slider for a view that shows black areas appear as you drag across. These black areas will be excluded from the effects of the sharpening.
60. Fine-tune your B&W conversIons
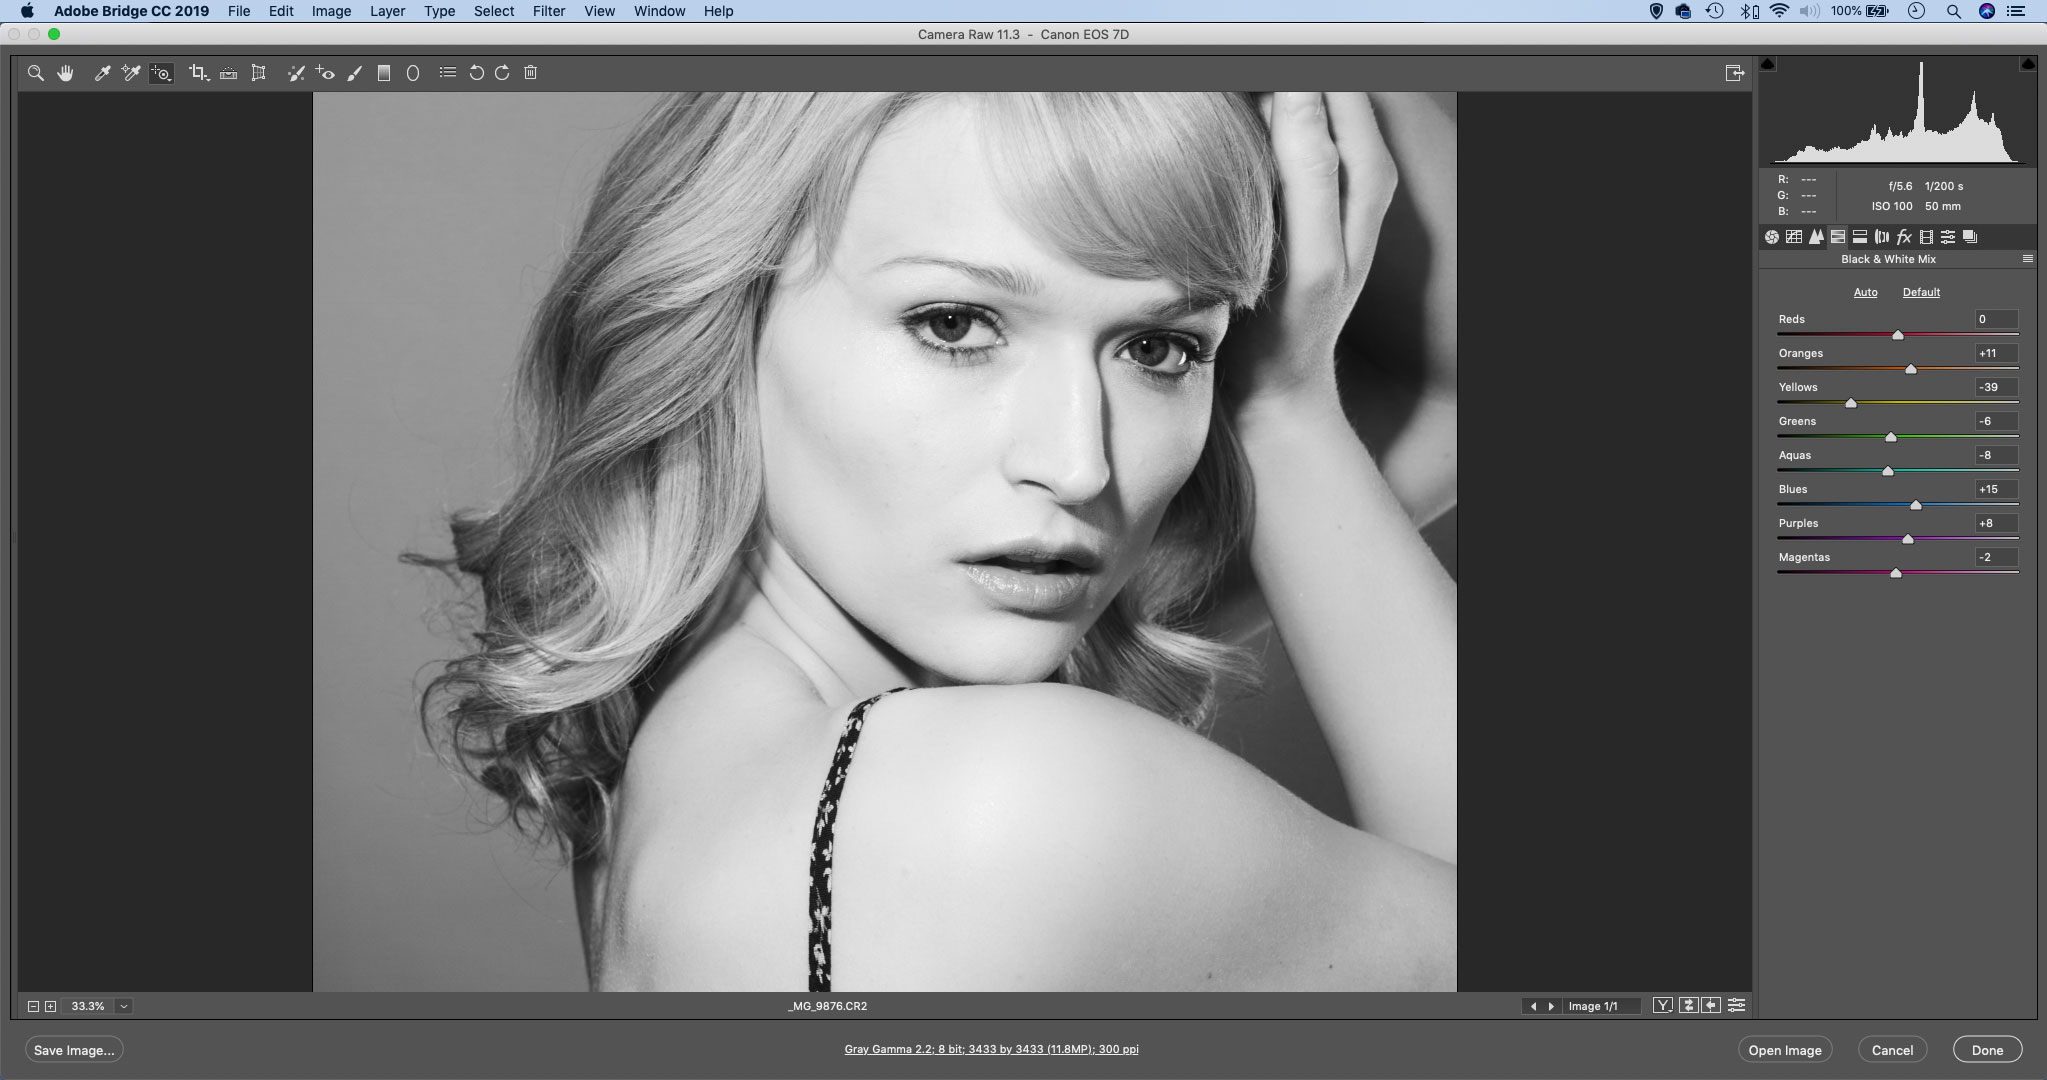
The Black and White panel in Camera Raw or Lightroom is the best tool for monochrome conversions. Drag the eight color ranges to fine-tune the conversion by altering the brightness of these colors. You can fine-tune the effect further by tweaking the Temperature and Tint control in the Basic panel.
30 Quick Raw tips
61 Double-click any slider in Camera Raw to reset it to a default value.
62 Click on a neutral point like a gray road or a white wall with the White Balance tool to fix color casts.
63 You can drag a box with the White Balance tool to sample from the median point of a wider set of pixels.
64 In the Tone Curve, double- click the words Point Curve to reset the curve line.
65 Double-click a profile in the Profile Browser to simultaneously choose the profile and collapse the panel.
66 Alt-click the New Preset icon in the Preset panel to create new Profiles.
67 Double-click the Zoom tool to jump to a 100% view, showing actual pixels.
68 Double-click the Hand tool to jump out to a ‘fit image’ view, for assessing the entire image.
69 When zoomed in, press and hold H then click-hold to zoom out of and into areas.
70 Double-click the White Balance tool to reset the white balance to As Shot.
71 Double-click the Straighten tool icon in the toolbar to instantly straighten an image.
72 When cropping, press X to toggle a horizontal or vertical aspect ratio.
73 When using the Adjustment Brush, hold Ctrl (mac) or right-click (win) and drag to change brush size.
74 Press R or L to rotate a photo 90 degrees left or right.
75 Click the bottom-right toggle slider icon to turn all settings in the current panel off or back on again.
76 When multiple images are selected in the filmstrip, alt- click to set the active image.
77 You can use Camera Raw without needing to open Photoshop: just right-click an image in Bridge and select Open In Camera Raw.
78 If you use tool shortcuts – like K for Adjustment Brush – pressing it again will select the previous tool.
79 When another tool is selected, press and hold the I key to temporarily use the White Balance tool.
80 When cropping, hold Shift and drag corners to constrain the ratio, and hold Alt to resize from the center.
81 If you want to set the image size or resolution, click the Workflow options or use the Save Image box.
82 When using the Spot Removal Tool, press V to toggle the overlay on or off so you can check your work.
83 When you add a new Radial Filter, double-click to automatically set it to the bounds of the image.
84 Press X after adding a Radial Filter adjustment to toggle between affecting inside or outside the circle.
85 Hold Space while dragging the circle to temporarily adjust the position of your Radial Filter adjustment.
86 The Graduated Filter snaps to 15-degree increments if you hold Shift as you drag.
87 Drag sections of the histogram to alter Blacks, Shadows, Exposure, Highlights or Whites.
88 When a value is highlighted in a number box, press the up/down arrow keys to alter it.
89 Hold Alt, and the Cancel button changes to Reset (this works in many dialog boxes in Photoshop).
90 When using the Point Curve, Cmd/Ctrl-click on the image to set a point on the curve line.
Tonal tips
91. The amazing S-curve
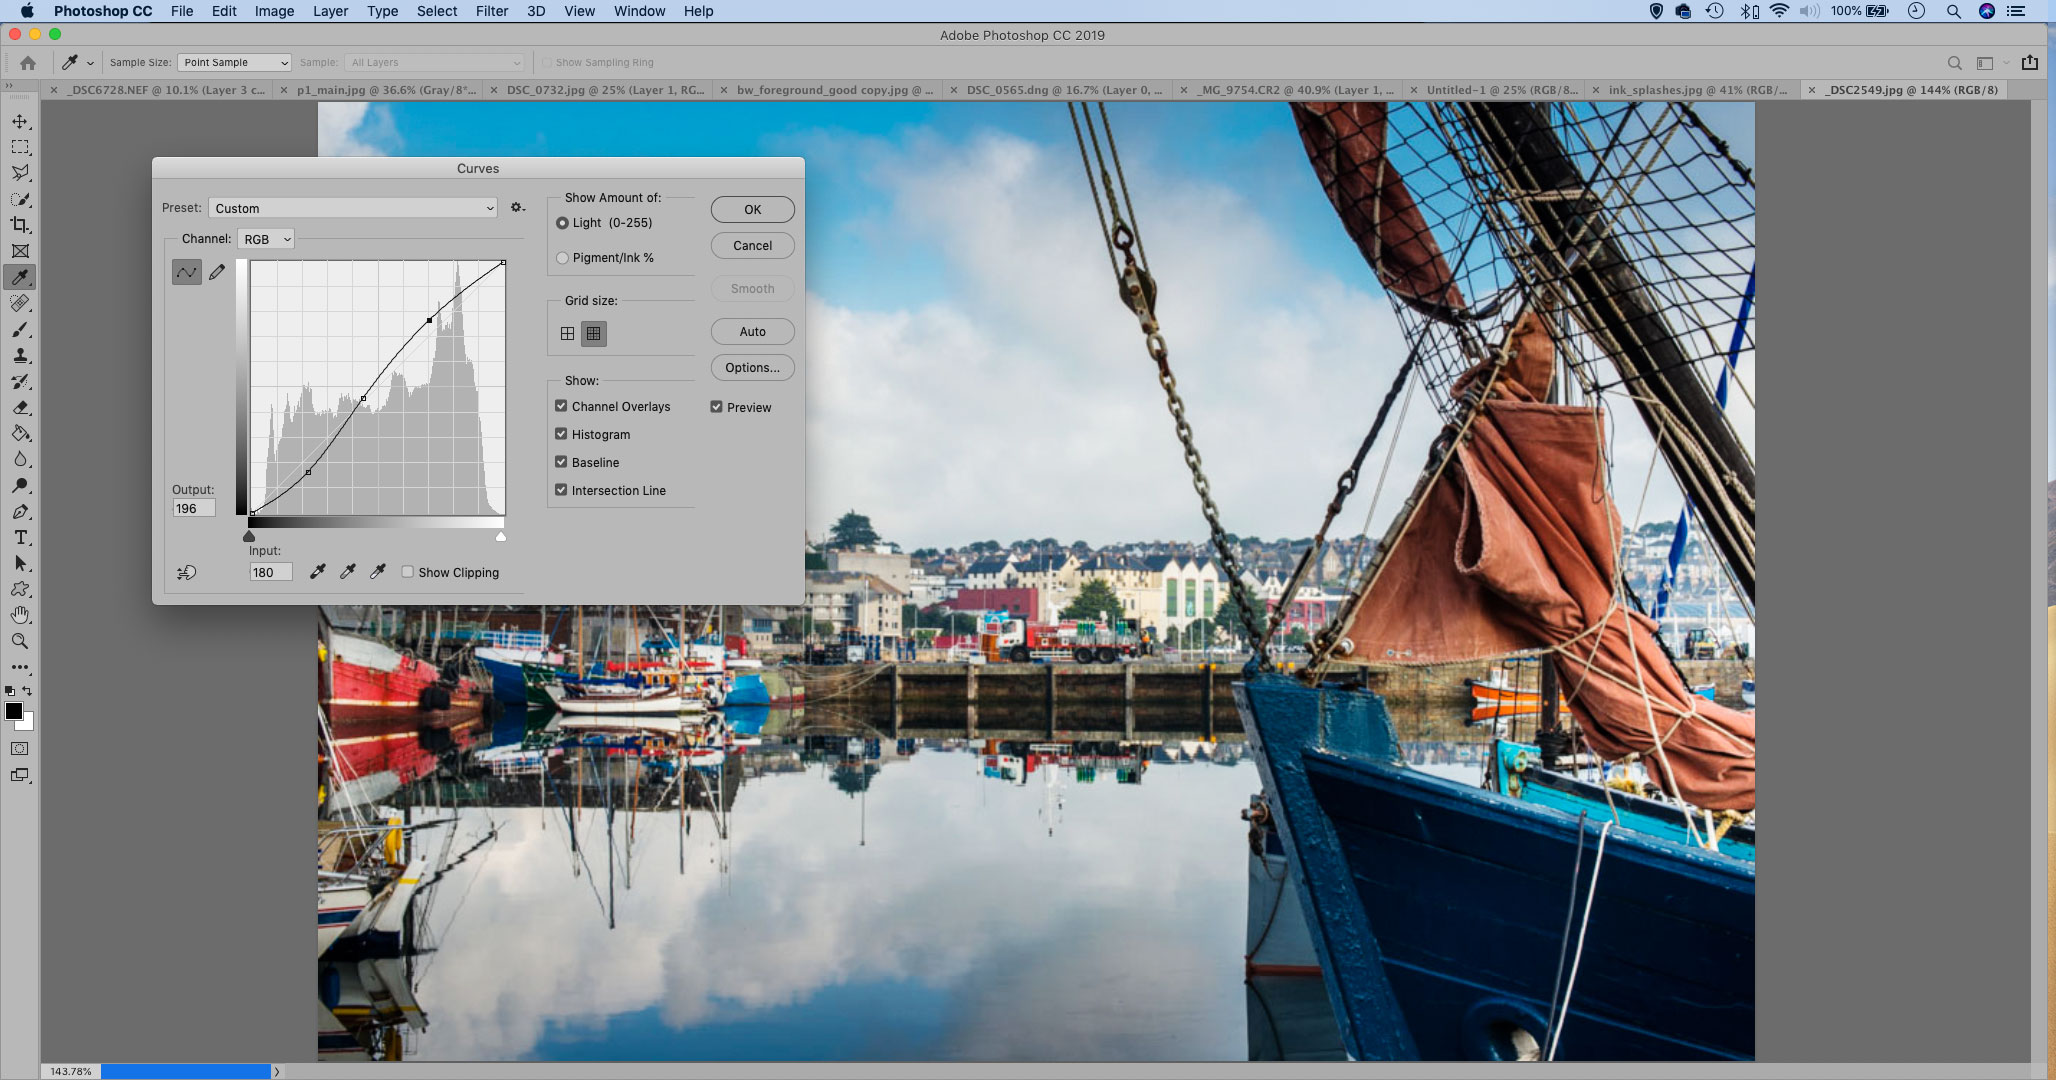
The best way to give an image extra punch is with a simple S-curve. Either use a Curves Adjustment Layer in Photoshop, or the Tone Curve in Camera Raw or Lightroom. Drag one control point upwards near the top-right of the line, and a second downwards near the bottom-left. The more pronounced the S is, the greater the contrast and color saturation. An optional third point in the middle of the line lets you anchor the midtones.
92. Fade your filter effects
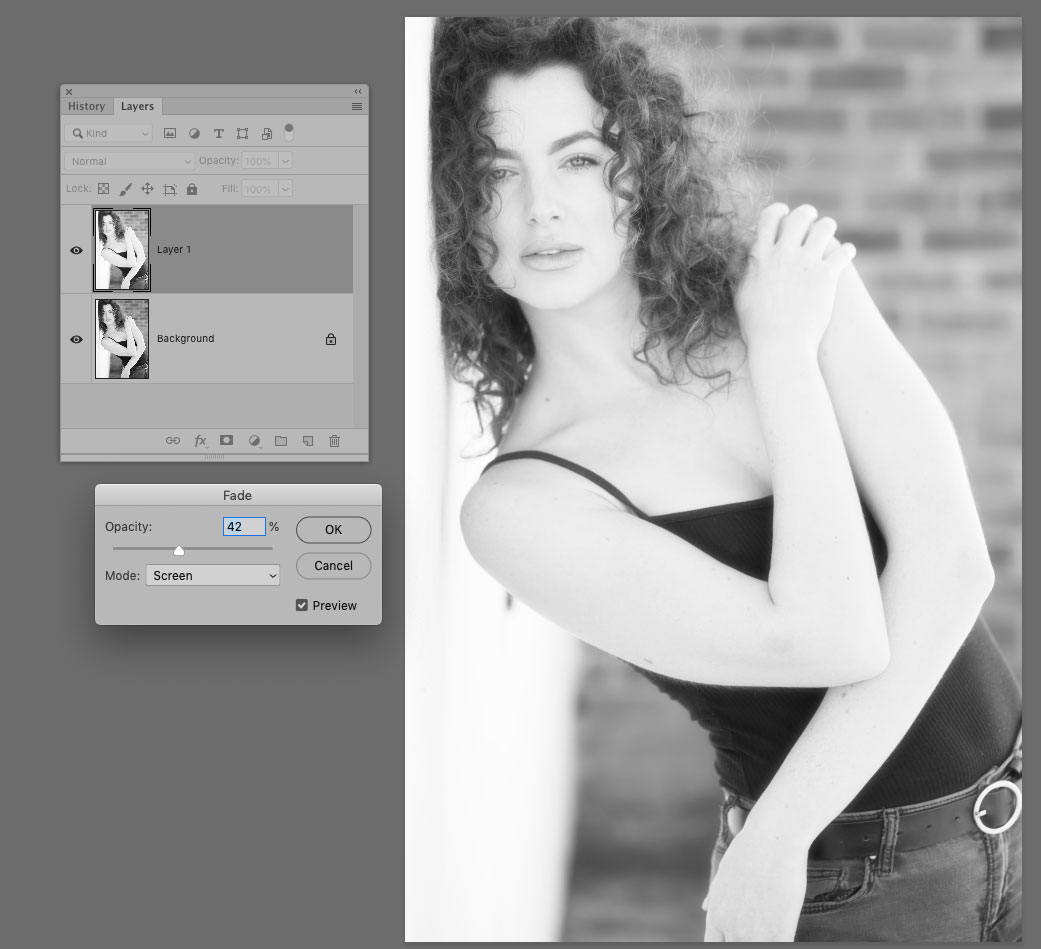
After applying a filter effect, you can ‘fade’ it by pressing Cmd/Ctrl+Shift+F. You can also experiment with different Blending Modes in this dialog. A faded Gaussian Blur set to Screen can result in a lovely soft-glow effect on monochrome images.
93. Solarize with curves
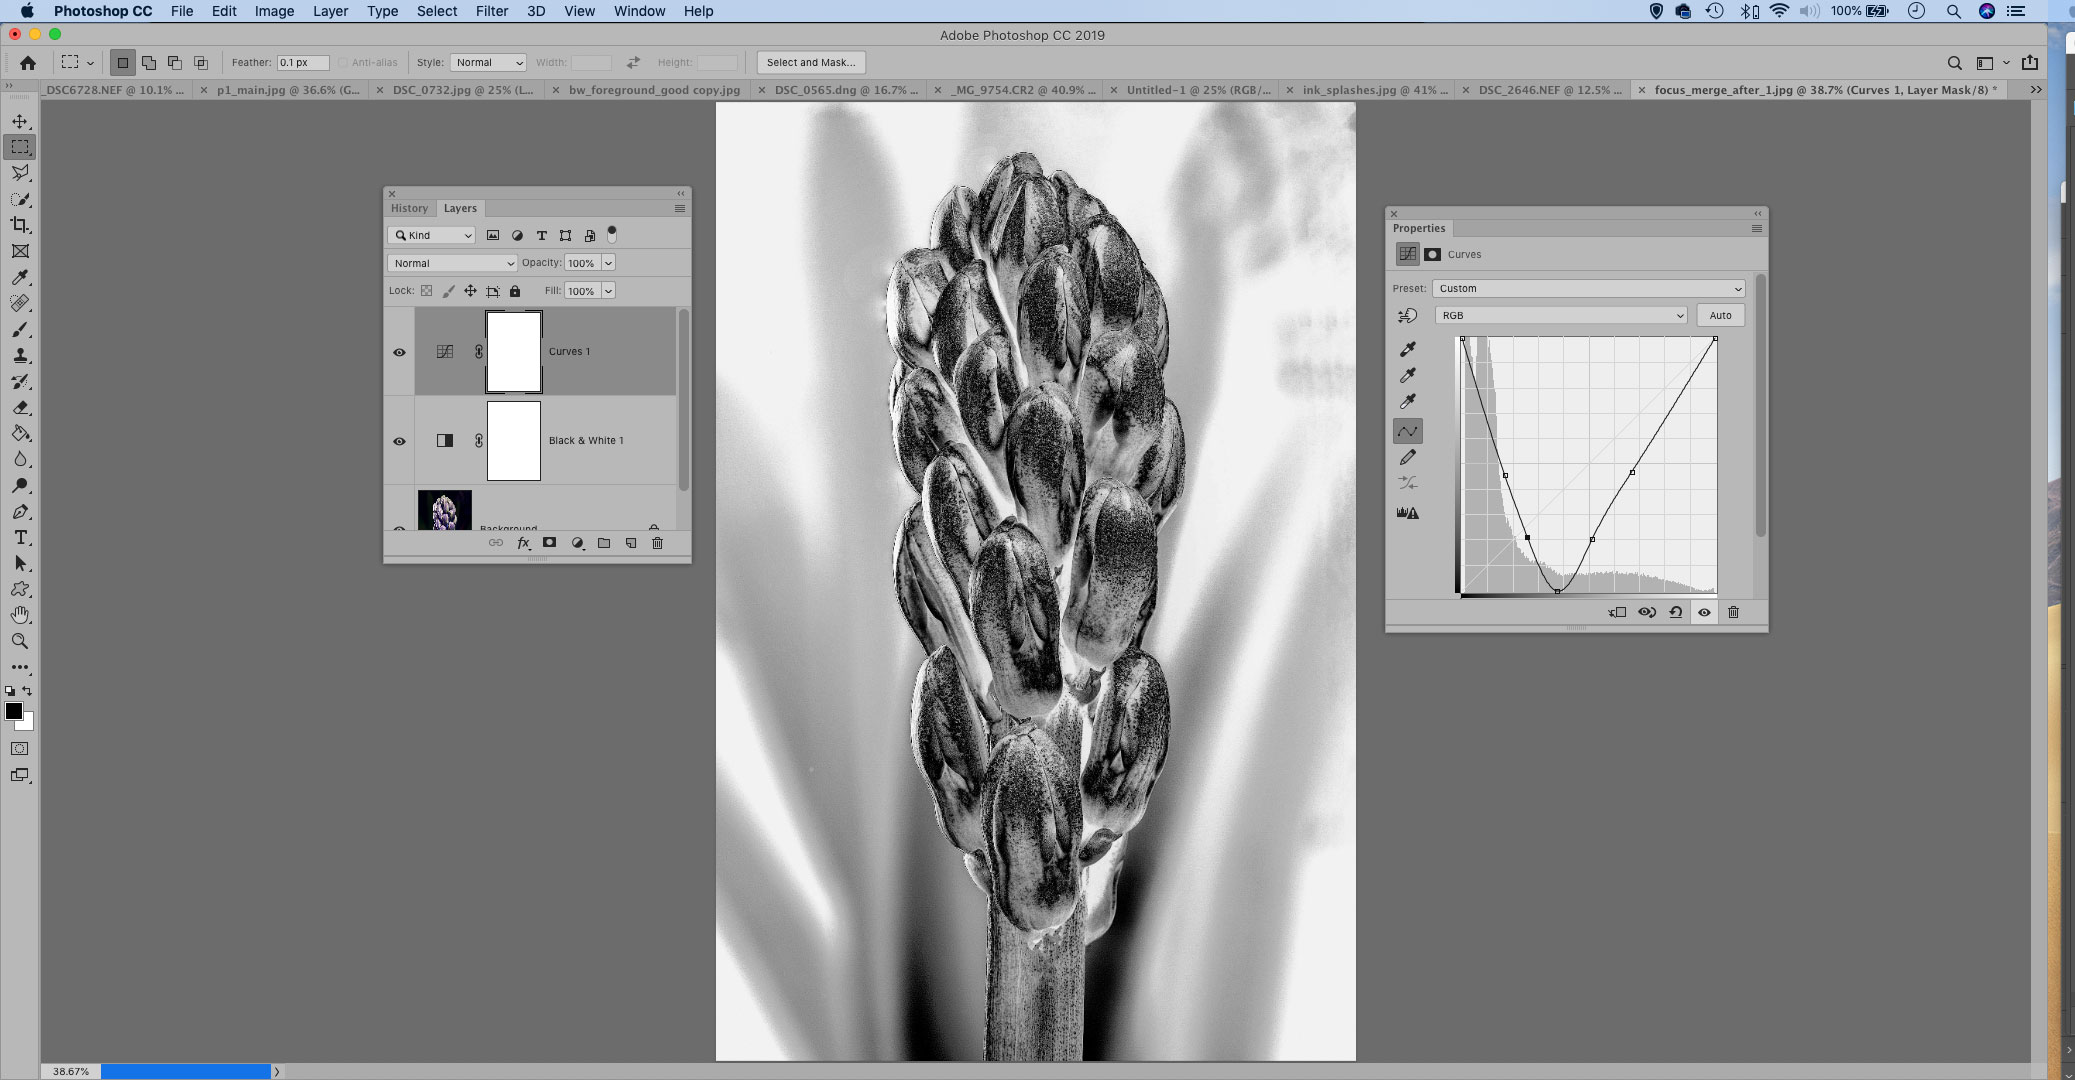
If you drag the bottom-left point all the way up to the top-left and the top-right point down to bottom-right, you invert all the tones for a negative effect. You can also create an authentic solarized effect by plotting a V shape, or an inverted V as shown.
94. Remove a white background
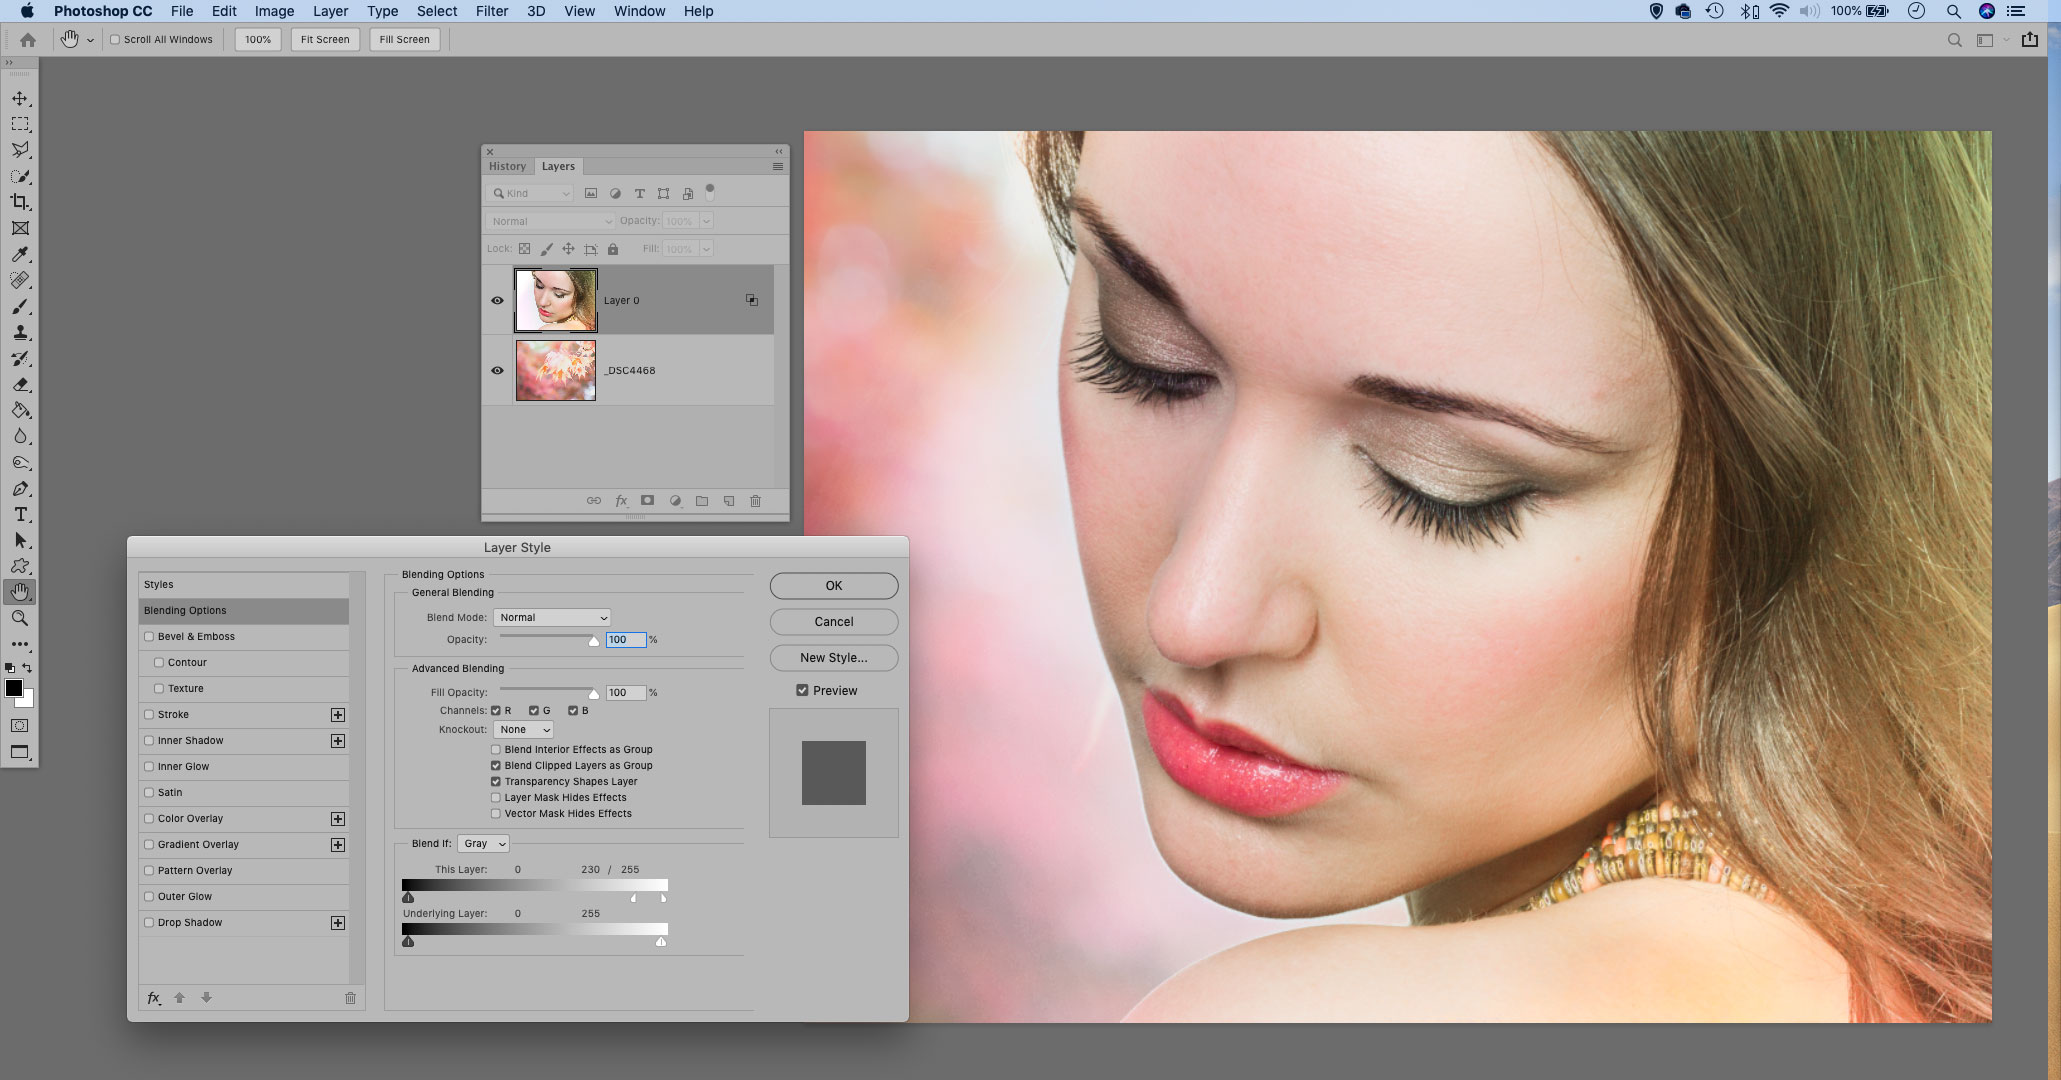
If you need to quickly remove a pure white backdrop to comp one image into another, simply copy it over and double-click the layer to enter the Blending Options, then drag the This Layer White slider inwards. If necessary, hold Alt and drag half the slider to split it up for a gentler transition.
95. Use the Auto buttons
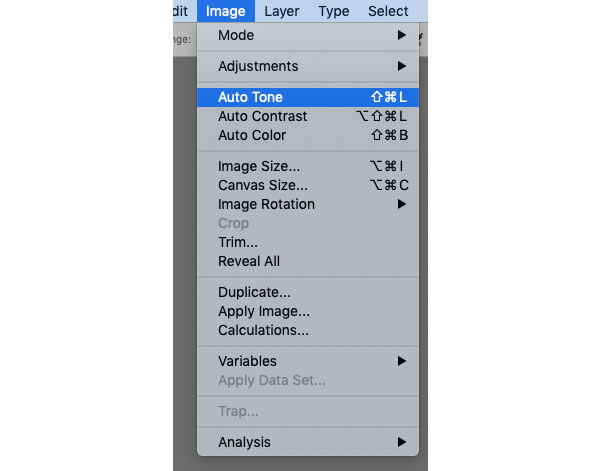
The three Auto options in Photoshop’s Image menu can be very useful for quick fixes. Each affects your image in a slightly different way. Auto Contrast takes the darkest pixels to pure black and the lightest to pure white. Auto Tone does a similar thing, but to each individual color channel rather than the composite RGB. Auto Color is similar to Auto Tone but attempts to make the midtones neutral, correcting color casts. It’s worth noting too for Lightroom CC users that the Auto button here is more advanced than ever, utilising AI to determine the right corrections.
Cropping
96. Use compositional crop overlays
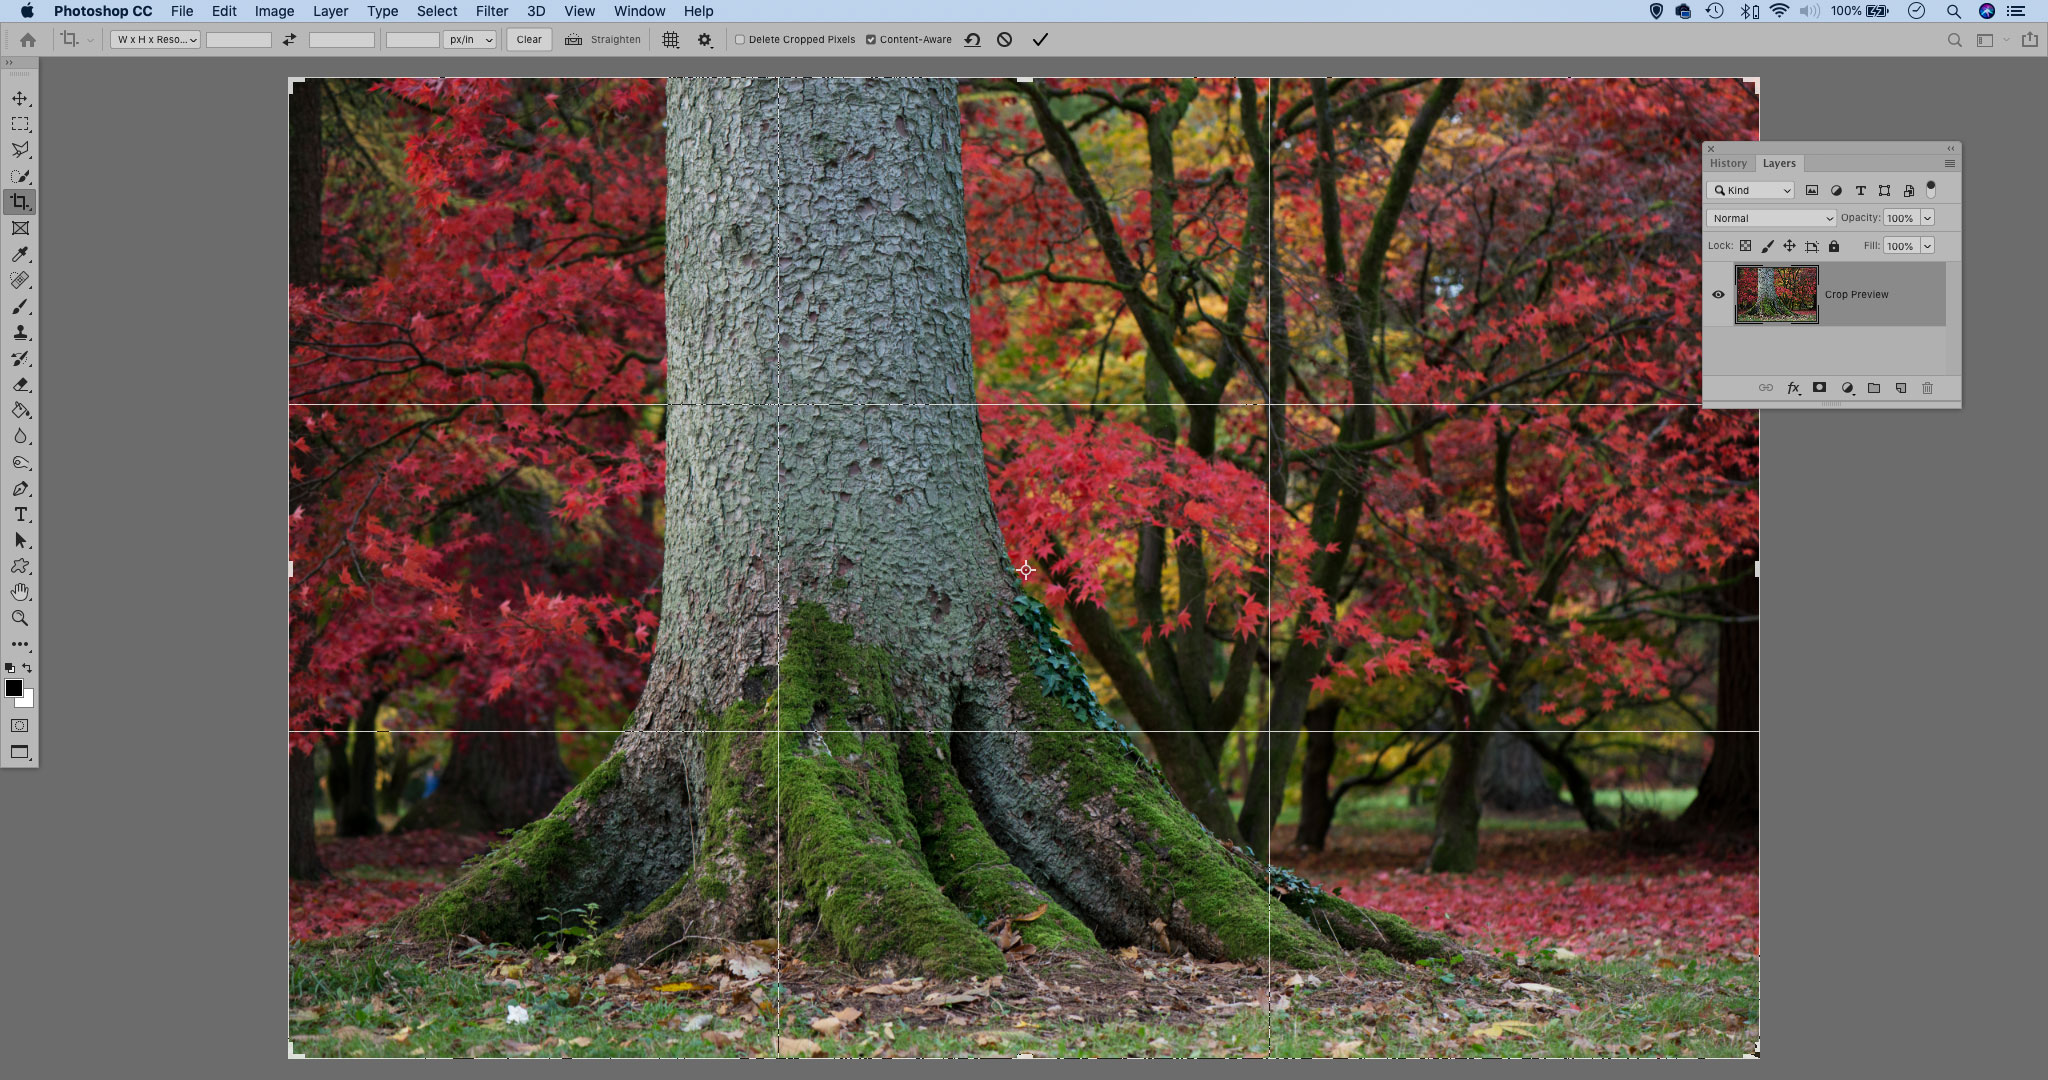
For handy cropping overlays, grab the Crop Tool and click the Overlay icon in the tool options at the top. Choose Always Show Overlay, then press O to cycle through the overlay options, each of which adheres to a different compositional rule. Shift+O changes the orientation of some of the guides.

97 Set width, height and resolution
You can use the Crop Tool to change the resolution of your image or prepare it for printing at a certain size. Simply choose W x H x Resolution in the top-left dropdown, then use the boxes to choose a width, height and resolution for your crop; 300 pixels/inch is standard for printing.
98 Crop non-destructively
If you shoot in raw, it’s usually best to do your cropping at the start of your workflow when the image is in Camera Raw or Lightroom, as the crop is completely non- destructive. Photoshop supports non-destructive cropping if Delete Cropped Pixels is unchecked in the tool options at the top.
99 Don’t do the math
Like all measurement settings in Photoshop, the Crop measurement boxes have built-in maths, so rather than working out 15 divided by 4 inches in your head, you can simply type in ‘15/4in’. You can even mix up your measurement units.

100. Find crop ratios quickly
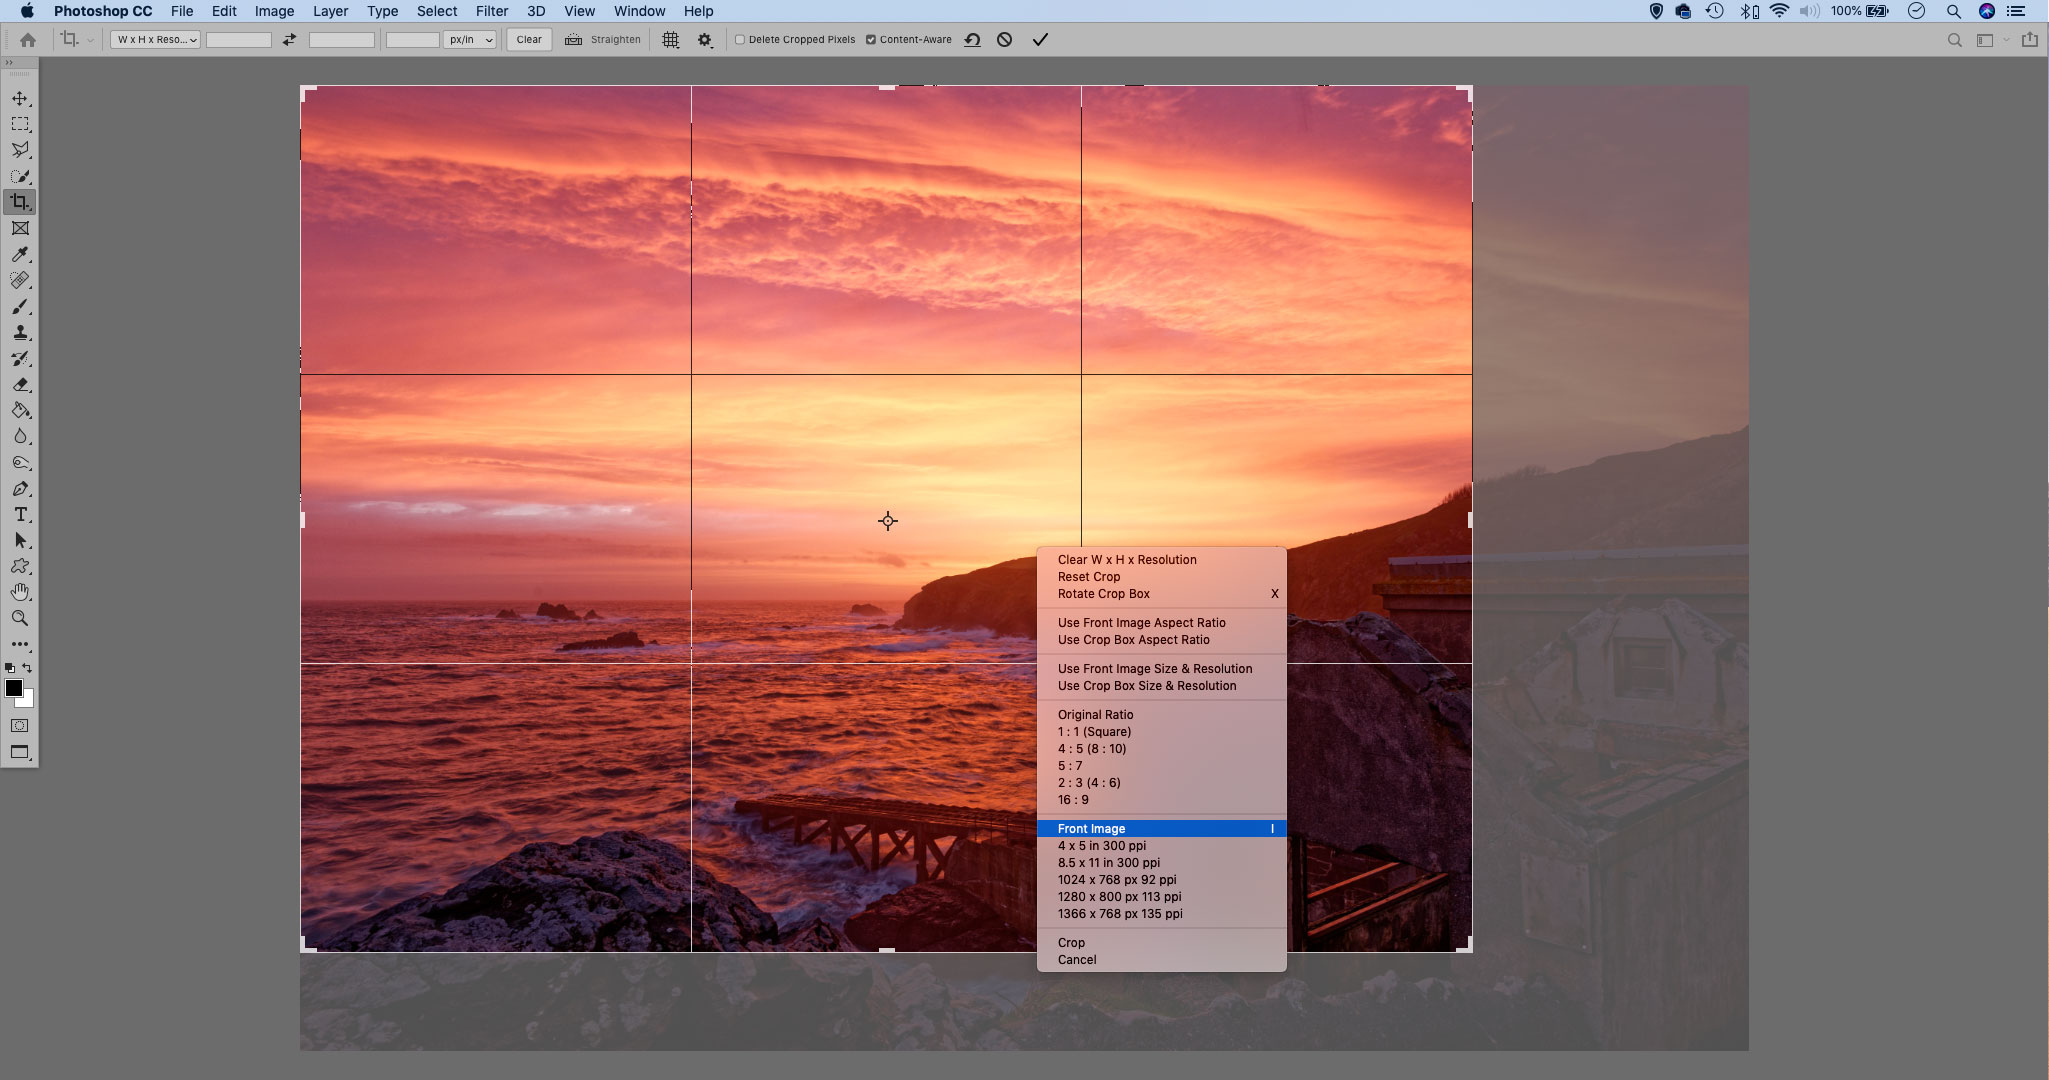
While cropping, you can right-click to choose from different common crop ratios like 1:1. There’s also a handy Front Image option that simply crops to the exact same ratio and resolution as your original full image.
Read more about Photoshop
If you're interested in using Adobe Photoshop CC, we thought you might also be interested in some of our photo editing hardware buying guides:
• Best laptops for photo editing
• Best portable hard drives
• Best desktop external hard drives for photographers
• Best monitors for photographers
• Best monitor calibration tools
The lead technique writer on Digital Camera Magazine, PhotoPlus: The Canon Magazine and N-Photo: The Nikon Magazine, James is a fantastic general practice photographer with an enviable array of skills across every genre of photography.
Whether it's flash photography techniques like stroboscopic portraits, astrophotography projects like photographing the Northern Lights, or turning sound into art by making paint dance on a set of speakers, James' tutorials and projects are as creative as they are enjoyable.
He's also a wizard at the dark arts of Photoshop, Lightroom and Affinity Photo, and is capable of some genuine black magic in the digital darkroom, making him one of the leading authorities on photo editing software and techniques.

