Easily enhance portraits in Photoshop CC with our fantastic FREE actions
Polish portraits to perfection with these straightforward Photoshop skills and our fantastic FREE Actions
Watch video: Retouch portraits with FREE actions in Photoshop CC
Retouching can be a sticky subject. People naturally want to look their best – just look at the popularity of face smoothing modes and apps. But there’s a line where things stop looking natural and start to look fake. This is why Photoshop CC remains the best tool for retouching.
We have complete control over the look of the image and, because we can make our adjustments on separate layers, we have the freedom to undo or tone things down if the effect begins to look a little over-the-top. There’s always a temptation to remove imperfection, but often if we reduce the effect slightly, the result – while still flattering – is more authentic. In this tutorial we’ll show you how to make effective, but subtle, enhancements to a face; from removing tiny imperfections to reducing bags under eyes.
• Read more: 100 Photoshop tips
We’ll come across a few retouching tools, like, the Healing tools, which remove problem areas for you. Then there’s filters and Adjustment Layers that can work wonders over eyes and skin.
We’ve also supplied a set of Retouching Actions among the files here. These are a recorded set of commands you can play on your own portraits. The person in the photo will be thank you for making them look their best, without looking unnatural!
01 Retouch spots
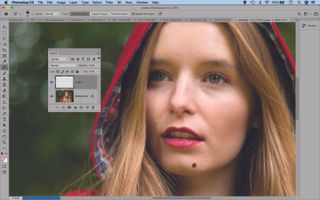
Open your portrait in Photoshop, go to the Layers panel (Window > Layers) and click the new layer icon. Get the Spot Healing Brush from the tools panel and check ‘Sample All Layers’ in the tool options. Use a brush to paint over spots, stray hairs and blemishes.
02 Soften lines
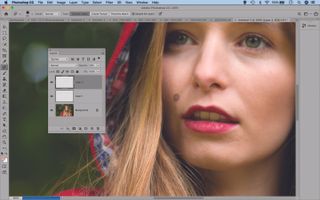
Make another new layer. This time go to the layer opacity slider in the Layers panel and set it to 50%. Use the Spot Healing brush to paint over lines, wrinkles and any other areas that stand out. This will soften, but not completely remove them.
03 Sample a color
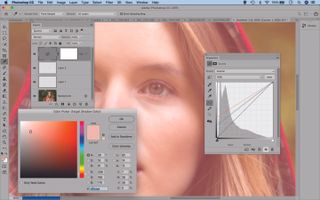
Click Create Adjustment Layer, choose Curves. Click the Curve thumbnail in the Layers panel to deselect it then double-click the Curves black point eyedropper to get a color box. Pick a skin tone from the cheek. Hit OK, then click on the eye bag to fix darker tones.
04 Tone down eye bags
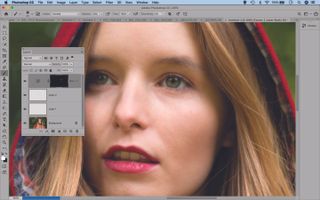
Go to the Layers panel and highlight the white mask thumbnail on the Curves layer, then press Cmd/Ctrl + I. Get the Brush tool, hit D to set color to white and 3 for 30% opacity, then paint over the eye bags to lift them. Do the same over other shadows on the skin.
05 Play the action
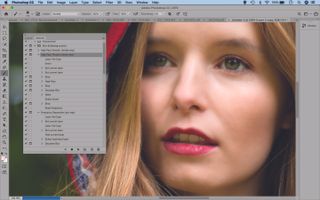
Double-click the retouching_actions.atn file, then go to the Actions panel (Window > Actions) select the ‘High Pass Texture’ action and play it. Follow the instructions, then grab the Brush tool and hit 3 for 30% opacity and paint the skin to reveal the effect.
06 Lift the skin
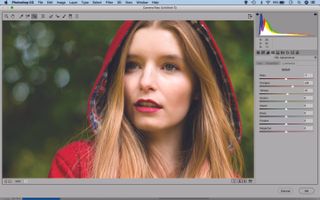
Press Cmd/Ctrl + Shift + Alt + E to merge a copy of the layers, go to Filter > Camera Raw Filter for tweaks. Grab the Targeted Adjustment tool, right-click and choose Luminance, then drag over the skin. Go to the Basic panel and boost contrast and saturation.
PhotoPlus: The Canon Magazine is the world's only monthly newsstand title that's 100% devoted to Canon, so you can be sure the magazine is completely relevant to your system.
Read more:
The best photo editing software: image editors for novices through to pros
The best photo-editing laptops: top laptops for photographers
10 best online photography courses – from beginner guides to masterclasses
Get the Digital Camera World Newsletter
The best camera deals, reviews, product advice, and unmissable photography news, direct to your inbox!
The lead technique writer on Digital Camera Magazine, PhotoPlus: The Canon Magazine and N-Photo: The Nikon Magazine, James is a fantastic general practice photographer with an enviable array of skills across every genre of photography.
Whether it's flash photography techniques like stroboscopic portraits, astrophotography projects like photographing the Northern Lights, or turning sound into art by making paint dance on a set of speakers, James' tutorials and projects are as creative as they are enjoyable.
He's also a wizard at the dark arts of Photoshop, Lightroom and Affinity Photo, and is capable of some genuine black magic in the digital darkroom, making him one of the leading authorities on photo editing software and techniques.


