Lightroom series part 4: How to correct lens distortion with Lightroom
Even the very best lens can produce a misshapen image, but Lightroom can easily help you remove the effects

Modern camera lenses are amazing, but they're not perfect. Zoom lenses especially can introduce barrel distortion or pincushion distortion and other aberrations. But while it's almost impossible to correct all of these aberrations optically, at least at prices we can afford, Lightroom can correct lenses digitally... and in this instalment we explain how.
If you are already a Lightroom user, you could discover some new tricks and processes you haven't tried yet. If you don't use Lightroom, then scroll down to the bottom where you'll discover how to get it and which Adobe Photography Plan is best.
Note: This article was written at a time when Lightroom's lens corrections were still in their infancy. They are now far more advanced, but while some of panels and interface elements may have changed, the principles are the same.
There is no such thing as a perfect lens. While lens technology has come on in leaps and bounds, lenses can still suffer from barrel or pincushion distortion.
Barrel distortion bends everything outwards, like it’s all being blown up like a drawing on a balloon. Pincushion looks like you’re pushing the image inwards, exactly like a pin in a cushion. Moustache distortion is much more complex, and considerably harder to fix.
Adobe’s solution to this has been to create maps of the distortion on a lens-by-lens basis. These maps are called Lens Correction Profiles. Generally each new release of Lightroom adds more profiles. By now, almost every mainstream camera lens is supported.
• See more Lightroom tutorials
Enable profile corrections
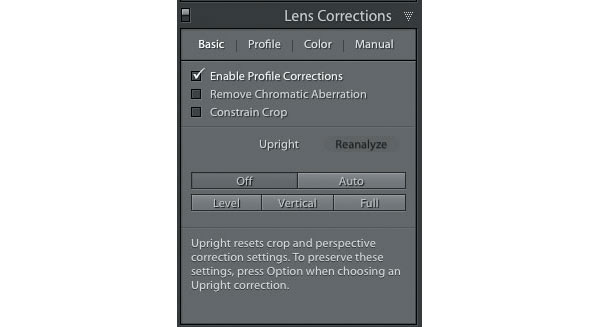
In the Lens Corrections Panel, tick the Enable Profile Corrections checkbox to automatically apply an available profile. Lightroom will load in the profile and the Lens, Model and Profile dropdown menus in the process. Our example uses a fisheye lens, where the extent of the correction is dramatic.
Mirrorless camera corrections
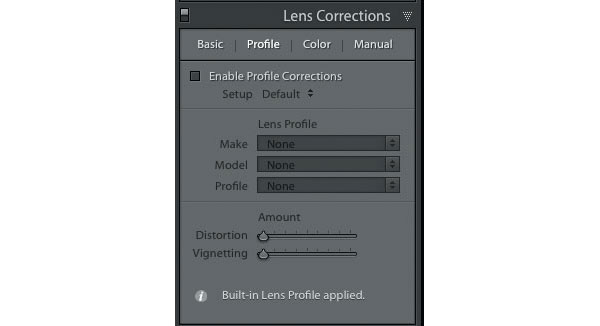
If you use a mirrorless camera like a Fujifilm, an Olympus or a Panasonic, you won’t see profiles for your system lenses. This is because Lightroom has internal profiles, made in conjunction with the camera makers, that are applied automatically.
Set a default
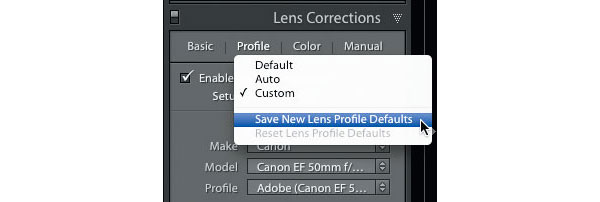
You can make Lightroom remember the lens and model you choose when it sees a file with metadata that matches the current one. Do this by clicking the Setup drop-down menu and choosing Save New Lens Profile Default.
Tweaking the tools
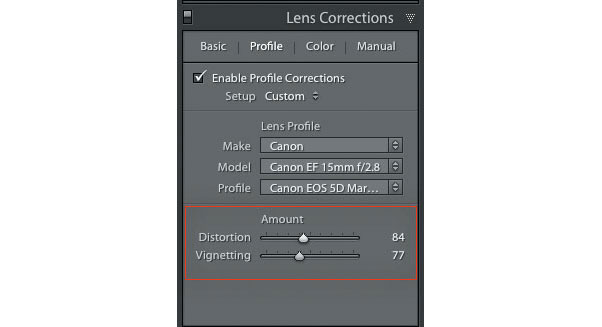
If you find that the level of distortion correction or even the vignette is wrong, you can adjust the effect with the Distortion and Vignetting sliders. By default they’re at 100 (as in 100% of the correction applied). Reduce the amount to reduce the distortion or vignetting or increase to apply more.
No profile detected?
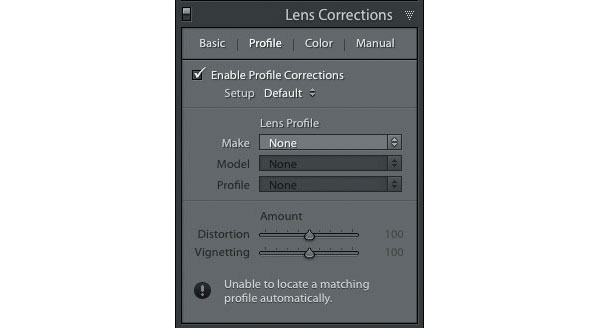
If Lightroom hasn’t detected a profile, you can choose one. This happens when Lightroom can’t match a lens profile to the lens metadata. Click the first menu and select the make and model of the lens.
About Digital Camera magazine
This tutorial originally appeared in Digital Camera Magazine, the monthly newsstand magazine for all photographers. Why not subscribe to a print edition, and have the magazine delivered direct to your door every month?
Alternatively, we have a number of different digital options available, including:
• Apple app (for iPad or iPhone)
• Zinio app (multi-platform app for desktop or smartphone)
• PocketMags (multi-platform app ideal for Android devices)
• Readly (all-you-can-eat digital magazine subscription service)
If you wanted a printed version of any of our most recent issues we have a selection of back issues to choose from in our online store.
How to get Adobe Lightroom
Adobe Lightroom is available in two versions: the regular Adobe Lightroom Classic CC designed for desktop users, which is what we cover in this series, and a new cloud-based Adobe Lightroom CC, which stores your files online and offers a similar but reduced set of features. For regular desktop users we recommend Adobe Lightroom Classic CC.
Adobe offers three subscription based Photography Plans which you can click on below. We recommend either the regular Photography Plan, or the Photography Plan (1TB) which costs more but comes with 1TB online storage in case you decide to go with Lightroom CC.
For this set of tutorials and for anyone who likes to work on a single main computer, we recommend the regular Creative Cloud Photography Plan. This is the cheapest way to get started AND it comes with Photoshop CC too.
Read more:
• This is the best photo-editing software today
• These are the best laptops for photographers right now
• We help you choose the best desktop computers for photo editing
Get the Digital Camera World Newsletter
The best camera deals, reviews, product advice, and unmissable photography news, direct to your inbox!
Sean McCormack is a commercial, and editorial photographer, book author, and regular contributor to Digital Camera magazine based in Galway, Ireland. He has extensive experience with Lightroom, dating back to its original beta version, and has tried out just about every plugin and preset available. His latest book is Essential Development 3: 25 Tips for Lightroom Classic’s Develop Module.

