RAW editing with Affinity Photo
See how to enhance landscapes with Affinity Photo's powerful RAW editing tools
Watch video: Affinity Photo's Develop Persona
Start here
• Affinity Photo tutorials
The tutorials
1. Affinity Photo vs Photoshop
2. RAW editing with Affinity Photo
3. Focus merge with Affinity Photo
4. Replace a sky in Affinity Photo
5. Moody mono in Affinity Photo
6. Six Affinity Photo landscape tips
7. Color correction in Affinity Photo
8. Live Filters in Affinity Photo
9. Create a classic wet plate look
10. Remove objects in Affinity Photo
11. Paint an abstract portrait
12. Enhance skintones in Affinity Photo
13. Create HDR in Affinity Photo
14. Replace a sky in Affinity Photo
15. Affinity Photo double exposures
16. Affinity Photo Denoise tool
Sometimes a scene might seem disappointing, only to reveal hidden delights in post. I headed to this beach in South Wales with high hopes, only to be met with flat light, grey skies and relentless drizzle. I didn’t hold out much hope for the Raws after viewing them on the back of the camera. But after opening them into Affinity Photo, I realized I may be wrong.
Read more: Affinity Photo 1.8 review
This is often the case with Raw files – they hold more detail than you think. The trick is knowing how to tease out the details. Affinity Photo offers all the tools we need to perform some much needed edits. We can enhance tones, convert to mono and apply sharpening. There’s also powerful Overlay Paint and Gradient tools to carry out selective adjustments.
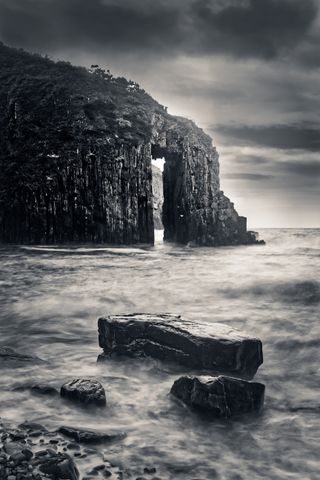
The Affinity Raw workflow: Develop Persona
The Raw editor in Affinity Photo is called the Develop Persona. When we open a Raw file it switches to this, but if you want to edit a JPEG, or any pixel layer in your document, you’re also able to open the Develop Persona and use the Raw tools within.
If you’re making the switch from Photoshop to Affinity Photo then the Raw workflow is slightly different. In Photoshop, you make Raw adjustments in Camera Raw before opening the image into Photoshop. The Raw edits are saved as XMP ‘sidecar’ files alongside the original files.
In Affinity Photo the Develop Persona is integrated into the main editor; there’s no Raw plugin. Once Raws are edited, you click ‘Develop’ to ‘bake in’ the adjustments. Unlike Photoshop there’s no Raw sidecar data. It makes it trickier to copy edits from one photo to another, although you can create presets for each of the Develop Persona’s panels.
Here's how to enhance scenes with the Develop Persona…
01 Crop and darken
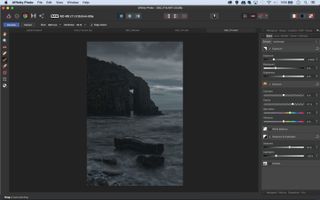
Grab the Crop tool, set Mode: Original Ratio in the tool options, then drag to crop the photo. Next go to the Basic panel. Lower the exposure to darken the image, revealing detail in the sky, then check Shadows/Highlights and lift the Shadows. Increase the Clarity to enhance the textures.
02 Lift the cliffs
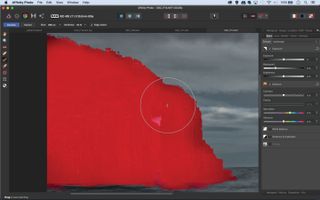
Grab the Overlay Paint tool and check ‘Edge Aware’ in the tool options at the top, then paint over the cliffs. If the brush messes up, switch to the Overlay Erase tool to remove areas. Go to the Basic panel and set Exposure 1, Blackpoint 3%, Brightness 24%, Contrast 30%.
03 Lighten the gap
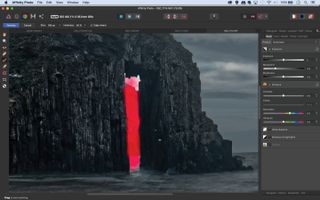
Go to the Overlays panel on the right and click the new Paint Overlay icon at the bottom. Use the Overlay Paint tool to paint over the gap in the cliffs, then go to the Basic panel and lift Exposure and Shadows to lighten the area, creating greater contrast with the cliffs in front.
04 Boost the sea

Use the Overlay Gradient tool, set Mode: Linear in the tool options, then drag down from the top of the frame to add a gradient to the sky. Then go to the Basic panel and lower the Exposure to darken. Next add a new Overlay Paint adjustment, then paint over the sea and lighten the area.
05 Apply color toning

Go to the Overlays panel and click on ‘Master’ then go to the Tones panel. Check ‘Curve’ and plot an S-shape curve line as shown to boost the contrast. Next check Black and White and Split Toning, then choose colors for the highlights and shadows as shown.
06 Reduce noise
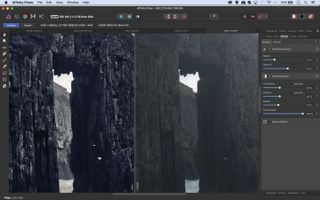
Go to the Details panel, check Detail Refinement and use the sliders to apply sharpening. Increase the Noise Reduction Luminance slider to remove noise. A before/after split view can be helpful (click the circle icon at the top). Once done, click the Develop button at top left.


About N-Photo magazine
This tutorial originally appeared in N-Photo, the monthly newsstand magazine for Nikon photographers. Why not subscribe to a print edition, and have the magazine delivered direct to your door every month?
Alternatively, we have a number of different digital options available, including:
• Apple app (for iPad or iPhone)
• Zinio app (multi-platform app for desktop or smartphone)
• PocketMags (multi-platform app ideal for Android devices)
• Readly (all-you-can-eat digital magazine subscription service)
If you wanted a printed version of any of our most recent issues we have a selection of back issues to choose from in our online store.
Read more:
• Photography tips and tutorial videos
• The best photo editing tools and accessories
• The best desktop computers for photo editing
• The best ultrawide monitors for photo editing
Get the Digital Camera World Newsletter
The best camera deals, reviews, product advice, and unmissable photography news, direct to your inbox!
N-Photo: The Nikon Magazine is a monthly publication that's entirely dedicated to Nikon users. As a 100% independent magazine, you can be assured of unbiased opinion from a trustworthy team of devoted photography experts including editor Adam Waring and Deputy Editor Mike Harris.
Aimed at all users, from camera newcomers to working pros, every issue is packed with practical, Nikon-specific advice for taking better photos, in-depth reviews of Nikon-compatible gear, and inspiring projects and exciting video lessons for mastering camera, lens and Photoshop techniques.
Written by Nikon users for Nikon users, N-Photo is your one-stop shop for everything to do with cameras, lenses, tripods, bags, tips, tricks and techniques to get the most out of your photography.
