How to capture creative autumn shots
Bag a bunch of creative shooting ideas this fall in this video tutorial
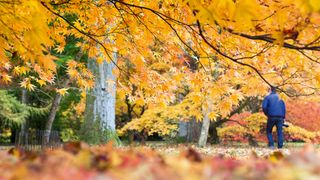
The transitional period between summer and winter is an outdoor photographer’s dream. Autumn's vibrant, warm colors and atmospheric sunlight, makes it the perfect season to explore nature with your camera.
While some photo projects require precision and concentration, you can easily combine the autumnal ideas in this guide with a family day out. And if you've got kids, why not get them involved too? Rather than nailing any timing or camera settings, the key for success here is to hone your creative eye and really consider the lighting in the environment.
We’ll be taking an abstract approach, and focusing on the golden hues and shapes rather than taking standard wide-angle landscape shots.

Max your aperture
To get started, you don’t need any fancy or specific kit. Our 50mm lens always does a fantastic job whenever we want to capture something that’s a little bit outside the norm. By throwing it open to the widest maximum aperture of f/1.8 for example, we were able to look up through the leaf canopy and focus manually somewhere in the foliage. Working with a fixed focal length generally forces you to reconsider what makes a good composition, so give it a go if you don’t usually.
The direction of the light is also key to getting stunning autumnal captures. For example, back-lighting enhances the luminant hues of autumn leaves, as the sunlight pierces through. For the most brilliant colours, try shooting towards the canopy into a bright sky.

Using a tripod is likely to be cumbersome, slow you down and hinder your spontaneity. This project is all about embracing your own creativity, and taking inspiration from the autumnal subjects surrounding you. Hopefully you’ll find handheld shooting freeing. Remember, abstract shots don’t have to be focussed perfectly to look gorgeous!
Fall fun with filters
This approach is less about getting technically perfect results. One of the biggest challenges here is throwing the idea of what makes a conventional shot out of the window. Force yourself to slow down, and try making use of manual focus to pull out different layers of the leaf.
We also had a play around with some warming filters: the Lee Filters Autumn tint set–in our shoot. There were three different coloured filters to choose from, and these gave our shots another level of warmth. The Autumn Tint Set makes the most of the rich golds, reds and browns that typify the Autumn season, and they can be used as both hard grads and standards in your scenes.
There’s plenty to keep you busy with this project, so don your boots and a scarf and get out in those crunchy leaves.
Read more: 6 ways to get the most out of your kit lens
What to look for
1. A good location

Obviously, you’ll need to visit an outdoor space with a variety of autumn foliage and colours to capture. We were lucky enough to spend a day at Westonbirt Arboretum, located in Gloucestershire, England. Local parks and wooded areas work too – just make sure you time your visit to coincide with the turning leaves.
2. Interesting light

Forests and parks are places of inherent contrast. Lighting also varies dramatically, both in terms of the weather and also depending on the thickness and height of the leafy canopy. Explore your location and look for interesting patterns, compositions and contrasts and created by a variety of leaves and trees.
3. A different viewpoint

Look up, down, all around you. If your camera has a vari-angle LCD screen, use it to get unusual compositions and perspectives. Live View should be turned on. We liked using a wide aperture and crouching down low to include out of focus leaves in the foreground.
4. Experimental methods

Now’s your chance to try some wacky techniques – the ones you’ve needed a good excuse for! Free-lensing (detaching the lens from the DSLR and angling it around in front as you shoot) gives charming light leaks. Panning your DSLR while using an exposure of 1/30 sec or longer works well too.
Read more: Bird photography: how to get better bird shots every time
Shooting tips for creative captures
1. Use live view

When you’re shooting at unusual angles or pointing the camera high into the trees, you’ll find it easier to shoot with Live View engaged rather than using the Viewfinder. Zoom in to the scene on the screen if you need to check the focal point of your images.
2. Look for subjects

Try shooting vivid subjects against contrasting backgrounds,such as a coloured berry against a plain green backdrop. You could also seek repetitive patterns and textures made by tree bark or piles of leaves. Look around your feet as well as at eye-level.
3. Aperture priority

As we were shooting handheld and moving around a lot, it made sense to put the camera into Av exposure mode. We selected a wide aperture of around f/1.8 and then let our DSLR set the shutter speed for us.
4. Use backlighting

For the dreamiest hues, aim to shoot towards the canopy into a bright sky. Because the bright light will cause your camera to underexpose the shot, dial in a positive exposure compensation of 1 stop.
5. Soft focusing

Your camera lens might struggle to focus on backlit scenes and dense layers of leaf canopy (ours did). Try switching to manual focus instead. The results are meant to be abstract, so it doesn’t matter so much if the focal point is unclear – use your artistic instinct.
6. Boost the hues

A few simple enhancements in Camera Raw can make all the difference to your final shots. Boost the Vibrancy levels, take the Blacks down, and then bump up the Contrast and Clarity levels. For our shot, this processing helped to bring out veins in the leaves.
Read more: Cheat sheet: How to take the perfect landscape shot
Add filters into the setup
1. Adapt your lens

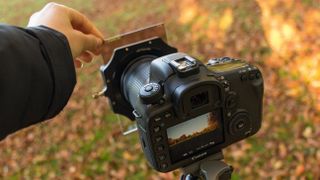
The Lee autumn filters fit into the 100mm system, so we needed a lens adaptor ring to match the thread size of our lens and a holder. Make sure you’ve got the right extras for the filters you choose. To start, screw the adaptor ring to the front of the lens, and then add on the holder.
2. Choose your filter

There are three filters here, and each gives a slightly different effect. The Chocolate filter accentuates autumn leaves and stones, the Coral is Pinkish and generally warming, and the Tobacco filter is the darkest and reddest of the three. Slide the filter into the holder.
3. Position the colour

Use Live View as you position the filter. Because the graduation line is placed 90mm from the top, the coloured portion is big enough to cover the whole scene. Raising the filter higher turns it into a grad, which suits scenes where there’s two definite subjects or a horizon line.
Read more:
147 tips and tricks to take photos of anything
How to get shallow depth-of-field effects with any camera
How to photography during the golden hour
Get the Digital Camera World Newsletter
The best camera deals, reviews, product advice, and unmissable photography news, direct to your inbox!

Lauren is a writer, reviewer, and photographer with ten years of experience in the camera industry. She's the former Managing Editor of Digital Camera World, and previously served as Editor of Digital Photographer magazine, Technique editor for PhotoPlus: The Canon Magazine, and Deputy Editor of our sister publication, Digital Camera Magazine. An experienced journalist and freelance photographer, Lauren also has bylines at Tech Radar, Space.com, Canon Europe, PCGamesN, T3, Stuff, and British Airways' in-flight magazine. When she's not testing gear for DCW, she's probably in the kitchen testing yet another new curry recipe or walking in the Cotswolds with her Flat-coated Retriever.