Home photography ideas: High-end car photography on your driveway!
Shoot studio quality images of your car with the help of Photoshop, a couple of flashes and an old clip frame
Watch video: Home photography ideas – High-end car photography at home
Photography projects at home
• Home photography ideas
Useful home photography kit
• Best tripods
• Best lighting kits
• Best reflectors
• Best macro lenses
You've probably spent a lot of time washing your car during the current lockdown, but it's tough to show off your wheels when you can't leave the house. And unless you live in a mansion, taking a photo of your car parked outside your front door doesn't show it off to its best.
So here's a brilliant home project you can shoot right on your driveway, and create a high-quality studio look that's right out of a car catalogue – but without needing to go to a studio or use stacks of complicated studio gear!
• Best camera for car photography
Enter two of an enthusiastic photographer’s most transformative tools: Photoshop and flash lighting. By lighting the car with flash, we’re able to overpower the natural light so that it plays a minimal role in the exposure, which gives us the dark moody look we want.
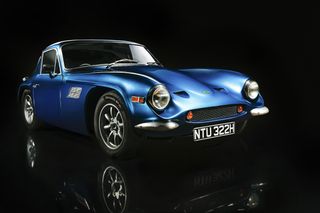
Ideally this would be achieved by using a huge bank of flash units in unison, but for most of us that’s just not a realistic option. So this is where the Photoshop part comes in.
By using a tripod to keep the camera still, we have the freedom to take multiple frames and then blend them together afterwards in Photoshop. As such, we don’t necessarily need an arsenal of lights all at once to get the studio look; we can simply use one or two, then light the car one section at a time over a series of shots.
It also means that we can create a subtle reflection with a single piece of reflective board, again by moving it into different positions over a series of shots. Let's take a look at how it’s done…
Lighting the car
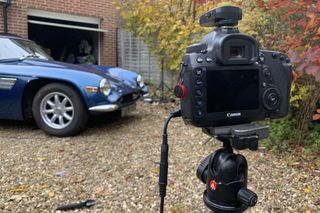
01 Set an exposure
After setting the camera up on a tripod, composing and focusing on the car, we work out a manual exposure that underexposes the natural light, so it barely registers. On an overcast day here we had 1/200 sec and f/11, ISO100, giving a near-dark image. Shooting at around 35mm will enable you to fit the car into frame without too much distortion; a 16-35mm zoom will be able to accommodate you with however much space you have to work with.
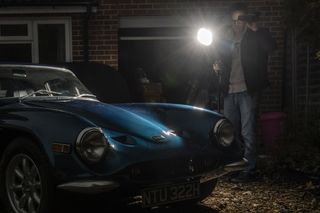
02 Fire the flash
Next we set up a single studio flash, powered through the mains. The flash is set to optical slave, triggered wirelessly and set to full power (400w). By popping the flash at different angles we can pick out various parts of the car and emphasize the flowing lines.
• Best photography lighting kits
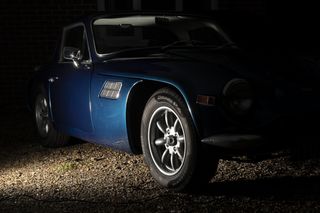
03 Move the flash
Try lighting the car from all angles with the flash. Experiment with backlighting from behind the car in order to highlight the edges and the curves. Direct the flash at specific areas like the wheels and grill. Take lots of shots and hold the light up high or down low.

04 Capture the reflection
Once we’ve lit the car, we start the reflection. We place two studio lights on either side to light the sides and lower section of the car, then take several frames, moving the reflective board around between shots to capture a complete reflection.
Build the image in Photoshop

PhotoPlus: The Canon Magazine is the world's only monthly newsstand title that's 100% devoted to Canon, so you can be sure the magazine is completely relevant to your system.
01 Load into layers
After picking the frames we want, we open them up as a layered document in Photoshop. This can be done by selecting the files in Bridge, then going to Tools>Photoshop>Load into Layers, or in Photoshop by using File>Scripts>Load Files into Stack.

02 Add a mask
Choose a shot to use as a base and drag it to the bottom of the stack, then hide all but the layer above. Toggle this layer on and off to determine the lit area of the car that you want to blend, then hold Alt and click the Add Layer Mask icon to hide the layer behind a full black mask.

03 Reveal the lighting
Grab the Brush tool, right-click and set hardness to 0. Hit D to set the color to white then paint over the car to reveal the area of the image you want. Once done, reveal the next layer up, then add a full mask again and paint more white. Continue building up the light.

04 Build the reflection
Next we can piece together the reflection, by masking and revealing the pieces of the board until they form a complete reflection along the car. The layers will start to mount up, so it may be easier to build the reflection separately then copy it over once complete.
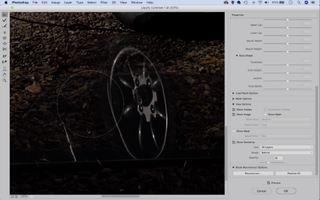
05 Liquify to fix
The gravel driveway here is uneven, so the reflection doesn’t match up in places. But this is easy to fix by nudging pixels with Liquify. Go to Filter>Liquify, then check ‘Show Backdrop’ in the settings and use the Forward Warp tool to tweak the reflections.

06 Tidy up
To make the backdrop black select the car (Select >Subject), then invert the selection (Cmd on a Mac / Ctrl on a PC +Shift+I), make a new layer and fill with black. To fix up any messy patches merge a layer (Cmd/Ctrl+Shift+Alt+E), then use the healing tools and clone tool to tidy up.
Read more:
A day in the life of professional car photographer Amy Shore
The best photography lighting kits in 2020: for studio, location and video
The best dash cam in 2020: constant protection for you and your car
Get the Digital Camera World Newsletter
The best camera deals, reviews, product advice, and unmissable photography news, direct to your inbox!
The lead technique writer on Digital Camera Magazine, PhotoPlus: The Canon Magazine and N-Photo: The Nikon Magazine, James is a fantastic general practice photographer with an enviable array of skills across every genre of photography.
Whether it's flash photography techniques like stroboscopic portraits, astrophotography projects like photographing the Northern Lights, or turning sound into art by making paint dance on a set of speakers, James' tutorials and projects are as creative as they are enjoyable.
He's also a wizard at the dark arts of Photoshop, Lightroom and Affinity Photo, and is capable of some genuine black magic in the digital darkroom, making him one of the leading authorities on photo editing software and techniques.


