How to photograph a classic still life at home
Learn how to photograph a classic still life at home using the rule of odds, color theory and a pop-up background
Watch video: How to photograph a classic still life at home
Still life is arguably one of the most accessible genres of photography. Even if you only have the best camera for beginners and the best travel tripod, you can capture stunning still life images. It’s also a great discipline if you’re new to photography or simply want to brush up on your core skills, because there’s really nowhere to hide.
The understated nature of items such as flowers and fruit means you’re not going to wow the viewer with the subject alone. How you arrange and light your subject is paramount and, since you’re working in a controlled environment, anything that isn’t tack-sharp and perfectly composed simply won’t do.
• Best camera for product photography
We set out to replicate the lighting used in classic still life paintings from artists such as Rembrandt and Caravaggio. A single light source allows you to create plenty of contrast between the highlights and shadows, and while you’re certainly welcome to use studio lighting, it isn’t essential.
We set up our still life next to a window on an overcast day to produce diffused side lighting. A plain sheet or wall will work as a backdrop, but we used a Lastolite Vintage Collapsible Background. Since our background is purple, we chose daffodils as our main subject. If you refer to the color wheel you’ll notice that yellow sits opposite to purple and is a complementary color.
Since we only had four daffodils to photograph, we added a dried rose to balance the composition according to the rule of odds. The shriveled rose contrasted to the freshly cut (or rather bought) daffodils, while referencing classic vanitas still life paintings.
Step by step: How to photograph a still life at home
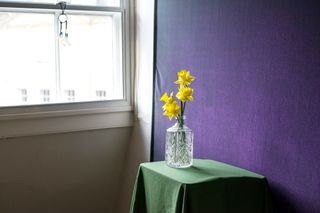
01. Window light
We set up next to a window on a cloudy day so our vase of flowers was lit from the left-hand side by diffused light. The result is a chiaroscuro-style lighting effect seen in classic still life paintings from artists such as Rembrandt. If you want a little more control over your lighting, try using a reflector or diffuser.

02. Backgrounds
We used a collapsible background from Lastolite (LL LB5722), but you could shoot against a plain wall or sheet of cloth. If you’re struggling to hang a sheet, try sewing a hair tie on each corner of the fabric, you can then loop them over objects such as picture hooks to hang your backdrop securely.
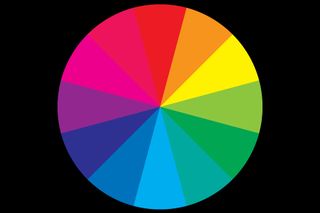
03. Wheel of fortune
Color is an important consideration when arranging a still life. Knowing that opposites on the color wheel are complementary, we chose to shoot yellow daffodils against our purple backdrop. The green cloth also complemented the red rose. You can edit colors independently using the HSL/Color panel in Adobe Lightroom.
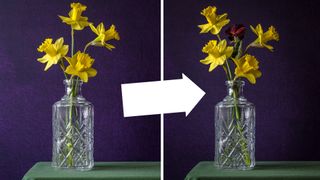
04. Play by the rules
We selected five flowers as our subjects. As you can see (right) an odd number of subjects makes for a more pleasing composition, as per the rule of odds. We wanted to position our flowers at different heights to help them fill the frame. This was achieved by using a pair of scissors to cut the stems to different sizes.
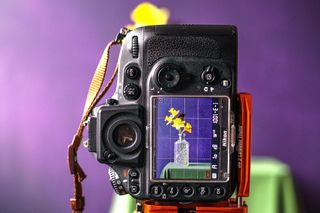
05. Use Live View
Set up your camera on a tripod. We used an L-bracket to secure our camera in portrait orientation. Use Live View to compose your shot, but don’t rely solely on bubble levels or your camera's virtual horizon; even if your camera is level, your subject might not be. We suggest using the grid overlay to line up your frame with your subject.
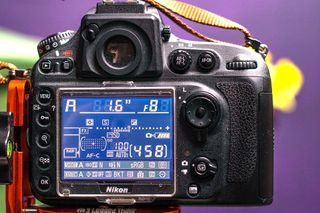
06. Camera settings
In Aperture Priority set the ISO to 100. We chose an aperture of f/8 to keep the subject sharp. To make the shot feel more like a classic still life, we added some negative exposure compensation to underexpose and create deeper shadows.
Read more:
Best large format printer for photographers
Photography tips
The best camera for beginners
The best travel tripod
Get the Digital Camera World Newsletter
The best camera deals, reviews, product advice, and unmissable photography news, direct to your inbox!

Mike is Digital Camera World's How To Editor. He has over a decade of experience, writing for some of the biggest specialist publications including Digital Camera, Digital Photographer and PhotoPlus: The Canon Magazine. Prior to DCW, Mike was Deputy Editor of N-Photo: The Nikon Magazine and Production Editor at Wex Photo Video, where he sharpened his skills in both the stills and videography spheres. While he's an avid motorsport photographer, his skills extend to every genre of photography – making him one of Digital Camera World's top tutors for techniques on cameras, lenses, tripods, filters and other imaging equipment – as well as sharing his expertise on shooting everything from portraits and landscapes to abstracts and architecture to wildlife and, yes, fast things going around race tracks...