Paint an abstract portrait in Affinity Photo using the powerful Brush tool
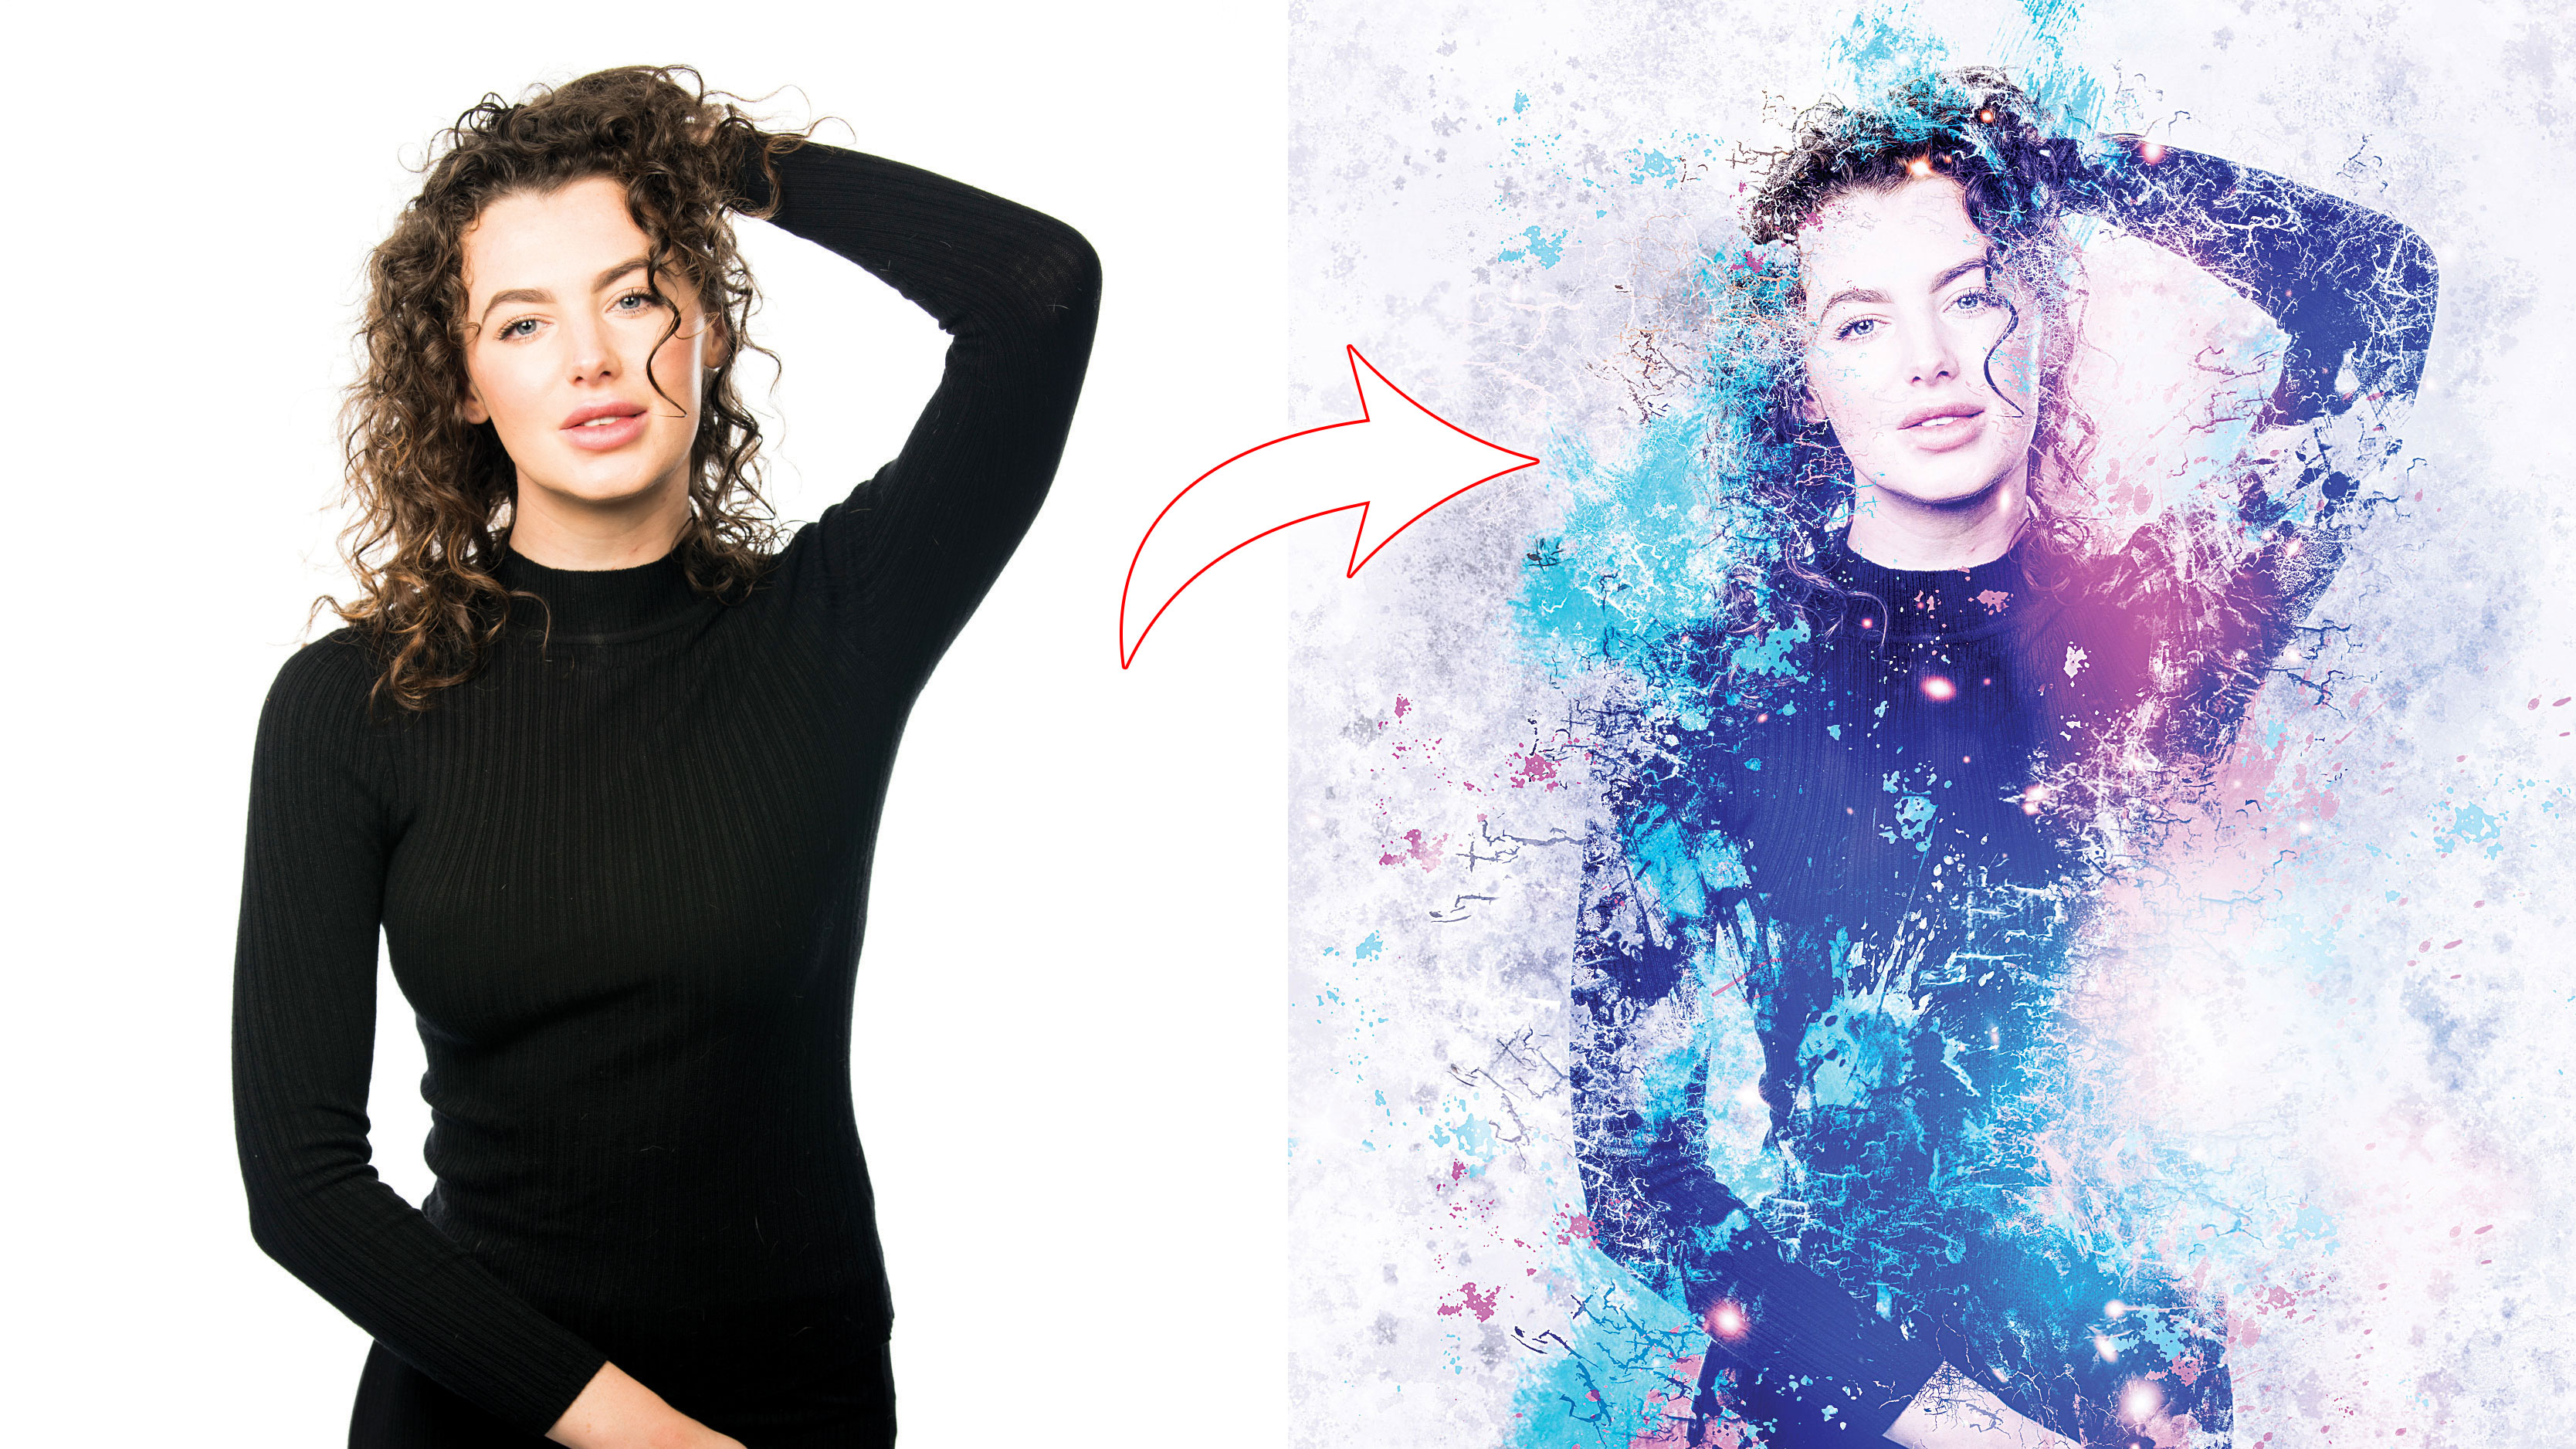
Use the powerful Affinity Photo Brush tool to create abstract portraits and many other striking image effects
Start here
• Affinity Photo tutorials
The tutorials
1. Affinity Photo vs Photoshop
2. RAW editing with Affinity Photo
3. Focus merge with Affinity Photo
4. Replace a sky in Affinity Photo
5. Moody mono in Affinity Photo
6. Six Affinity Photo landscape tips
7. Color correction in Affinity Photo
8. Live Filters in Affinity Photo
9. Create a classic wet plate look
10. Remove objects in Affinity Photo
11. Paint an abstract portrait
12. Enhance skintones in Affinity Photo
13. Create HDR in Affinity Photo
14. Replace a sky in Affinity Photo
15. Affinity Photo double exposures
16. Affinity Photo Denoise tool
Watch video: Create an abstract portrait in our Affinity Photo tutorial
Brushes in Affinity Photo go far beyond the standard circular brush most of us are probably familiar with. In some ways they even surpass what can be done in Photoshop. Firstly, there’s a wide array of different brush tips to choose from, including the excellent set of grunge brushes we’ve used for our scatter effect here. What’s more, brushes can be customized with a range of useful parameters like spacing, scattering and wet edge controls. You can have hours of fun simply by playing with all the settings.
But the options don’t stop there… You can also create your own brushes from any image or shape, like the colorful splashes in our portrait above (created using real-life ink splashes).
One of the best things about using brushes in Affinity is how the brush tip shows a preview of the stroke before you start painting – including any colour, opacity or blend settings applied – so you can see how each stroke will affect your image.
For this effect we start by isolating our subject with a layer mask, then paint both in front of and behind her on different layers of the canvas. We’ll paint on the layer mask too, which has the effect of eating away at certain parts of our subject’s figure.
Once done, we can use our ink splash brushes. To make your own, begin by isolating a shape on a transparent background, then export it as a PNG (see video for full details). Once done, you can head to the Brushes panel, click the top-right icon and choose ‘New Intensity Brush’ then load in the PNG.
Finally, we’ll make use of a star photo downloaded from the NASA images website, which is a fantastic source of amazing free photographs…
Read more:
Step 1: Select the subject
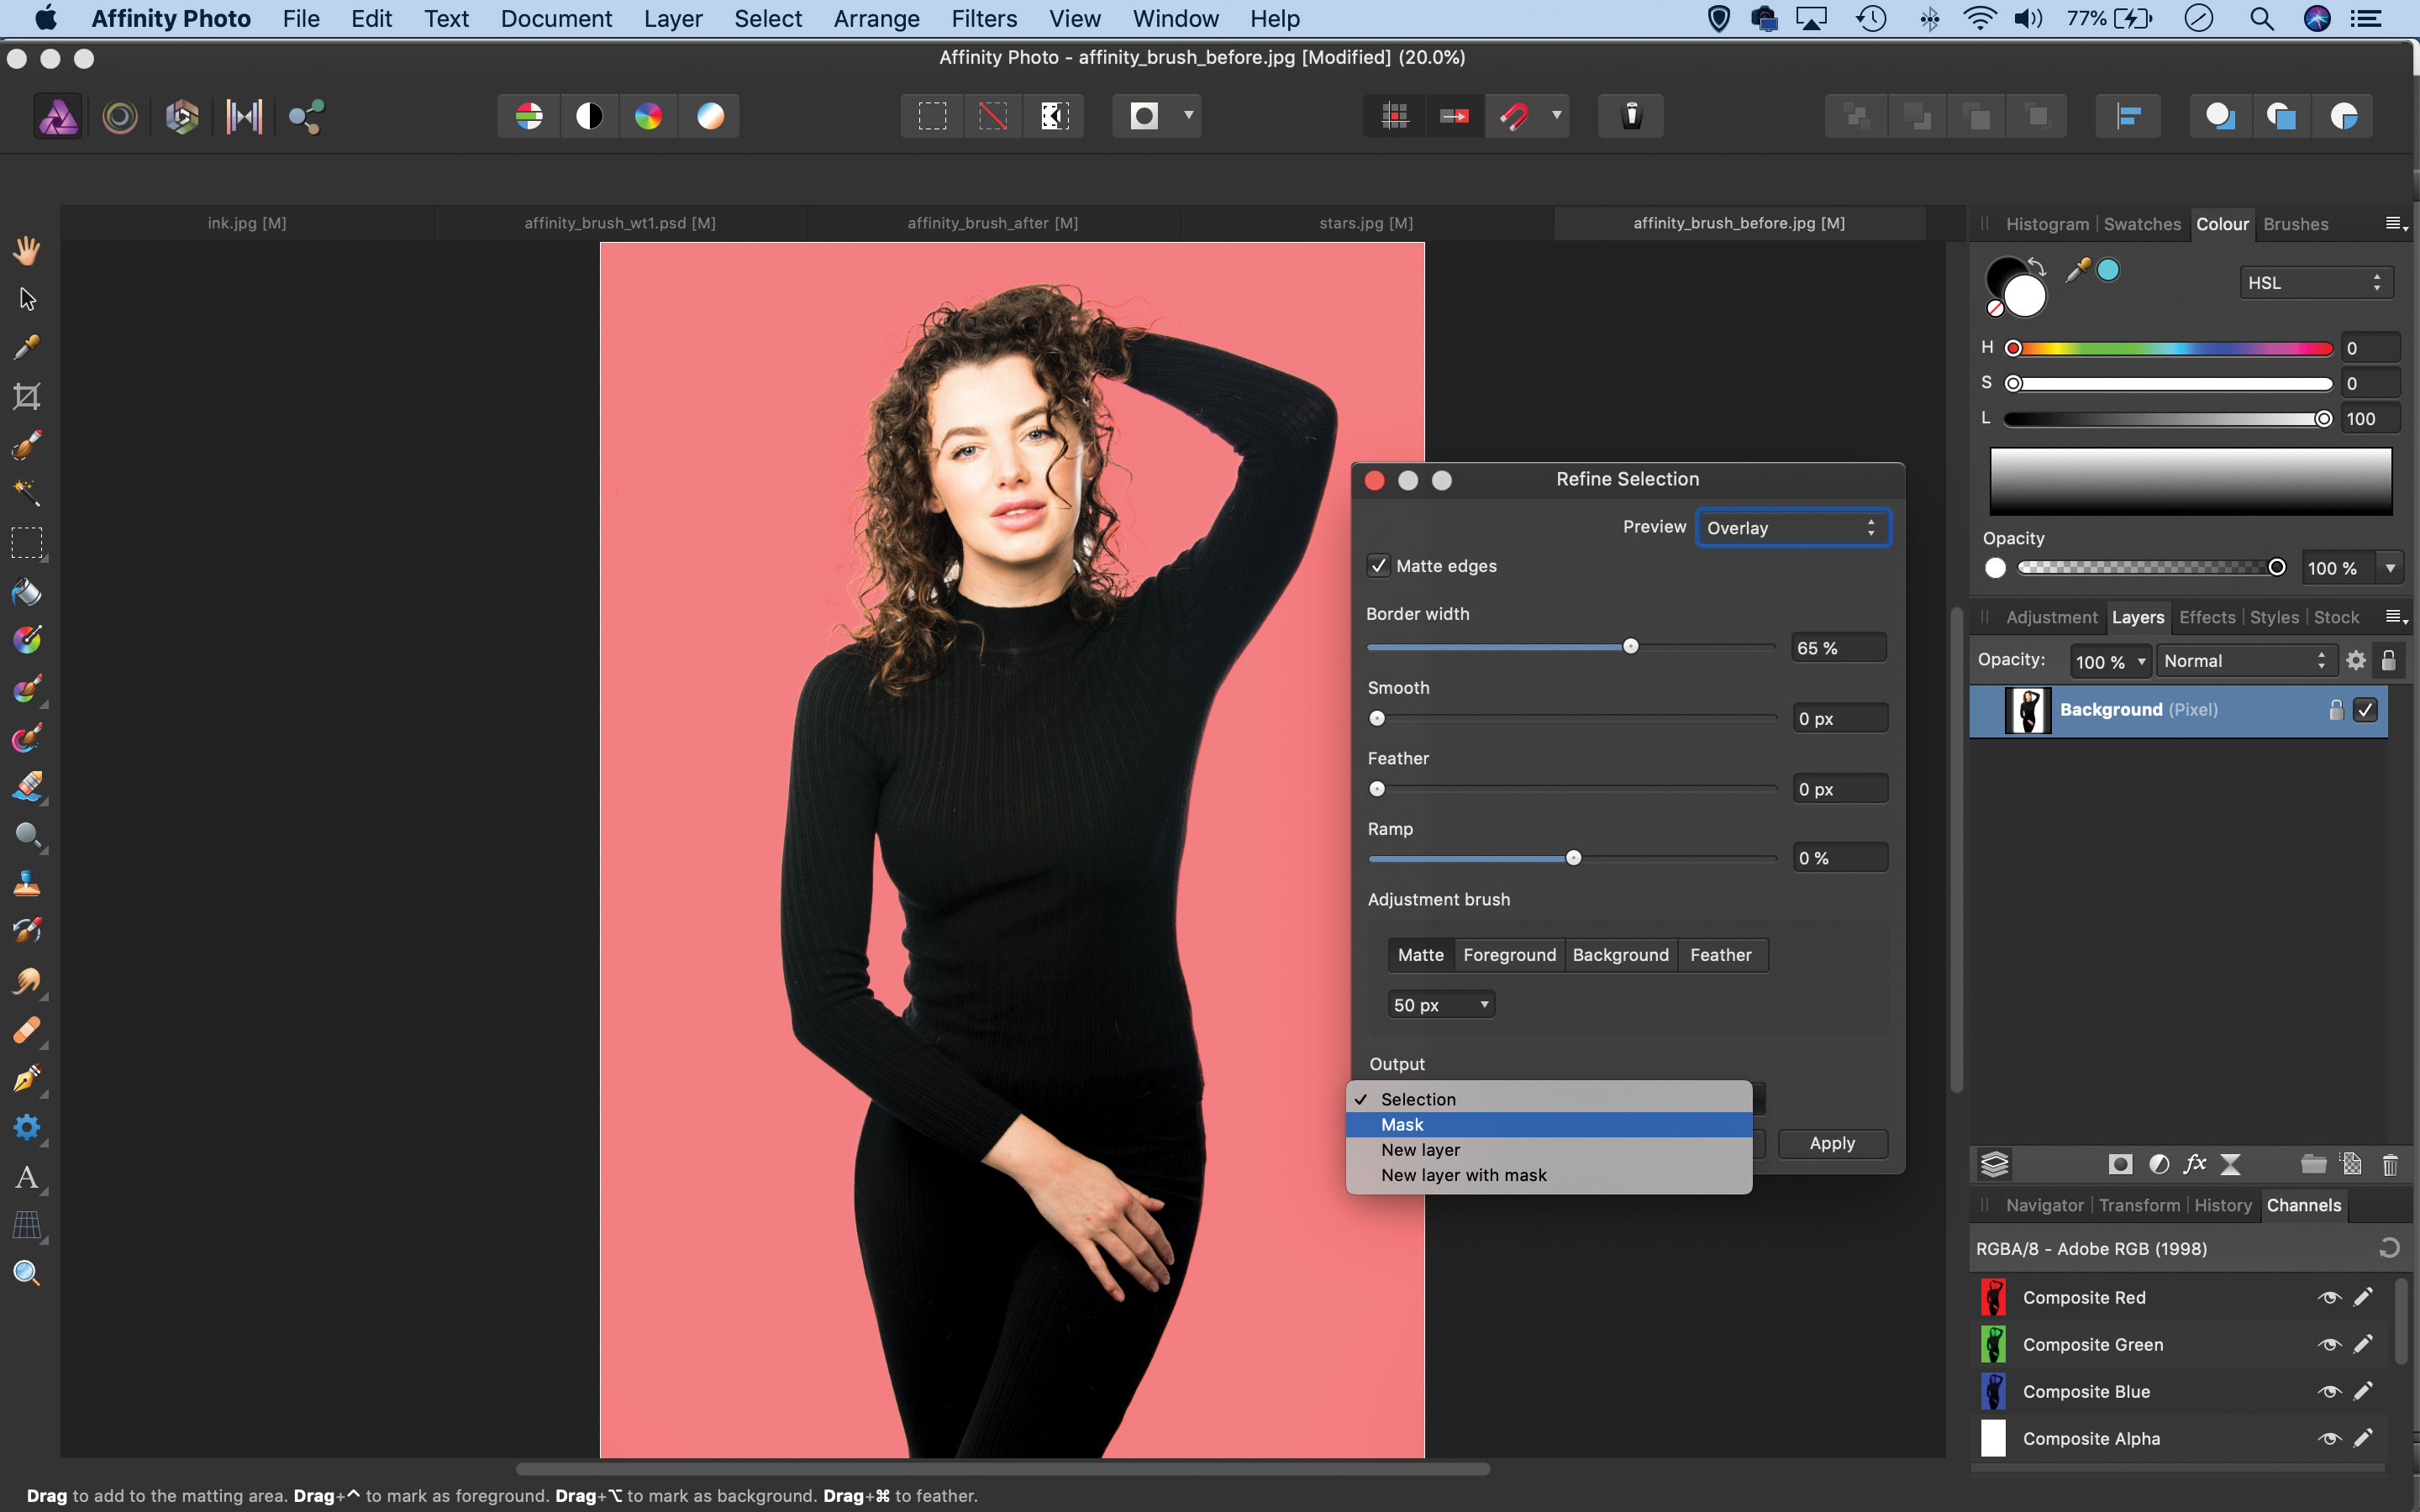
We've opened our portrait, then grabbed the Selection Brush from the Affinity toolbar and paint over the subject to select her. Next we go to Select > Refine Edges and increase the Border Width to refine the selection. We set Output: Mask and hit OK. Now we go to the Layers panel and click the Add Pixel Layer icon.
Step 2: Paint a texture
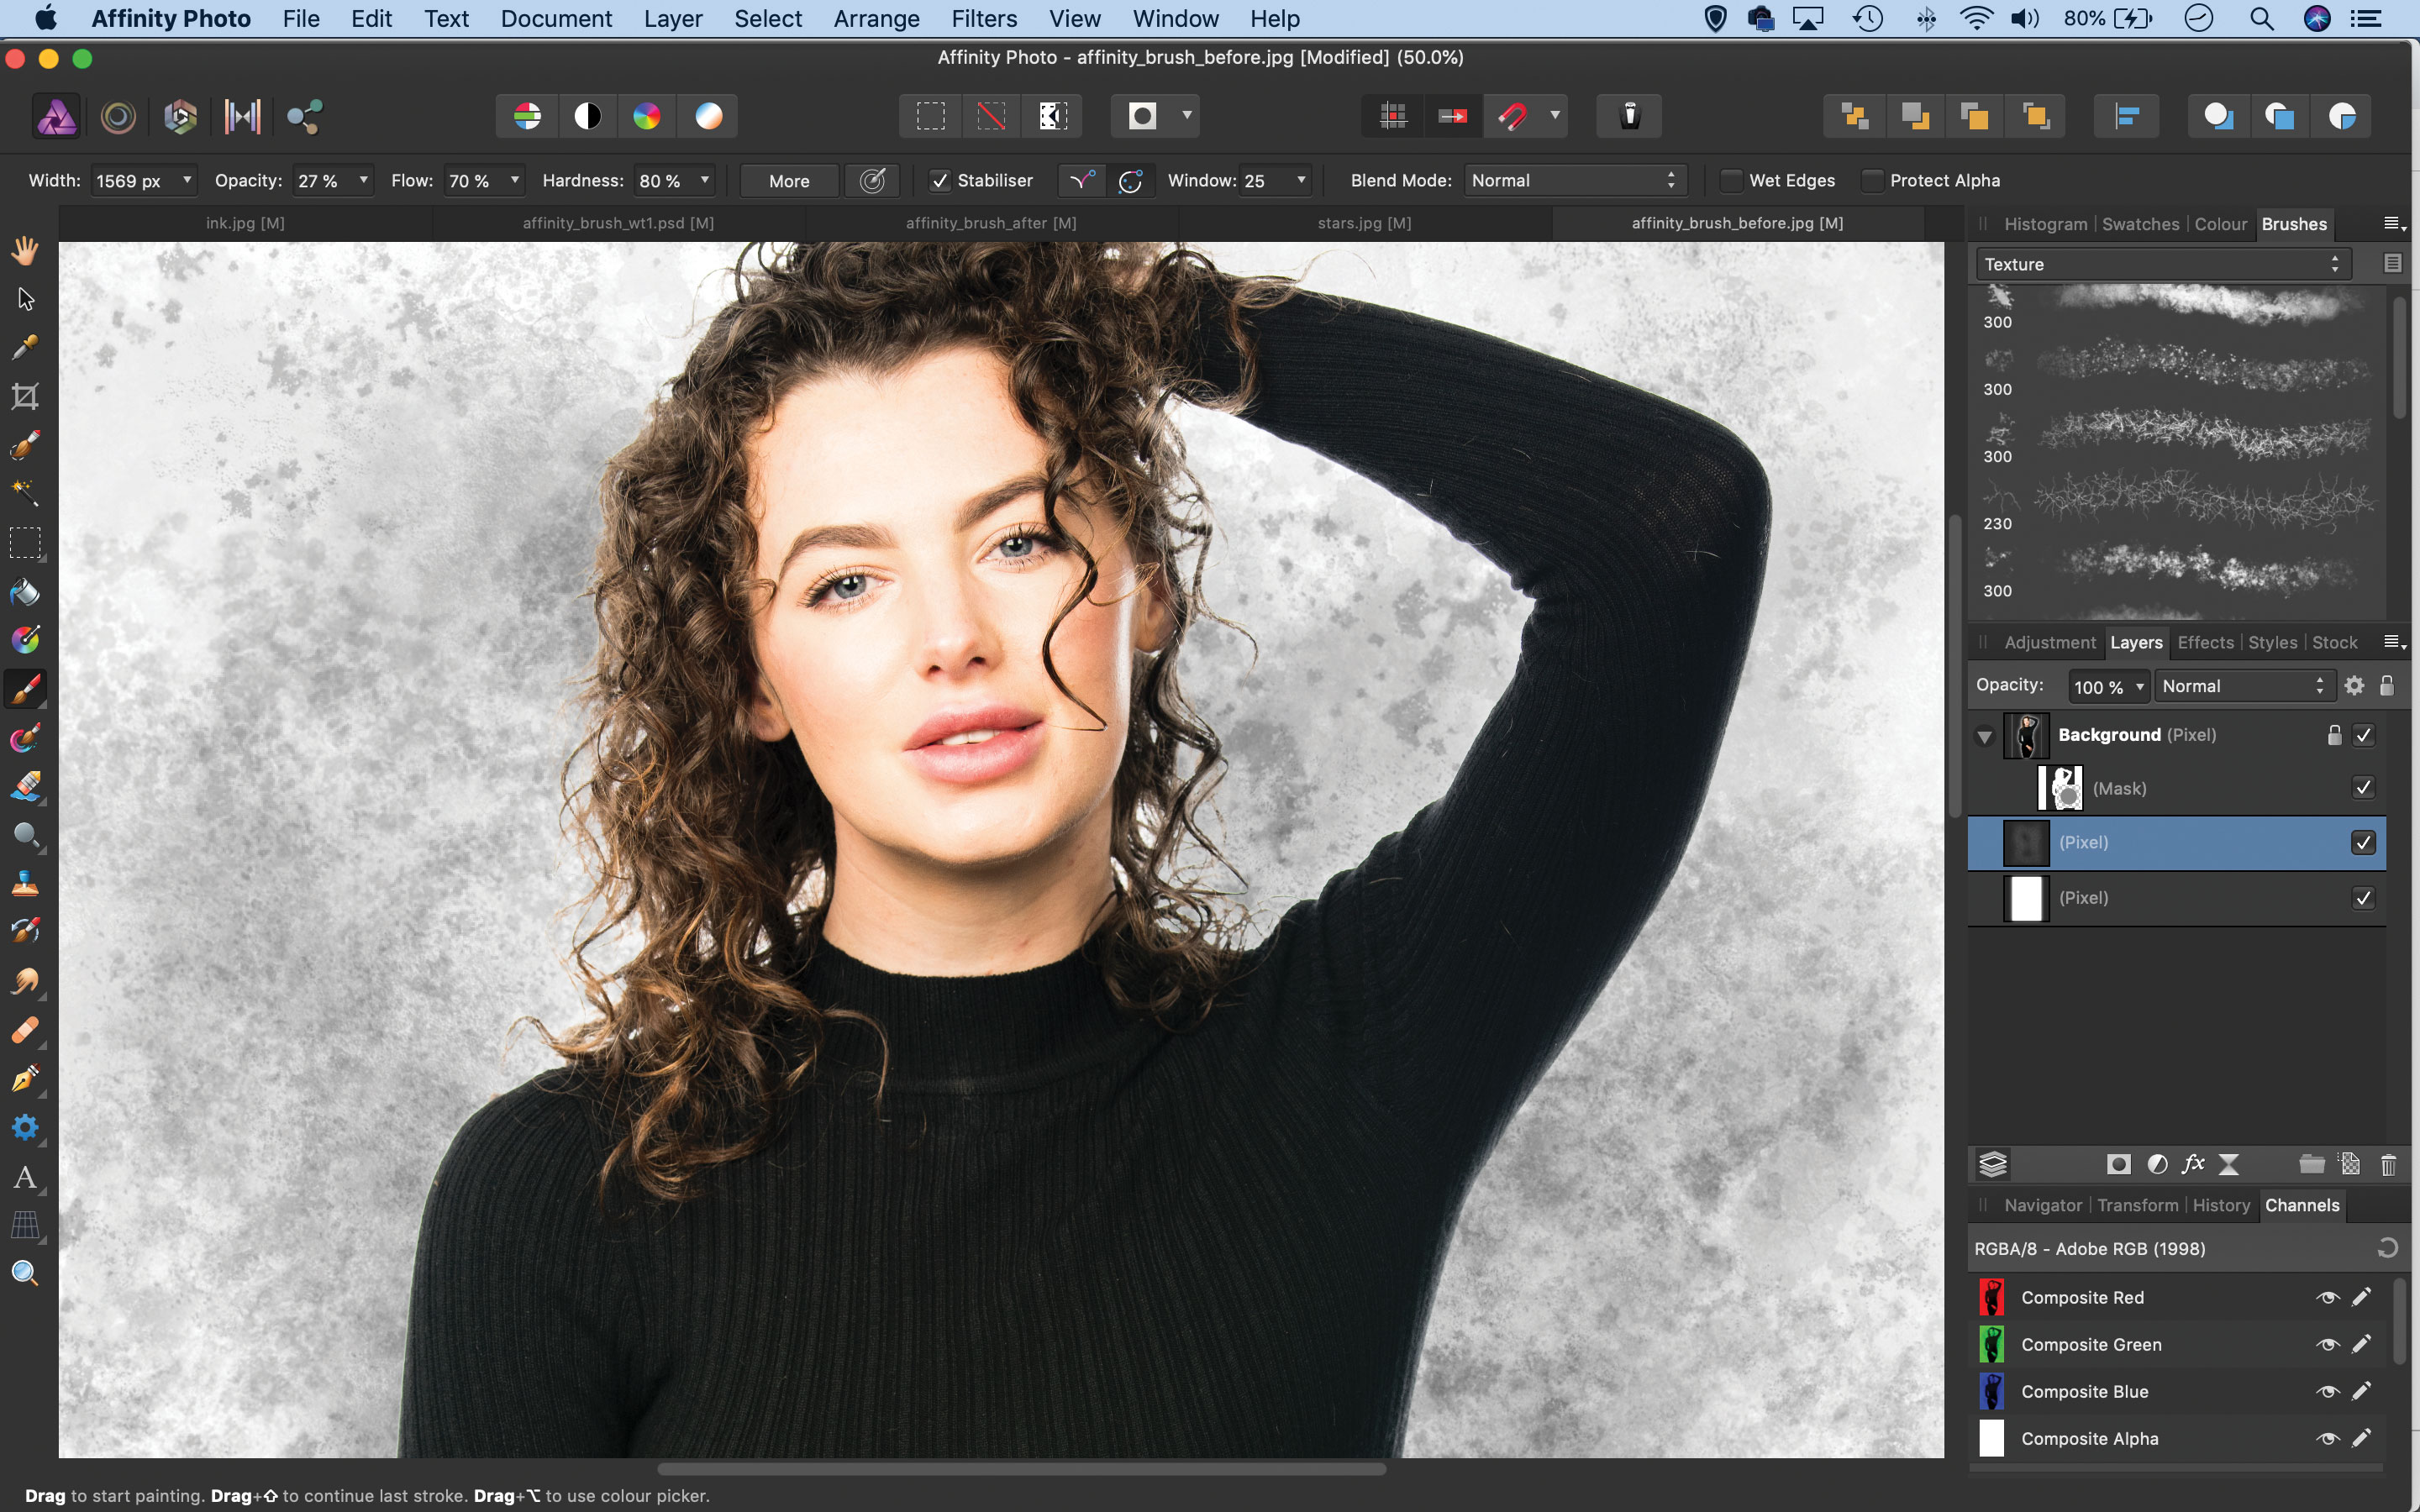
We drag the new layer to the bottom of the stack, then go to Edit > Fill and fill the layer with white. Next we make a new layer, go to the Brushes panel (View > Studio > Brushes), click the drop-down and choose Texture. Then we pick a brush, and choose a grey colour in the Color panel and paint over the layer.
Step 3: Rough up the mask
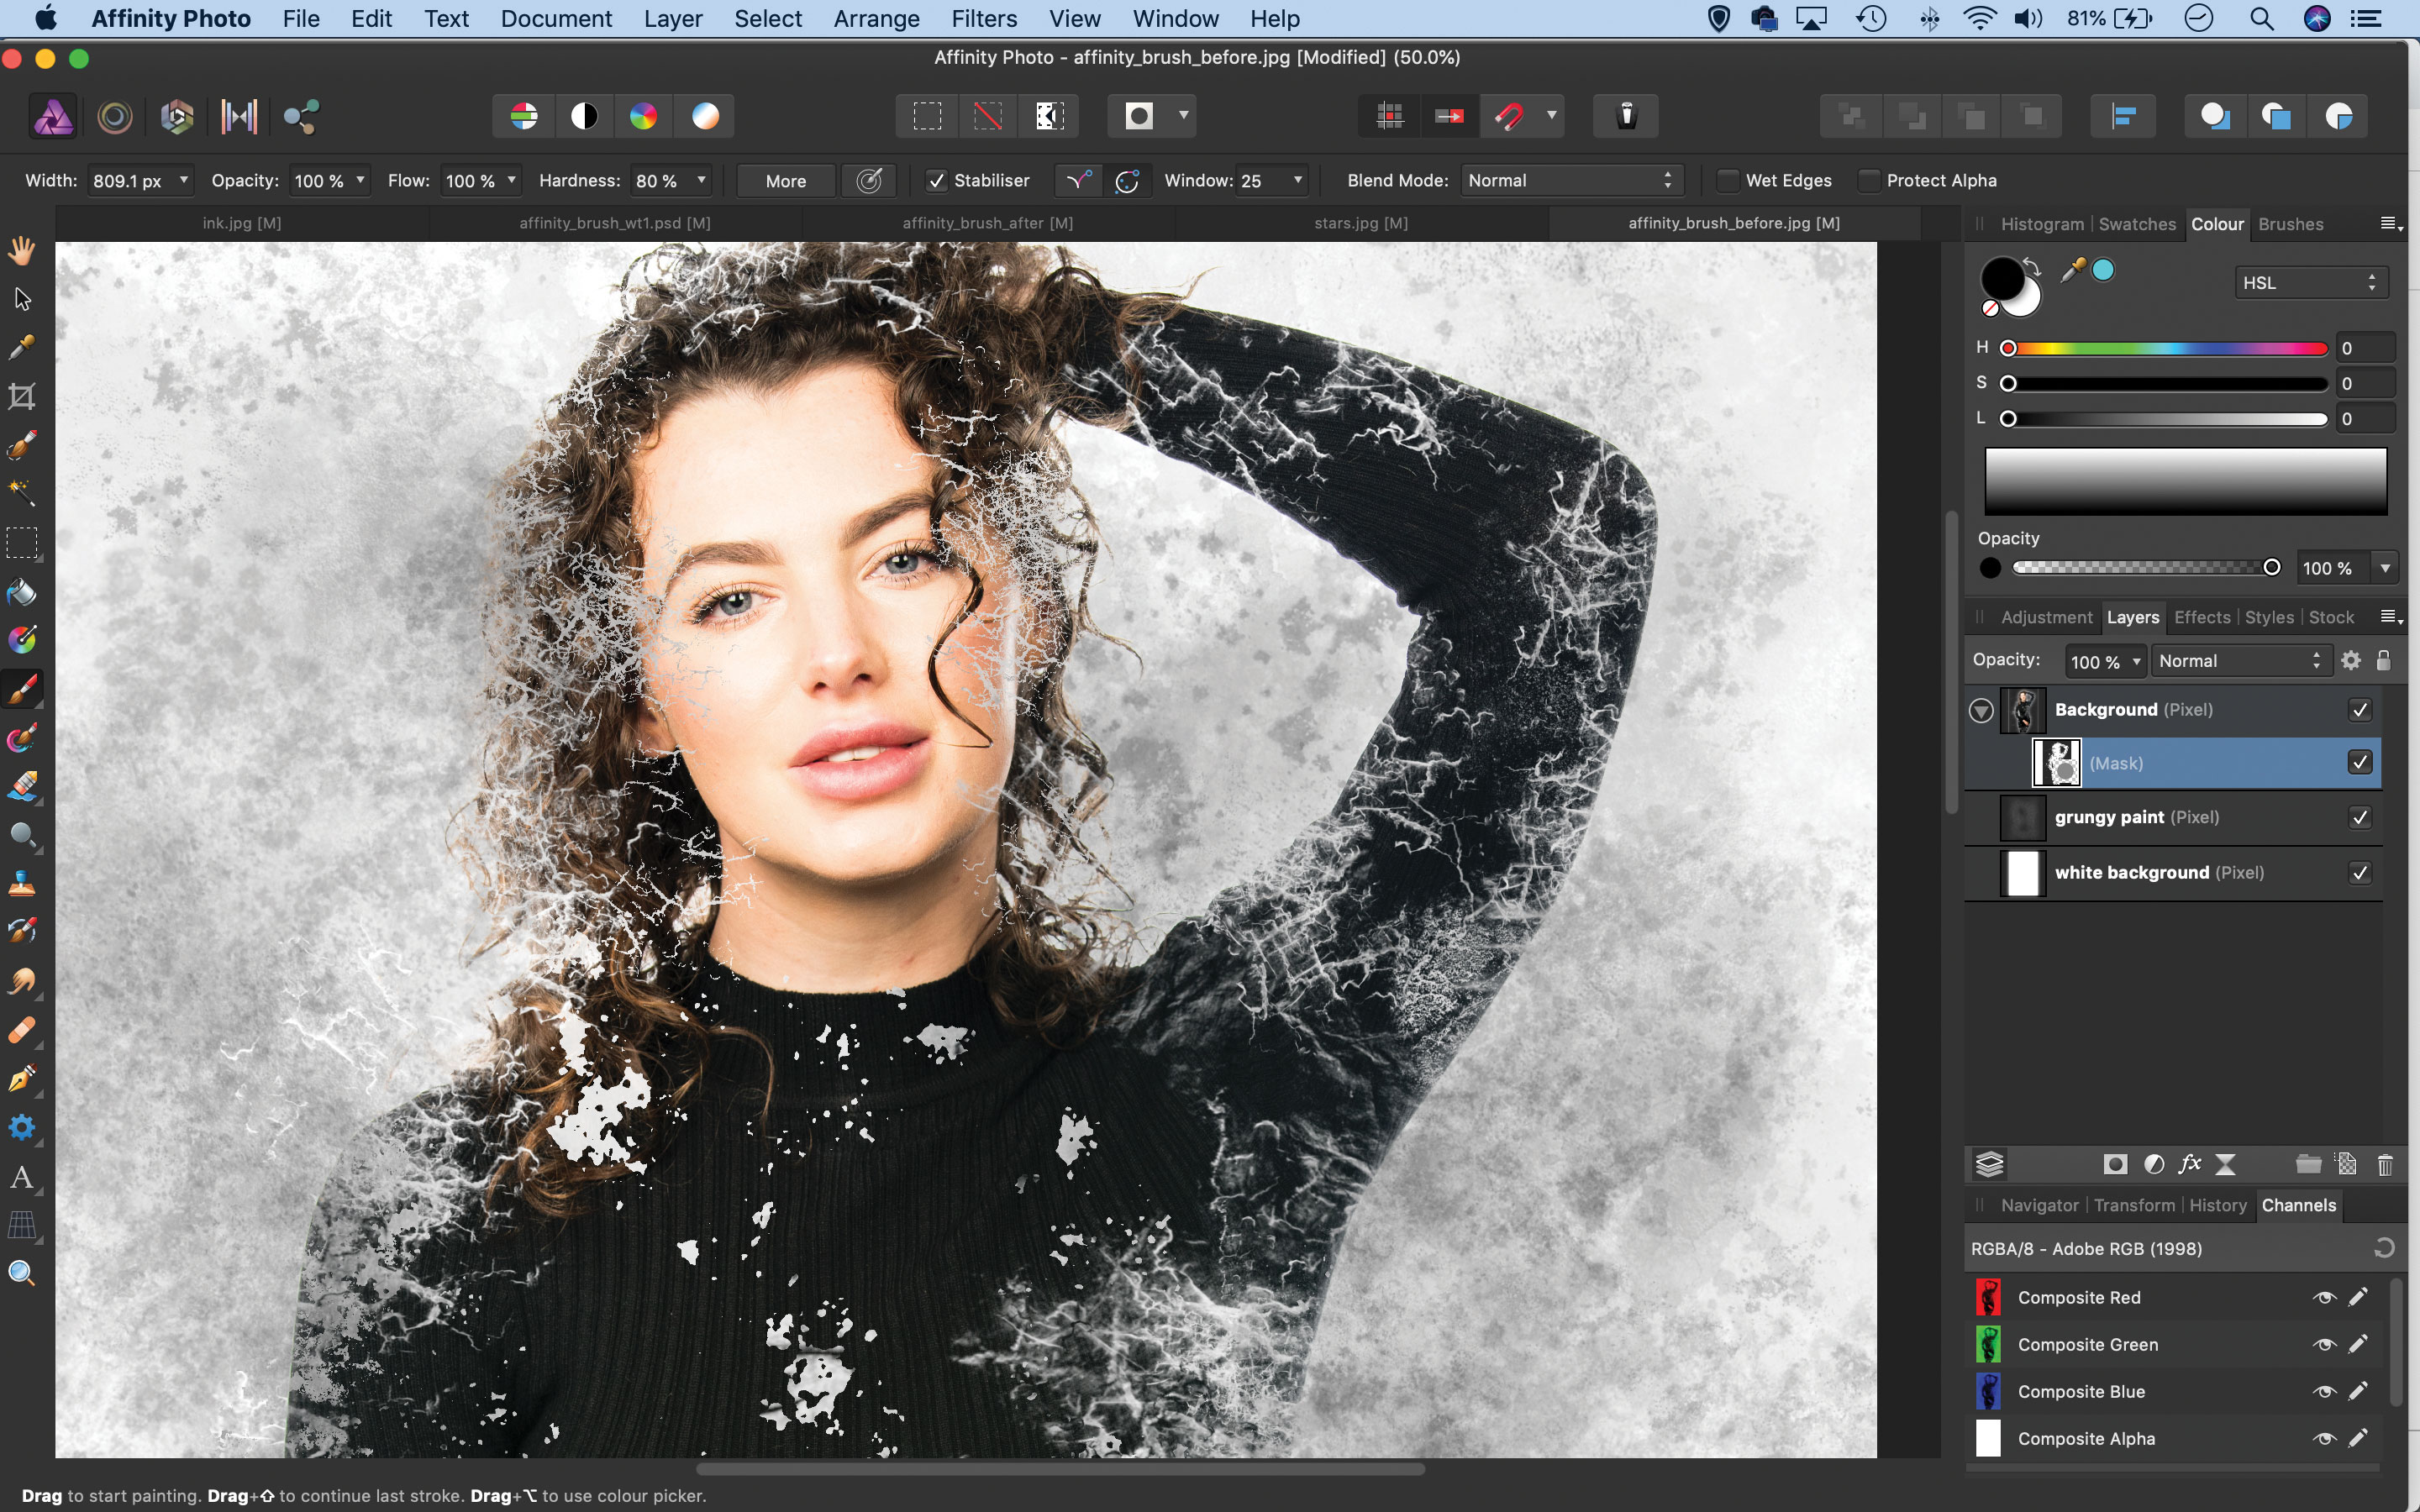
News, we highlight the mask thumbnail on the portrait layer, then set the colour to black and use Grunge brushes to paint over the image. This will take chunks out of the edges of the subject. We can build up the effect with different brushes and experiment with brush opacity to add depth.
Step 4: Sample and paint
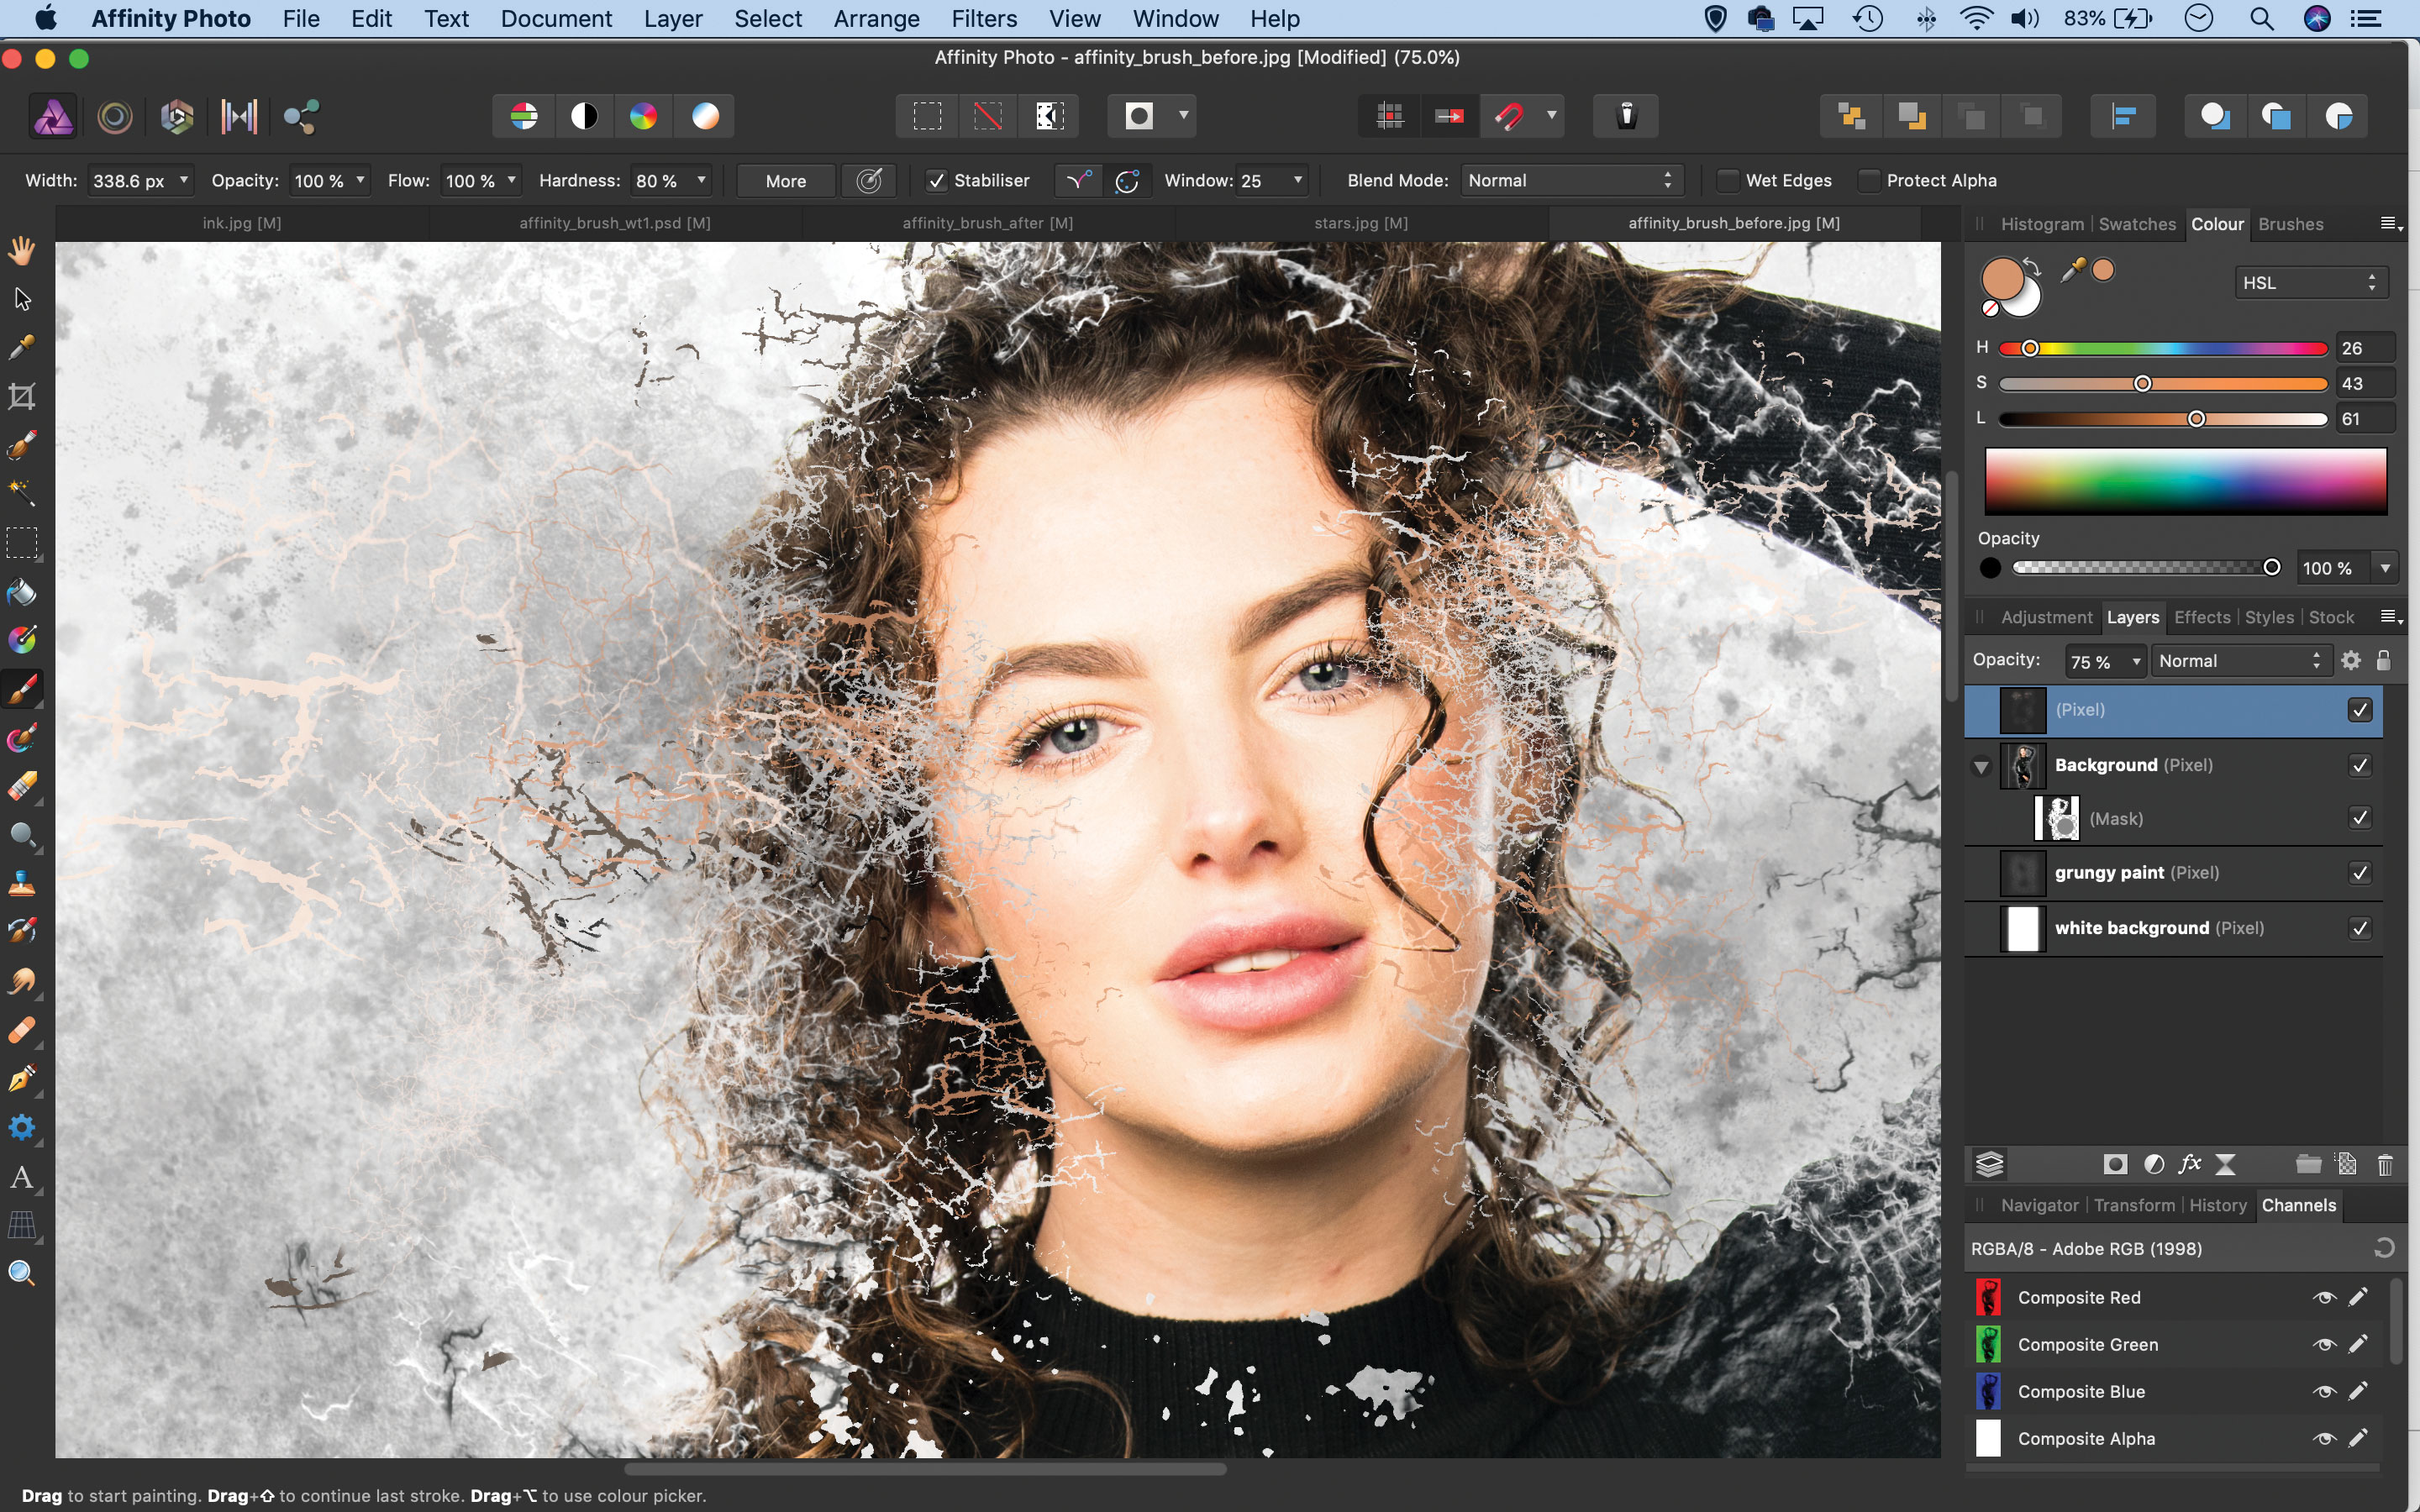
For the next step, we make another new pixel layer at the top of the stack and go to the Brushes panel and double-click the ‘Grunge 3’ brush to open the settings, Increasing the Scattering and Size Jitter. We can hold Alt and click to sample colours from the portrait, then paint to scatter them around the edges of the figure.
Step 5: Use splash brushes
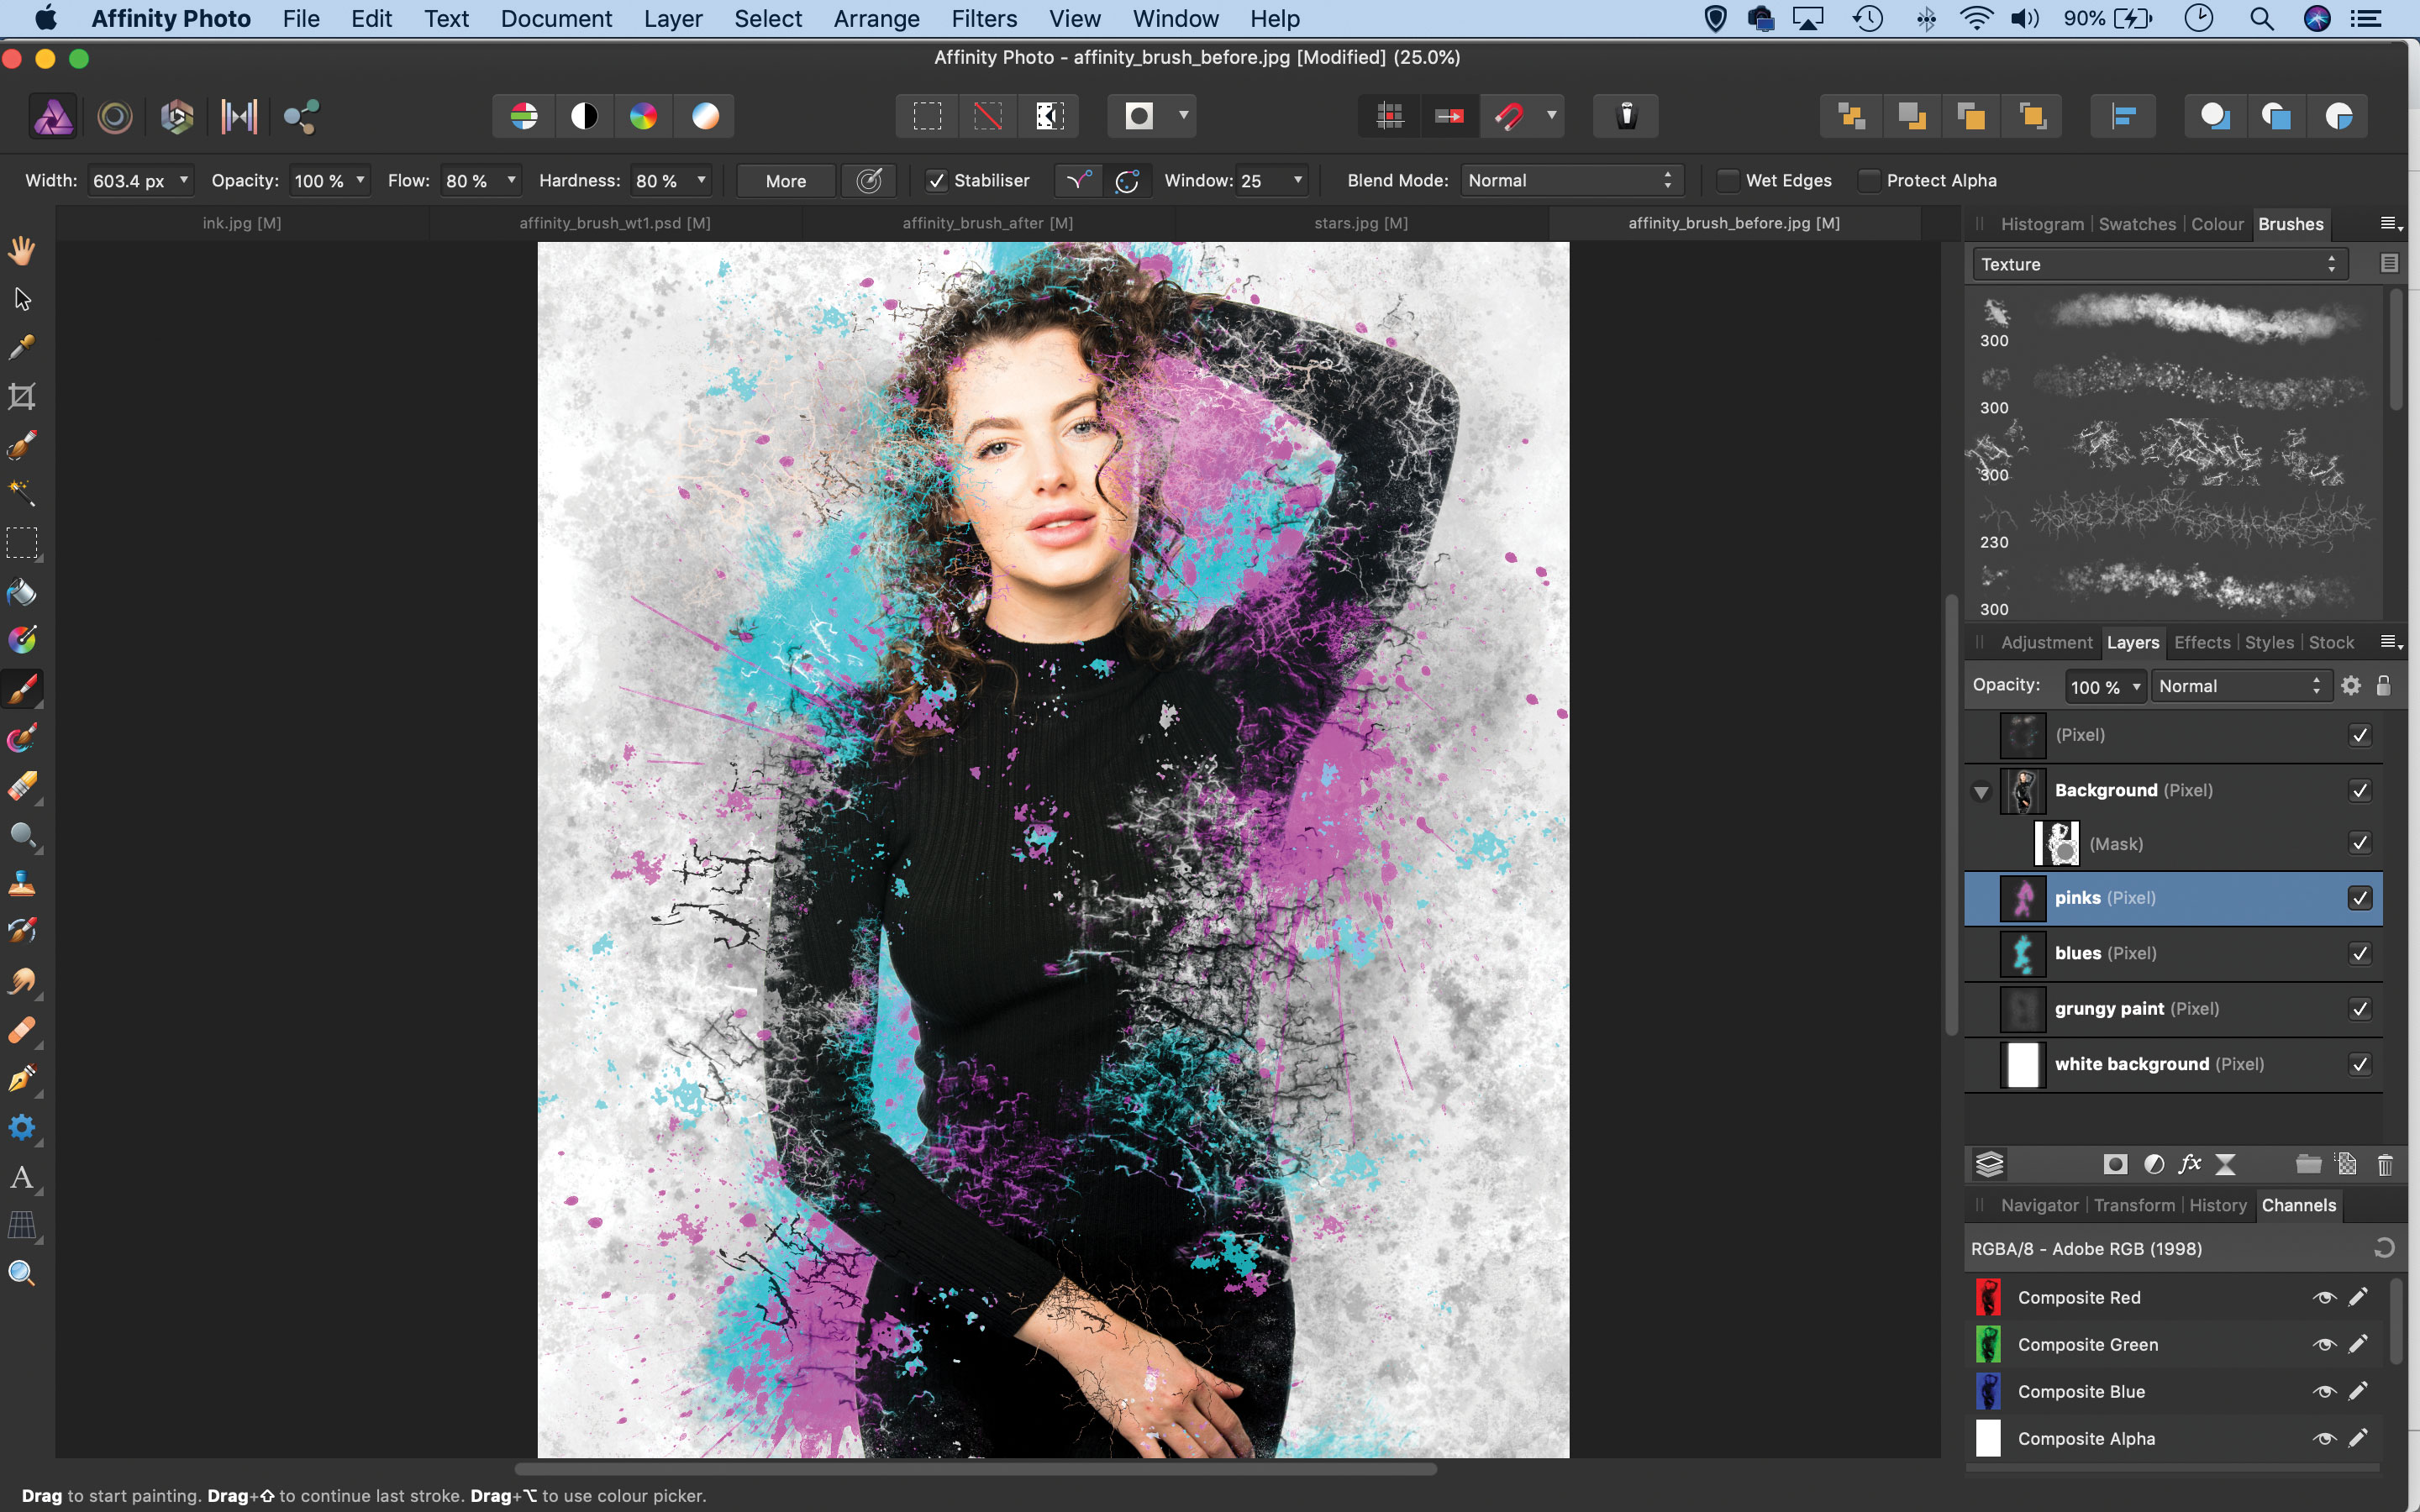
This project makes heavy use of layers! We make two new layers below the portrait layer, then use the ink splash brushes (see the Quick Tip below) to dab in splashes of colour behind the subject. Using the rotation control in the brush settings, we can alter the shape of the splashes as we paint. We can paint a few drops of colour on the top layer too.
Step 6: Blend a photo
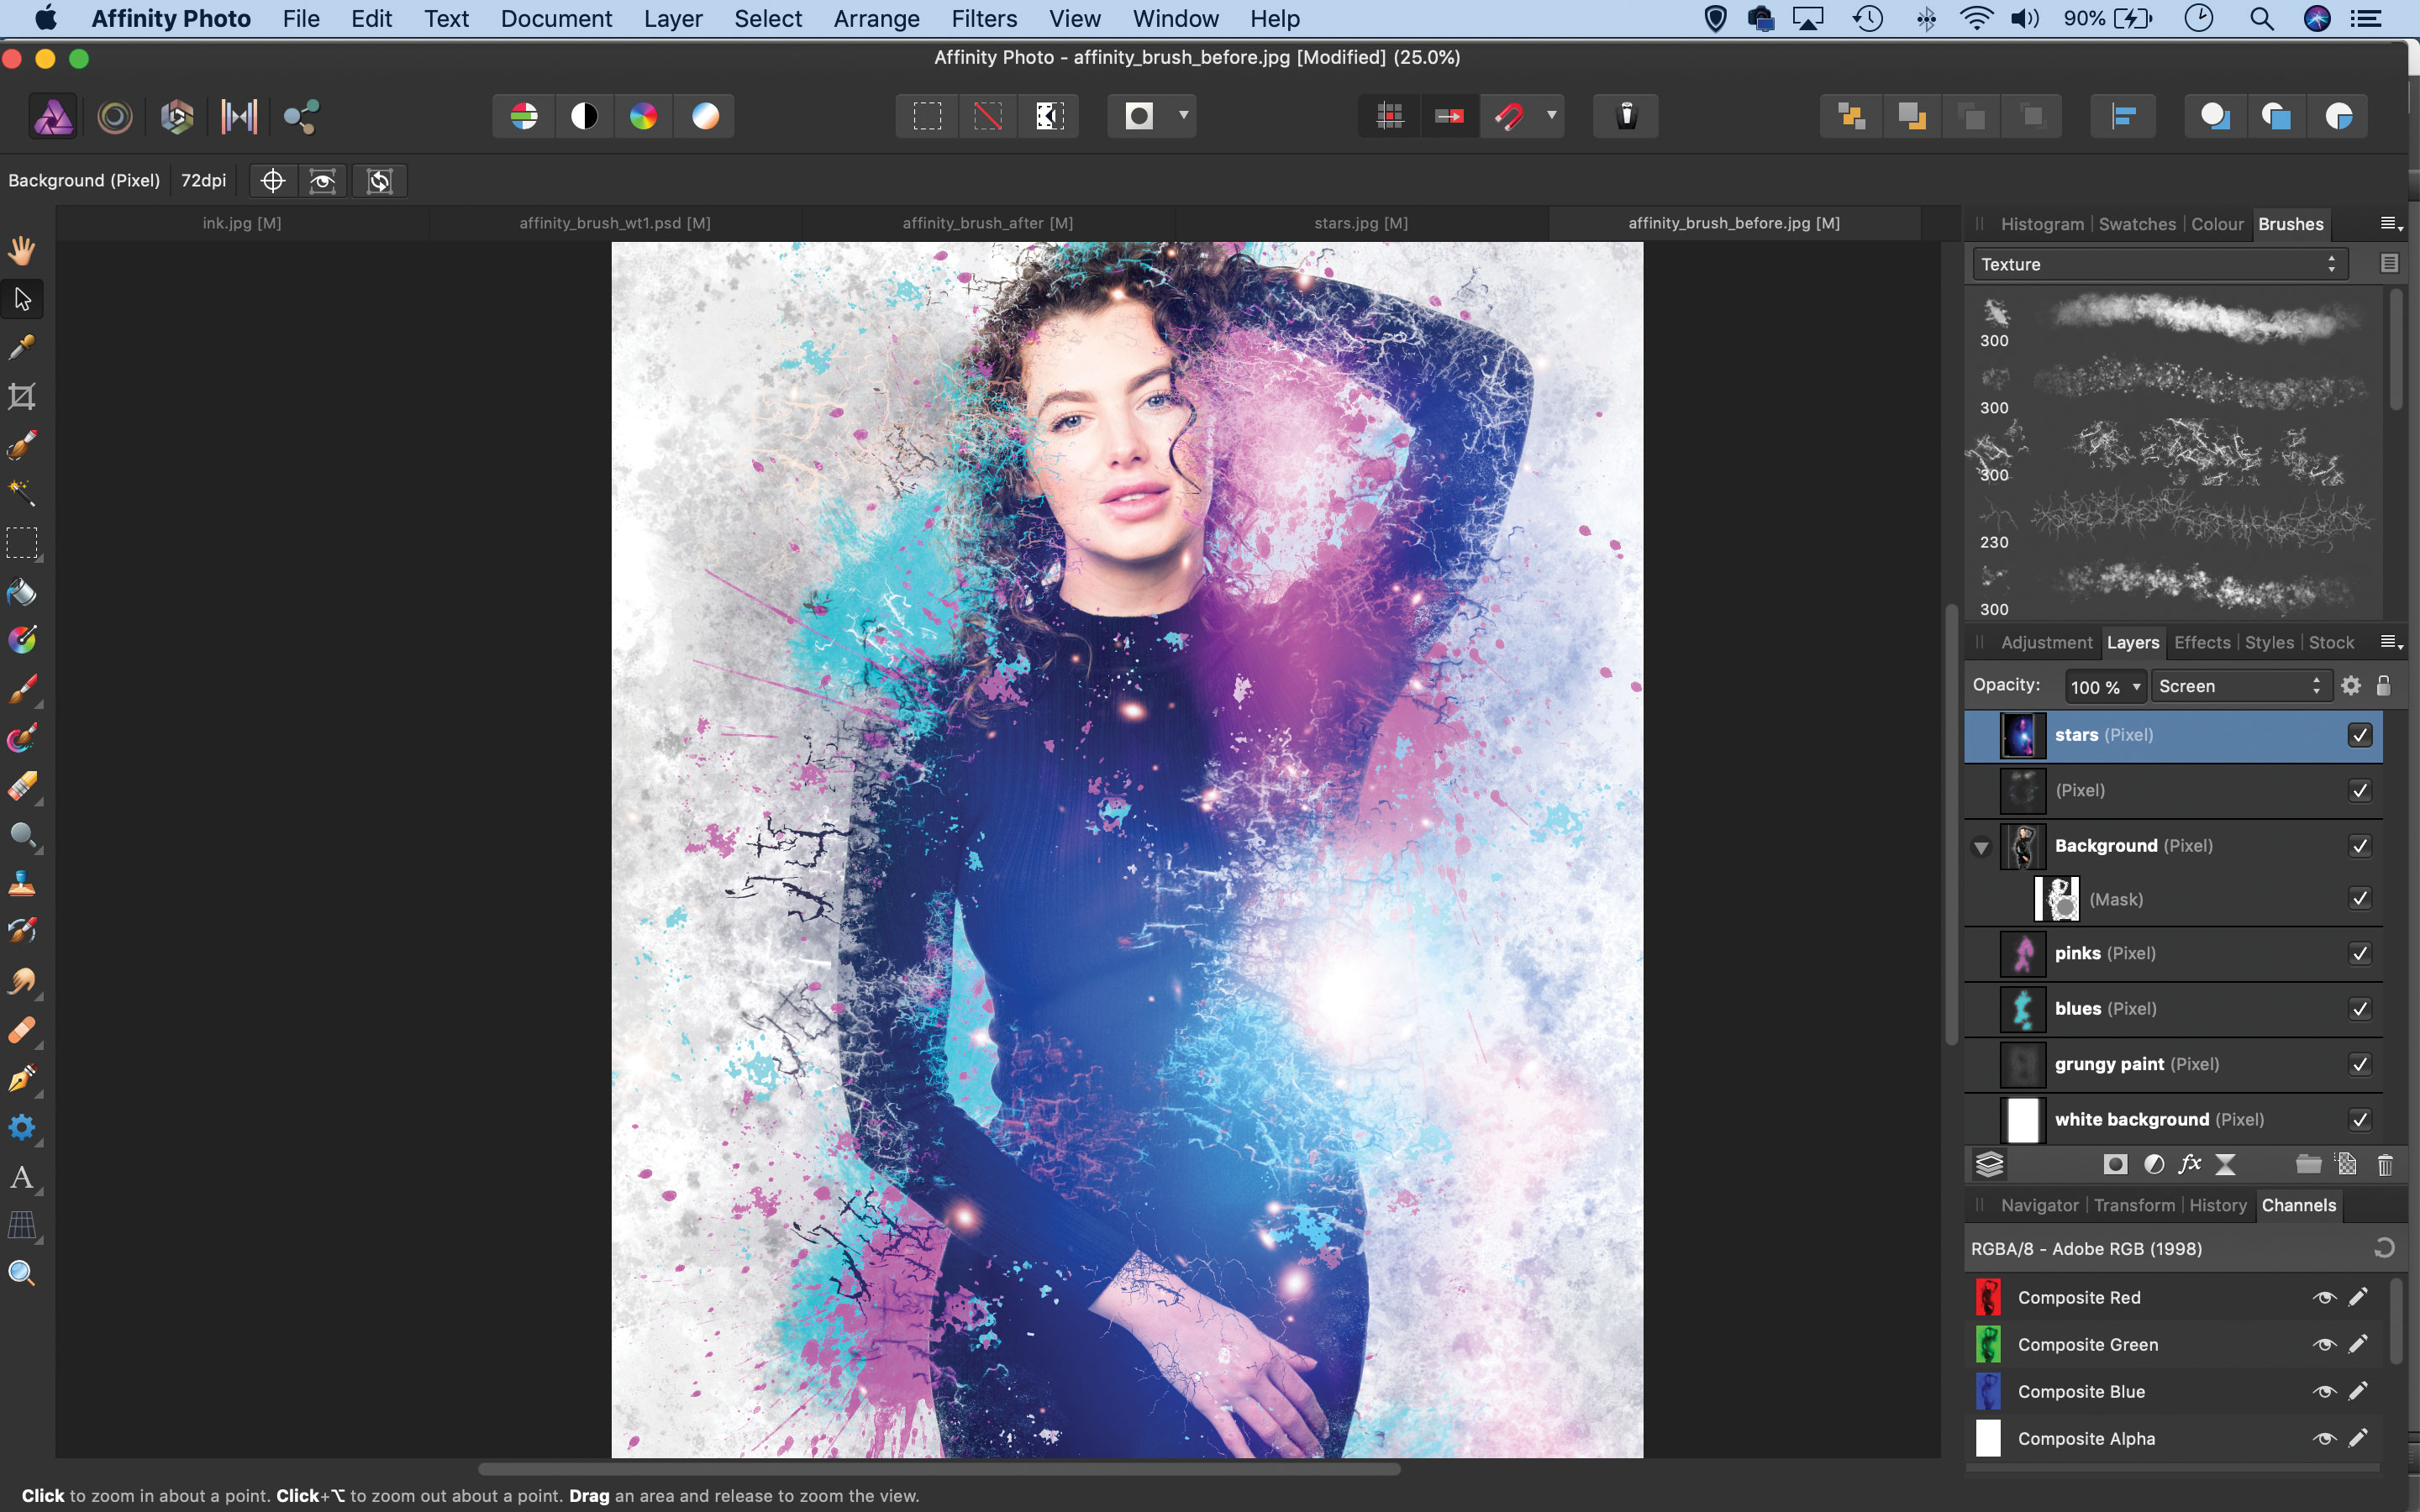
To finish off, we have opened a star photo from the NASA website, then copied (Cmd/Ctrl+C) and pasted (Cmd/Ctrl+V) it into the main image. We can go to the Blend Mode drop-down in the Layers panel and choose Screen, then use the Move tool to alter the position.
Quick tip
To make your own brushes, begin by isolating a shape on a transparent background, then export it as a PNG (see video for full details). Once done, you can head to the Brushes panel, click the top-right icon and choose ‘New Intensity Brush’ then load in the PNG.
About N-Photo magazine
This tutorial originally appeared in N-Photo, the monthly newsstand magazine for Nikon photographers. Why not subscribe to a print edition, and have the magazine delivered direct to your door every month?
Alternatively, we have a number of different digital options available, including:
• Apple app (for iPad or iPhone)
• Zinio app (multi-platform app for desktop or smartphone)
• PocketMags (multi-platform app ideal for Android devices)
• Readly (all-you-can-eat digital magazine subscription service)
If you wanted a printed version of any of our most recent issues we have a selection of back issues to choose from in our online store.
Read more:
• Photography tips and tutorial videos
• The best photo editing tools and accessories
• The best desktop computers for photo editing
• The best photo-editing laptops right now
• The best photo editing software today
Get the Digital Camera World Newsletter
The best camera deals, reviews, product advice, and unmissable photography news, direct to your inbox!
N-Photo: The Nikon Magazine is a monthly publication that's entirely dedicated to Nikon users. As a 100% independent magazine, you can be assured of unbiased opinion from a trustworthy team of devoted photography experts including editor Adam Waring and Deputy Editor Mike Harris.
Aimed at all users, from camera newcomers to working pros, every issue is packed with practical, Nikon-specific advice for taking better photos, in-depth reviews of Nikon-compatible gear, and inspiring projects and exciting video lessons for mastering camera, lens and Photoshop techniques.
Written by Nikon users for Nikon users, N-Photo is your one-stop shop for everything to do with cameras, lenses, tripods, bags, tips, tricks and techniques to get the most out of your photography.
