How to use Canon Digital Photo Professional – Canon DPP part 6
Learn to adjust colors of RAW images selectively using free editing software – Canon Digital Photo Professional 4
Watch video: How to adjust colors selectively of your RAW images using Canon Digital Photo Professional 4
Canon Digital Photo Professional 4 is free RAW editing software that's available to every Canon EOS camera user – and is designed to help you import, organize, edit and share your photographs. This series of Canon Digital Photo Professional tutorials will help you get the best from this photo editor.
Part 1: Canon Digital Photo Professional tutorials
Part 2: Boost your tonal range
Part 3: Controlling tonal range
Part 4: Rescuing highlights
Part 5: Correcting color casts
Part 6: Selective color adjustments
Part 7: Creative color effects
Part 8: Black & white with DPP
Part 9: Fixing image distortion
Part 10: Sharpen images and smooth noise
In this tutorial, we demonstrate how to make selective colour adjustments to create more colourful and visually stimulating images. While this global adjustment might give a drab blue sky more impact, it could simultaneously make over-saturated skin tones look too orange.
Photoshop users can selectively boost weaker colours in their Raw files without over-saturating stronger ones, courtesy of the Vibrance slider. Although DPP 4 lacks a Vibrance slider it does boast a new Color Adjustment palette that can be persuaded to produce similar selective adjustment results.
As with the Adobe Camera Raw editor’s HSL panel, DPP 4’s Color Adjustment palette enables you to target and tweak an individual colour’s Hue, Saturation and Luminance values. This makes it a much more useful program when it comes to increasing the saturation of a photo’s weaker colours without over-saturating the stronger ones. The sky in our example image is rather desaturated, while the flowers’ colours are stronger.
We’ll show you how to adjust the saturation of specific colours to make the sky more blue, while also creating more textural variety in areas such as the ivy on the pub wall. We’ll also show you how to tweak tones to reveal missing colours that you can then enhance.
01 LIGHTEN THE SHADOWS

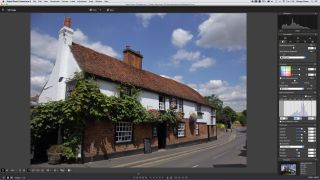
Browse to your Raw image in the Folder pane of Canon DPP4. Click the Edit Image button, then the Basic palette tab. In the Advanced section, drag the Shadow slider to 3 to lighten the slightly underexposed shadows and reveal more colour detail.
02 GAMMA ADJUSTMENT

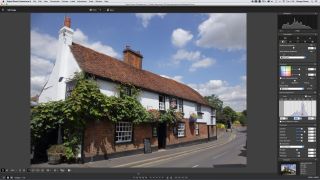
To reveal more midtone colour and detail, toggle the Gamma adjustment pane open. In the histogram window, drag the vertical midtone control bar left to remap the shot’s original midtones to a lighter value; -45 will do the trick here.
03 FINE-TUNE

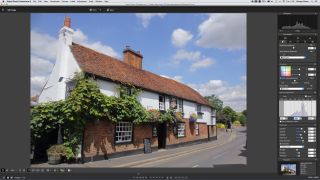
In the Fine-Tune pane, tick the Auto Lighting Optimizer box. Leave it set to Standard. Go to the Advanced pane and drop the Highlights slider to -1 and boost Color Saturation to 1. You’re now ready to make selective colour adjustments.
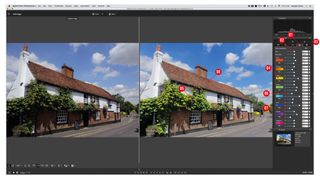
Canon Digital Professional workspace

1. COLOR ADJUSTMENT PALETTE
Click here to access the Hue, Saturation and Luminance (lightness) adjustment sliders for eight separate colours.
2. GLOBAL ADJUSTMENTS
These top two sliders adjust all the photo’s colours simultaneously. The Hue slider causes colours to shift to new values in a dramatic way.
3. RESET
Feel free to experiment with different H, S and L settings. As you’re editing a Raw file you can click here to reset all the image’s colours. Even if you close DPP 4, you can later choose Adjustment>Revert To Shot Settings to see the shot’s colours as they were captured in camera. You can also reset individual colours by clicking the Reset icon below their thumbnail.
4. COLOR THUMBNAIL
These thumbnails give you an idea of the range of colours that will be altered if you drag the adjacent HSL sliders; although this colour is labelled Yellow, it also alters lighter greens. It’s worth boosting the Saturation slider of the Yellow section if you have vegetation in your photo.
5. EXTRA TEXTURE
By boosting the Saturation of the Yellows we’ve made some of the ivy leaves stand out against their greener colleagues, creating more variety in this area. Distant yellow plants also have more impact, which helps give the photo extra depth.
6. HUE
The H slider adjacent to each colour thumbnail creates a shift in that colour’s hue. By changing the Hue of the Aqua and Blue colours we’ve added a hint of cyan to them.
7. LIGHTNESS
By reducing the value of the Blues Lightness slider we’ve darkened the skies and made them look more dramatic. This slider can help increase the contrast between objects with different colours.
8. SELECTIVE ADJUSTMENT
By dropping the Orange colour’s Saturation slider to -3.0 we’ve kept the warm tiles from becoming over-saturated. This slider provides an effective way of keeping skin tones from looking too orange when boosting the saturation of other colours in a shot.
JARGON BUSTER!
OVER-SATURATED: Saturated colours may not look good printed, due to the different way colour is reproduced by screens and printers.
AUTO LIGHTING OPTIMIZER: This tool helps auto correct an image that is underexposed or lacks contrast with a click. You can fine-tune the result using a three-setting slider.
Get the latest Canon DPP software
Canon's DPP 4.12.60 is the latest version (released 9 July 2020) and available for most current Canon EOS DSLR owners – eg EOS 2000D, 800D, 90D, 7D Mk II, 6D Mk II, 5D Mk IV and 1D X Mk III. As well as Canon EOS R-system mirrorless cameras eg EOS R, RP, R5 and R6.
You can download this version of Canon's Digital Photo Professional software from Camon's site here Get Canon's DPP software but you’ll need your EOS camera's serial number. Check the website to see if your Canon EOS camera is compatible with the latest DPP.
PhotoPlus: The Canon Magazine is the world's only monthly newsstand title that's 100% devoted to Canon, so you can be sure the magazine is completely relevant to your system.
Read more:
Best photo editing software: image editors for novices through to pros
Best photo-editing laptops: top laptops for photographers
Best online photography courses – from beginner guides to masterclasses
Get the Digital Camera World Newsletter
The best camera deals, reviews, product advice, and unmissable photography news, direct to your inbox!
The editor of PhotoPlus: The Canon Magazine, Peter 14 years of experience as both a journalist and professional photographer. He is a hands-on photographer with a passion and expertise for sharing his practical shooting skills. Equally adept at turning his hand to portraits, landscape, sports and wildlife, he has a fantastic knowledge of camera technique and principles. As you'd expect of the editor of a Canon publication, Peter is a devout Canon user and can often be found reeling off shots with his EOS 5D Mark IV DSLR.

