Achieve instant mono perfection with Affinity Photo 2
Sometimes, things just look better in black and white. Take your first steps in a world measured in shades of grey. We'll start with camera skills, but scroll down to discover how to adjust your mono photos in Affinity Photo 2!
Black and white photography allows you to step away from reality to create a mood, express emotion and focus on the elements of a composition in a way that colour photography just can’t do. Colour is conventional, which means that a black-and-white image has the potential to draw people in and make them look a bit deeper.
That’s not to say that colour isn’t a powerful compositional device in its own right – one that you can use to evoke a mood and highlight a subject or story – it’s just that monochrome enables viewers to step back and consider the themes and relationships between elements in a different way.
We're using the terms black and white and monochrome interchangeably. In reality, a mono image doesn’t have to be black and white or grey, but let’s keep things simple! The first thing you need to decide when you start taking black and white pictures is whether you’re actually going to shoot in black and white or in full colour.
Your camera might offer a few black and white options, including a mono ‘automatic scene mode’, which gives you some limited creative choices, such as increasing or decreasing the contrast or adding a toning effect like sepia. It will certainly have a monochrome picture style or film simulation that you can select when you’ve set one of the advanced shooting modes, such as Aperture Priority or Manual. You’ll be able to make finer adjustments to the look of your black and white pictures with one of these options.
The trick to better black and white photography, however, is to shoot in colour. Doing so will allow you to spend time converting an image to mono on your computer, where you can develop an eye for the subjects, colour combinations and lighting that look best in black and white. You can seek these out when you’re next shooting with black and white in mind.
If you shoot in RAW then you make things even more convenient for yourself. A RAW file holds the original, untouched colour information from the camera sensor, regardless of which picture style, white balance or other image processing settings were selected on the camera when the photo was taken.
This means that you can set your camera’s monochrome picture style and get a black and white preview image on the rear display or in the electronic viewfinder if your camera has one. You’ll still have recorded a full-colour image that you can subsequently convert using the powerful tools in your editing software, but you’ll be able to assess the potential for a black and white shot, and adjust your framing and composition to make the most of it while you’re out and about with your camera.
There are plenty of things to point your camera at when you’re shooting in black and white. Landscapes, seascapes, cityscapes – pretty much all of the ’scapes – can take on added drama, while still-life and fine-art photos suit the timeless quality and emphasis on shape, form and texture that a mono treatment imparts. Abstracts, portraits, wildlife and street photography are also perennial favourites.
Any subject that’s pretty much monochromatic in reality, such as architecture, misty forests and snow-covered scenes, is worth a shot in black and white. The transformation might not be as thrilling as when you strip away the colour from something more vibrant, but it doesn’t take a lot of work to make it look more dramatic.
Photos of subjects where colour is the key feature don’t always translate well to black and white. When the warm colours of a sunset scenic are removed, for example, it can be visually unsettling. Having said that, colourful flowers can look fantastic as studies in black and white, particularly when you start playing around with the underlying colours in software.
The image that you capture is just the starting point. As with black and white film photography, most of the magic takes place in the darkroom – or in our case, the digital darkroom. It’s very satisfying to watch an image that looks OK in colour come to life in black and white, although it takes more than simply desaturating an image in software to make that happen.
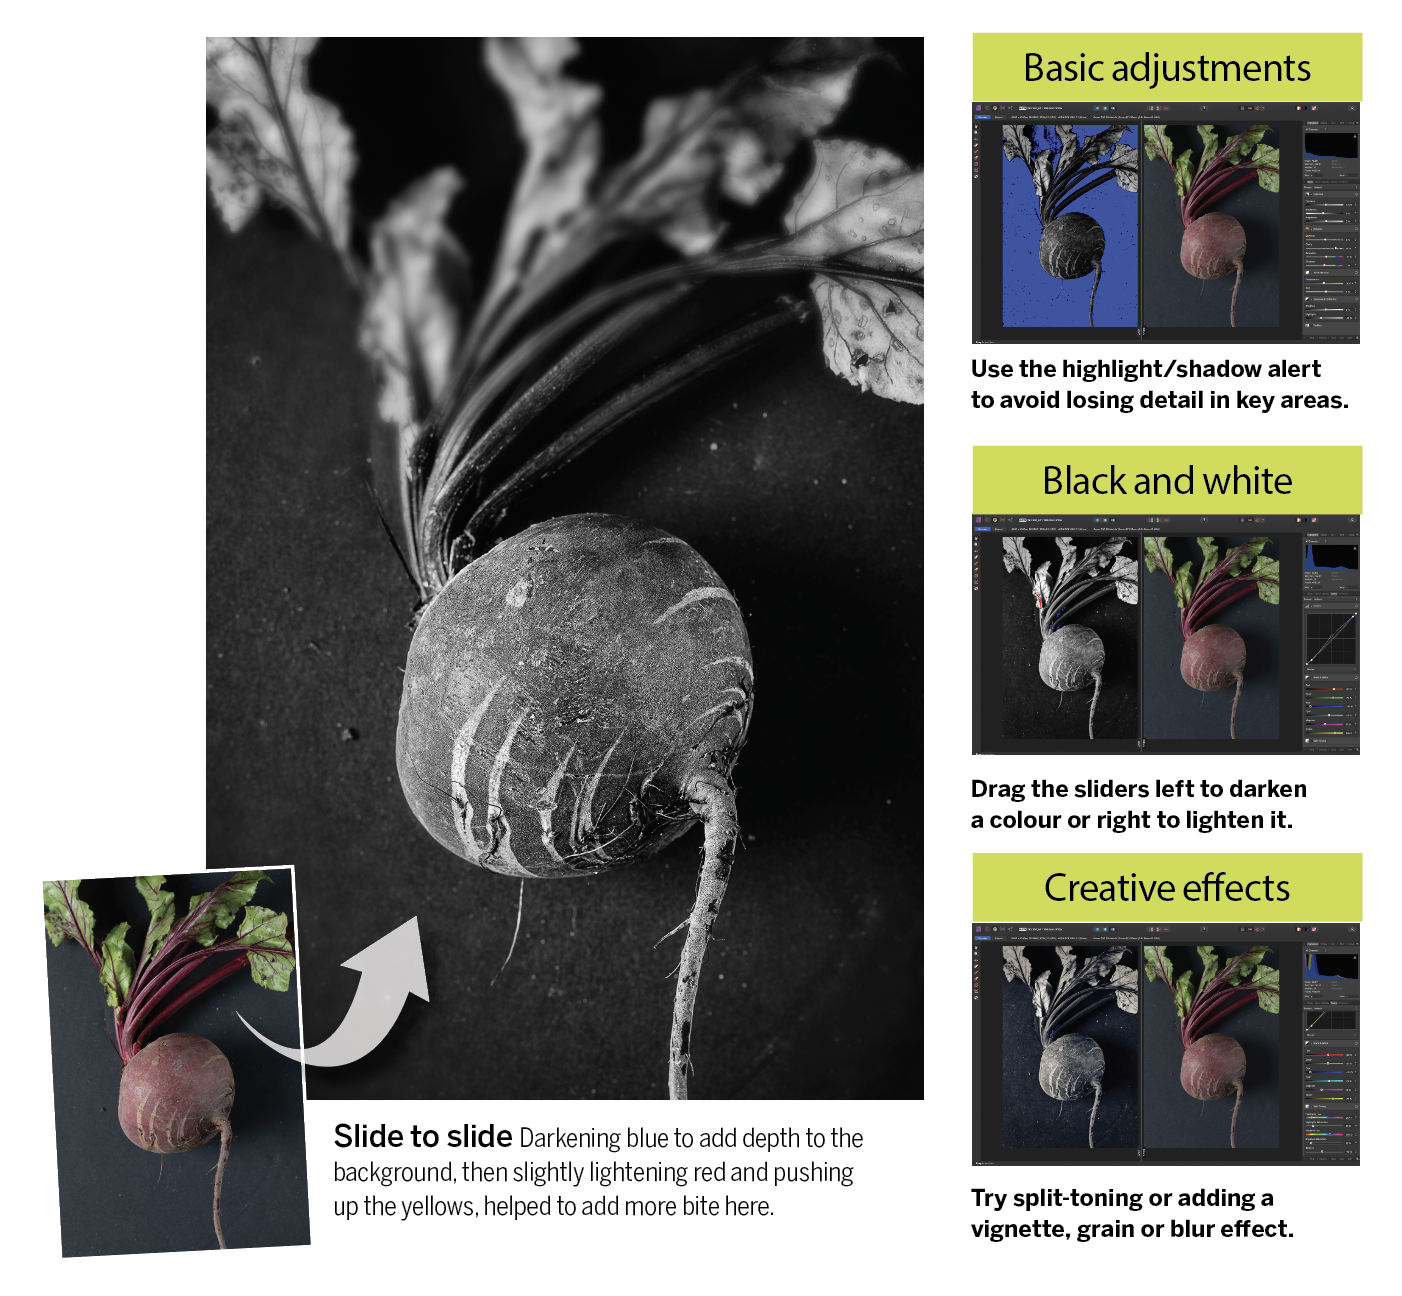
Simply changing the colours to shades of grey can leave you with a relatively flat image, but there’s an assortment of controls that can help you to lift a shot. For a start, you can make a substantial impact using basic adjustment tools such as Shadows, Highlights, Clarity and the Tone Curve.
Where things get really interesting is when you take advantage of the colour mix sliders. In Serif’s Affinity Photo 2, for example, you’ll find these under Black and White in the Tones panel. Other RAW editing software gives you a set of HSL (Hue, Saturation, Luminosity) sliders that enable you to achieve a similar result. You can use these sliders to target specific colours in your image and increase or decrease their brightness. This in turn affects the tones in your black and white image.
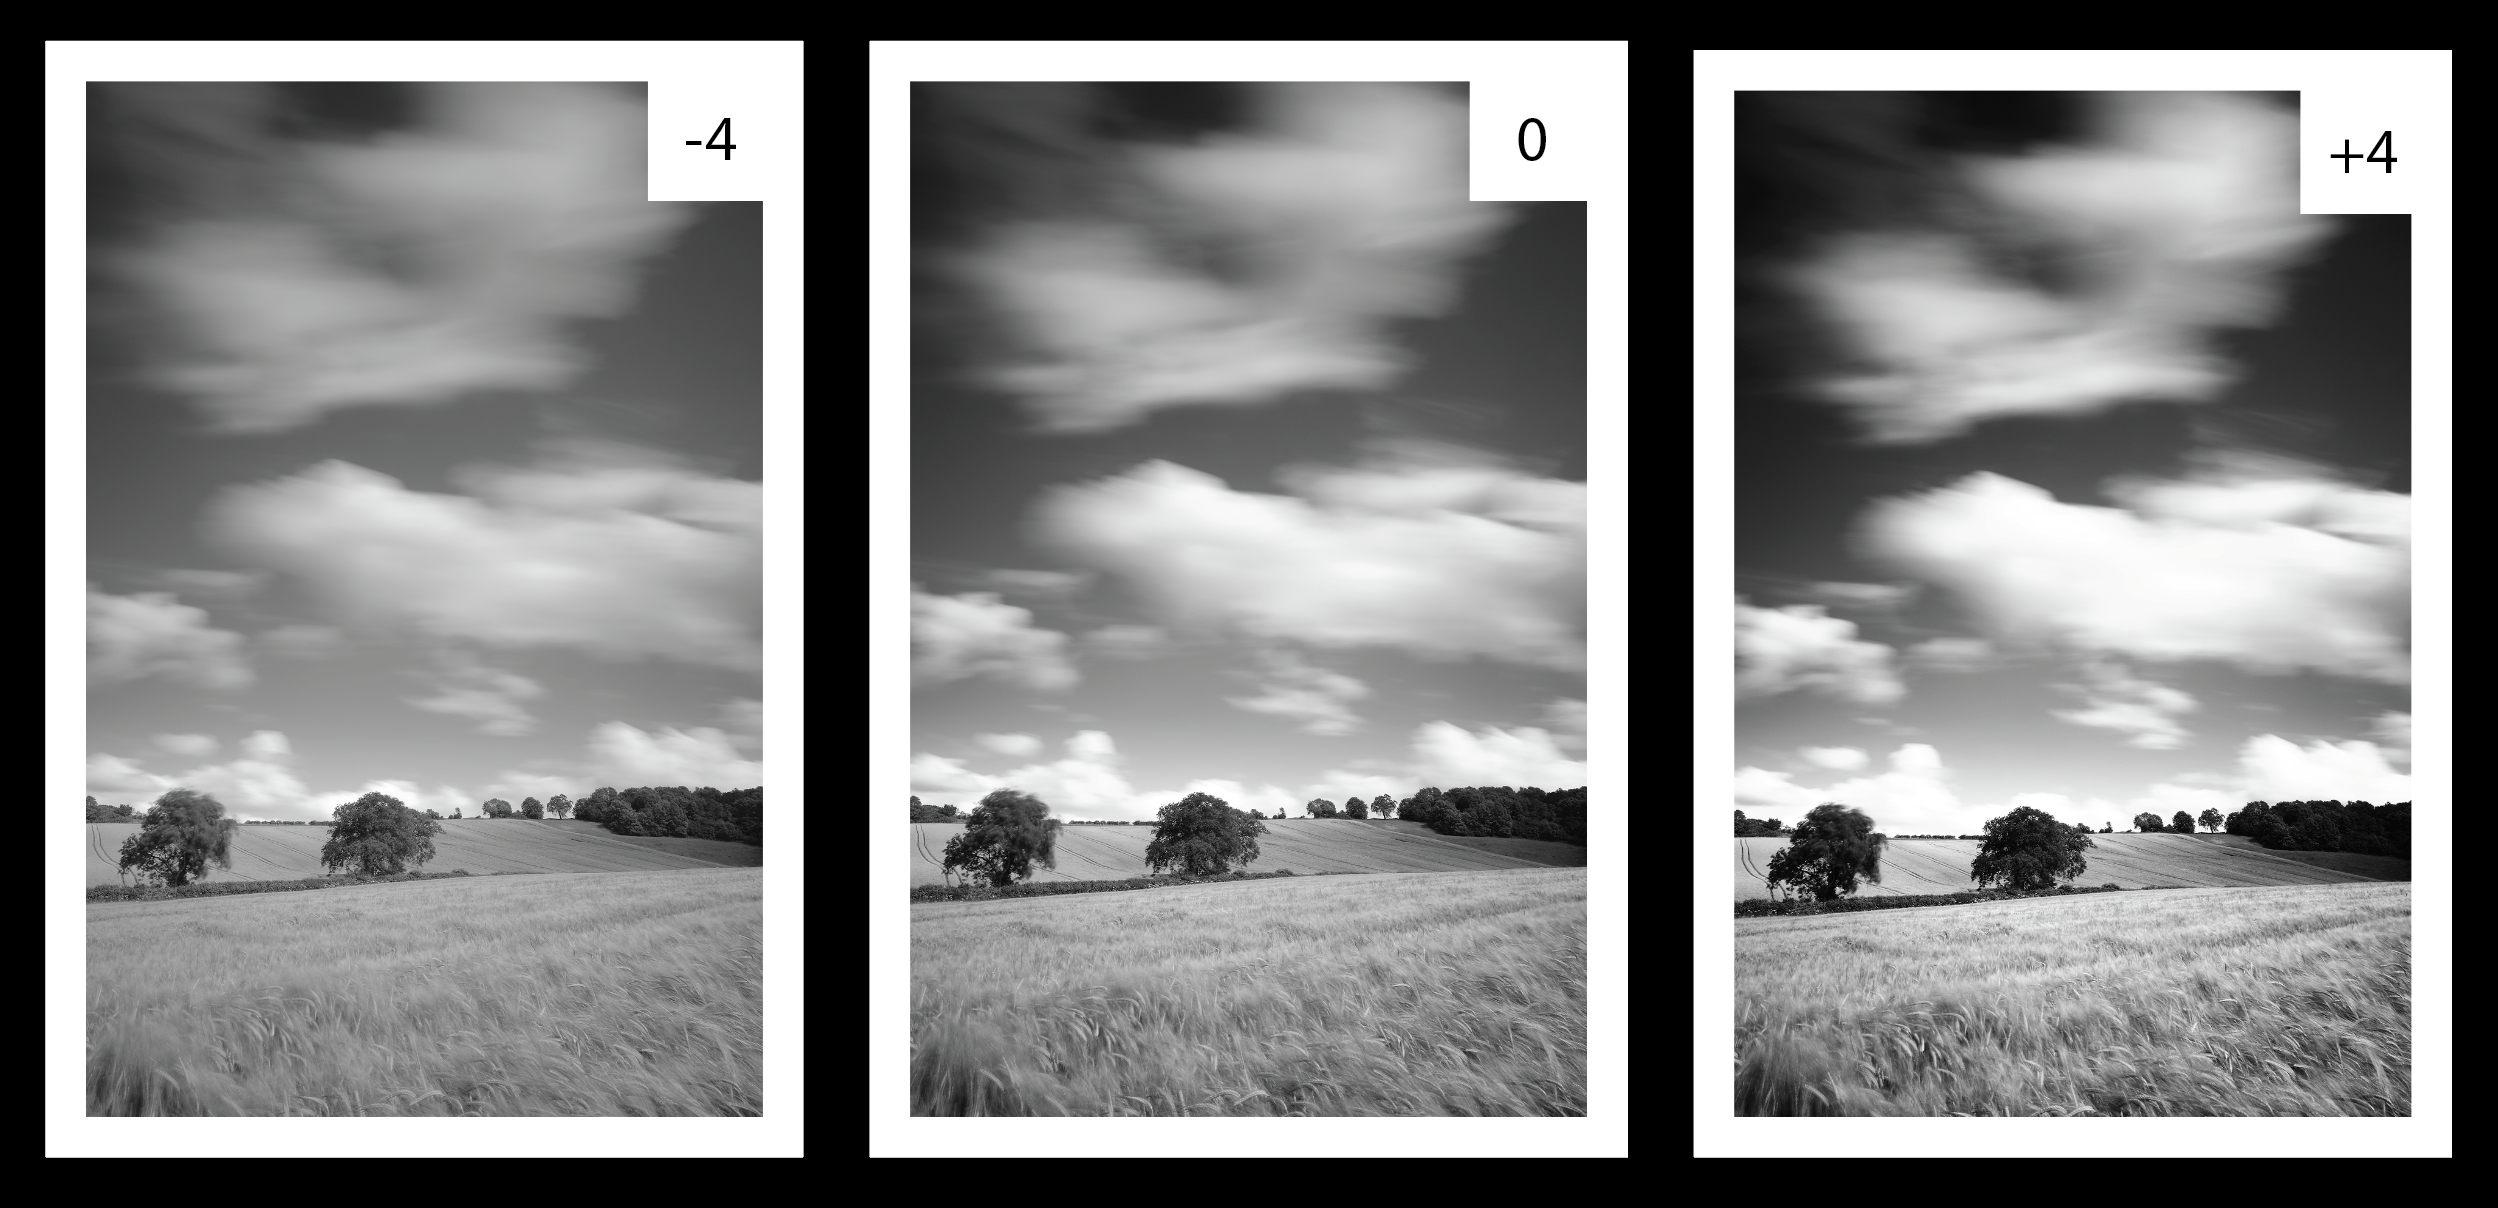
Want to make a blue sky darker to make the clouds stand out? Drag the blue slider to the left. Looking to make autumn leaves glow in an almost infrared way? Nudge the yellow and red sliders to the right. It’s easy and fun and a great way to explore the art of black and white.

Out now, Affinity Photo 2 is the brand-new version of the only fully-loaded photo editor integrated across macOS, Windows and iPad. The first choice of millions of creative and photography professionals around the world who love its speed, power and precision, Affinity Photo 2 has everything you need to edit and retouch images, create multi-layered compositions, beautiful raster paintings and so much more. It's also equipped with hundreds of time-saving tools and a completely redesigned UI to make your editing experience more seamless than ever. Affinity Photo 2 is available for a one-off payment with no subscription, or try the 30-day free trial.
Take advantage of the black and white tools to take your pictures up a level
Although it’s perfectly possible to simply desaturate a colour image in software, you’ll end up with a grey and lifeless result. Many of the colours that look vividly different to the naked eye can appear quite similar in tone when the colour is removed.
But one of the advantages of shooting a colour image and converting it later is that you can use the colour sliders in your editing software to mix the underlying colours that make up the final black and white image. It’s easier to do this with a RAW file, as you’ll be starting with an unprocessed image.
After carrying out some basic adjustments, such as tweaking the shadows, highlights and clarity, select the Black and White option and then use the colour sliders to make the specific colours – and the tones in the black and white image – darker or lighter. Be prepared to magnify the image as you do so, as it’s easy to get carried away and lose detail and smooth gradations.
5 black and white photography tips
1) Shoot RAW files
You’ll get the best of both worlds if you save your pictures as RAW files – a black and white preview and a colour image that you can convert at your leisure later. Shooting mono JPEGs better captures the experience of shooting black and white film, though.
2) Look for shape, form and texture
Colour can be used as a device to draw the eye into a composition. Without the benefit (or distraction) of colour, you’ll need to use contrast, lines, shape, form and texture to add impact. A mirrorless camera can display the image in black and white in its electronic viewfinder, making it easier to compose mono shots.
3) Shoot on sunny days
Black and white is more forgiving than colour when it comes to ‘bad’ light. Seek out bold shadows and don’t be afraid to embrace pure whites and blacks.
4) Boost contrast
Some subjects look flat in black and white, so use in-camera contrast adjustments and filter effects (if you’re shooting JPEGs) or the colour sliders in editing software to boost the contrast between colours when you’re converting to mono on a computer.
5) Warp reality
Mono images remove the reality of the original scene, so push this further by experimenting with creative treatments, such as very dark or very bright exposures, using a strong ND filter to blur moving objects, or a tilt-shift lens to create just a sliver of sharpness.
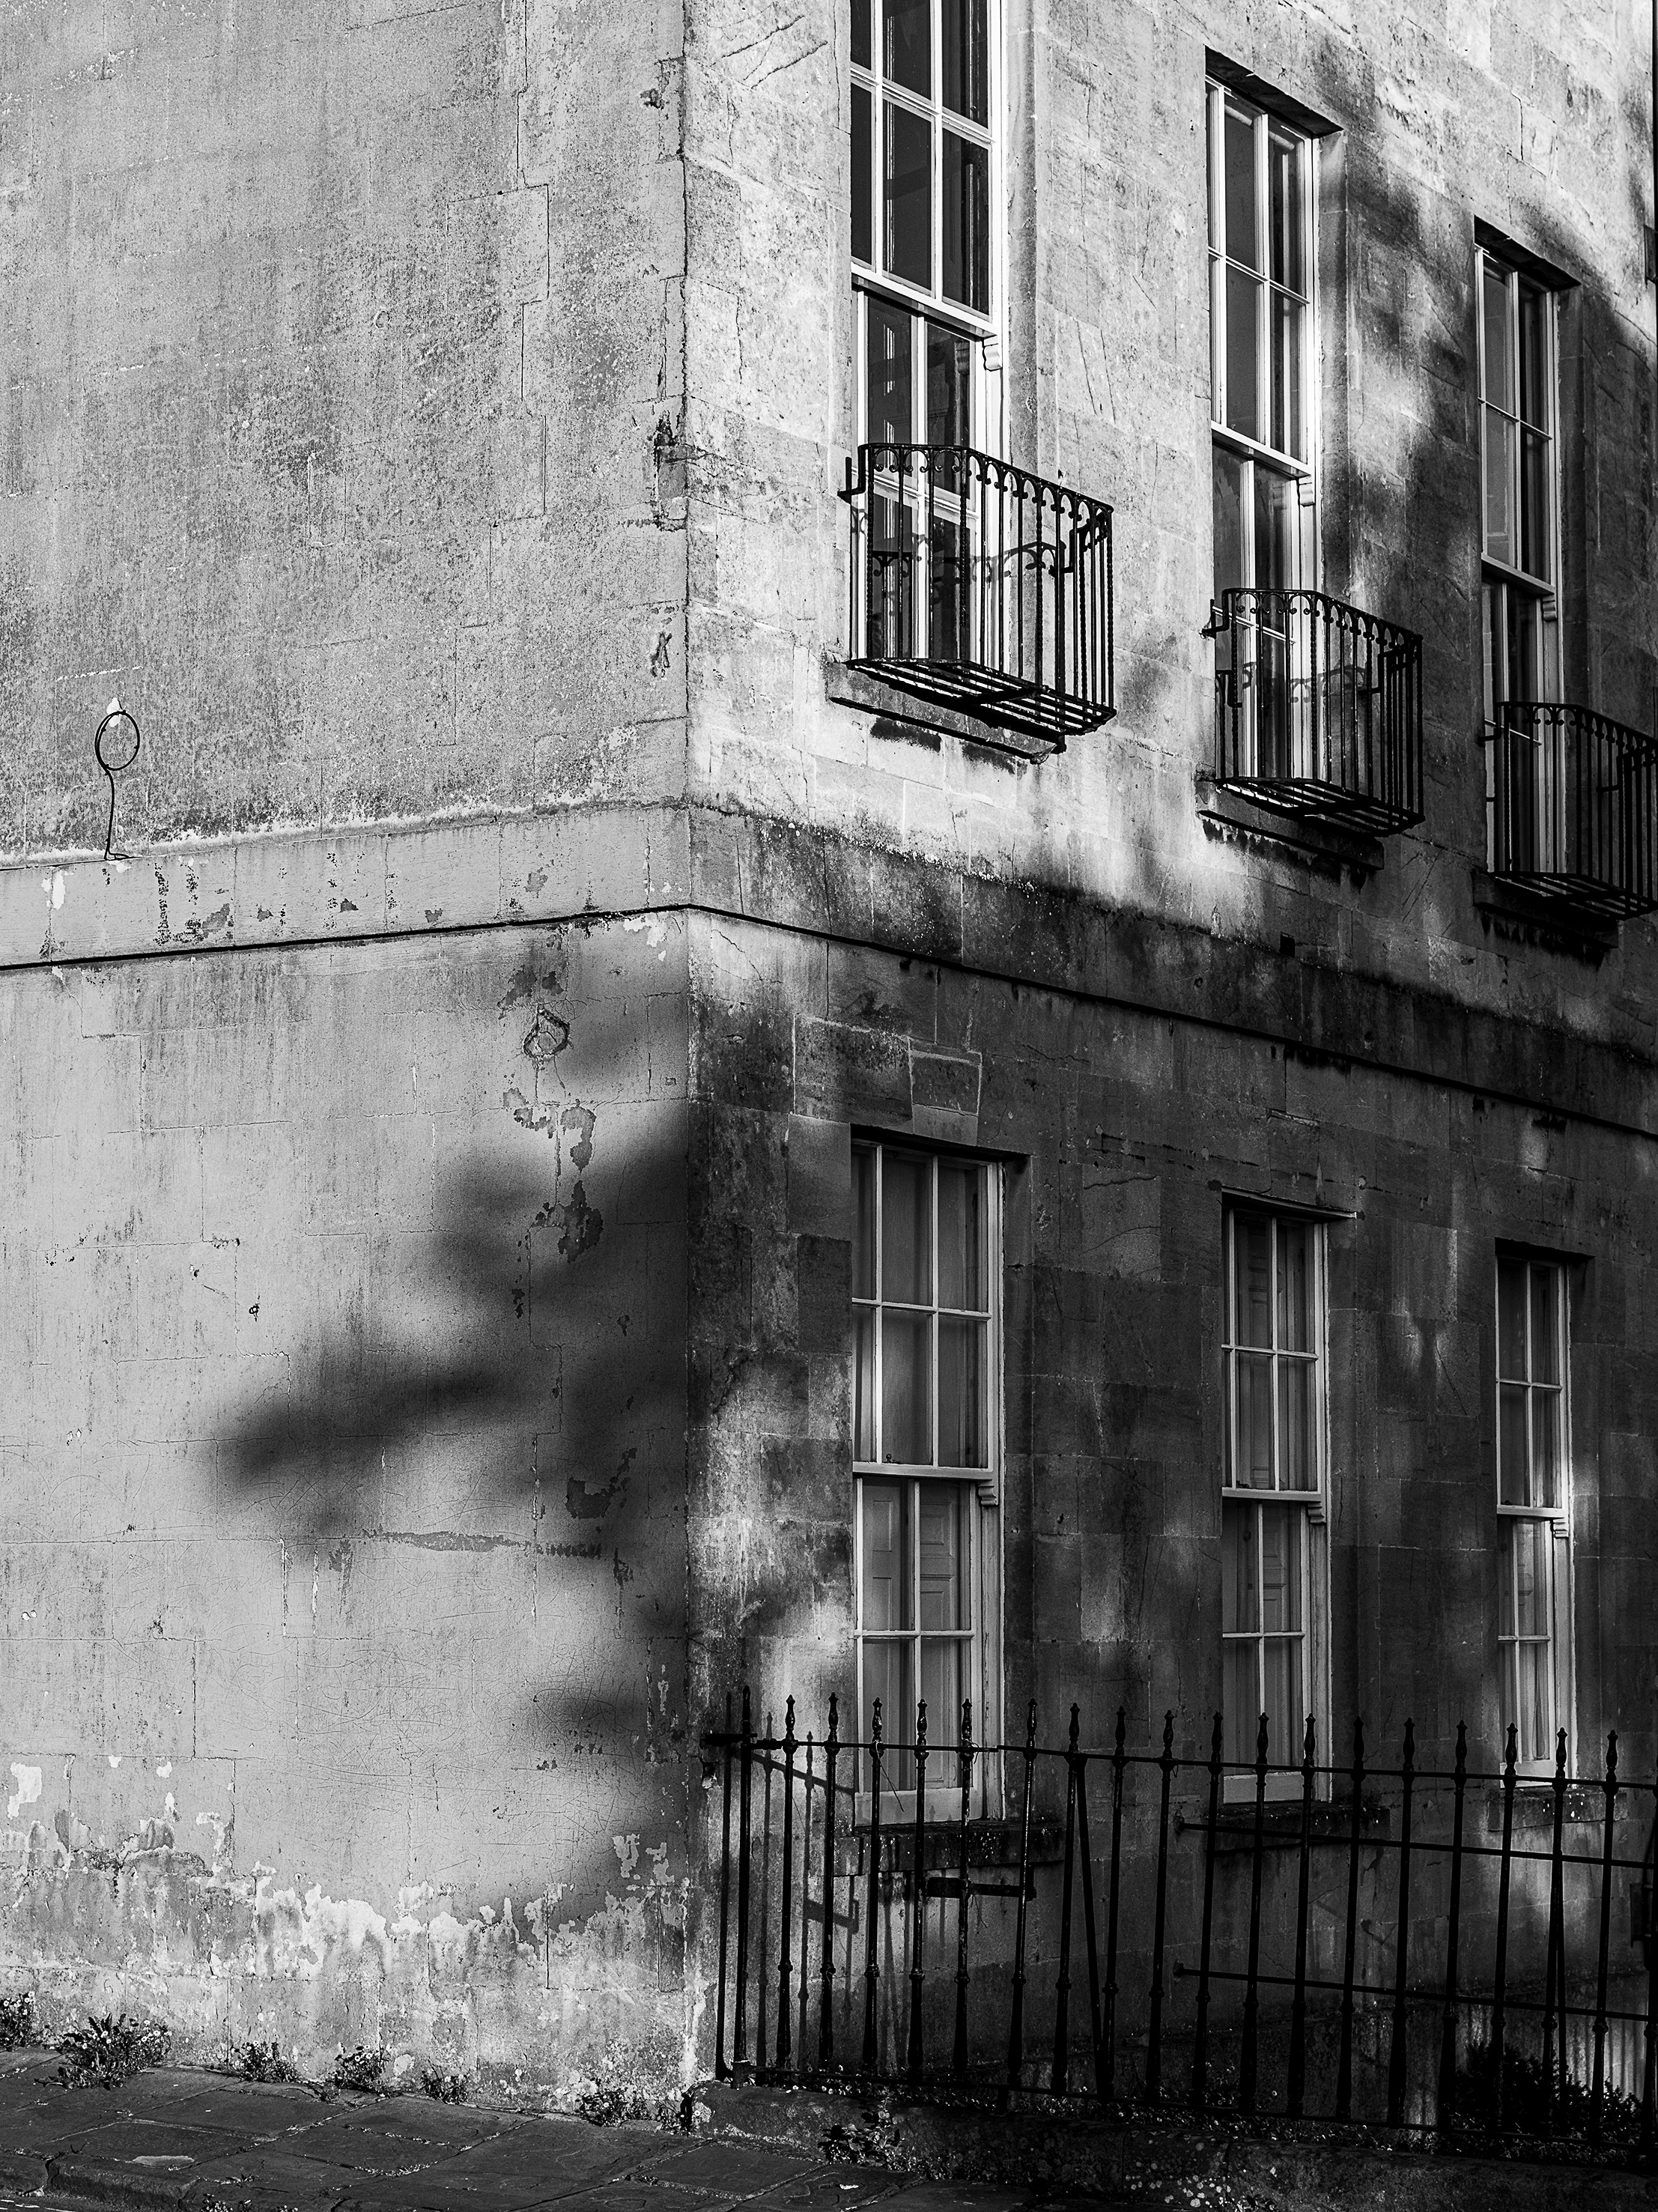
Achieve mono perfection in Affinity Photo 2
The black and white adjustment tool makes it easy to convert your photos to monochrome in Affinity Photo 2, but the real skill comes in fine-tuning the conversion to suit the subject.
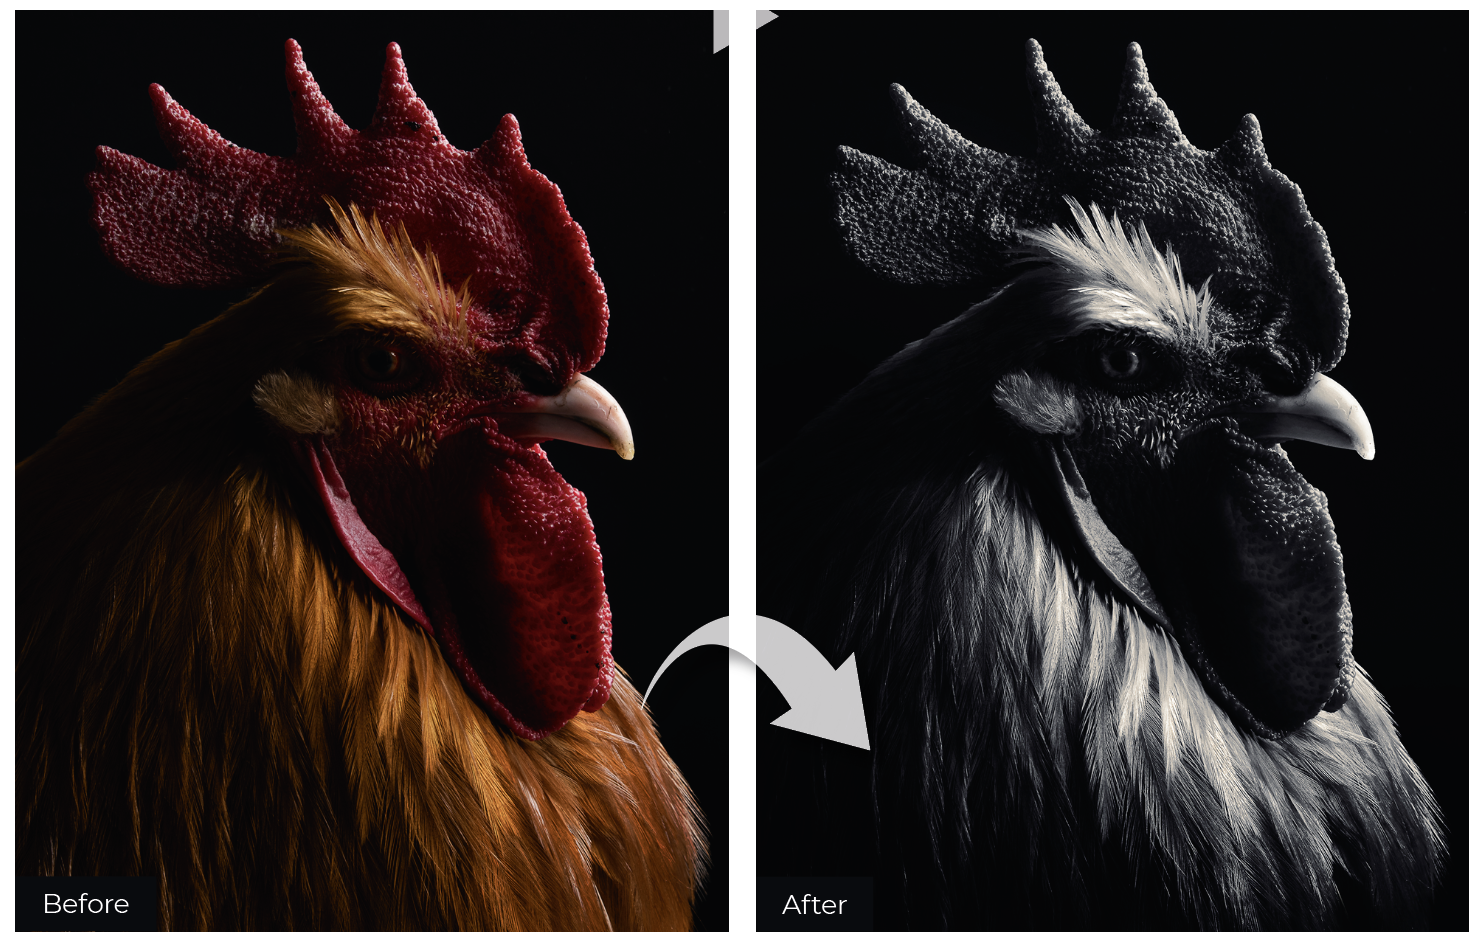
It’s simply not enough to remove the colour; we also need to decide how certain colours should be removed. Specifically, we can control the brightness of colours as we rid the image of them. A blue sky, for example, might benefit by darkening the blue range, while a portrait may be enhanced with a lift to the red skin tones.
Once we’ve chosen a look for our monochrome image, we can then go on to enhance it further using other adjustments. It can be helpful to think of these edits as different recipes for your black and white photos, but it’s not always clear which recipe will work best on which photo. To speed things up, we could make a black and white preset or create a lookup table – a kind of preset that lets you save and apply different colour effects with the minimum of effort.
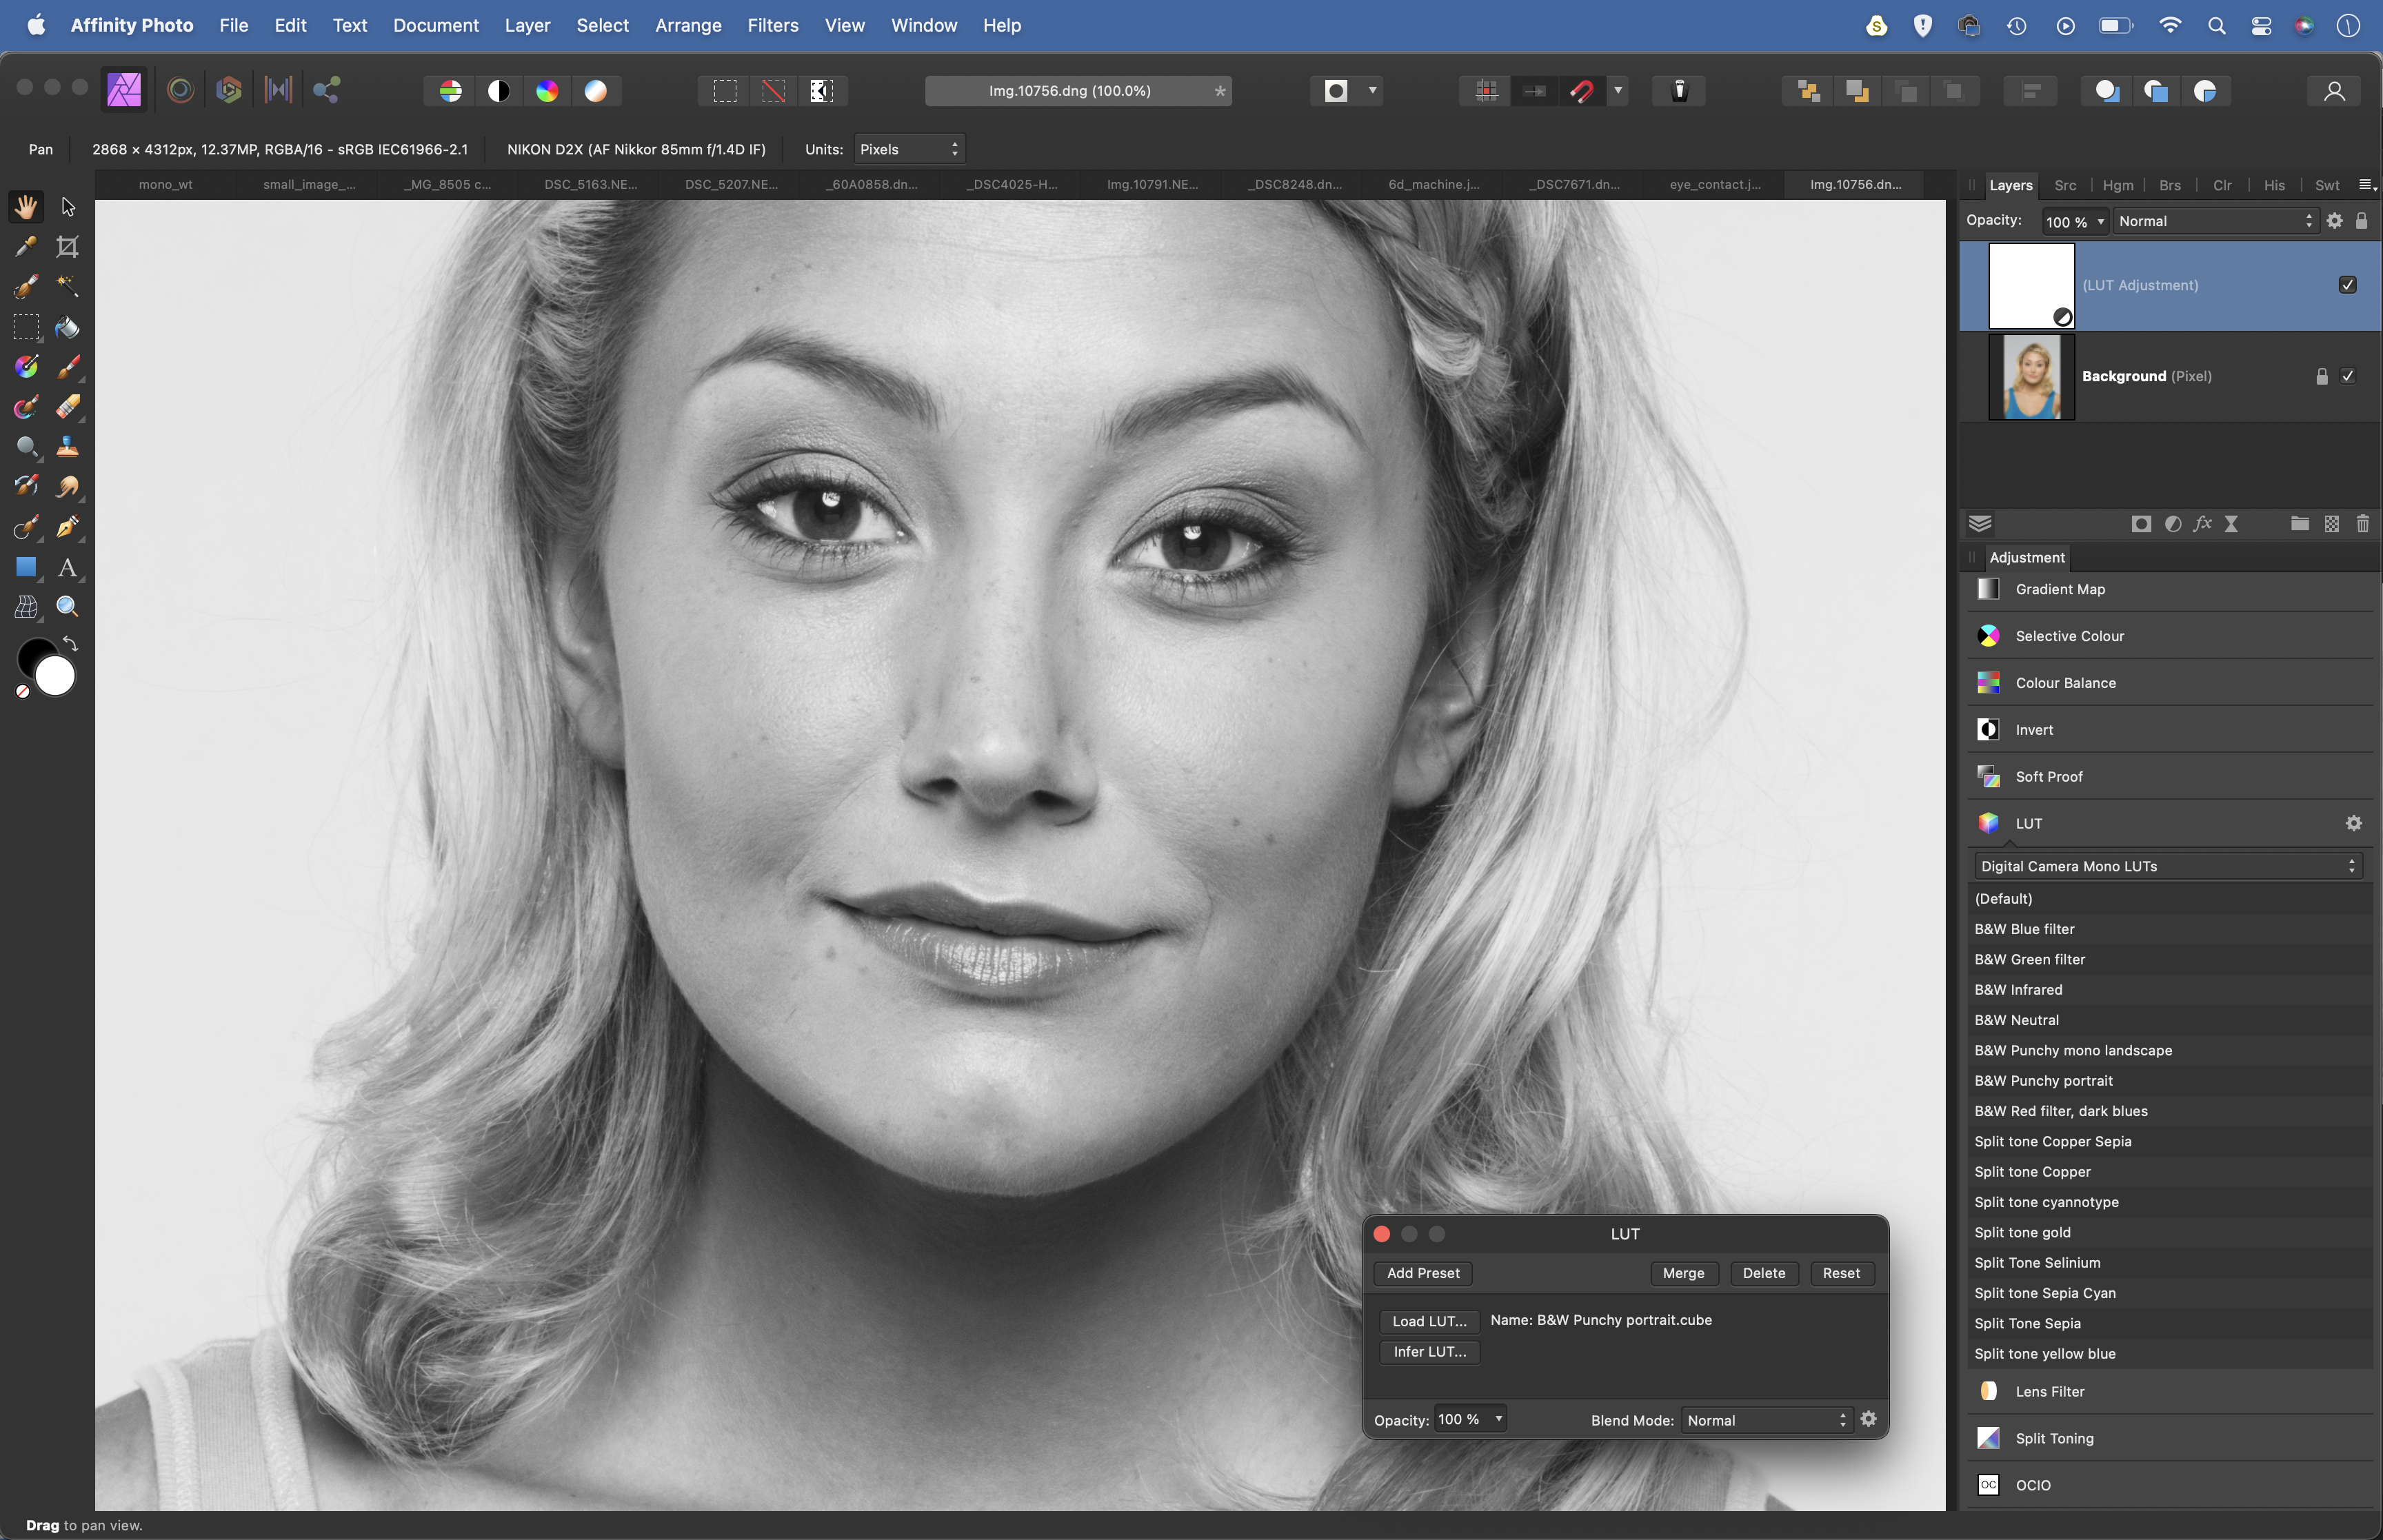
We’ve supplied a set of 15 monochrome LUTs among the project files for you to try out on your photos. There are seven black and white effects and eight split-tone treatments. Download them here. To install them, go to the Adjustment panel in Affinity Photo (View > Studio > Adjustment). Scroll down to the LUT option and click the cog icon, then choose Import LUT Category. Navigate to the supplied Mono.afluts file and load it in. Now simply click on the LUTs to apply to your photo. If you want to fine-tune the split-tone effects, try adding a black and white layer before applying the LUT.
1) Convert to black and white
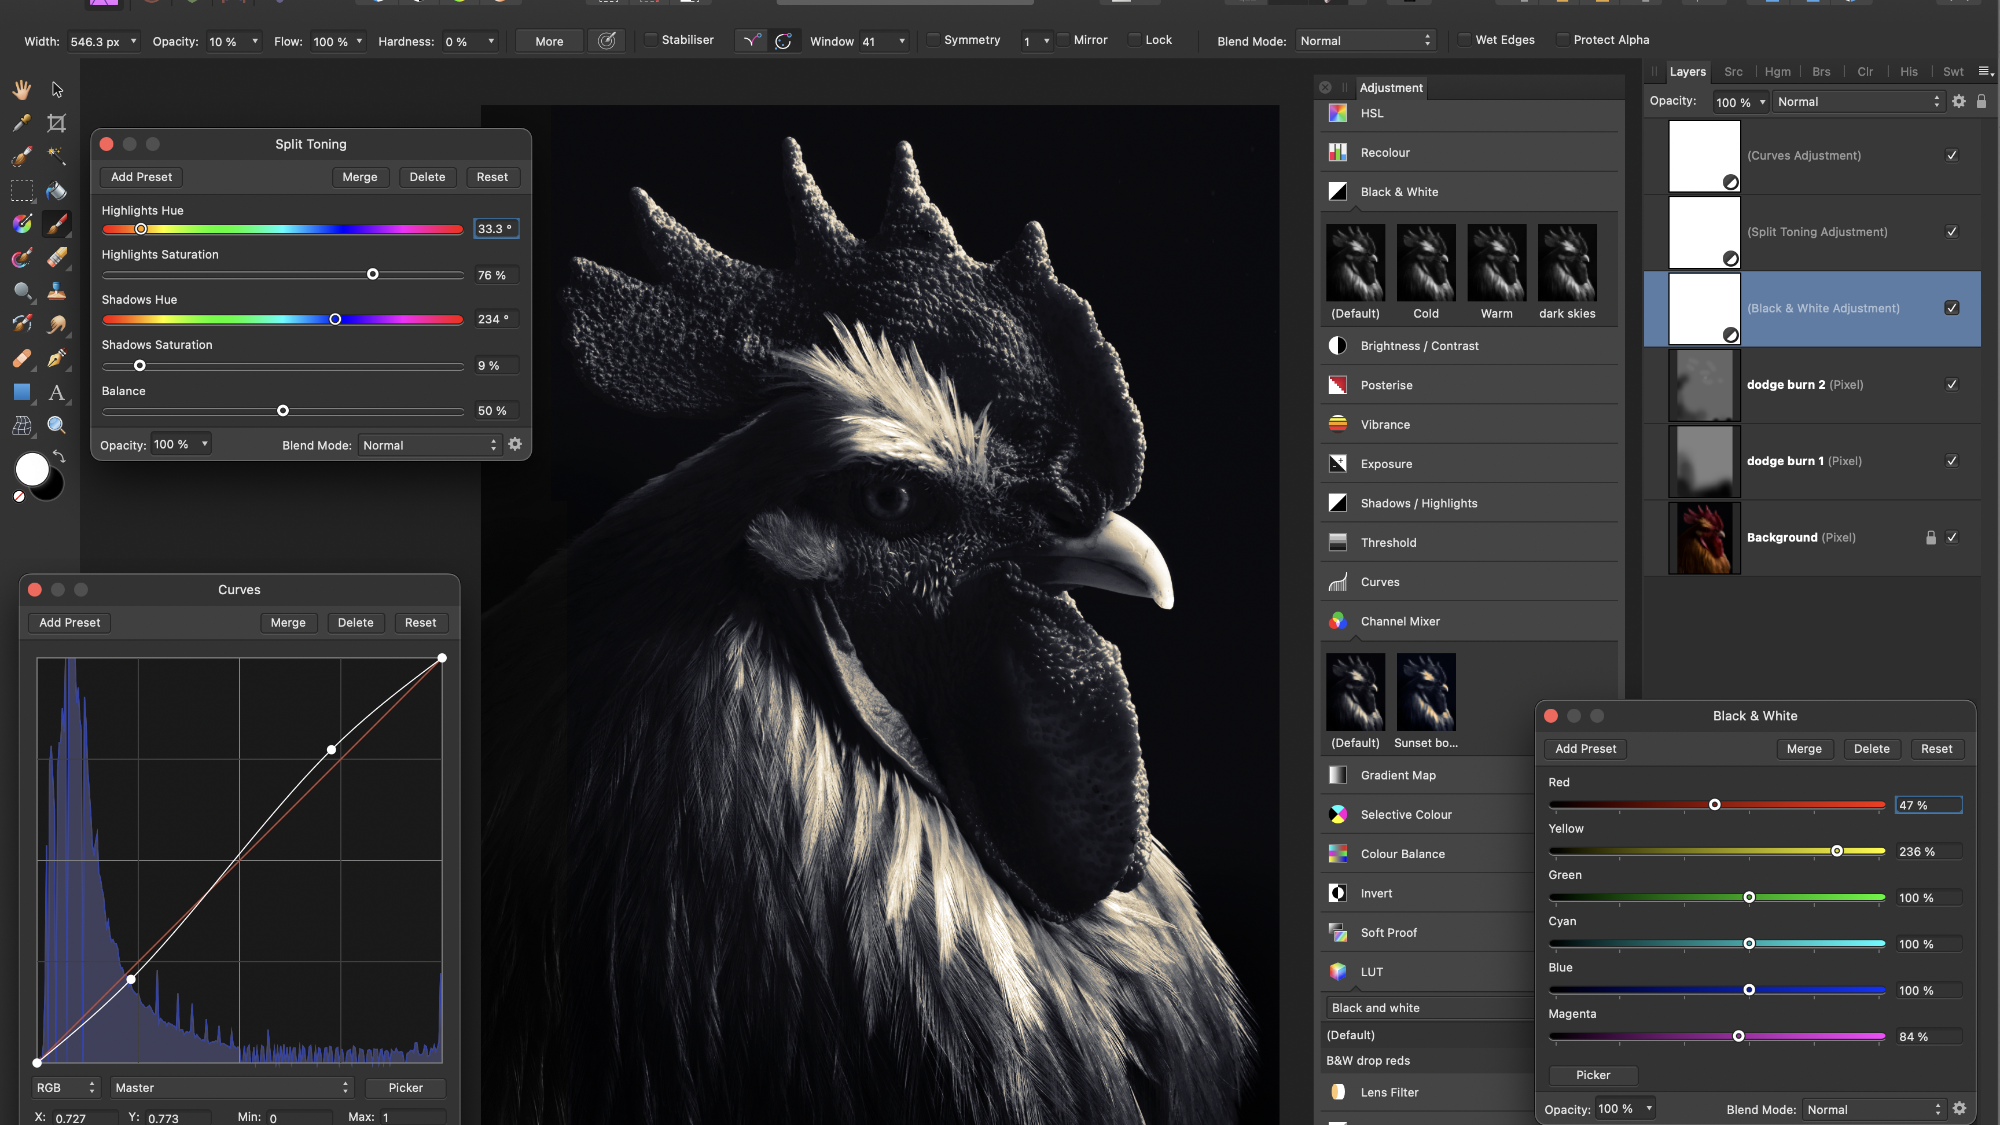
The Black and White Adjustment is the best tool for mono conversions in the Photo Persona. Click the Adjustment icon at the bottom of the Layers panel and choose Black and White. Six sliders let you fine-tune the mono conversion by altering the brightness of colour ranges. Here, it allows us to lift the yellow feathers and darken the red comb on the chicken’s head.
2) Non-destructive adjustments
The Black and White Adjustment is a non-destructive Adjustment Layer. This means we can double-click the layer to change the settings at any time. We can also quickly save treatments when creating LUTs or presets for our black and white effects. With Adjustment Layers, we can lower the strength by altering layer opacity or adding a mask to make a local adjustment.
3) Use Curves adjustments
A Curves adjustment is ideal for increasing contrast. Initially, conversions can look flat, but Curves let us add punch. Simply plot two points to make a shallow S-shaped curve (the more pronounced the shape, the greater the contrast). The top point controls highlights, and the bottom sets the shadows. We’ve also added a split toning layer. This lets you add colour tints to the highlights and shadows.
4) Create black and white presets
Black and white tools can be monotonous, so it makes sense to save your treatments so that you can quickly apply them. Presets allow you to save the settings in the Black and White panel. Click Add Preset to save the settings and name the preset. It will appear in the Adjustment Panel (View > Studio > Adjustment under the Black and White heading.
5) Save LUTs
While presets let you save the slider settings, LUTs allow you to save the Adjustment layers that factor in an effect, so you can include settings like Curves or Split Toning. To create a LUT, make some adjustment layers, then go to File > Export as LUT. Name the LUT and save. To load your LUTs into Affinity, click the cog next to LUTs in the Adjustment panel and choose Import LUTs (or Import LUT category to load our free set).
6) Make a Dodge/Burn layer
To make a new layer, go to Edit > Fill, select HSL sliders from the dropdown and set H: 0, S: 0, L: 50%. Change the Blend Mode of the layer to Soft Light. Now you can paint black to darken parts of the image or white to lighten it. Grab the brush tool, choose a soft-edged brush, hit 2 for 20% opacity, and start painting to gradually lighten or darken areas.
Get the Digital Camera World Newsletter
The best camera deals, reviews, product advice, and unmissable photography news, direct to your inbox!
Digital Camera World is one of the leading authorities on camera and photography news, reviews, techniques, tutorials, comparisons, deals and industry analysis. The site doesn't just specialize in cameras, but all aspects of photography, videography and imaging – including camera phones, gimbals, lenses, lighting, editing software, filters, tripods, laptops, printers, photo books, desks, binoculars and more.
Whether you're using, looking to buy or trying to get the most out of a compact camera, action camera, camera drone, cinema camera, beginner camera or professional camera, Digital Camera World has a roster of experts with combined experience of over 100 years when it comes to cameras, photography and imaging.

