Home photography idea: Powerful photos with powder photography
Create dramatic and atmospheric action images by shooting powder photography portraits with flash
Watch video: Home photography ideas – Powder photography portraits
Photography projects at home
• Home photography ideas
Useful home photography kit
• Best tripods
• Best lighting kits
• Best reflectors
• Best macro lenses
When photographing a moving subject such as a dancer, it can be a challenge to convey a sense of graceful motion in a still image. But something as simple as a handful of powder can show off the action in a wonderfully atmospheric way.
The fine white powder hangs in the air, shifting with the action and creating dusty whorls that catch the light. It also makes an almighty mess – to your gear, the surroundings and your plucky subject – but that’s a price worth paying for the extra dimension that the powder gives the shoot.
In this tutorial we’ll explain how to get set up and shoot your own powder portraits. You’ll learn how to light the scene, pose your subject and apply the magic ingredient. Lighting plays a big part and, although it might look like a complicated setup, there are only three inexpensive flashguns at work here, with a couple of modifiers attached to them to diffuse and spread the light.
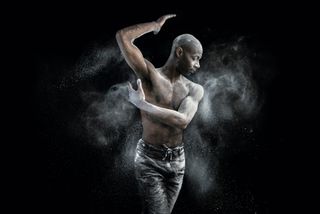
What’s more, you don’t necessarily need a studio. Any decent-sized space will do – you could even shoot it outdoors on a dry night. In fact, there are advantages to not being in a studio, as it makes the clean-up process much easier if you can hose the area down!
The underground car park below Digital Camera World HQ did the job for us – and we managed to escape before any of the drivers noticed the light dusting of white powder over their vehicles!
For our shoot we used flour, though obviously in the current climate baking ingredients can be very hard to come by, so you can use talcum powder or even plain or colored paint powder as substitutes.
• Best online photography courses
Get ready for powder power
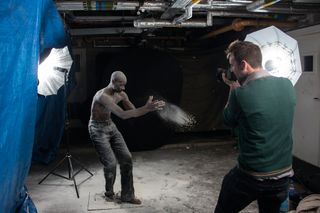
01 Find a good spot
We need a dim environment and a dark backdrop. We shot in an underground car park below the office here. Do what you can to minimize the mess beforehand by arranging tarps and dust sheets.
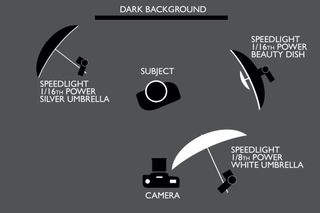
02 Set up your lights
In our three-speed light setup, the front light is fitted with a white shoot-through umbrella, the back left has a silver umbrella and the back right a portable beauty dish. All three strobes are set to manual mode.
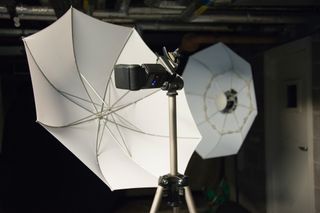
03 The trigger set-up
We fire the flashes with a wireless flash trigger attached to one of the speed lights. The other two flashguns are set to slave mode, so that they go off upon detecting the first (master) light.
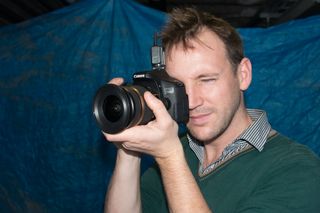
04 Go wide and expose for flash
When using off-camera flash we need to use manual exposure mode. Use a shutter speed of 1/200 sec and then adjust the aperture and ISO until the exposure looks right (here we’re at f/6.3 and ISO400). A wide-angle zoom is perfect, as it enables you to squeeze your whole subject and the surrounding powder cloud into frame.
Recipe for success
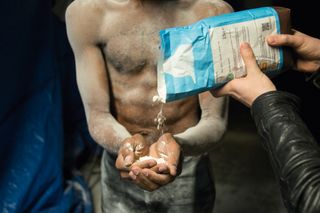
01 Apply the flour
We tried two types of flour – just to be scientific about it! – but found very little difference between plain and self-raising. However sieving the flour will definitely encourage it to hang in the air. We asked our model to hold flour in his hands and then release it as he danced and moved.
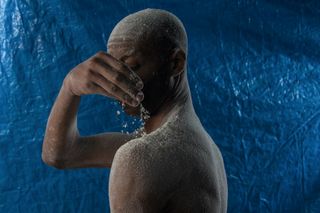
02 Off the shoulder
To show the movement in different parts of the body, try sprinkling flour over the shoulders, arms and feet. If your subject has long hair, you could try sprinkling it there as well. This way, it flies off naturally as they move. Keep a few towels on hand to dust off between shots.
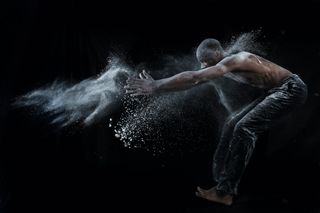
03 Perfect the poses
It really helps on a shoot like this if you can work with a subject who knows how to move their body. If you can trust your subject to get into interesting positions, it frees you to concentrate on perfecting the technique, timing and composition.
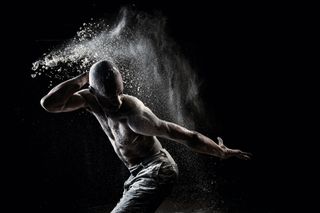
04 Play to the light
Strong back- and side-lighting gives us these bright highlights along both sides of the body. Pose the subject to make the most of this edge light, by asking them to turn their head and body one way or the other as they move – a straight-on pose won’t work here.
Finishing touches in Photoshop
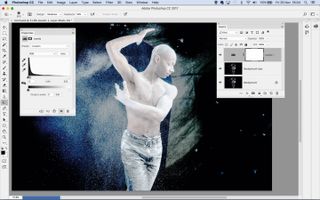
Duplicate the background layer, then add a Levels adjustment layer and drag the middle slider all the way to the right for a bright image. Highlight the duplicate layer, grab the Burn tool and set range to Shadows, then burn the backdrop to black.
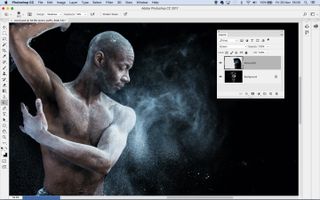
There’s an easy way to copy the flour from one image to another in Photoshop, to create the perfect puffs. Make a loose selection around the flour with the Lasso tool, copy and paste into another image then set the blending mode to Screen.
PhotoPlus: The Canon Magazine is the world's only monthly newsstand title that's 100% devoted to Canon, so you can be sure the magazine is completely relevant to your system.
Read more:
• Boudoir photography tips
• Home photography ideas: Creative nude lighting with a projector
• Best wide-angle lens: ultrawide zooms that get everything in the picture
• The best flashgun: the best strobe units for Canon cameras, Nikon and more
Get the Digital Camera World Newsletter
The best camera deals, reviews, product advice, and unmissable photography news, direct to your inbox!
The lead technique writer on Digital Camera Magazine, PhotoPlus: The Canon Magazine and N-Photo: The Nikon Magazine, James is a fantastic general practice photographer with an enviable array of skills across every genre of photography.
Whether it's flash photography techniques like stroboscopic portraits, astrophotography projects like photographing the Northern Lights, or turning sound into art by making paint dance on a set of speakers, James' tutorials and projects are as creative as they are enjoyable.
He's also a wizard at the dark arts of Photoshop, Lightroom and Affinity Photo, and is capable of some genuine black magic in the digital darkroom, making him one of the leading authorities on photo editing software and techniques.

