How to use the augmented reality tools in Luminar 4
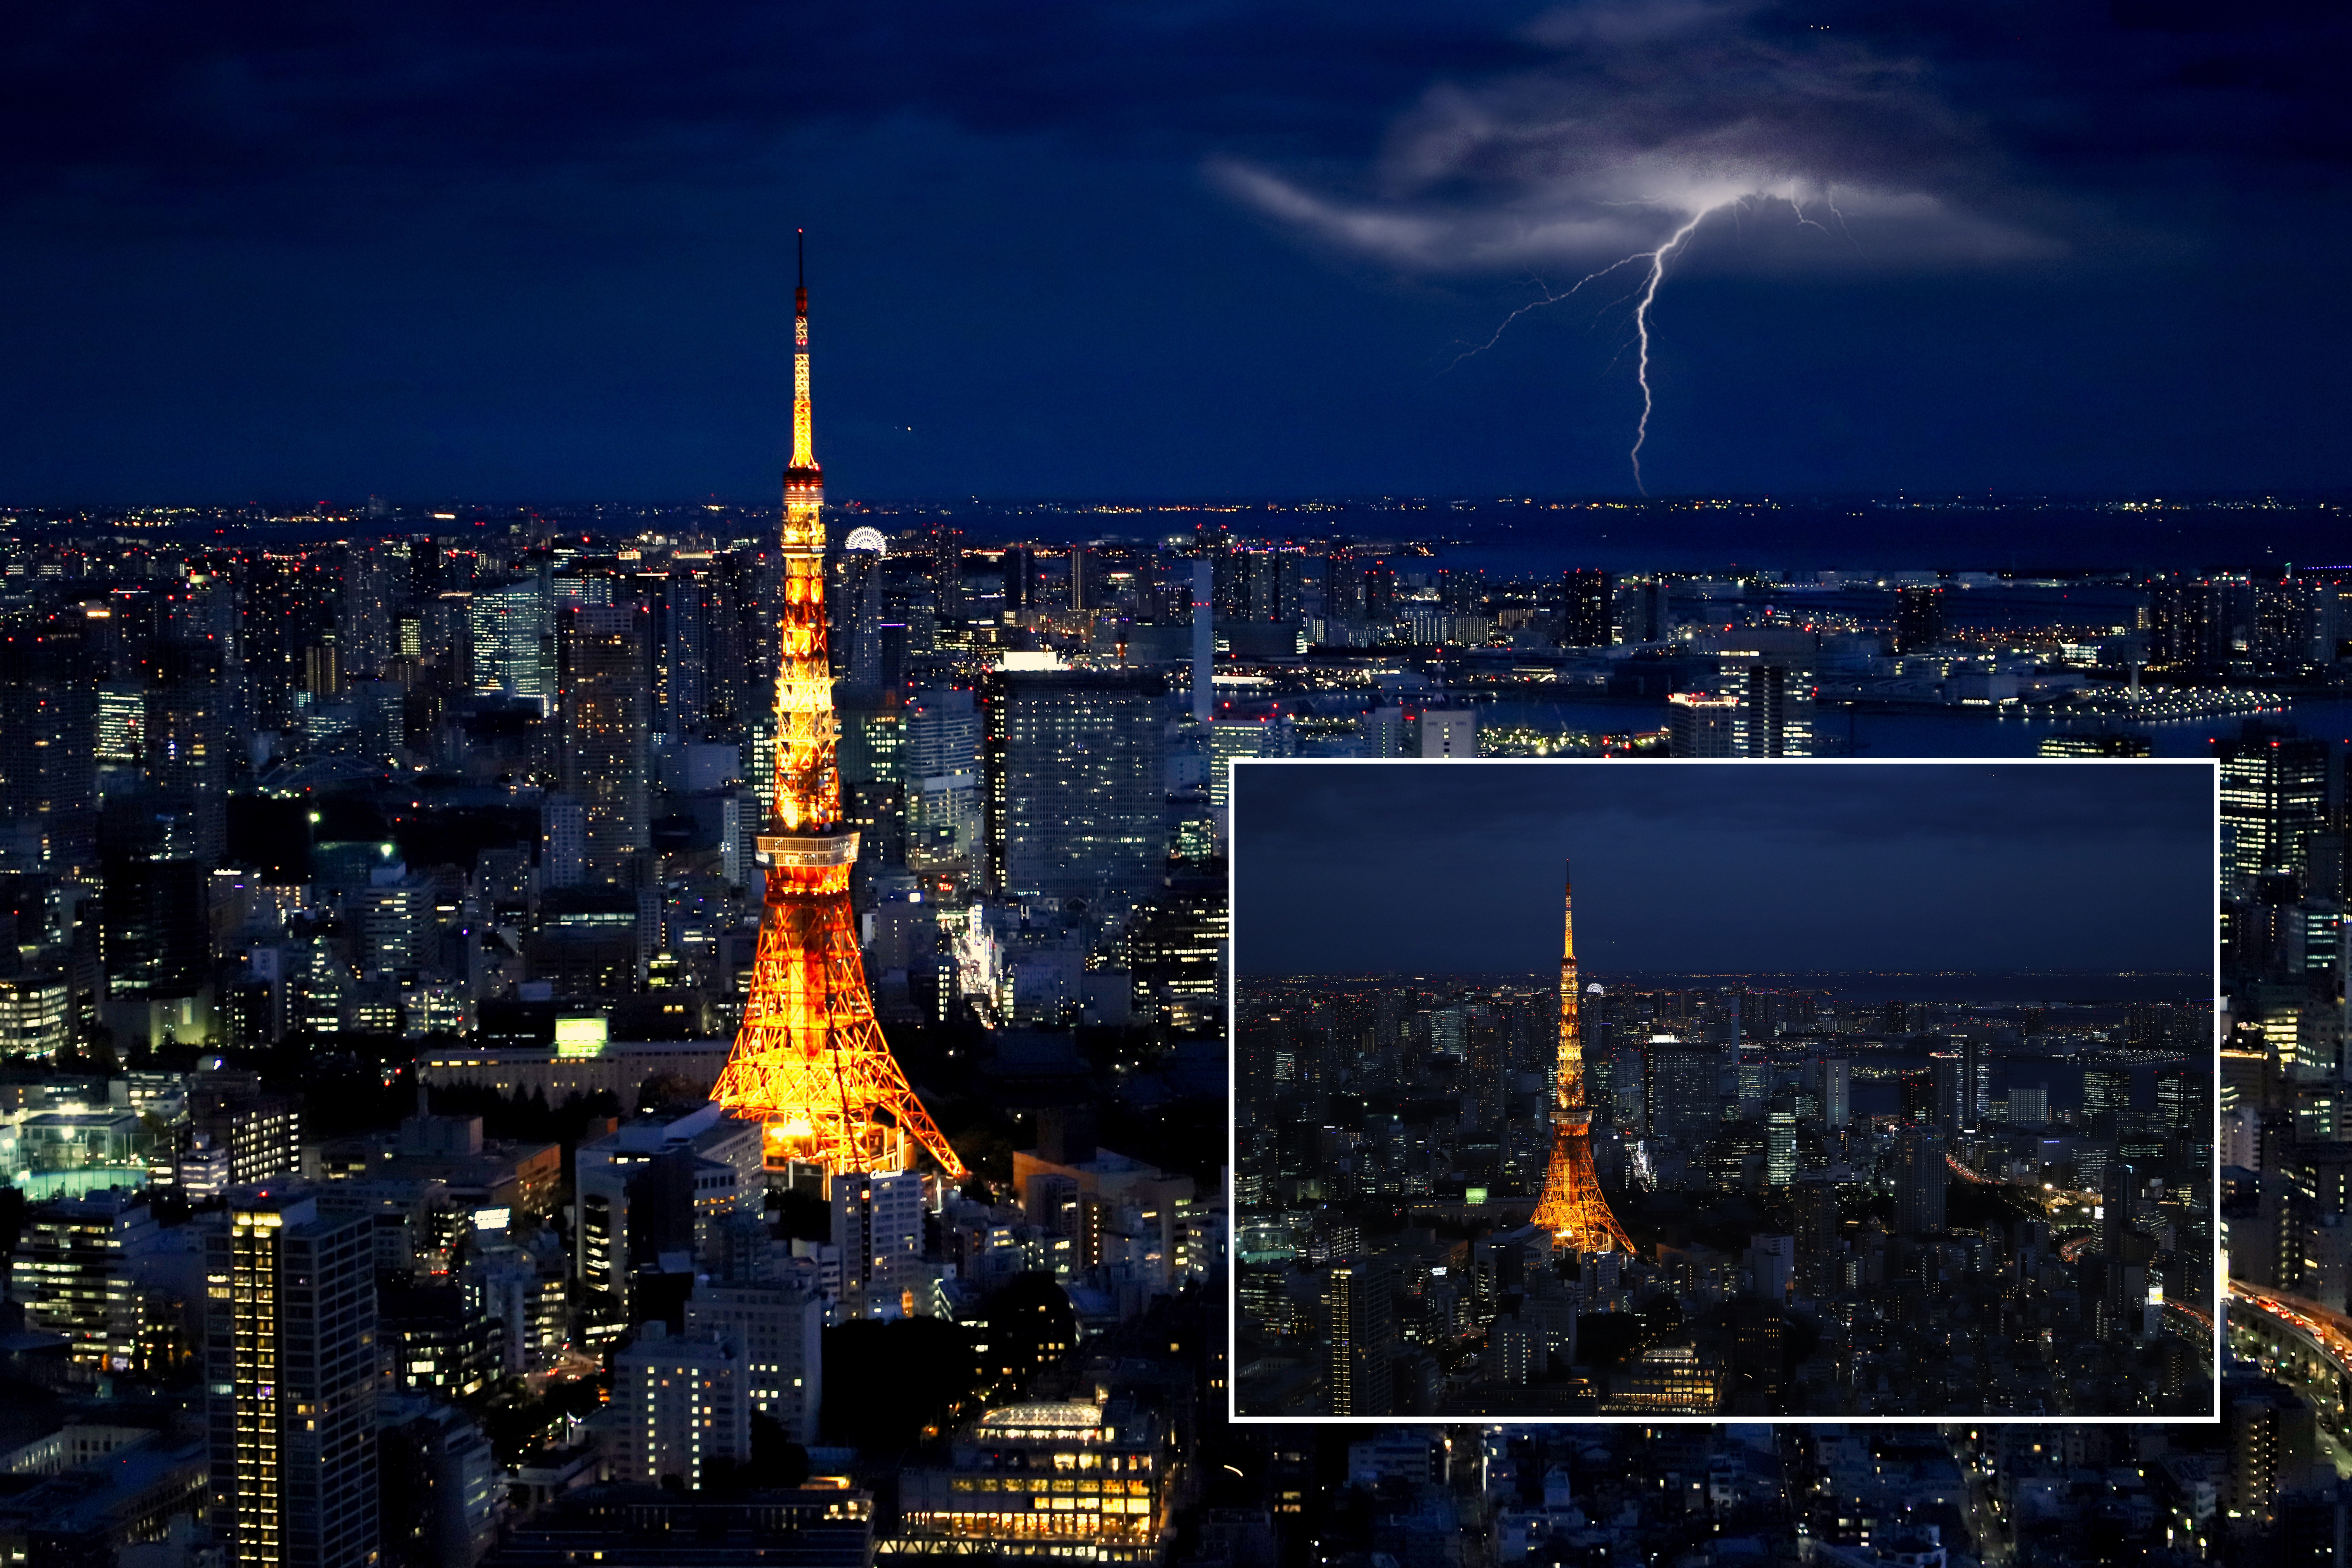
Luminar 4 is remarkable for its use of artificial intelligence and machine learning to drive photo editing in whole new directions. For photographers, it means that much of the pain of selections and masking is taken away, as the software can now automatically identify, mask and blend different objects in a picture.
We’ve seen this already with the AI Sky Replacement tool, which can add a new sky to an otherwise flat-looking landscape, and the AI Portrait Enhancer tools, which can automatically identify and mask not just human faces, but individual facial features.
And now Luminar 4.2 has arrived, bringing more new tools, including the remarkable AI Augmented Sky feature. It might sound like it crosses over with the AI Sky Replacement tool, but it’s actually a different feature. The AI Sky Replacement tool can add a new sky; the AI Augmented Sky tool can add things to that sky, from mountains to clouds, birds and even planets.
For some photographers, this idea might be a little controversial! If you like to take photographs that depict the world as it is, then you’re better off with Luminar’s regular adjustments. If you want to picture the world as you’d like it to be, however, the new AI Augmented Sky feature will have you hooked.
Augmented reality has been around for a while in games, VR applications and camera phones. It might not be photography as we know it, but it’s part of a broader spectrum of image-making that includes illustration and digital art.
Add an augmented sky in five steps
Everyone loves a thunderstorm – this one took us about a minute!
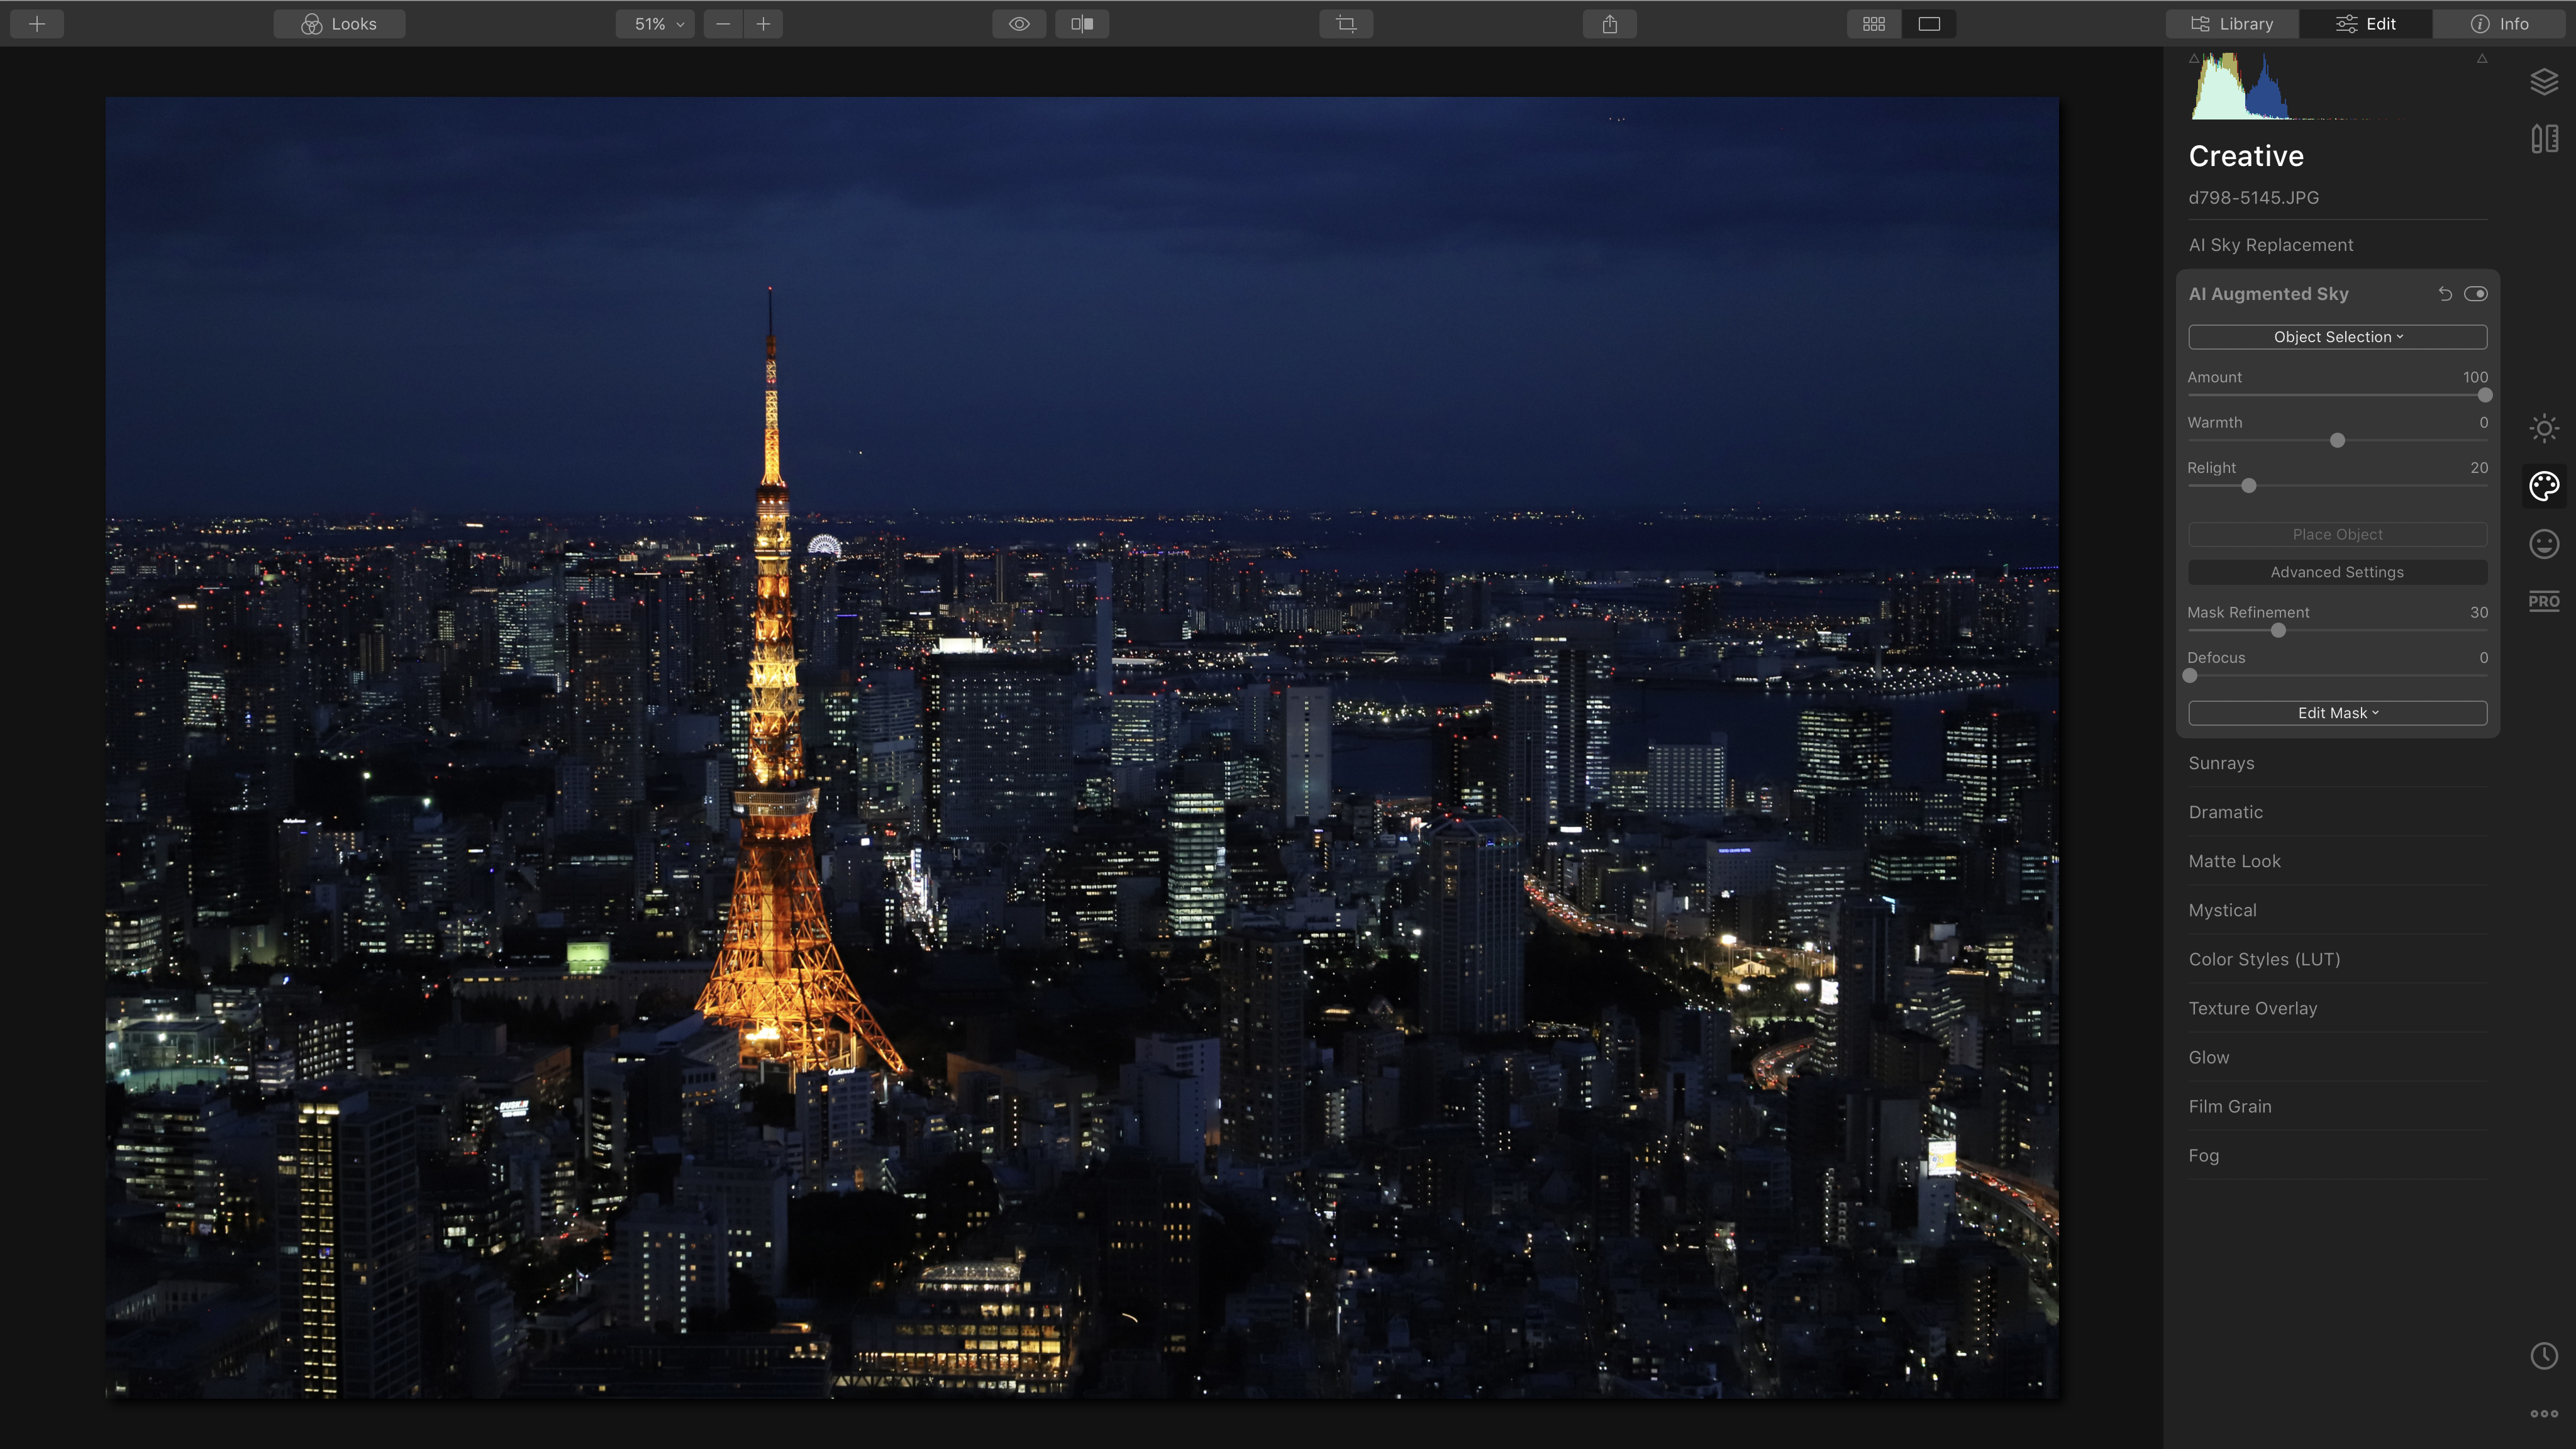
1. The AI Augmented Sky panel
Luminar 4’s interface has been simplified and reorganized compared with previous versions. It consists of four key workspaces, displayed as icons running down the right side of the screen. The AI Augmented Sky tool is in the ‘Creative’ workspace. To open the tool settings panels, you just click on the title. Our shot is a nice but slightly dull image…
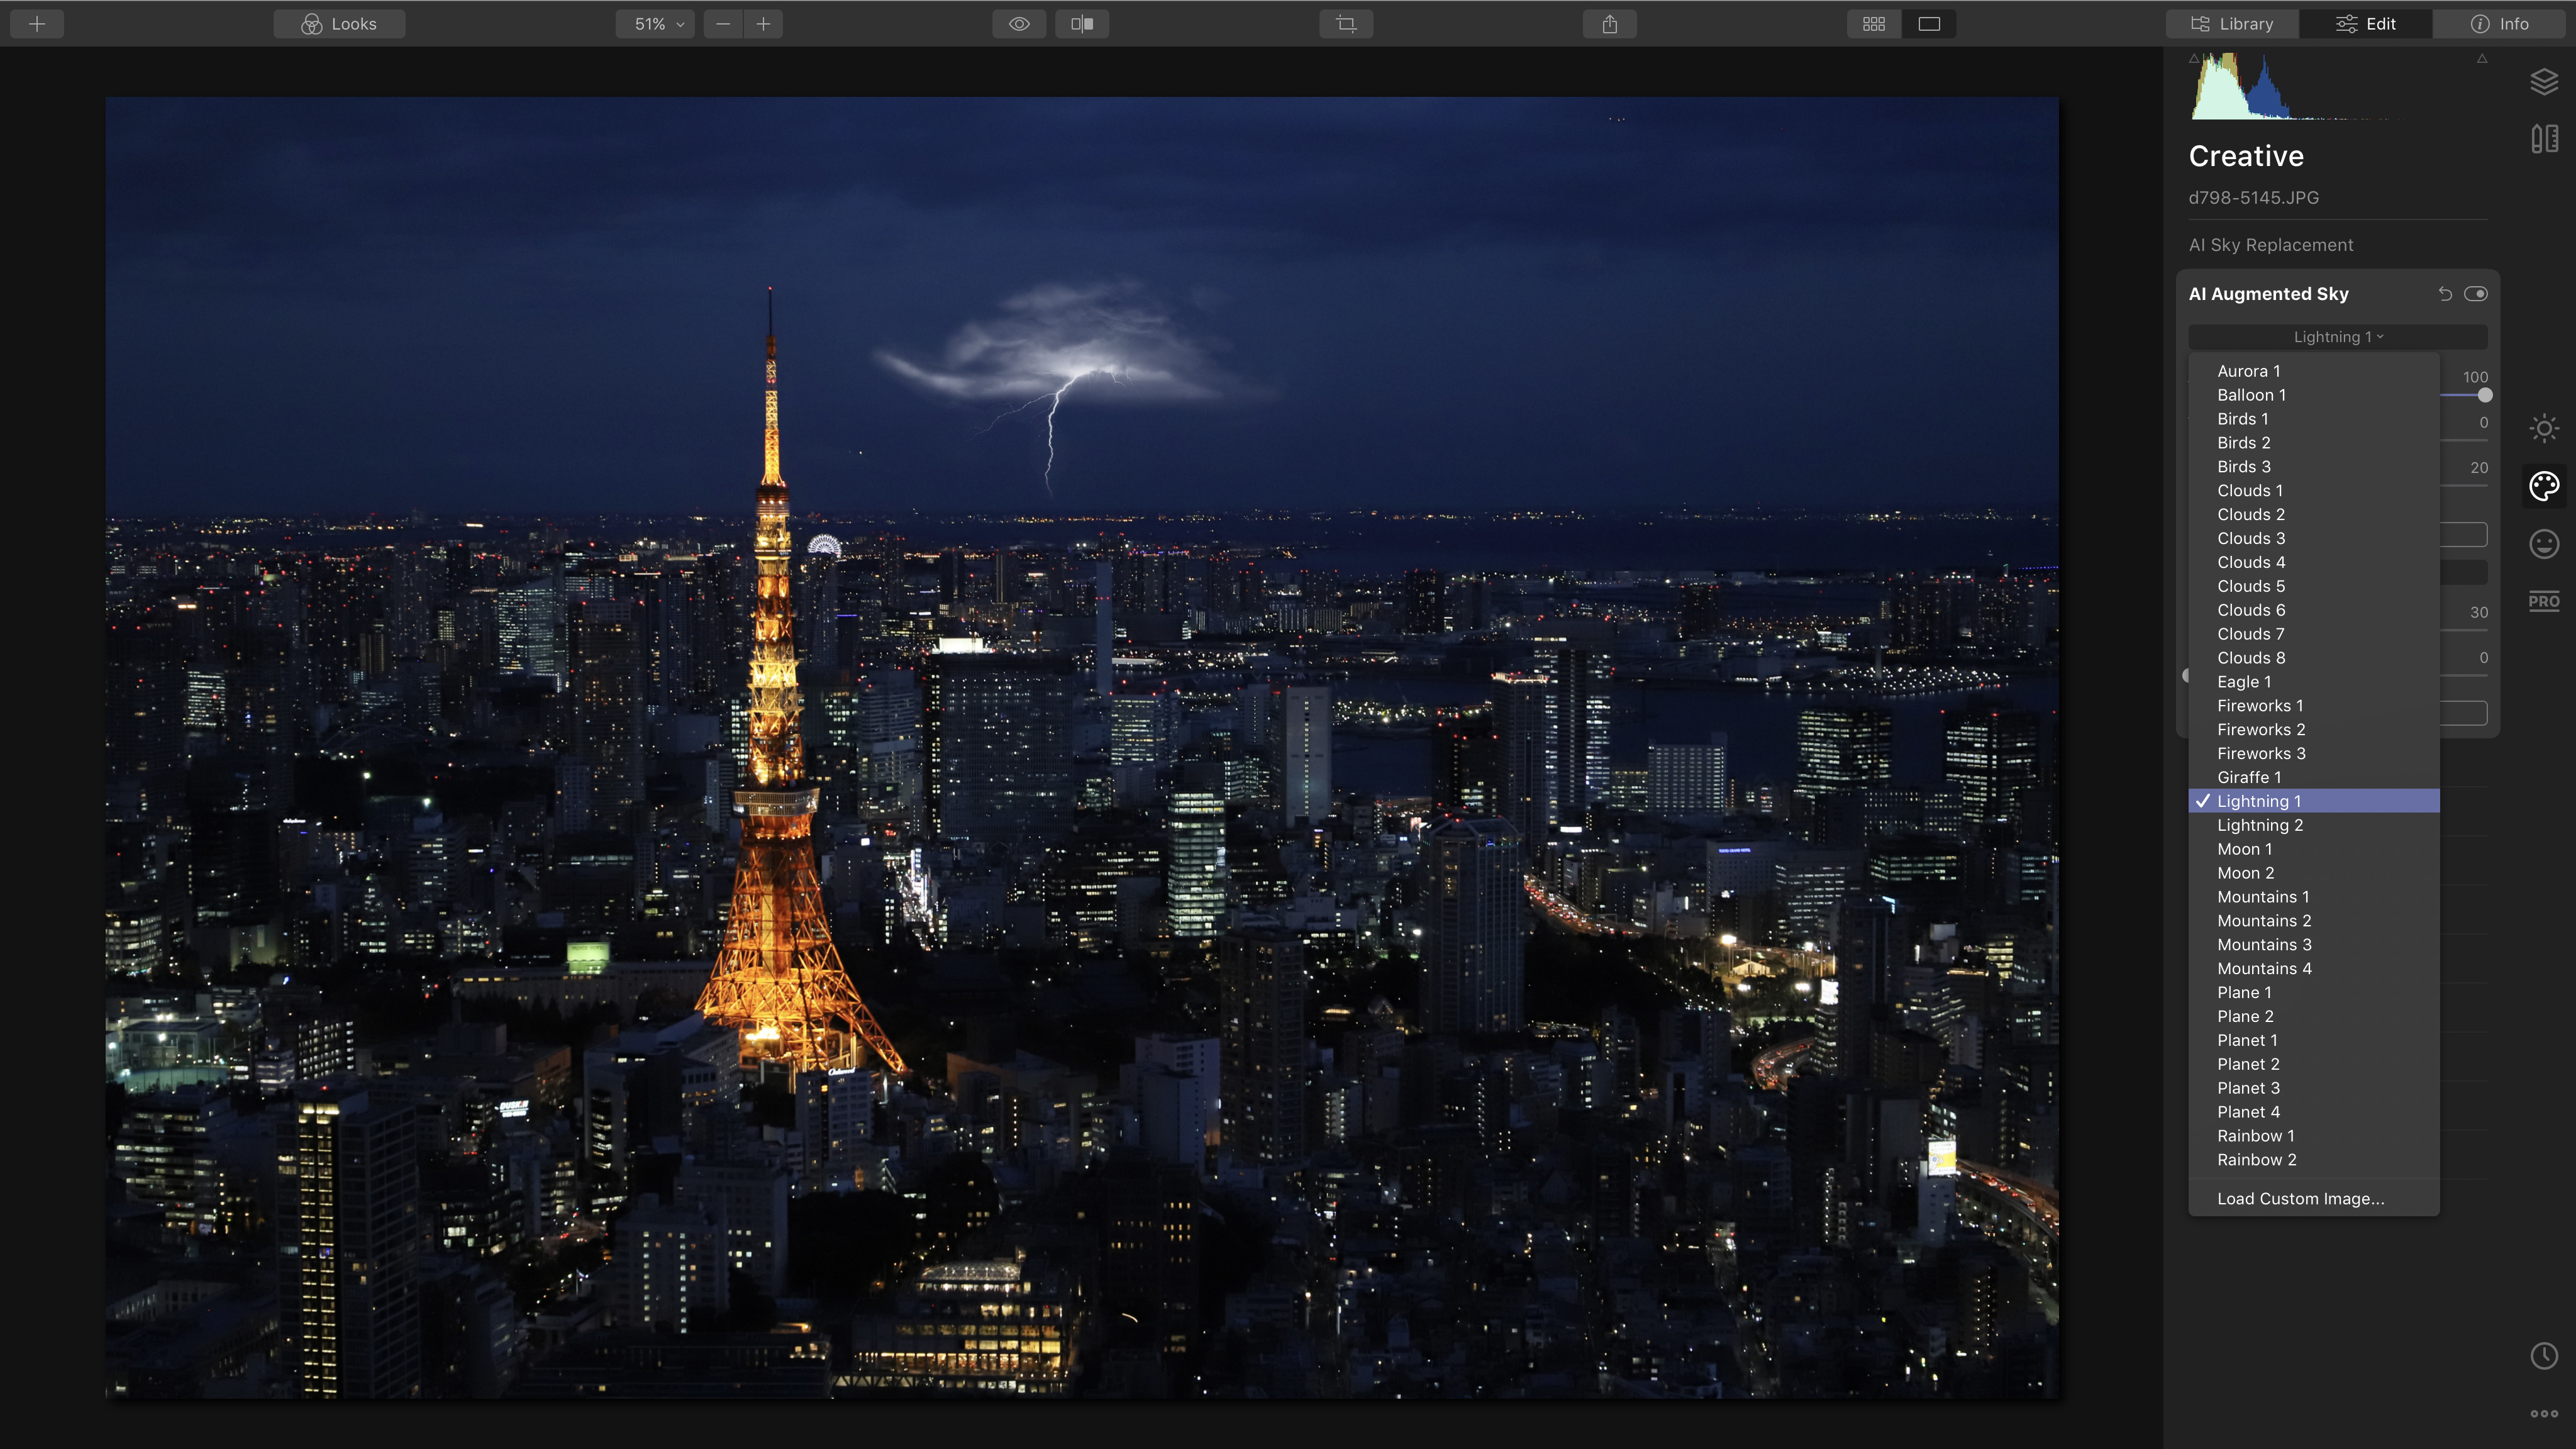
2. Add some lightning
Let’s spice things up a little! Normally you might expect a job like this to take a lot of careful blending and masking, but with the AI Augmented Sky tool it couldn’t be easier. First, we need to choose the object we want to add to the sky. Luminar 4 comes with a long list of options. You can also use the ‘Load Custom Image’ option to add your own.
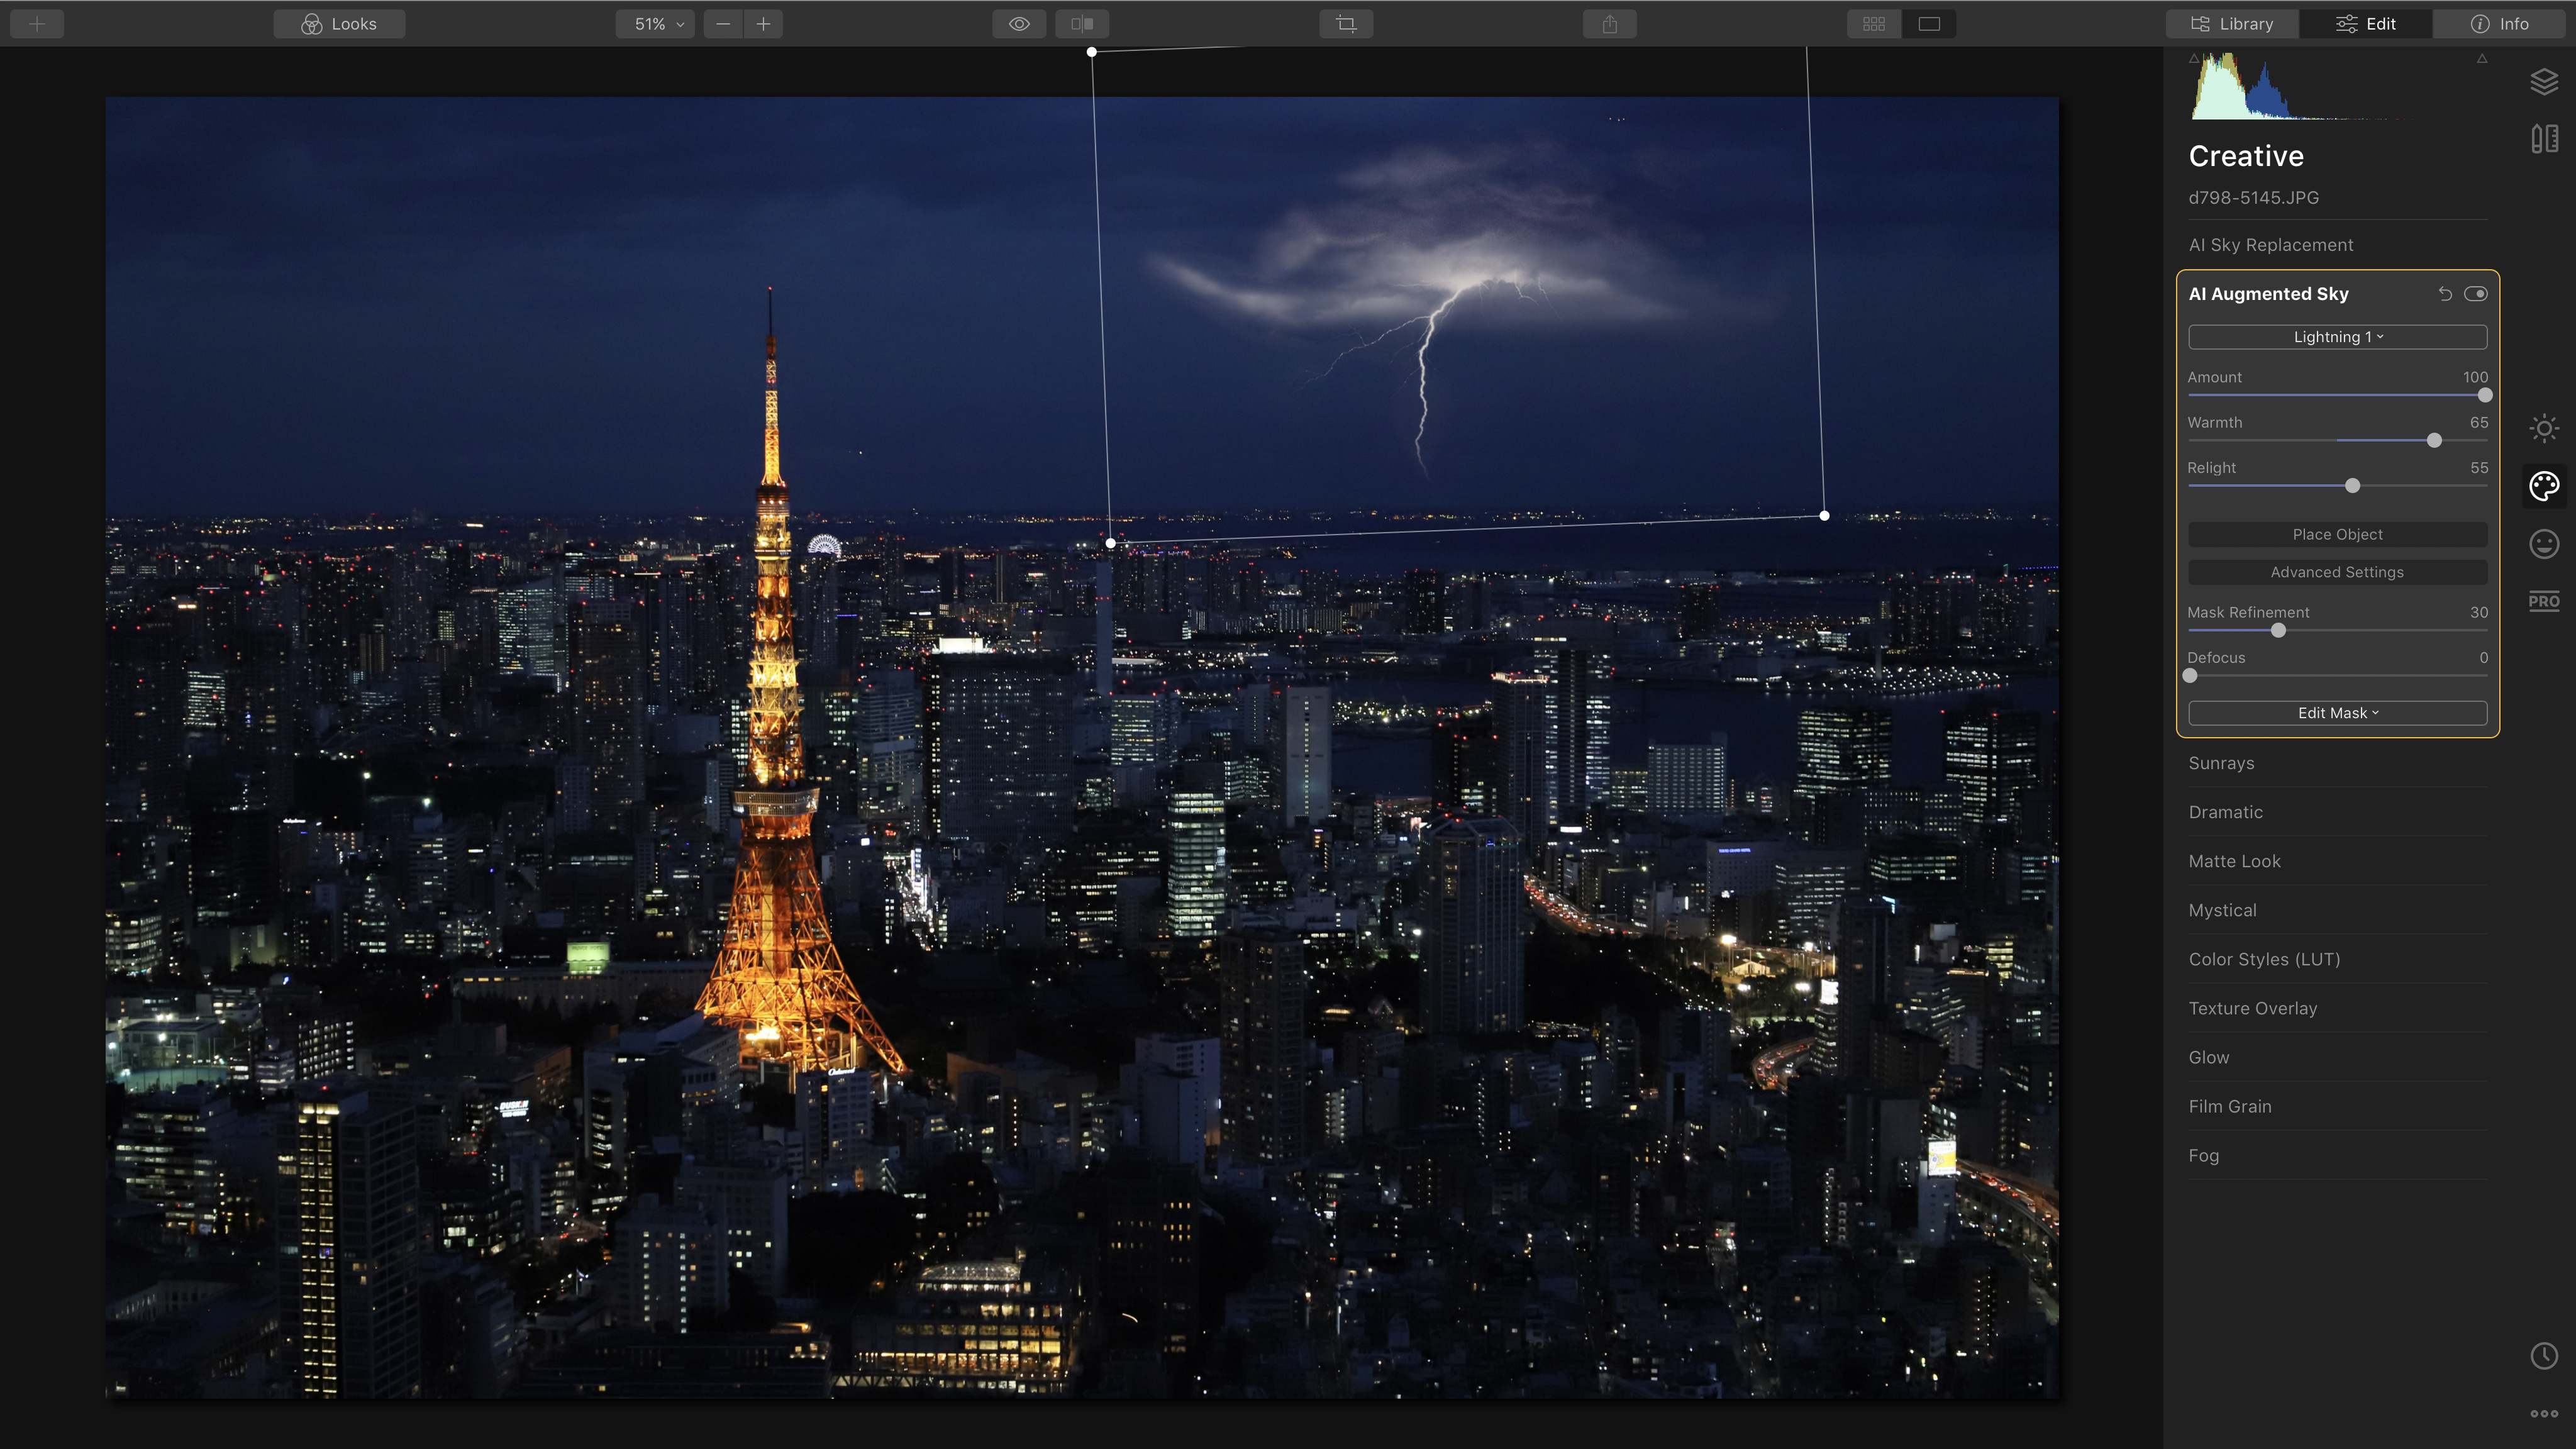
3. Reposition your object
Luminar drops your augmented sky object into the centre of the frame. The foreground and sky masking is carried out automatically, so it may be obscured by an object in the foreground. To move the object to a better location, use the Place Object button. You can now move, resize or rotate it, or even adjust its warmth and brightness to match the scene.
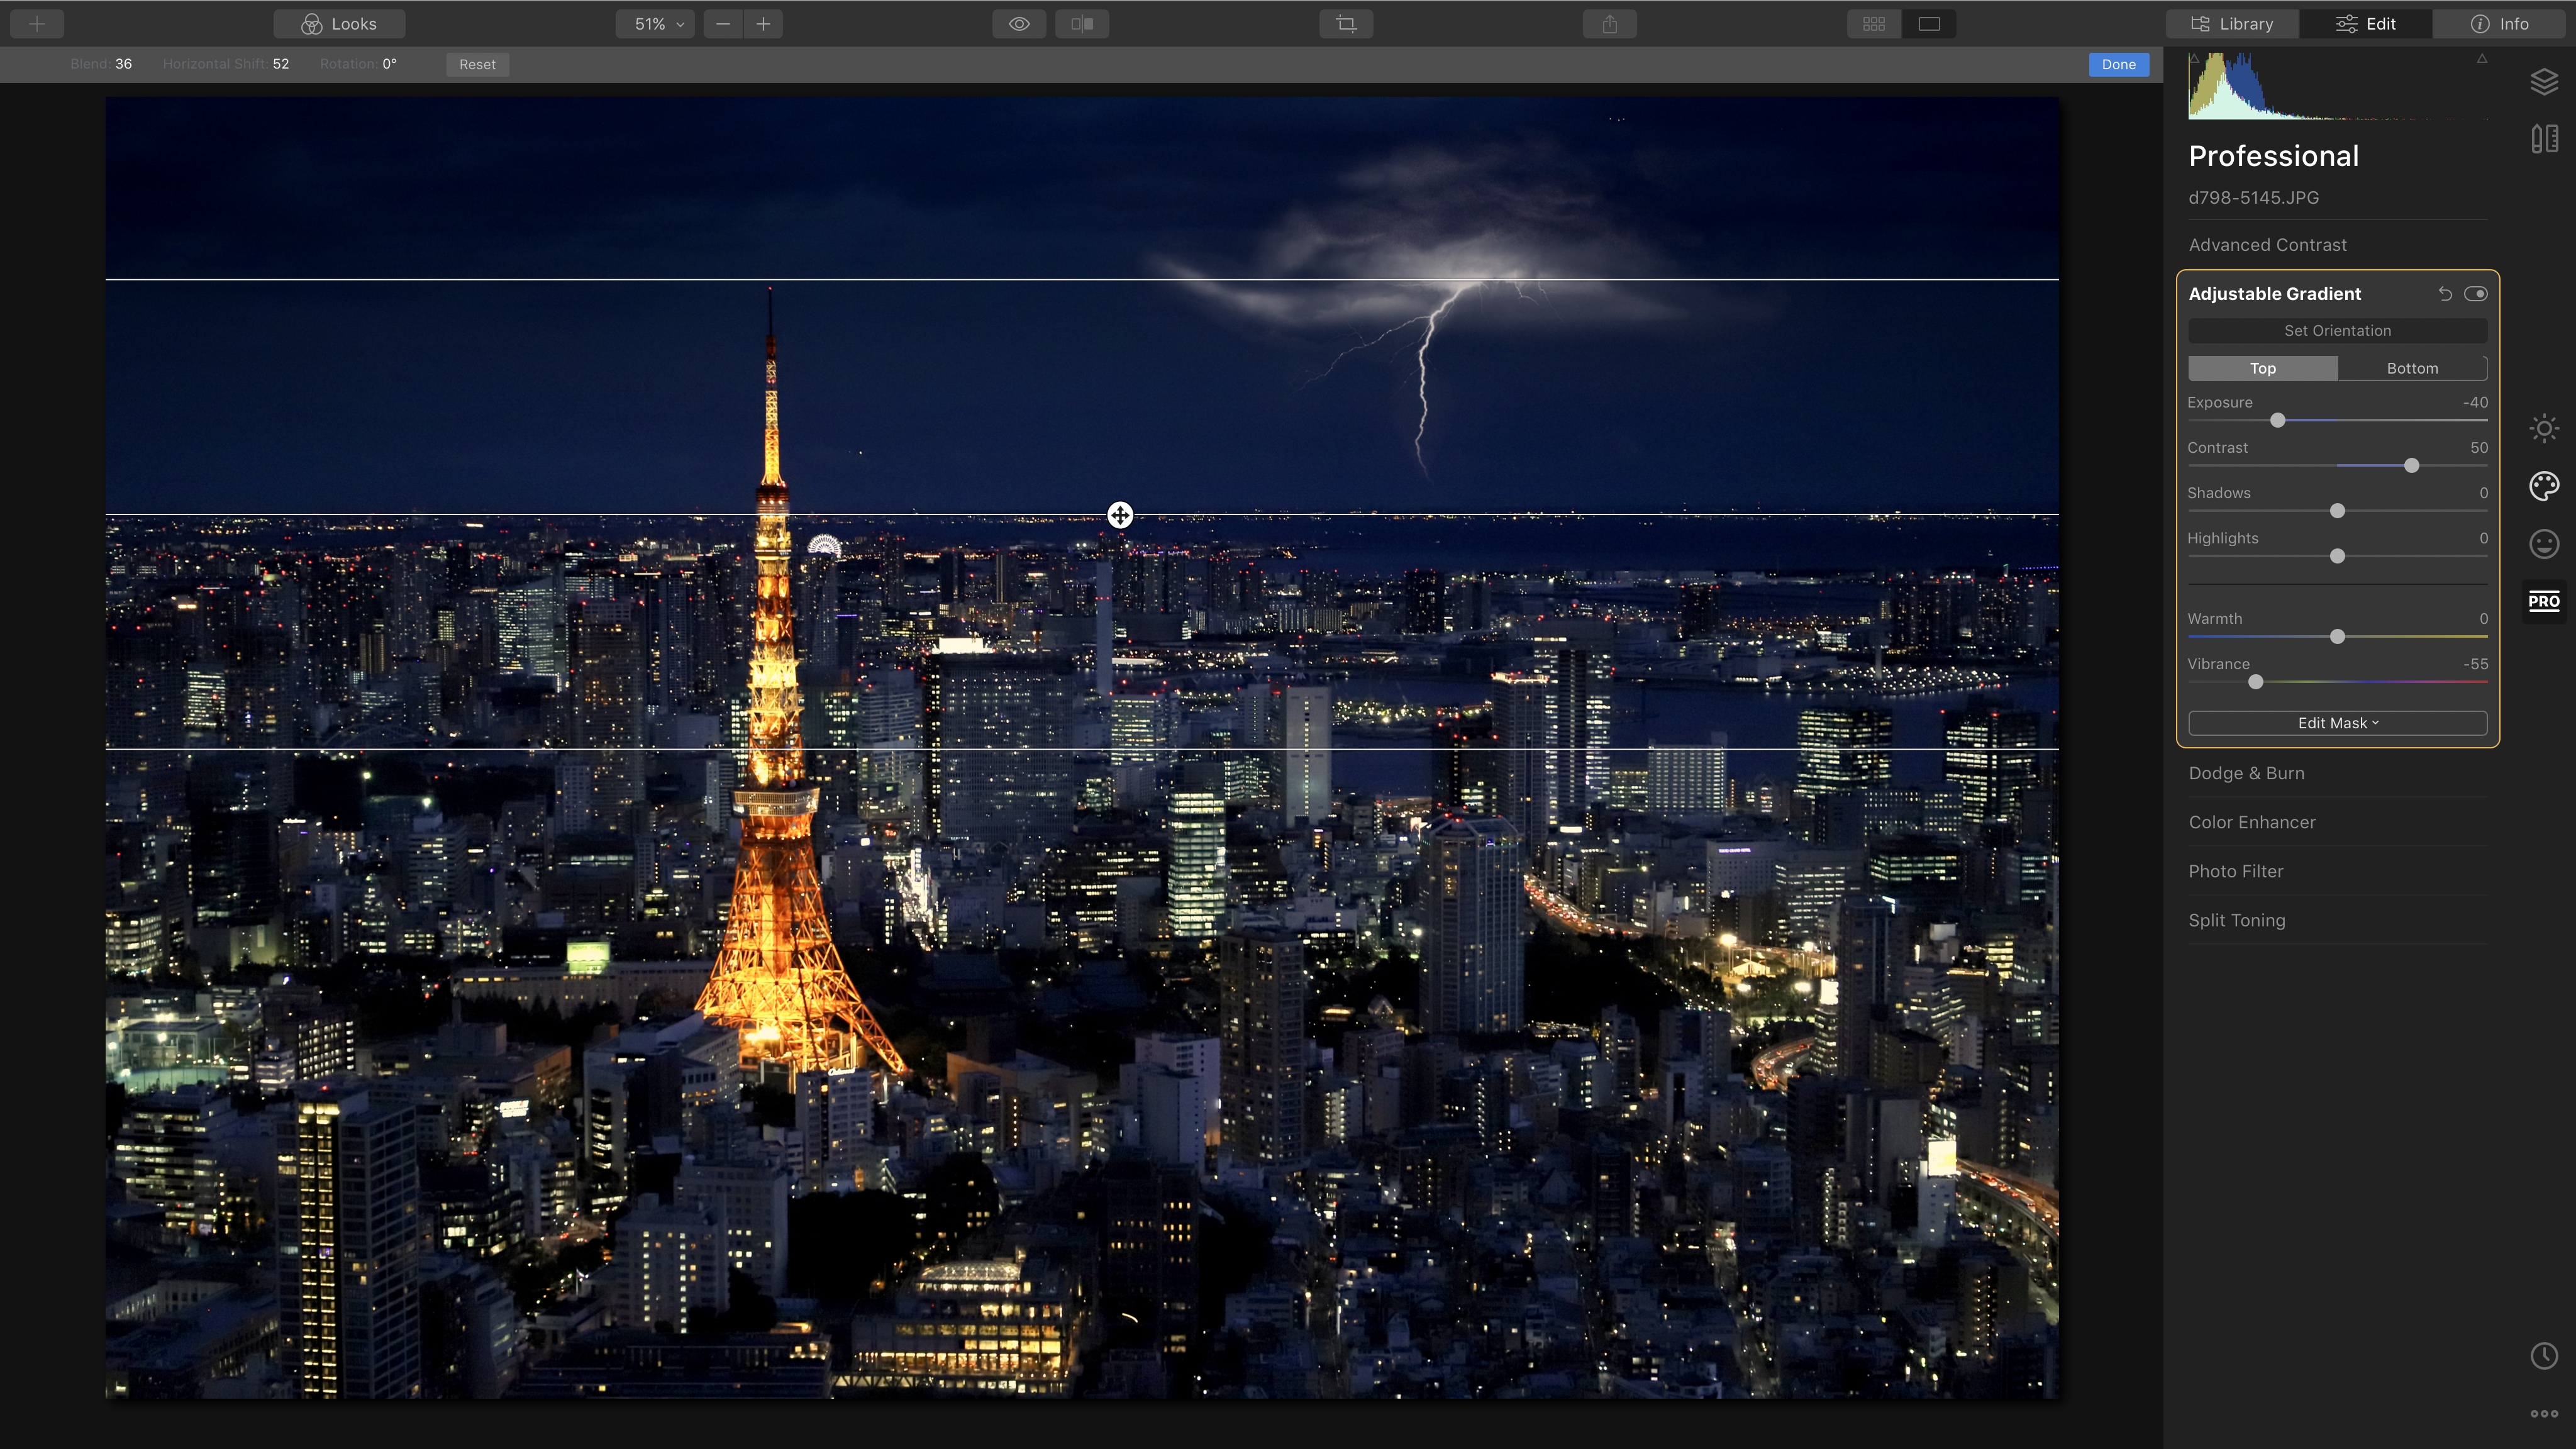
4. Darkening the sky
You can use the AI Augmented Sky feature on its own, but it’s even more effective when used with the other editing tools. To add some depth and gradation to the sky, we’ve used the Adjustable Gradient tool in the Pro workspace to increase the Exposure for the bottom part of the picture and reduce the Exposure and increase the Contrast for the top.
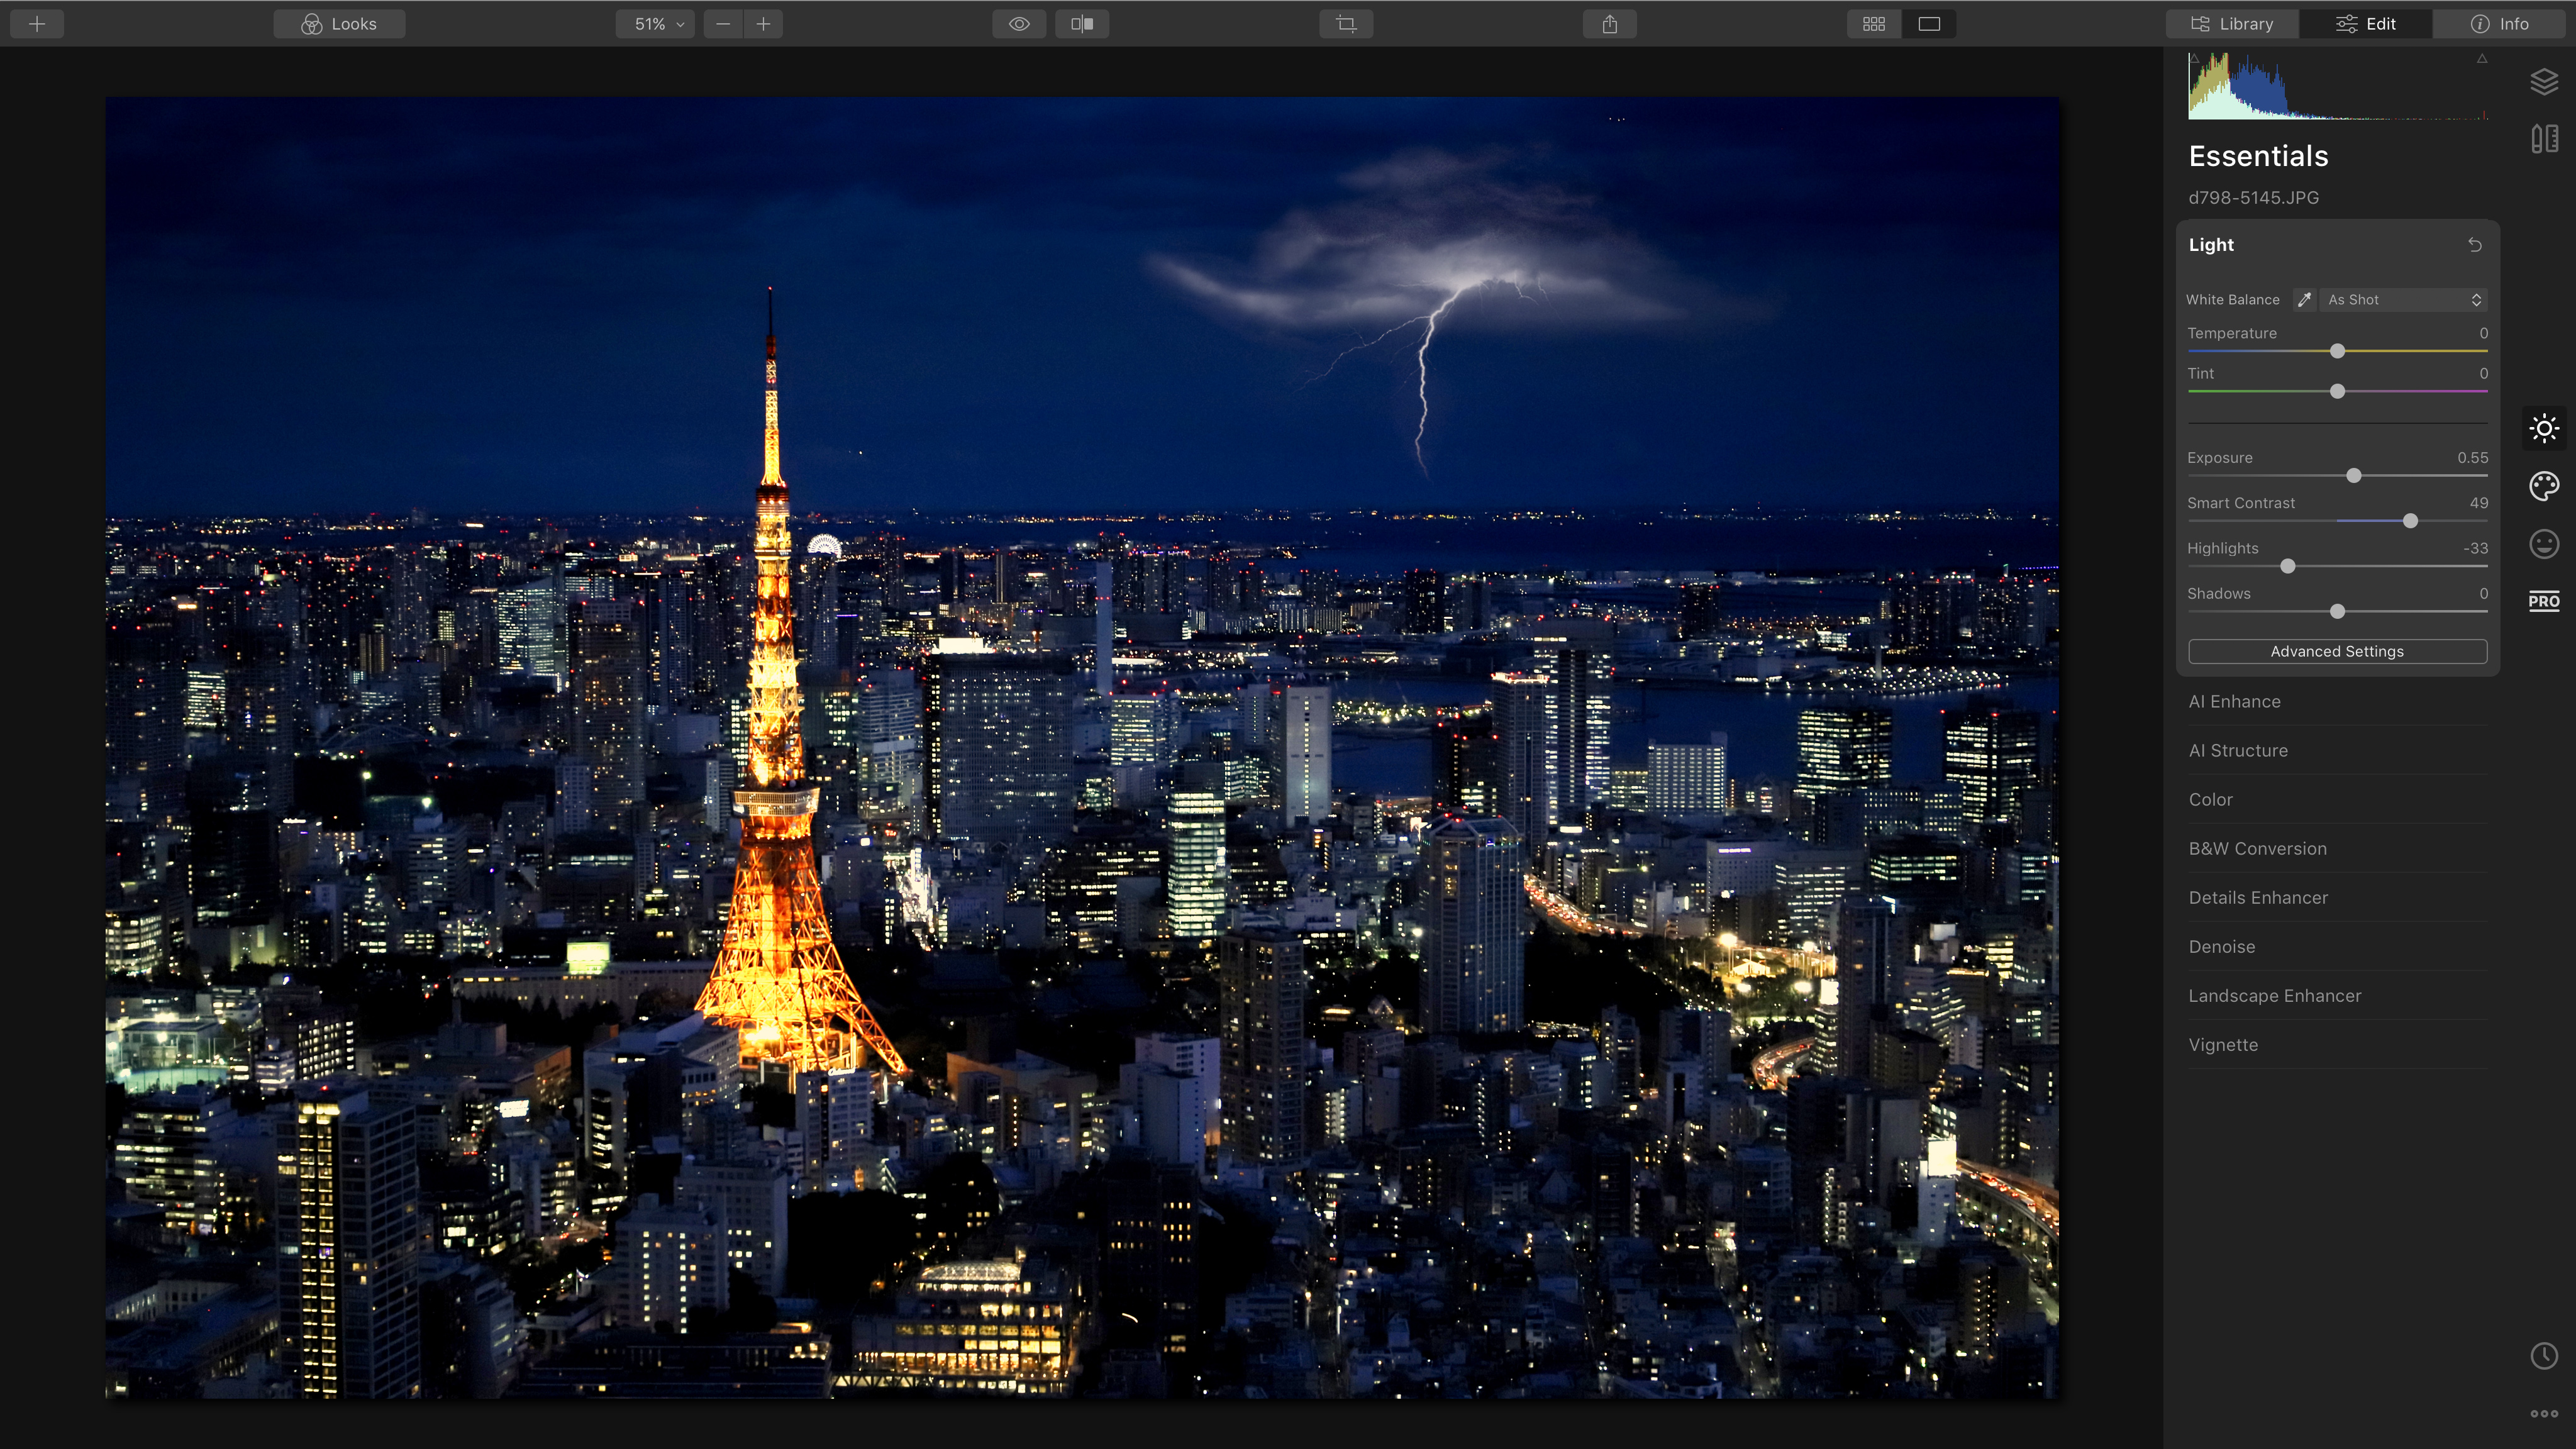
5. Smart Contrast
Finally, to add a little more ‘sparkle’ to this picture, we’ve used another new feature in Luminar – Smart Contrast. Regular contrast adjustments can leave parts of the picture too dark or light and make key detail disappear; the Smart Contrast slider is much better at preserving details and tones while still adding a lot more ‘bite’. You’ll find it in the Light panel in the Essentials workspace. (If you want regular Curves adjustments, click the Advanced Settings button.)

AI Augmented Sky tools
Learn about the key AI Augmented Sky controls
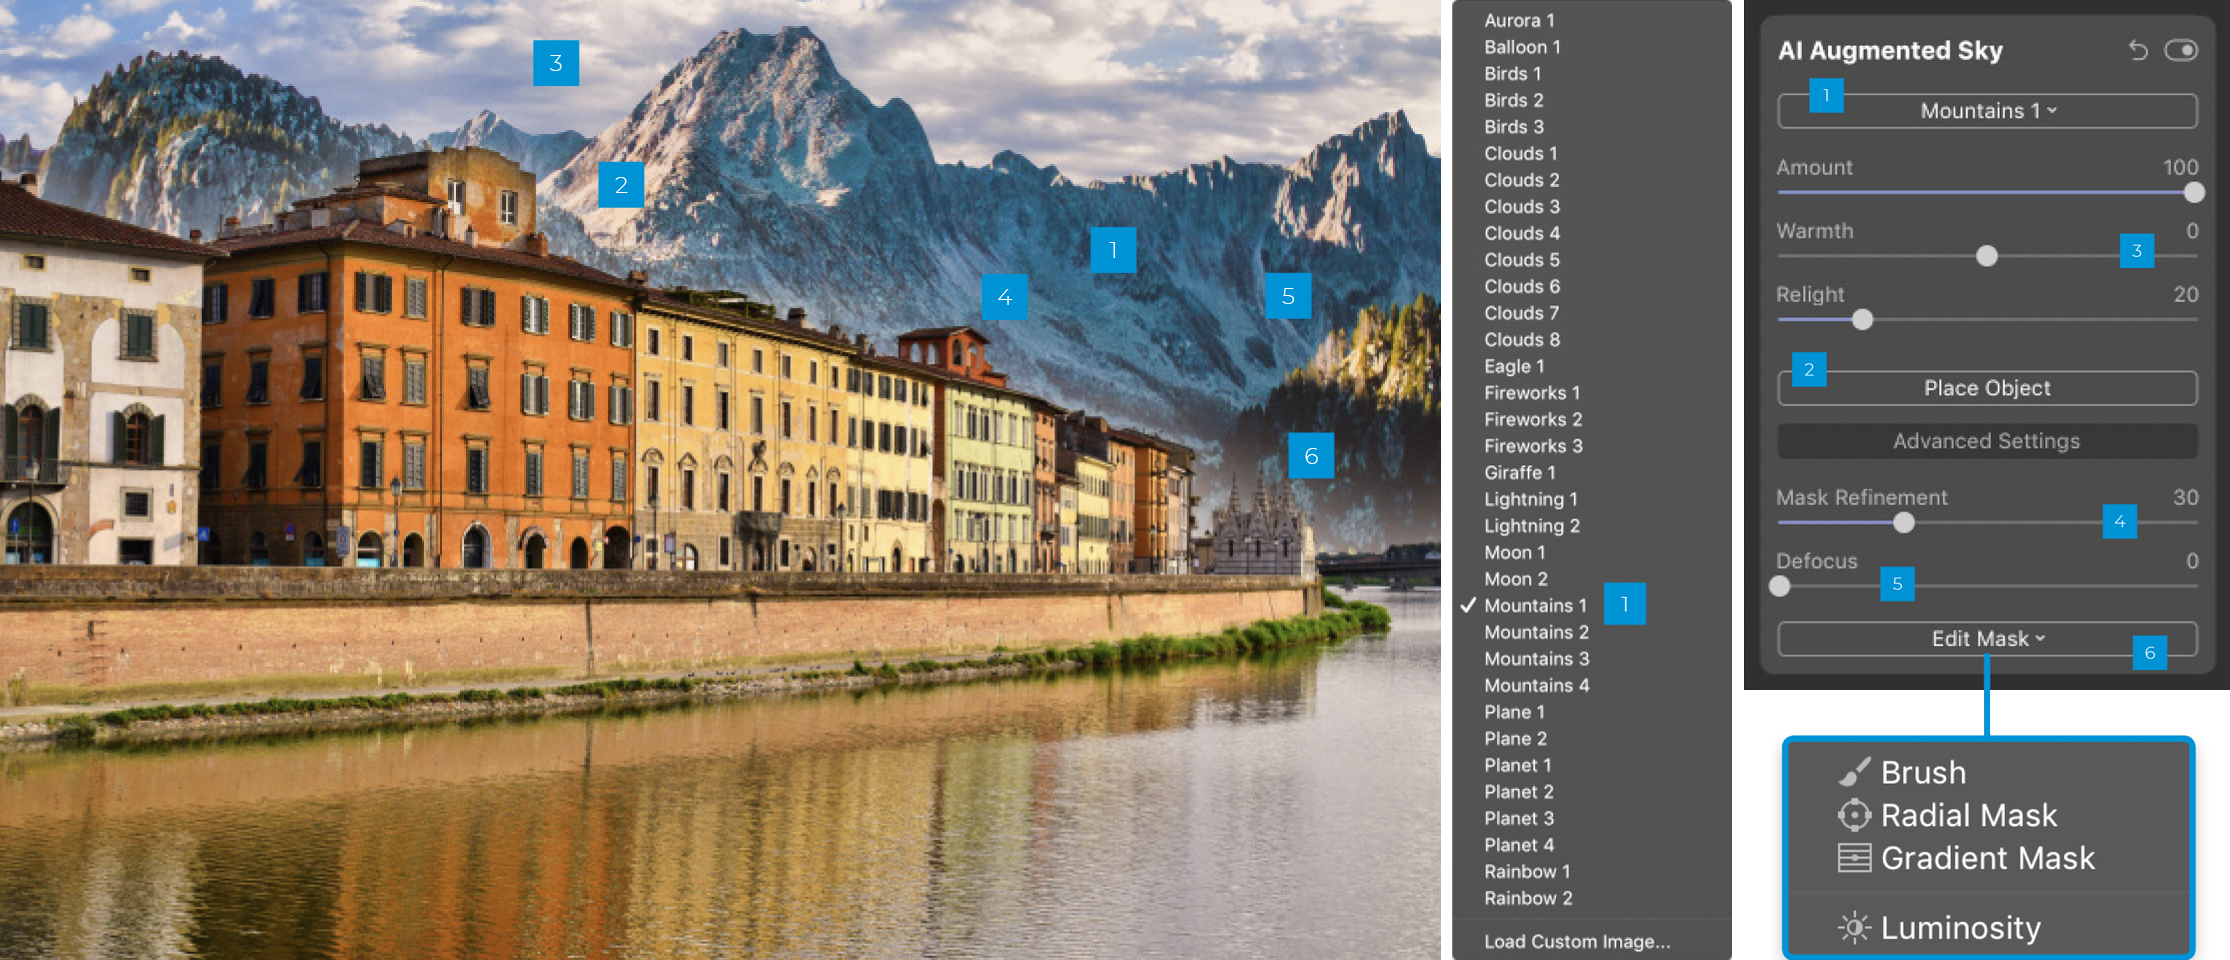
1. Choose an object
Choose an object for your augmented sky via this drop-down menu. There are no mountains behind the town of Pisa, but the building tones and the landscape are a good match.
2. Place Object
Click here to select the object you’ve added and display handles for moving it, resizing and rotating it as required to fit the scene. Here, the mountains needed to be resized and repositioned to fit the composition.
3. Sky effects
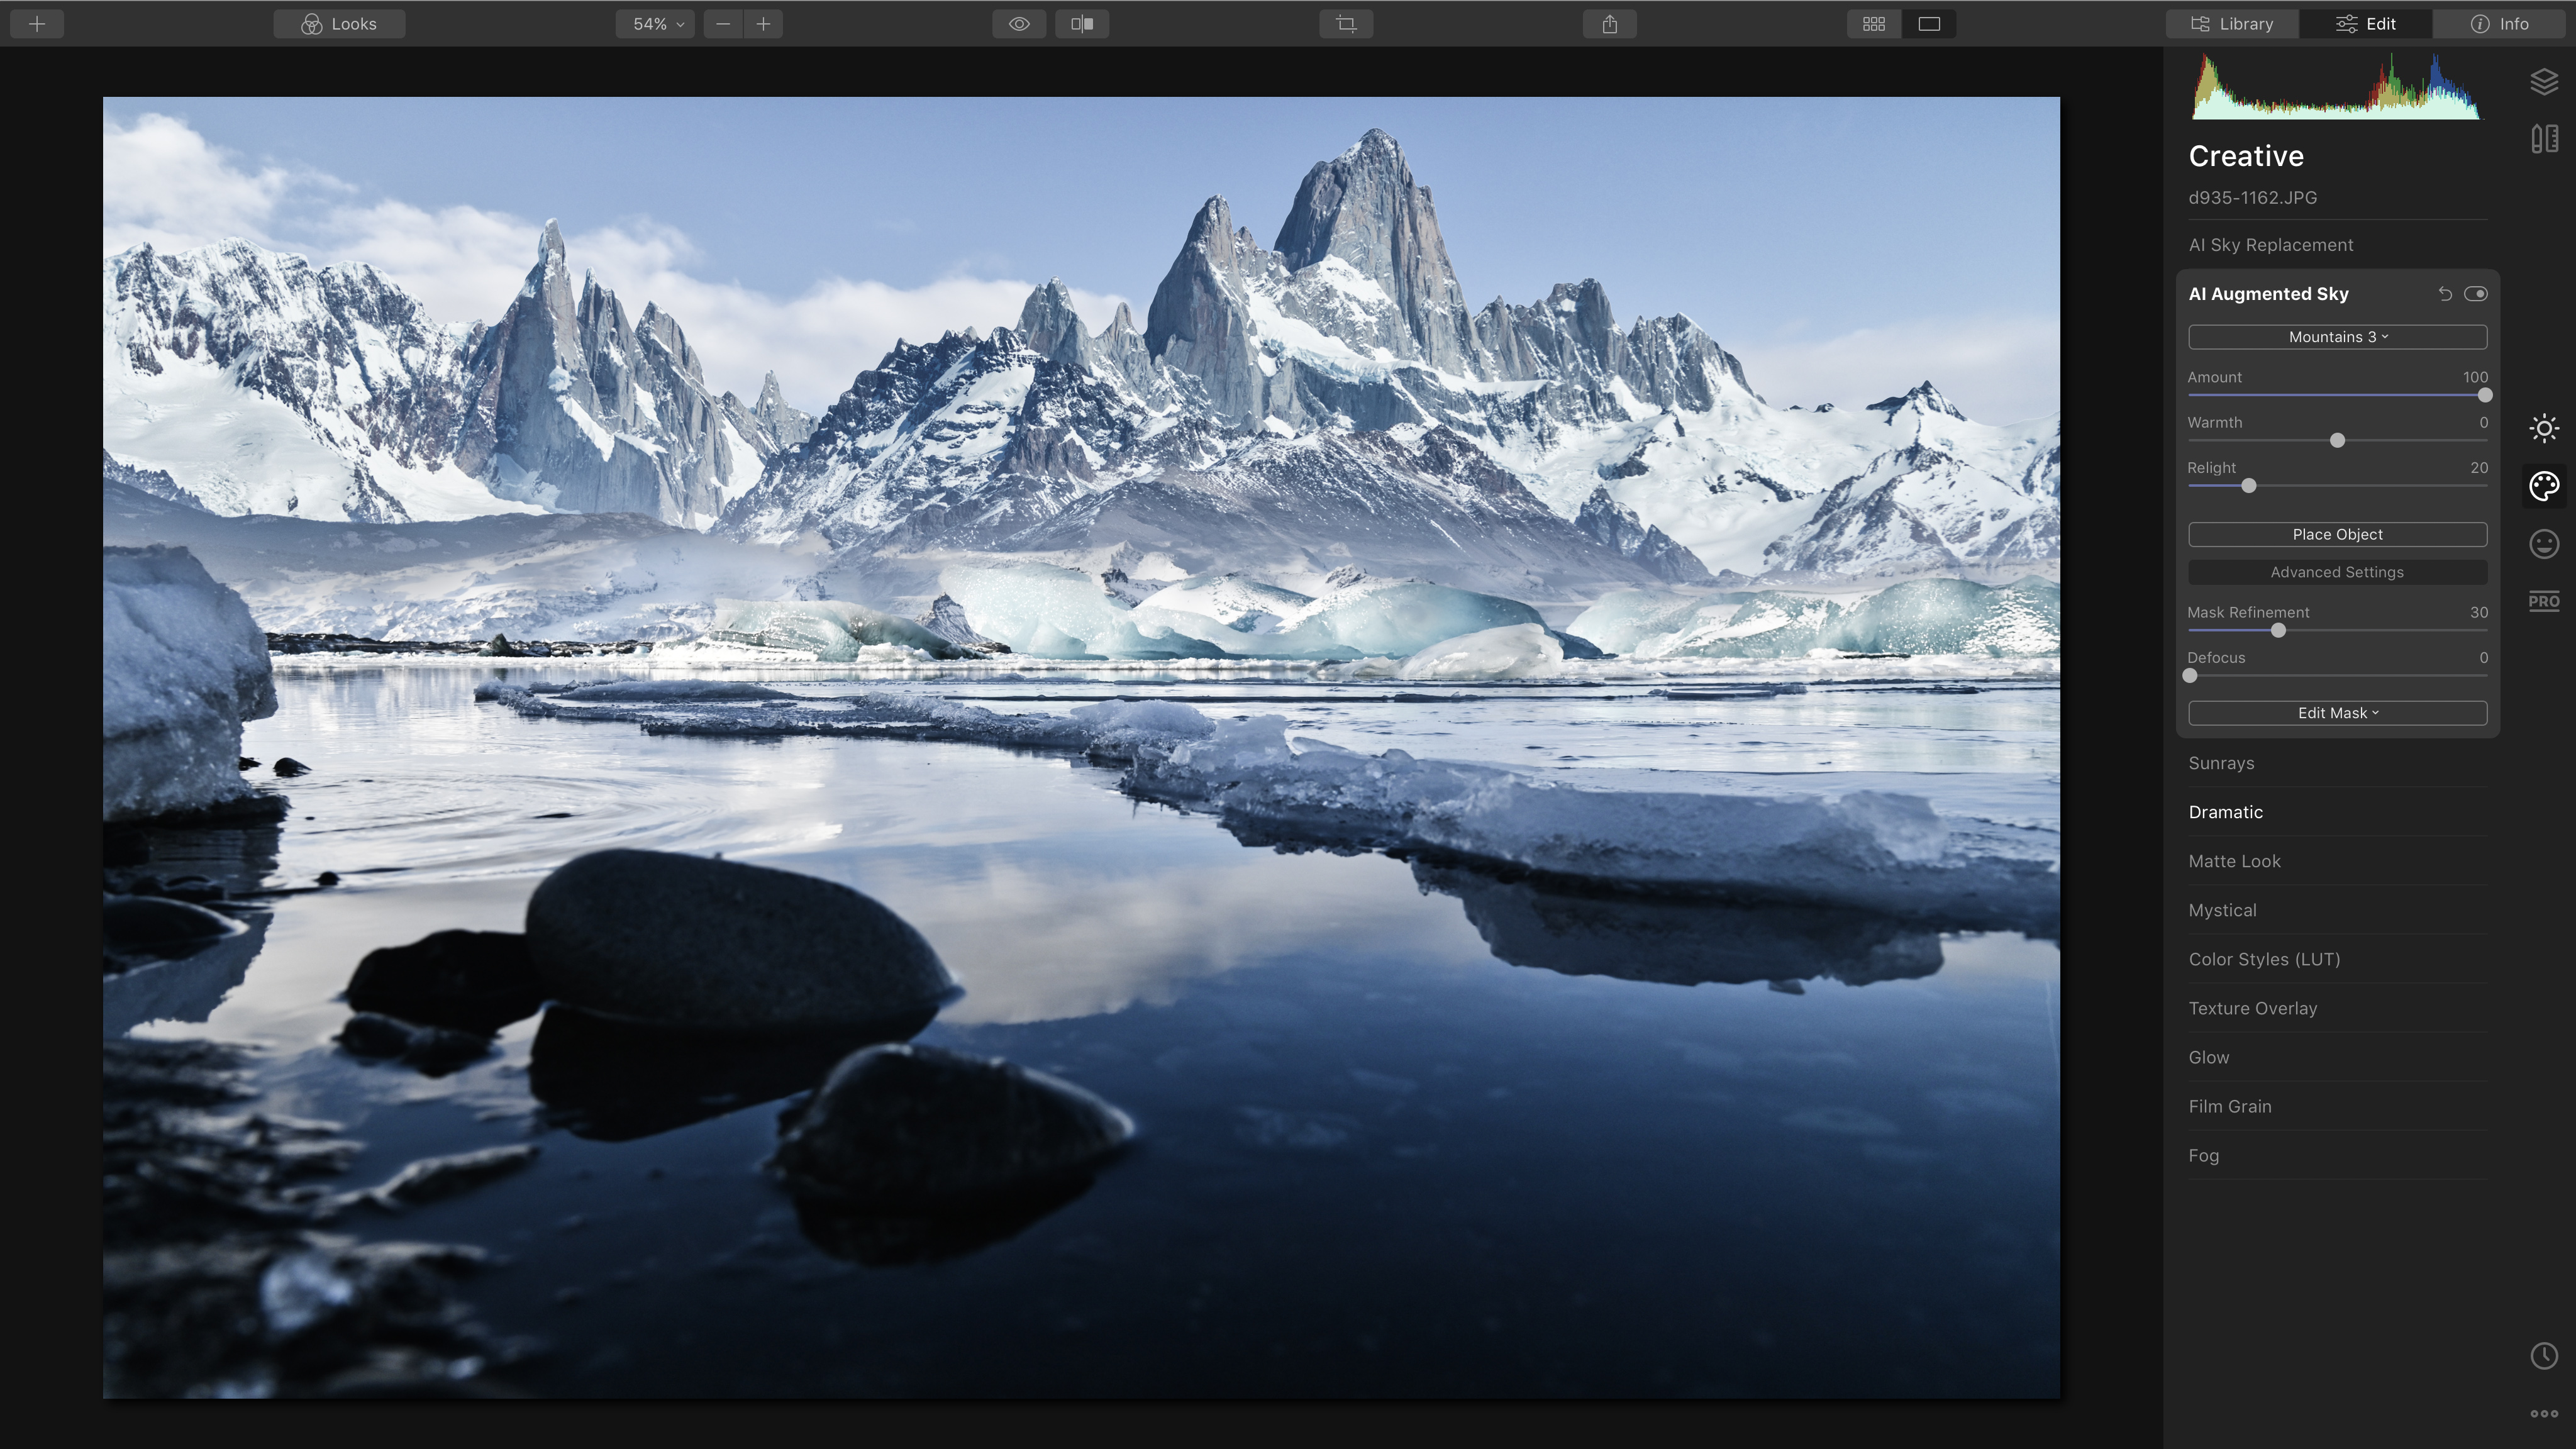
Your sky augmentation should blend in with the hues and tones of your image as effectively as possible. Amount controls the transparency of your object, Warmth changes its color balance, and Relight adapts it to the main image.
4. Mask Refinement
Sometimes the mask created around complex outlines isn’t quite right, but mostly Luminar does a remarkable job.
5. Defocus
Here you’d expect both the scene and the mountains to be sharp, so we don’t need the Defocus slider. You might use it if you’re shooting a close-up or with a wide aperture that throws the background out of focus.
6. Edit Mask
You can get masking problems near the horizon, especially with hazy, poorly defined detail. Use this button if you need to manually mask the areas affected by the Augmented Sky tool.

Three more augmented skies
Here’s a taste of the sky effects you can create in Luminar 4

Icelandic church with birds
Augmented skies don’t have to be extreme. This image of an Icelandic church has been enhanced with a flock of birds that look quite natural in this setting. Luminar did a terrific job of masking the landscape and the church roof, but we needed the manual masking tools to remove some birds from the church’s white walls.

Pisa Cathedral
The contrast in the original photo is a little flat, and the sky is just a blank blue. The AI Augmented Sky tool was our first step, to add the clouds, but we used two other Luminar tools alongside it – the new AI Smart Structure tool to add detail to the
walls but not the clouds, and the AI Sky Enhancer to give the sky more depth.
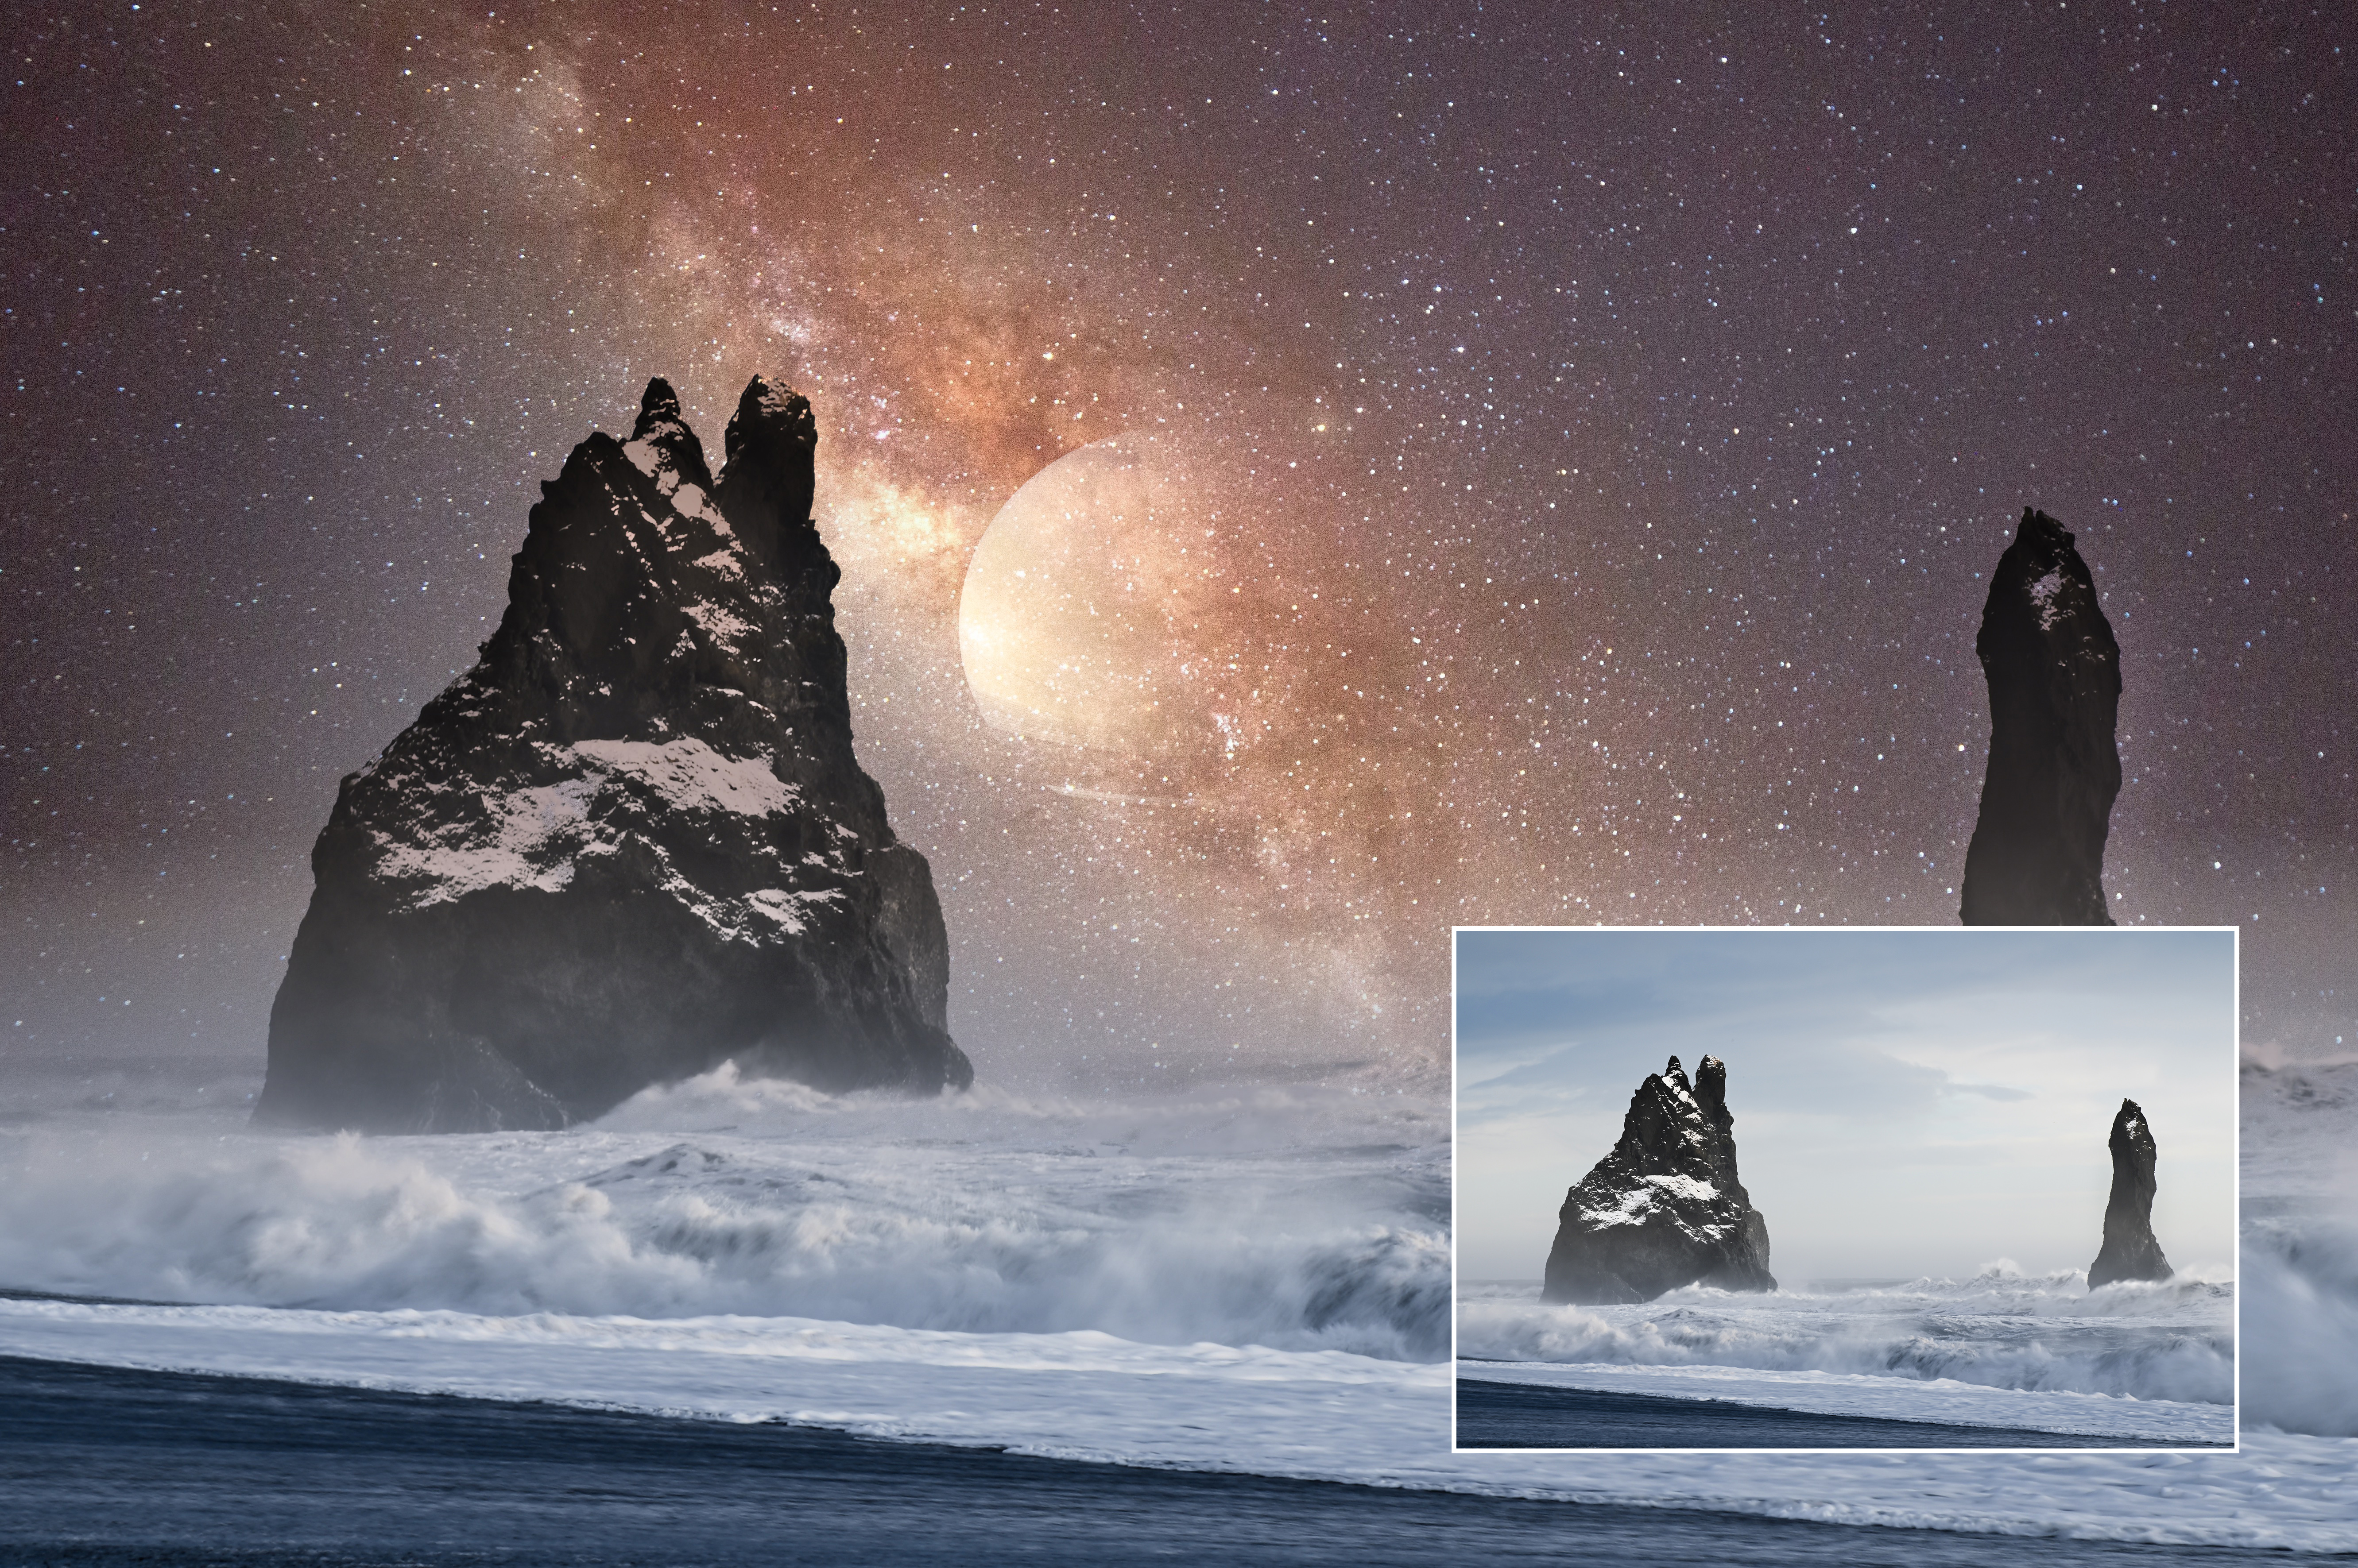
Galactic beach
Here’s one that goes to the other extreme! We took a regular shot of a stormy beach and added a new ‘galaxy’ sky with the Luminar AI Sky Replacement tool… Then we used the new AI Augmented Sky tool to add a planet! It shows Luminar’s potential for creating creative illustrations from your photographs.

Five great tips for changing skies
The new AI Augmented Sky feature in Luminar 4 does an extraordinary job of blending objects into skies, often leaving you with little to do except tweak a couple of sliders to complete the effect. However, if you want your pictures to look even more convincing, we have a few tips for combining objects and scenes. It’s up to you how far along the journey from ‘real’ to ‘surreal’ you want to go!
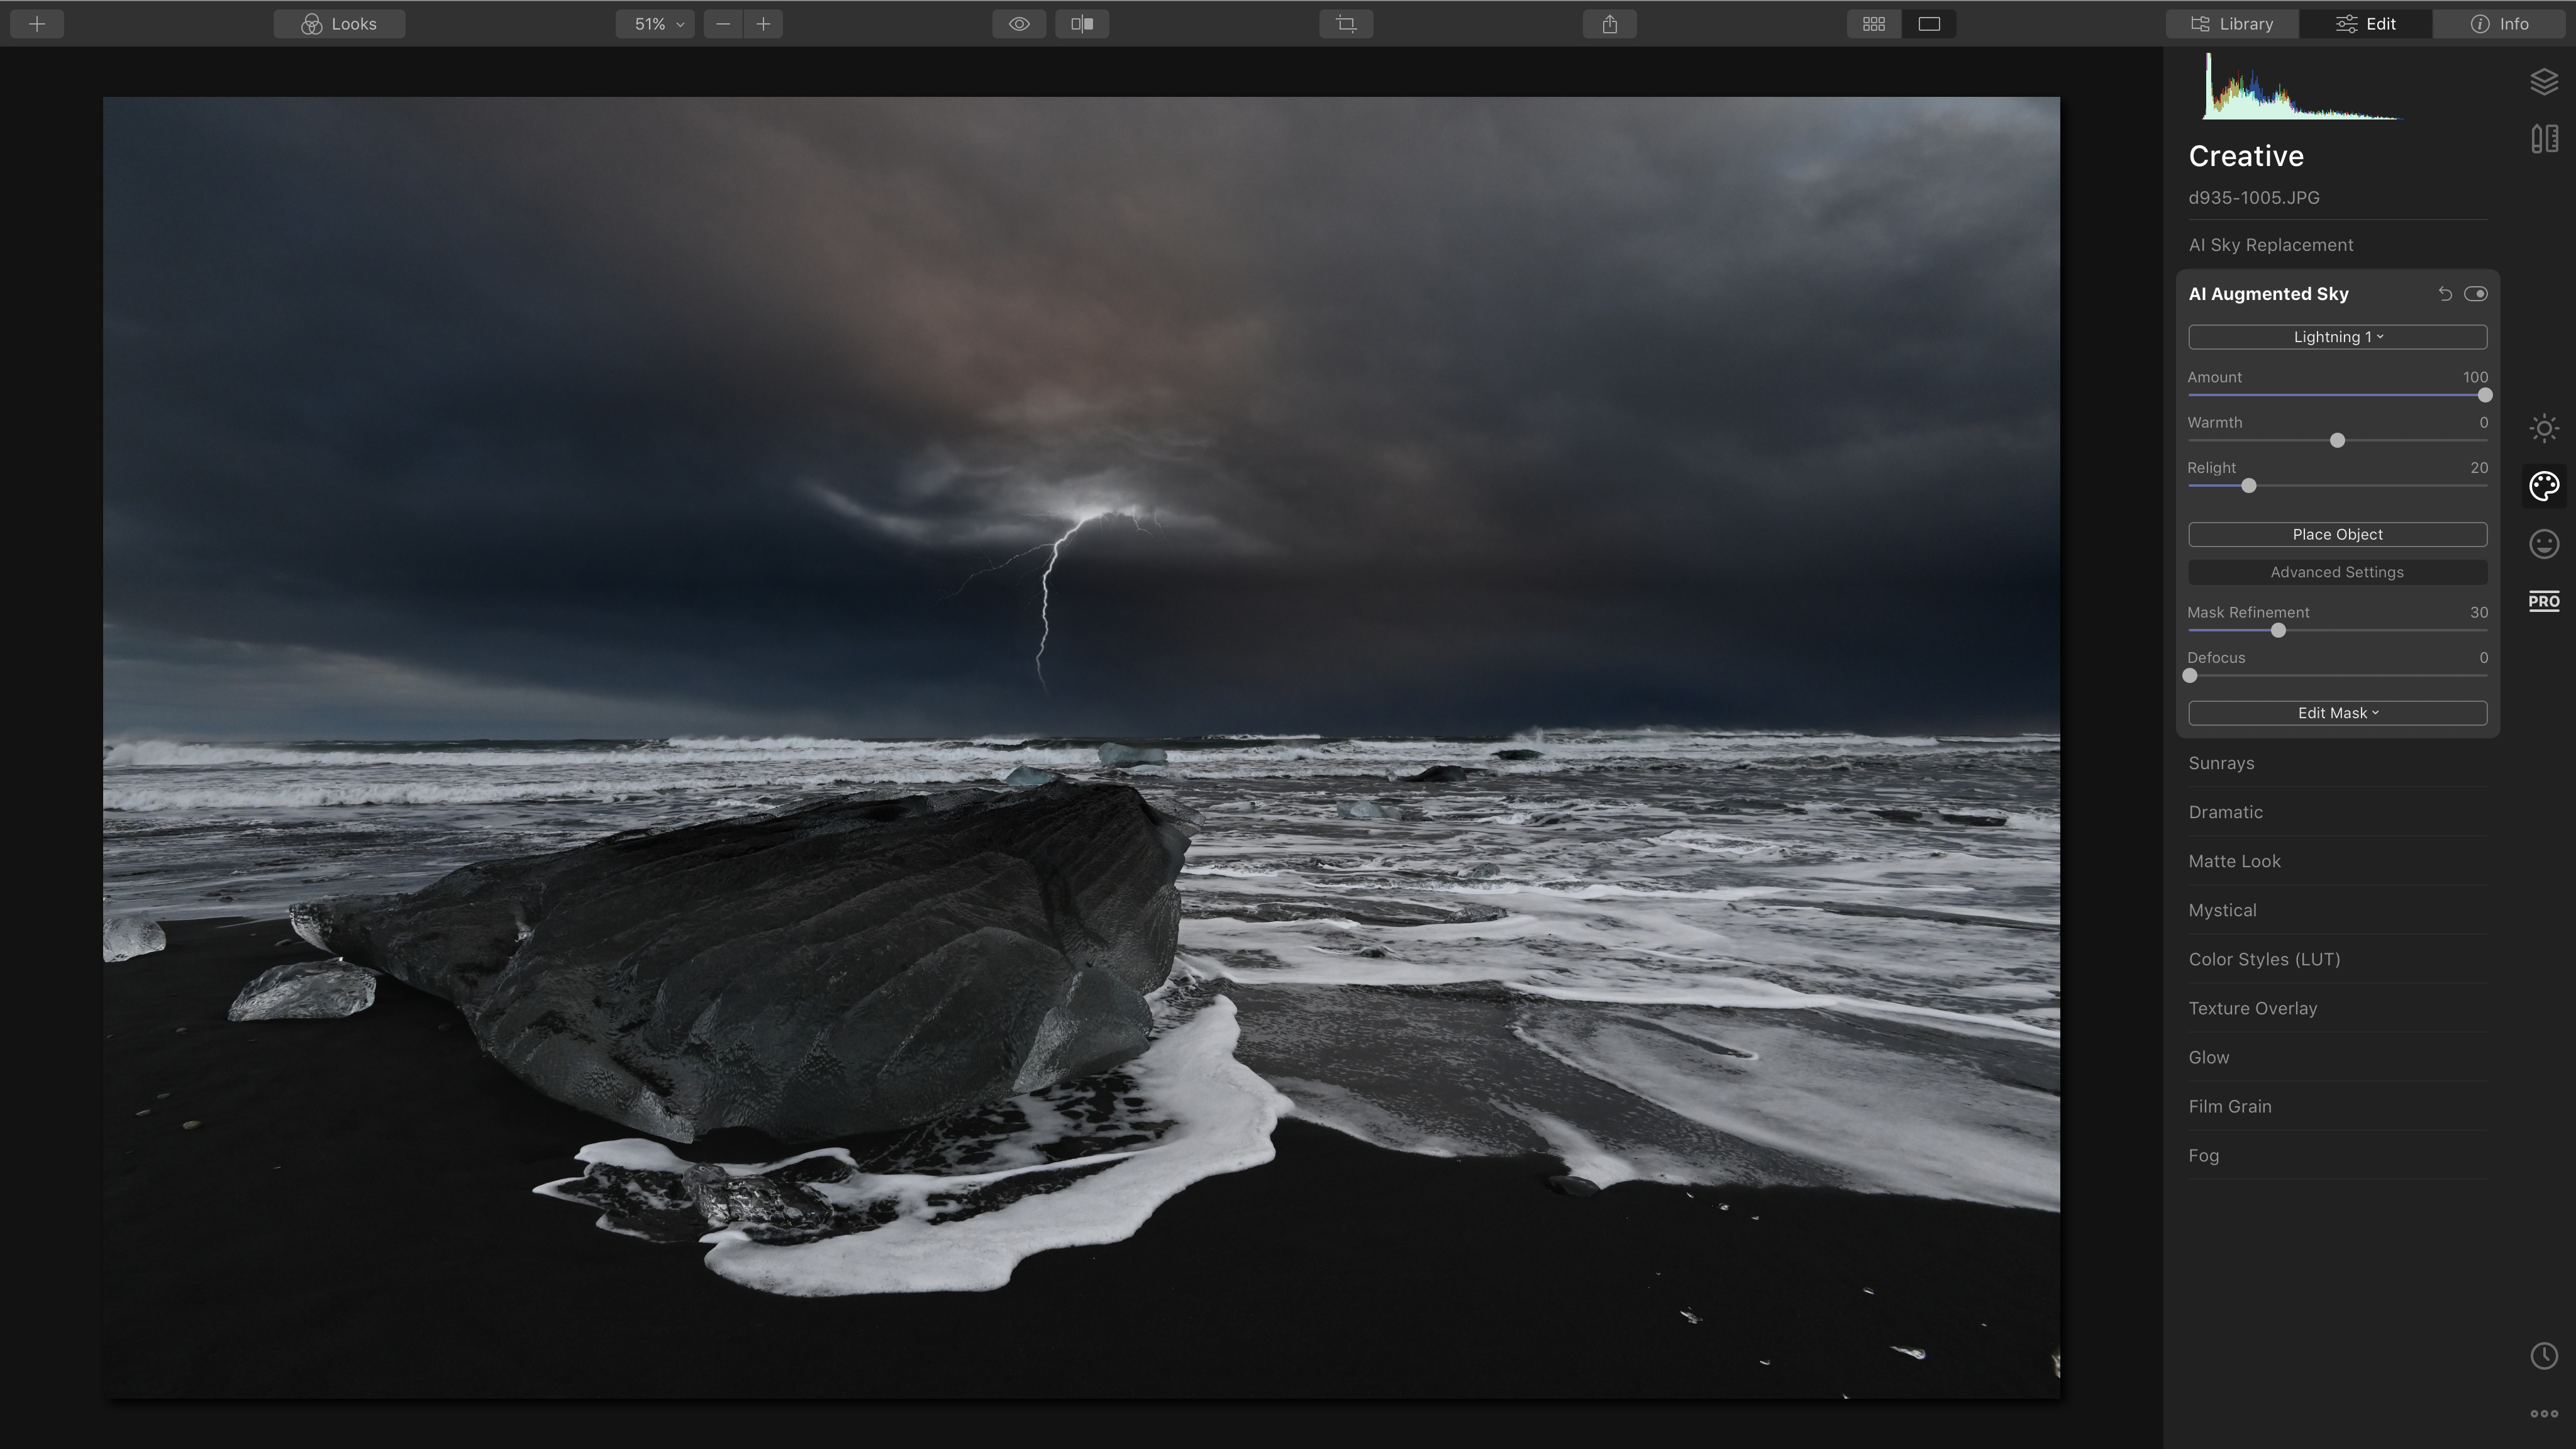
1. Sky brightness
Try to match the brightness of the object you’re adding to the sky in your photo. For example, the Lightning effect works best against a dark, stormy sky – you can darken the sky in Luminar, of course.
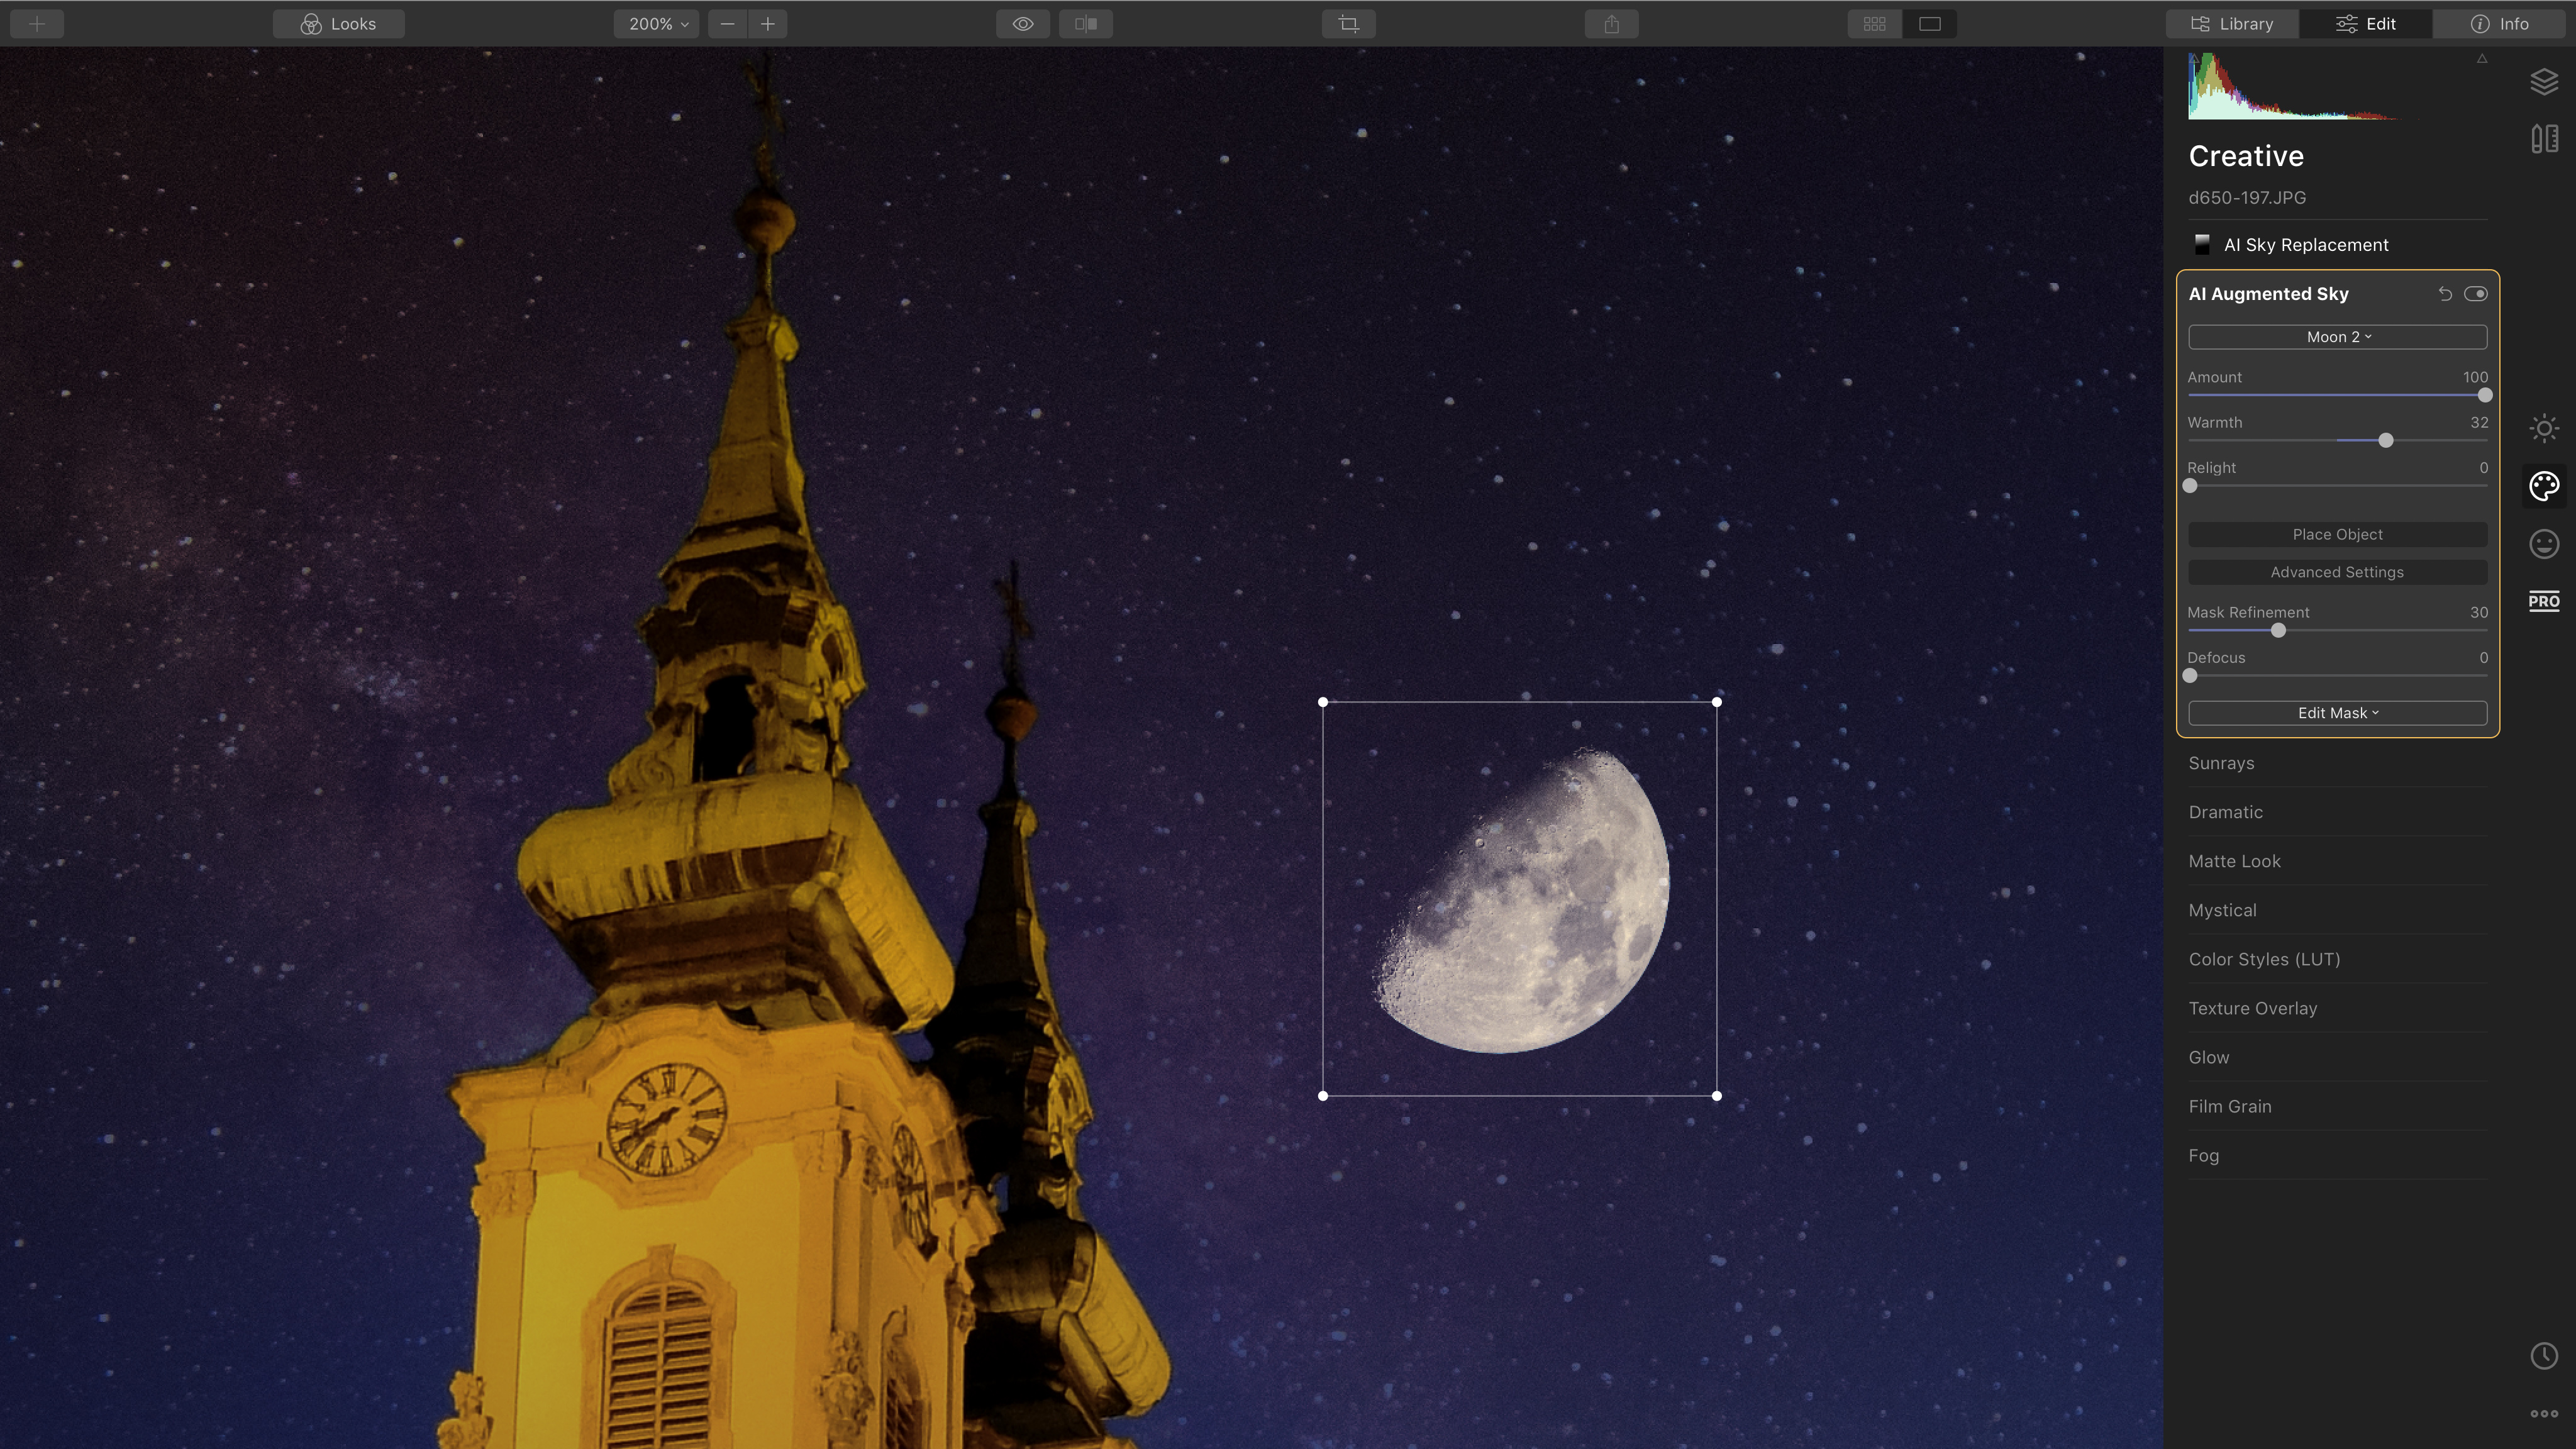
2. Appropriate objects
You can add the moon to a regular daytime shot, but it’s not going to show up too well. Pay attention to perspective, too. Only add a ‘big’ moon if the photo was shot with a long focal length lens, for example.
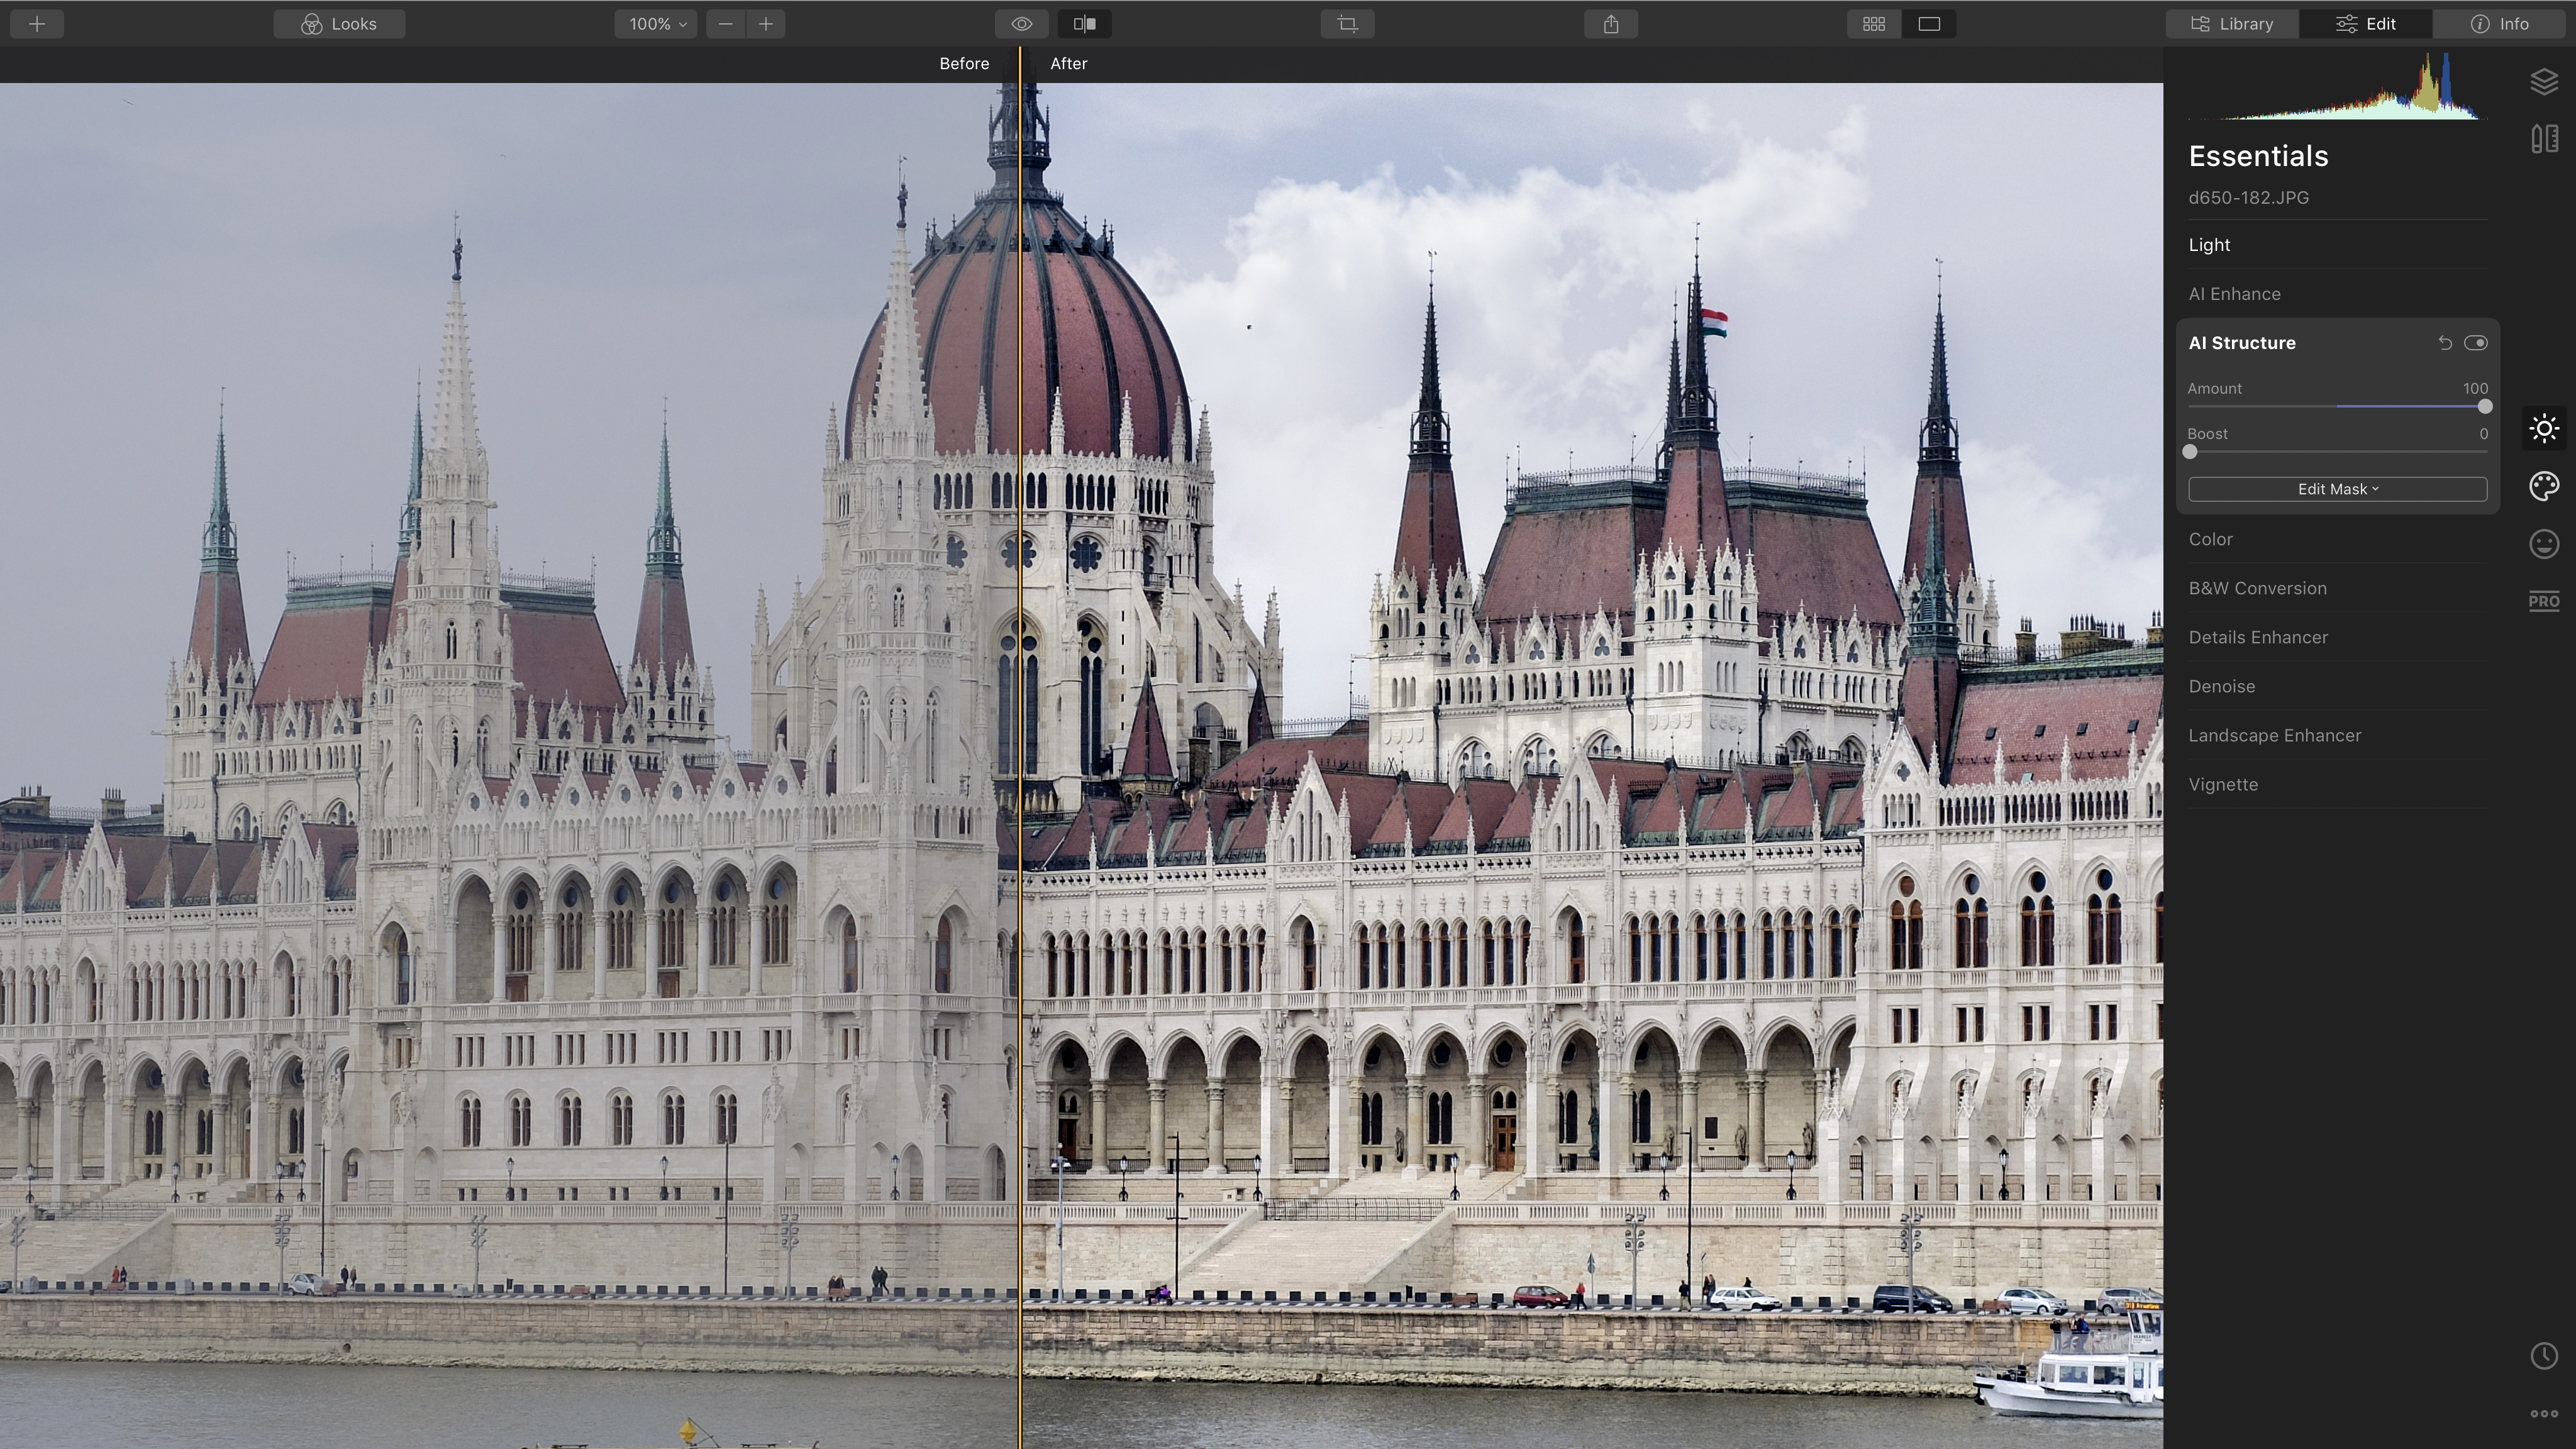
3. AI Structure
The new AI Structure tool is very useful alongside augmented skies, because it can make your main subject a lot crisper and clearer, but won’t artificially emphasize the sky.
4. Reflections
The mountains in this scene have been added with the AI Augmented Sky tool. Unfortunately, they’ve left no reflection in the still lake, so keep this in mind
when you’re planning your images.
5. Add a Look
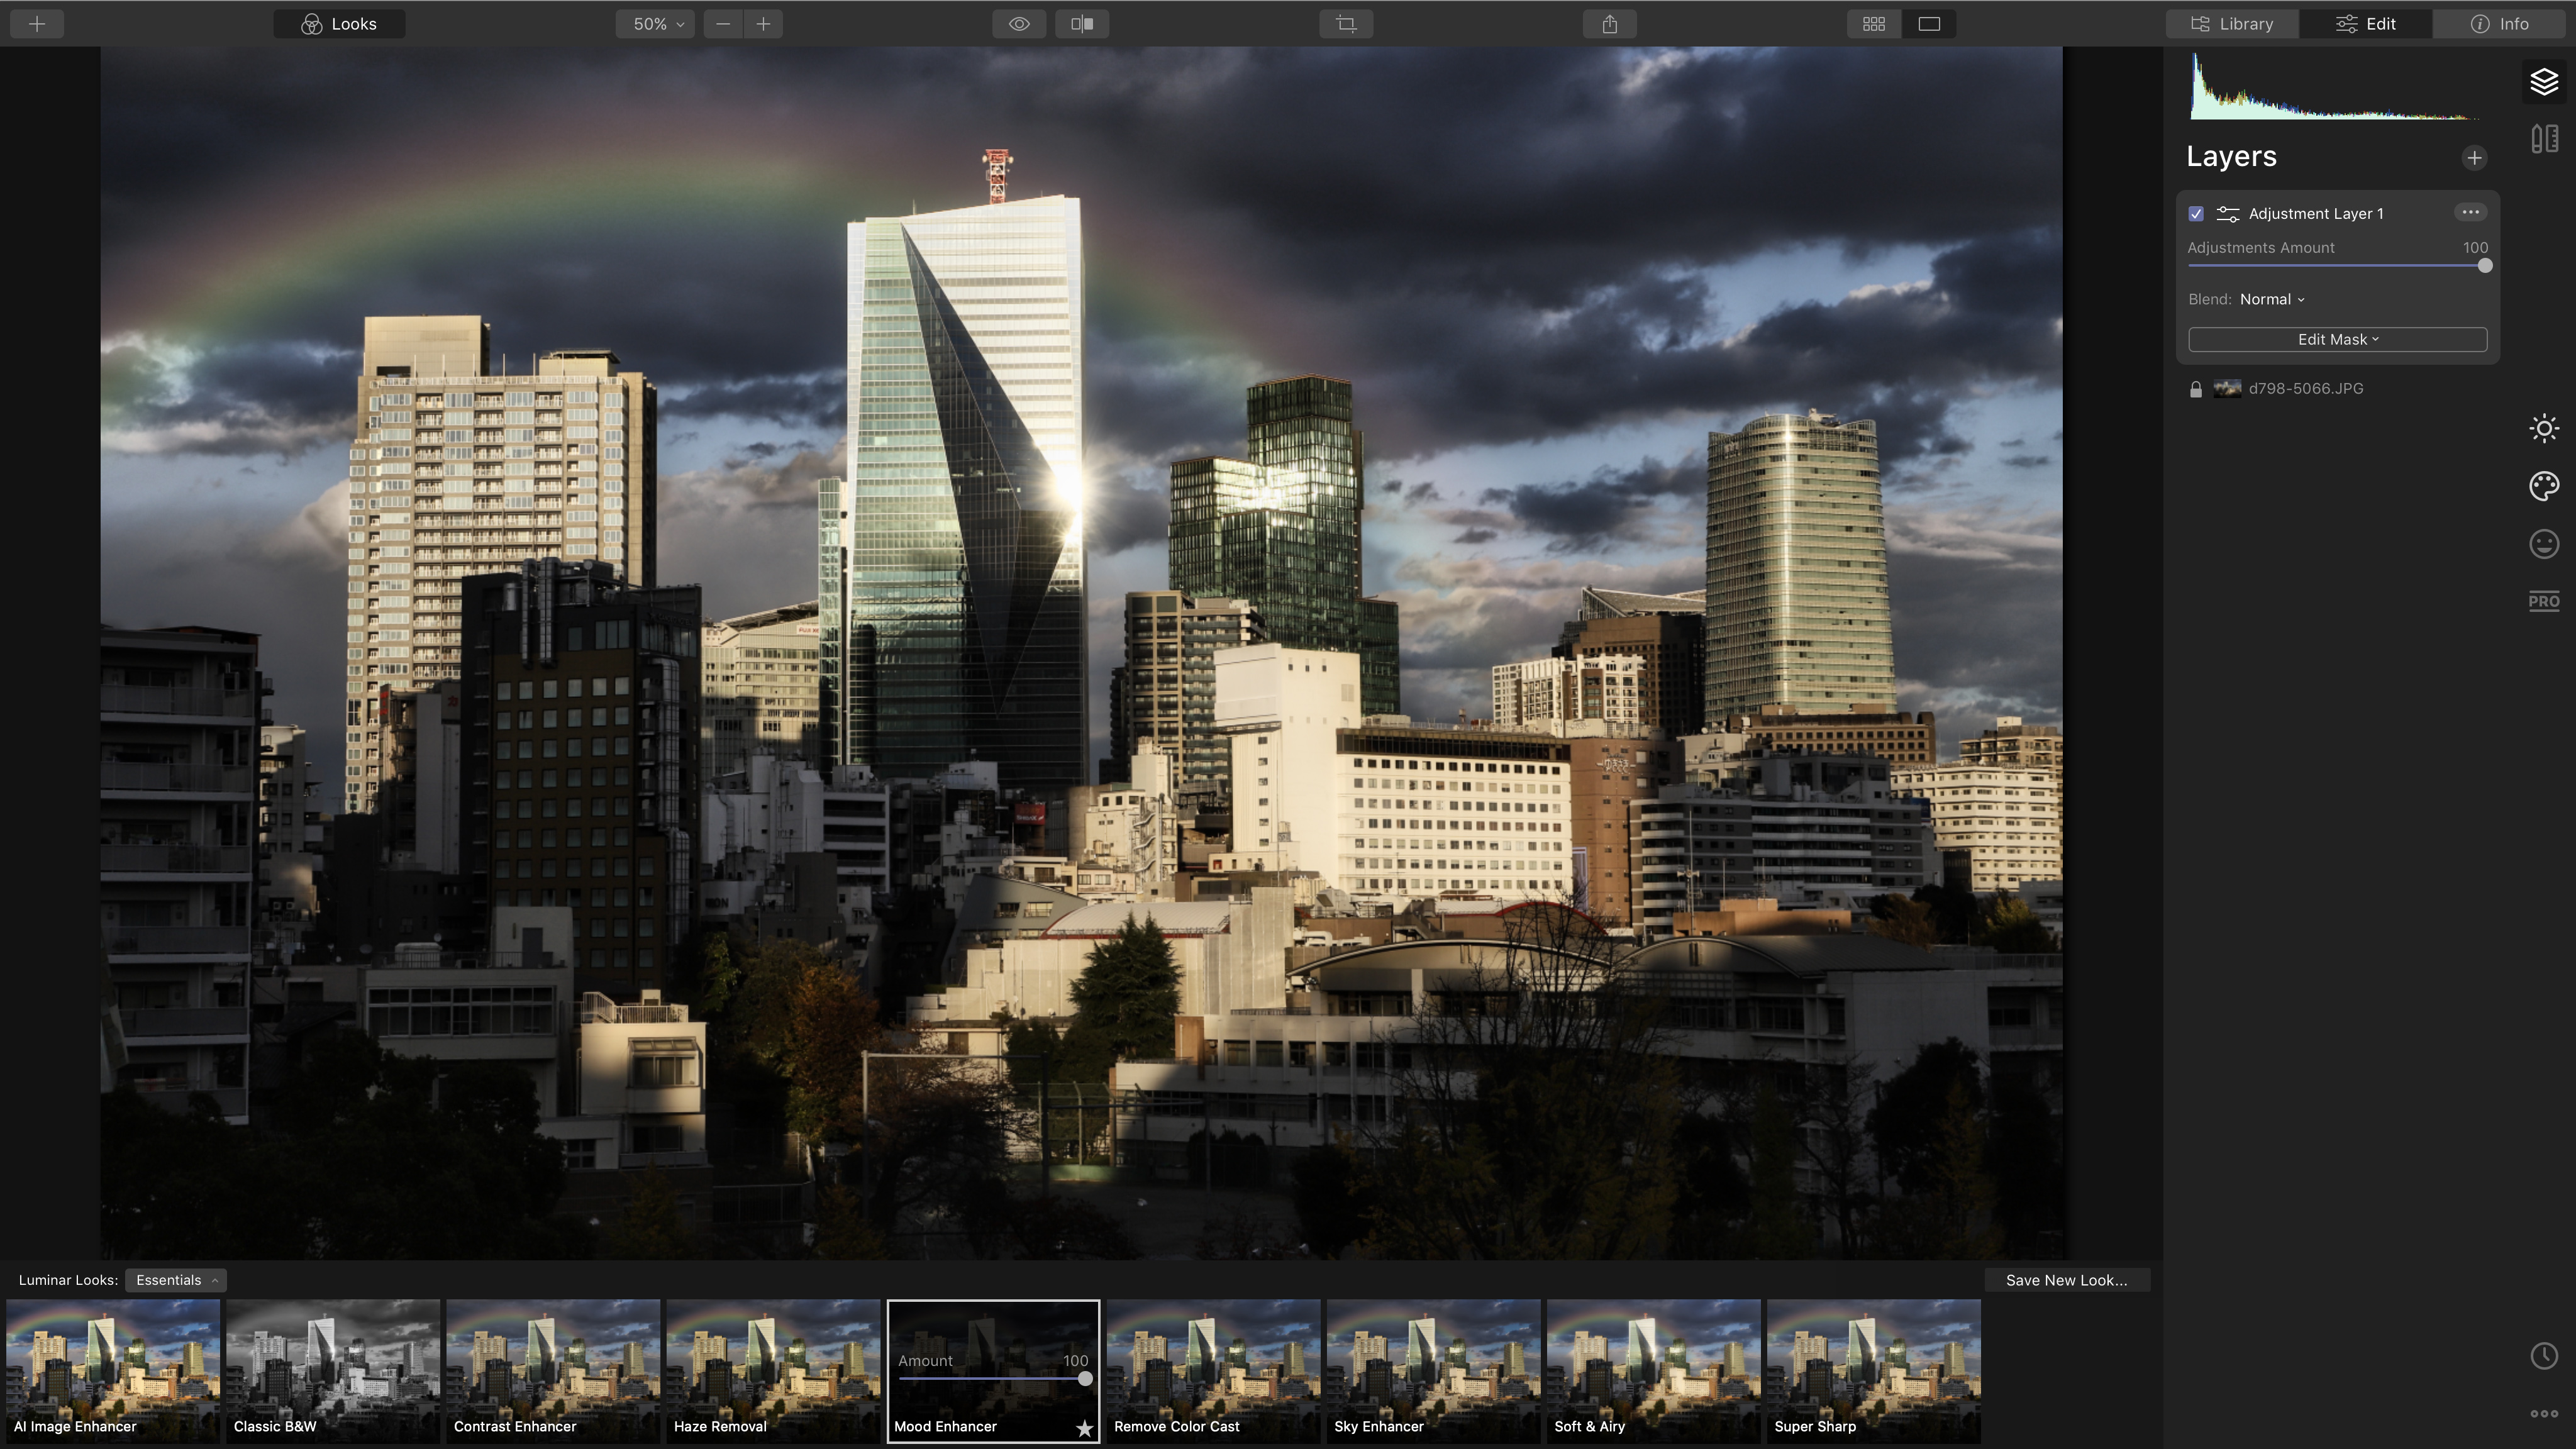
If you can’t quite get the tones and colors of the image and the augmented sky to match, try adding a Look. Use a new adjustment layer, so that you can control the opacity and masking if you need to.

How to get a copy of Skylum Luminar 4
If you don’t have Luminar 4 already, you can download a free 7-day trial from the Skylum website. It’s available in both macOS and Windows versions and as all the features are fully functional, you can follow this tutorial yourself. If you decide to go ahead and buy Luminar 4, you can use the exclusive discount code DCW20 to save £10 / $10 on the full purchase price.
Visit skylum.com to learn more about Augmented Sky.
Get the Digital Camera World Newsletter
The best camera deals, reviews, product advice, and unmissable photography news, direct to your inbox!
Digital Camera World is one of the leading authorities on camera and photography news, reviews, techniques, tutorials, comparisons, deals and industry analysis. The site doesn't just specialize in cameras, but all aspects of photography, videography and imaging – including camera phones, gimbals, lenses, lighting, editing software, filters, tripods, laptops, printers, photo books, desks, binoculars and more.
Whether you're using, looking to buy or trying to get the most out of a compact camera, action camera, camera drone, cinema camera, beginner camera or professional camera, Digital Camera World has a roster of experts with combined experience of over 100 years when it comes to cameras, photography and imaging.

