Landscape enhancement tools in Luminar 4
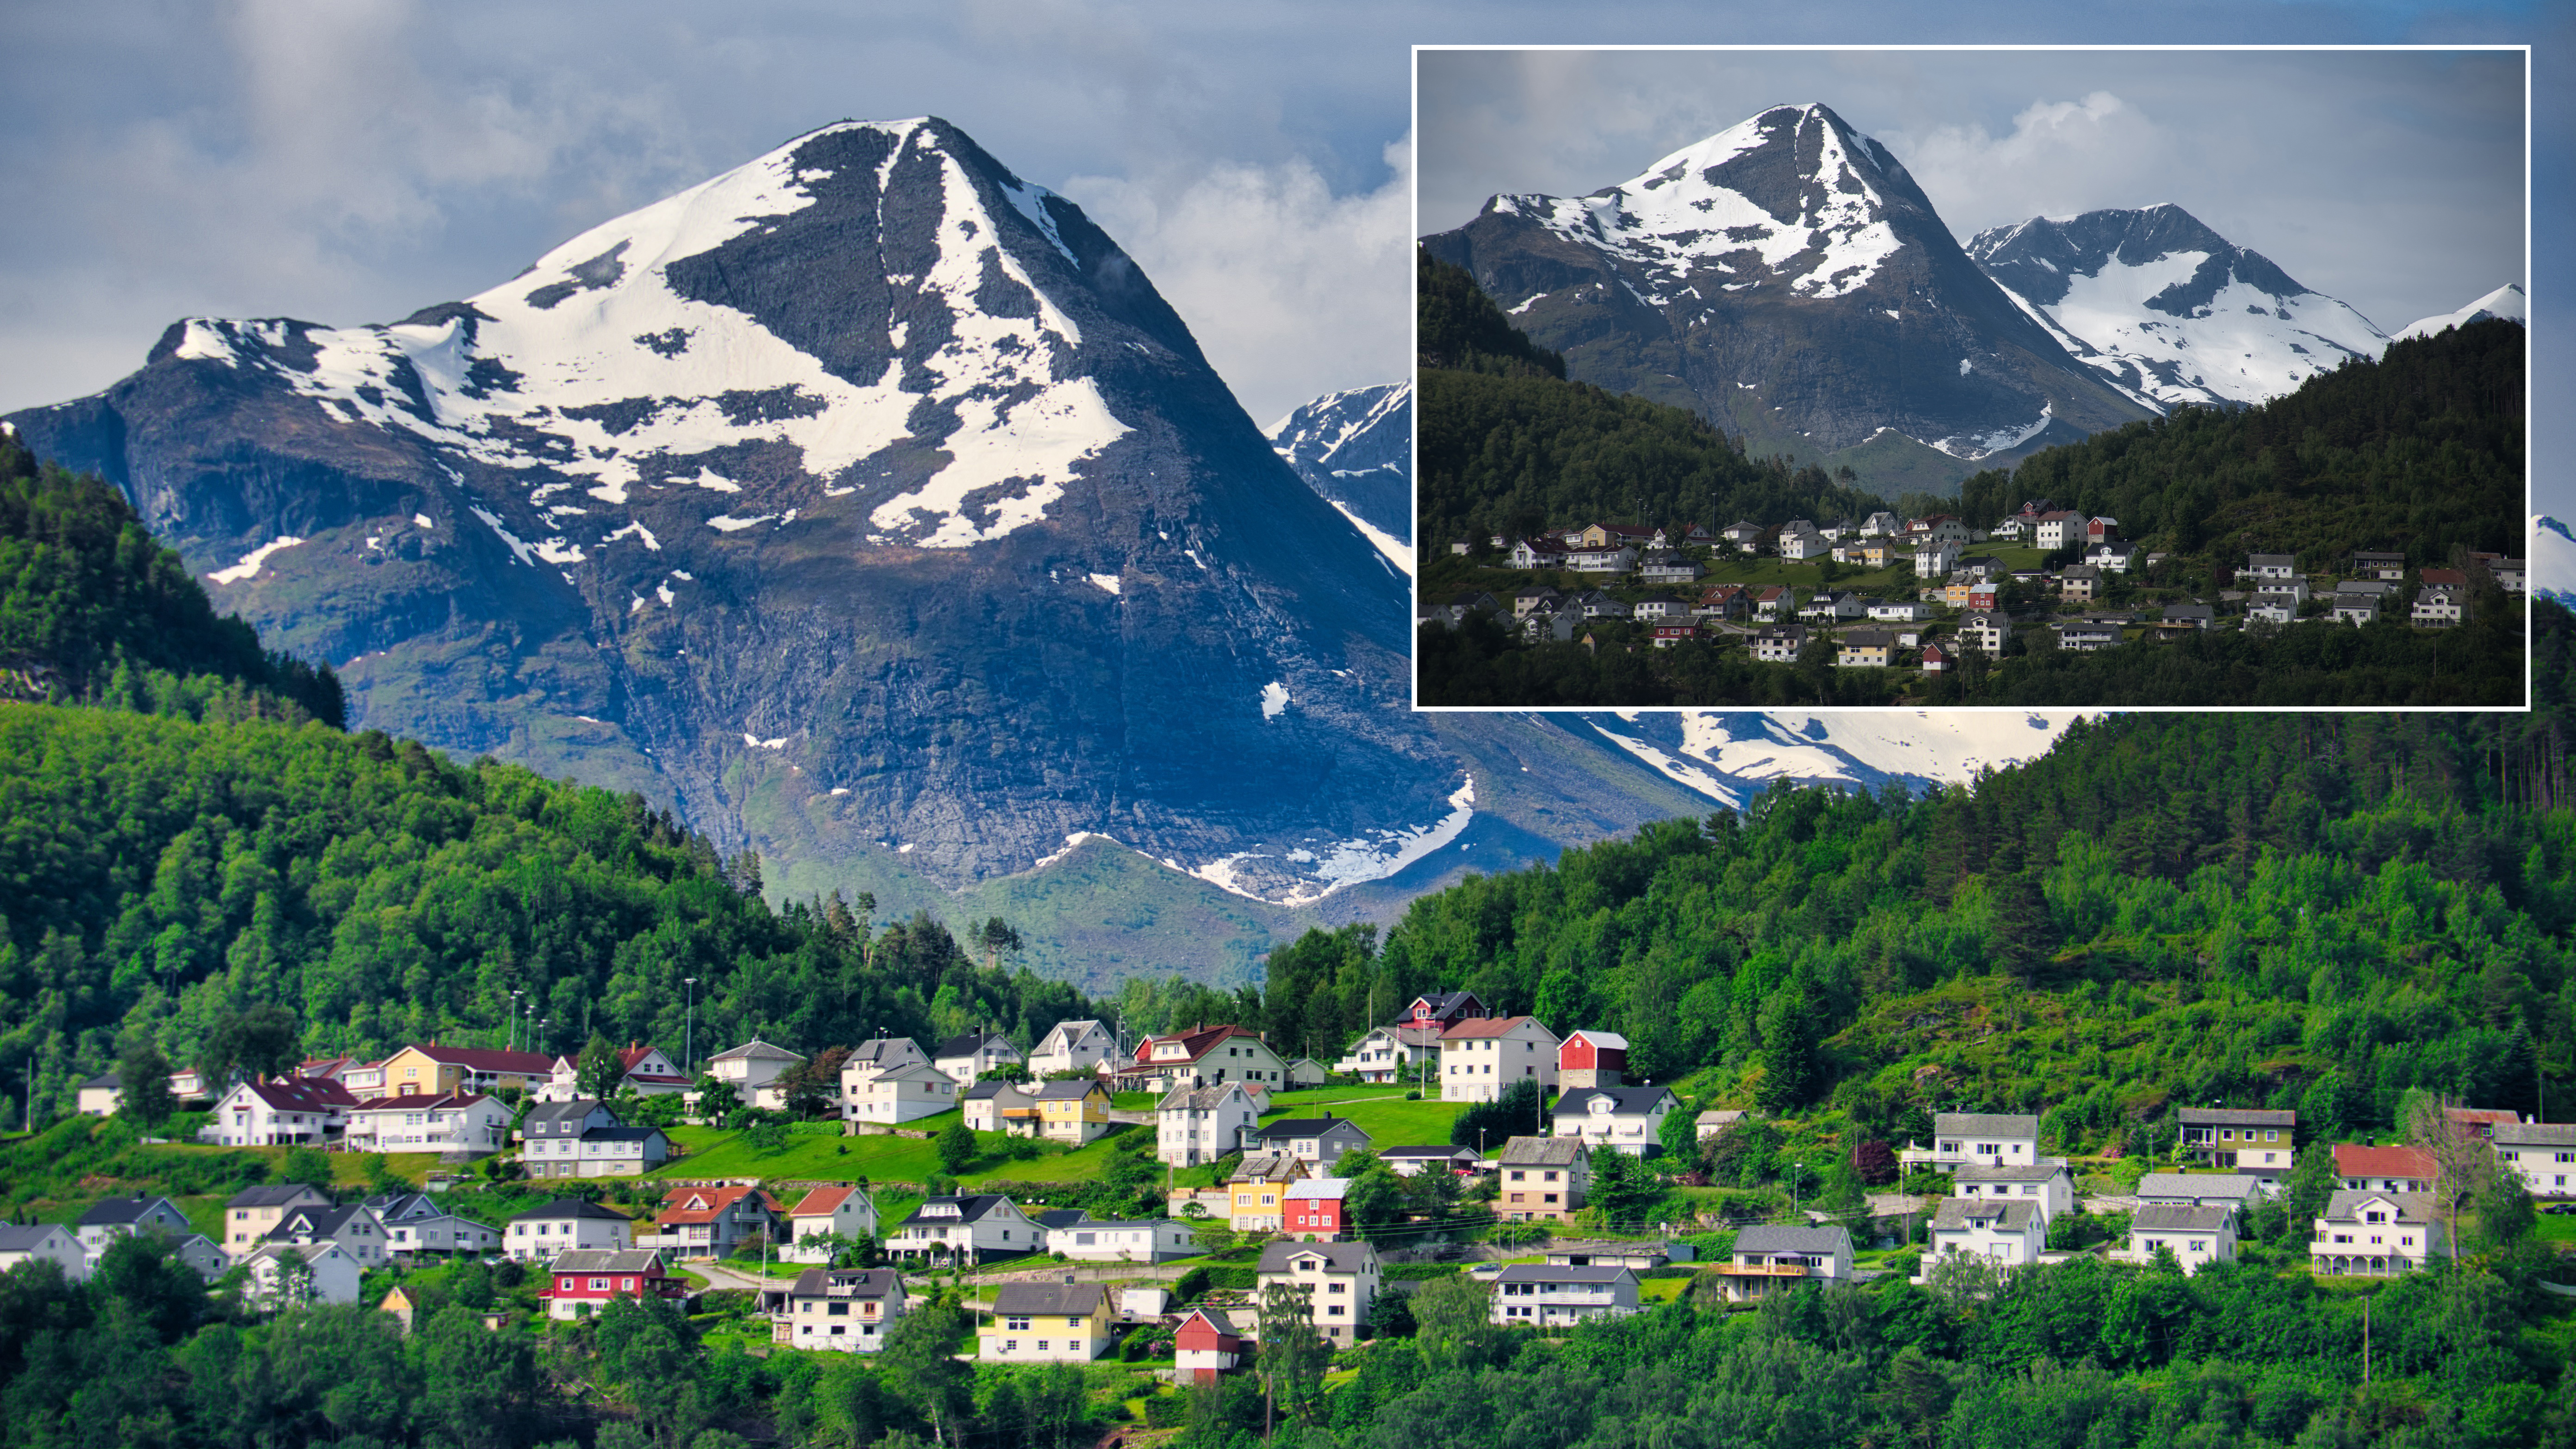
We all love landscapes. Varied and constantly changing with the light and weather, they are one of the most popular subjects to shoot. If you are inspired by a landscape, it’s only natural to want to enhance it as best you can to reveal all the details and the colors, and try to get across some of the atmosphere and sense of place that drew you to the scene.
Luminar 4 has a number of tools to use for enhancing landscapes. In previous installments we’ve looked at the AI Sky Replacement and AI Augmented Sky tools for those times when nature doesn’t give us the skies we were hoping for, and how the Clone & Stamp and Erase tools can get rid of distracting clutter and man-made objects from the scenery. This time we’ll look at a set of tools designed specifically for landscape enhancement. You’ll find them in the Landscape Enhancer Panel in the Essentials Workspace.
They include a Dehaze slider, for cutting through atmospheric haze in long-distance landscapes; a Golden Hour slider for recreating the look of warm, late afternoon sunlight (or early morning, for that matter); and a Foliage Enhancer, to give grass and leaves a lush green look.
There’s more you can do with Luminar to enhance your landscapes. In the Creative Workspace you’ll find the Sunrays filter, which can add atmospheric lighting effects to your landscapes, and the Mystical and Glow filters for giving landscape images a dream-like ethereal glow.
Let’s take a look at how these landscape enhancement tools work and how you can use them together.
Improve a landscape in five steps
These simple steps can make landscapes come to life
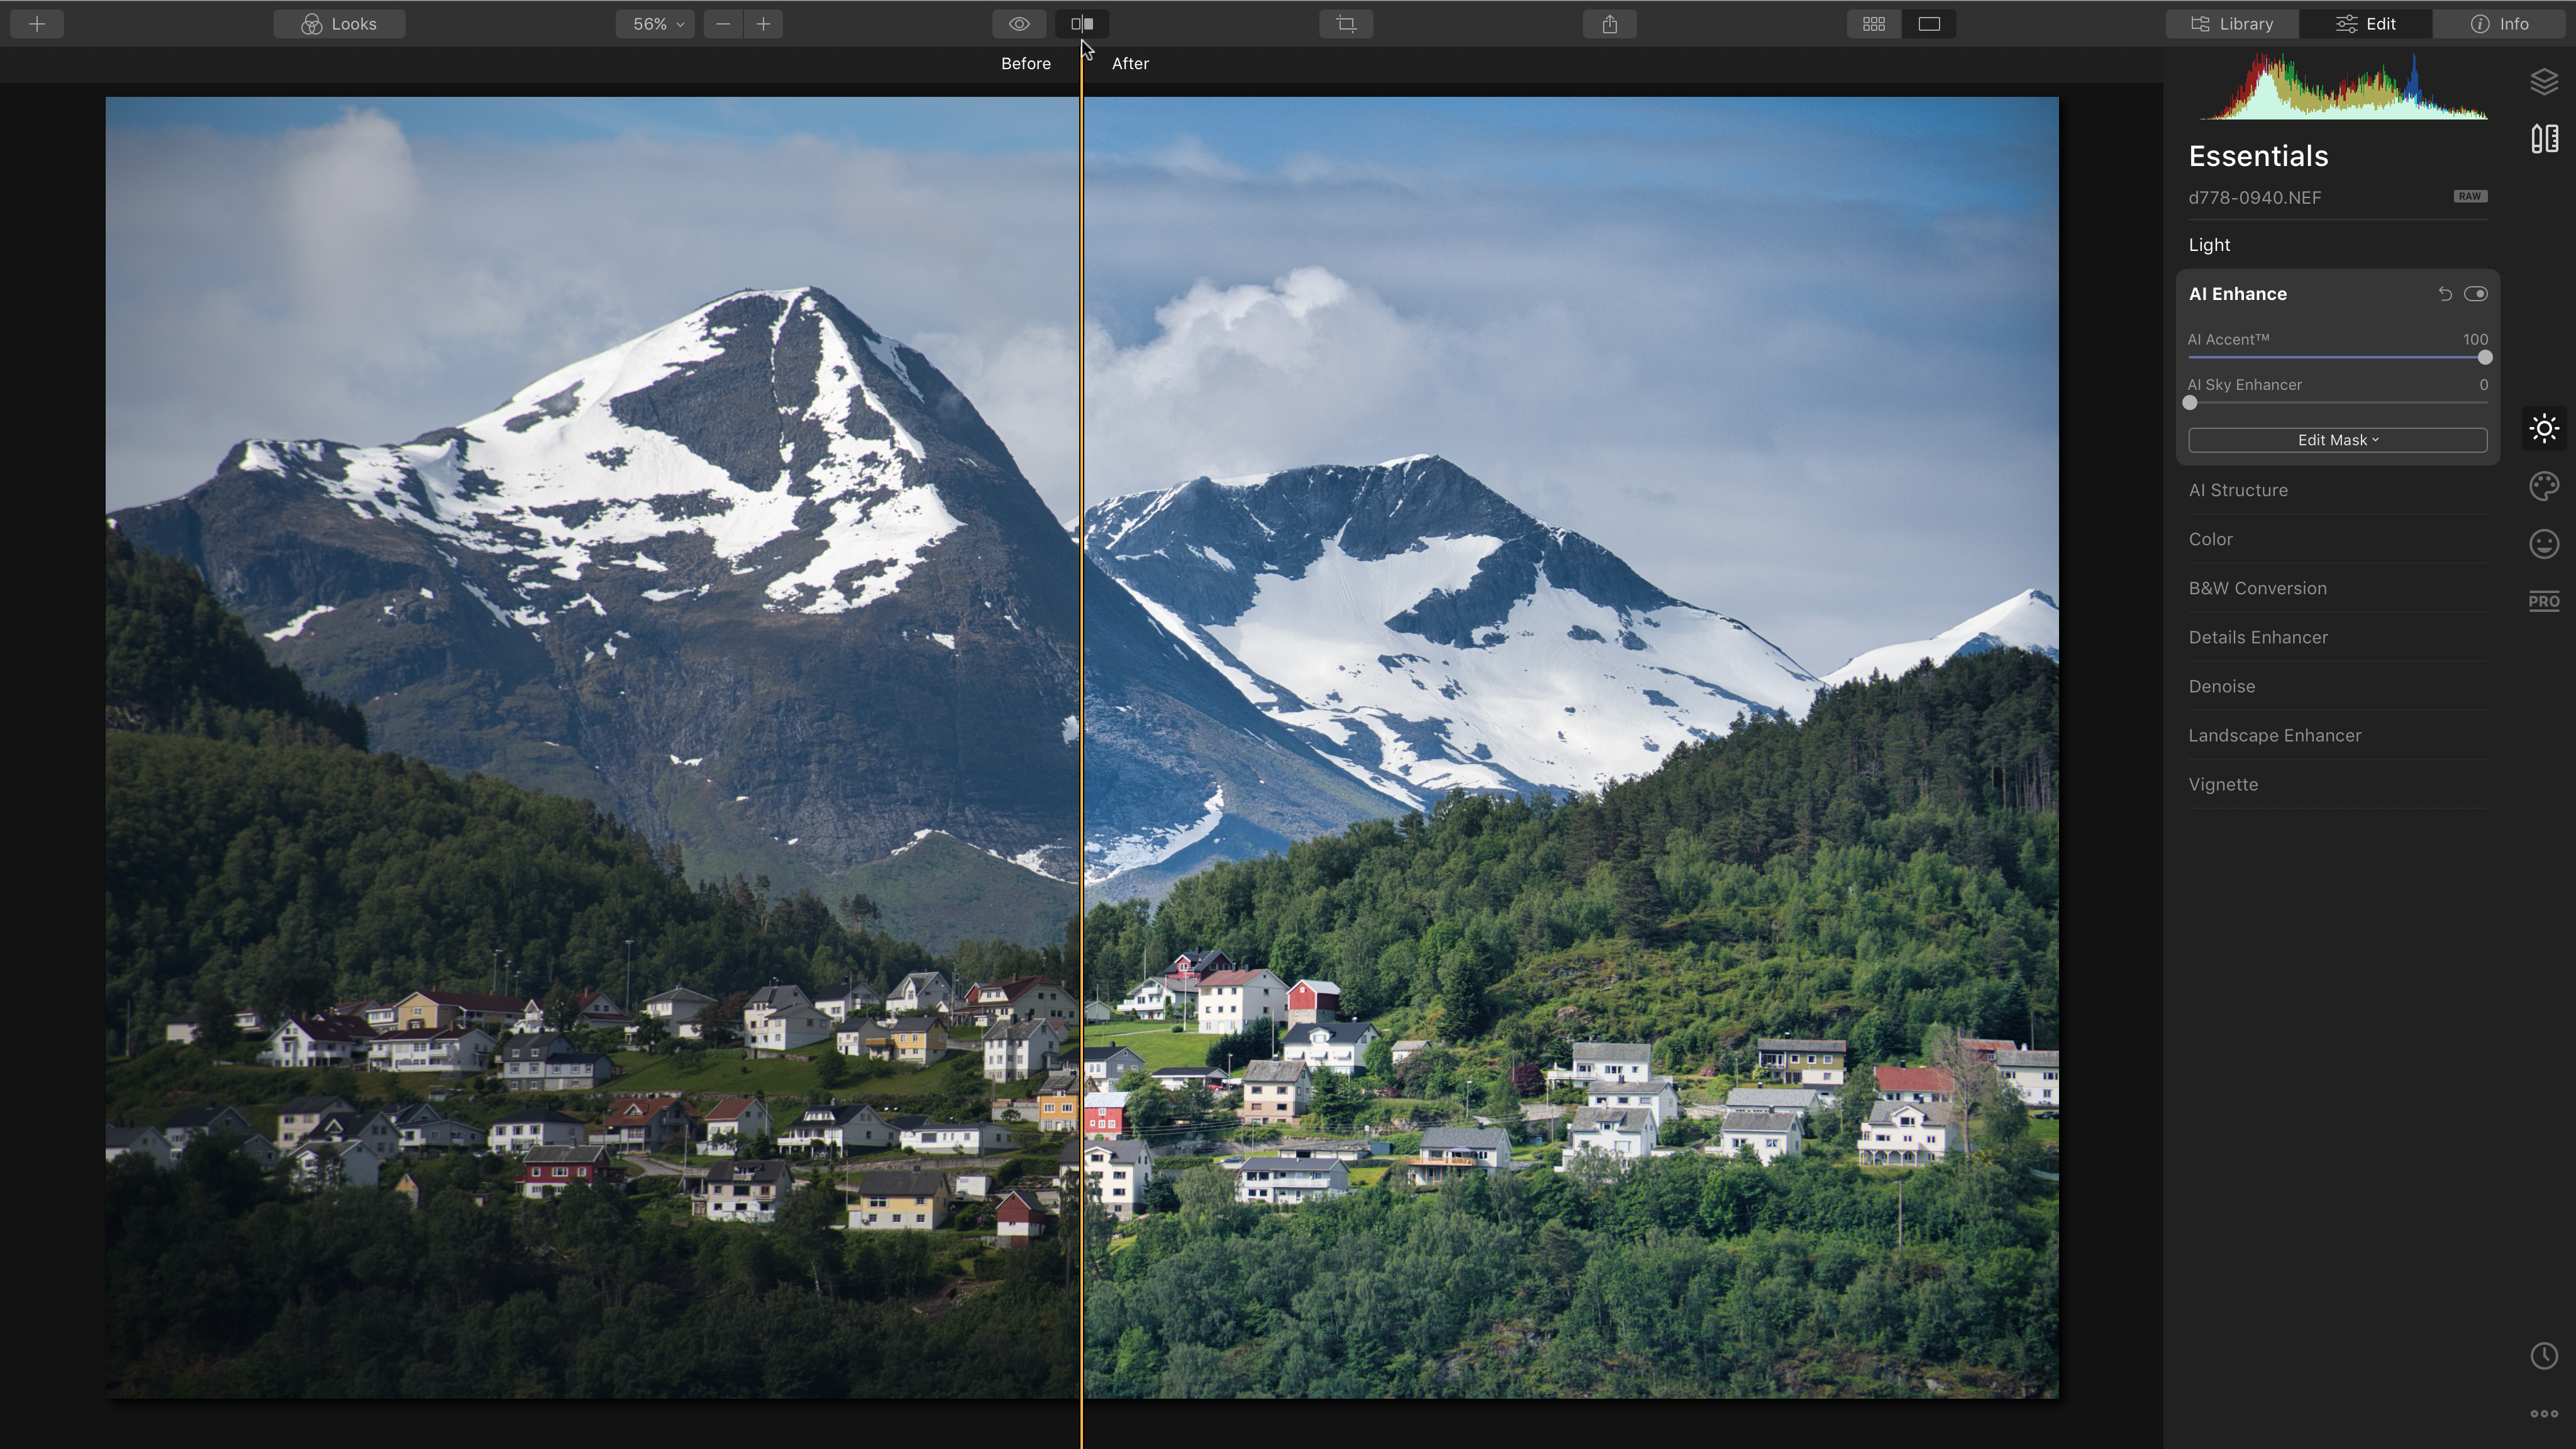
1. Try AI Enhance
The AI Enhance tool is in the Essentials Workspace. It might look like no more than a simple quick fix slider, but behind it are some advanced machine-learning algorithms that split up the scene into different areas and objects which are then enhanced individually. Trying this first can fix or improve a lot of tone and color problems straight off.
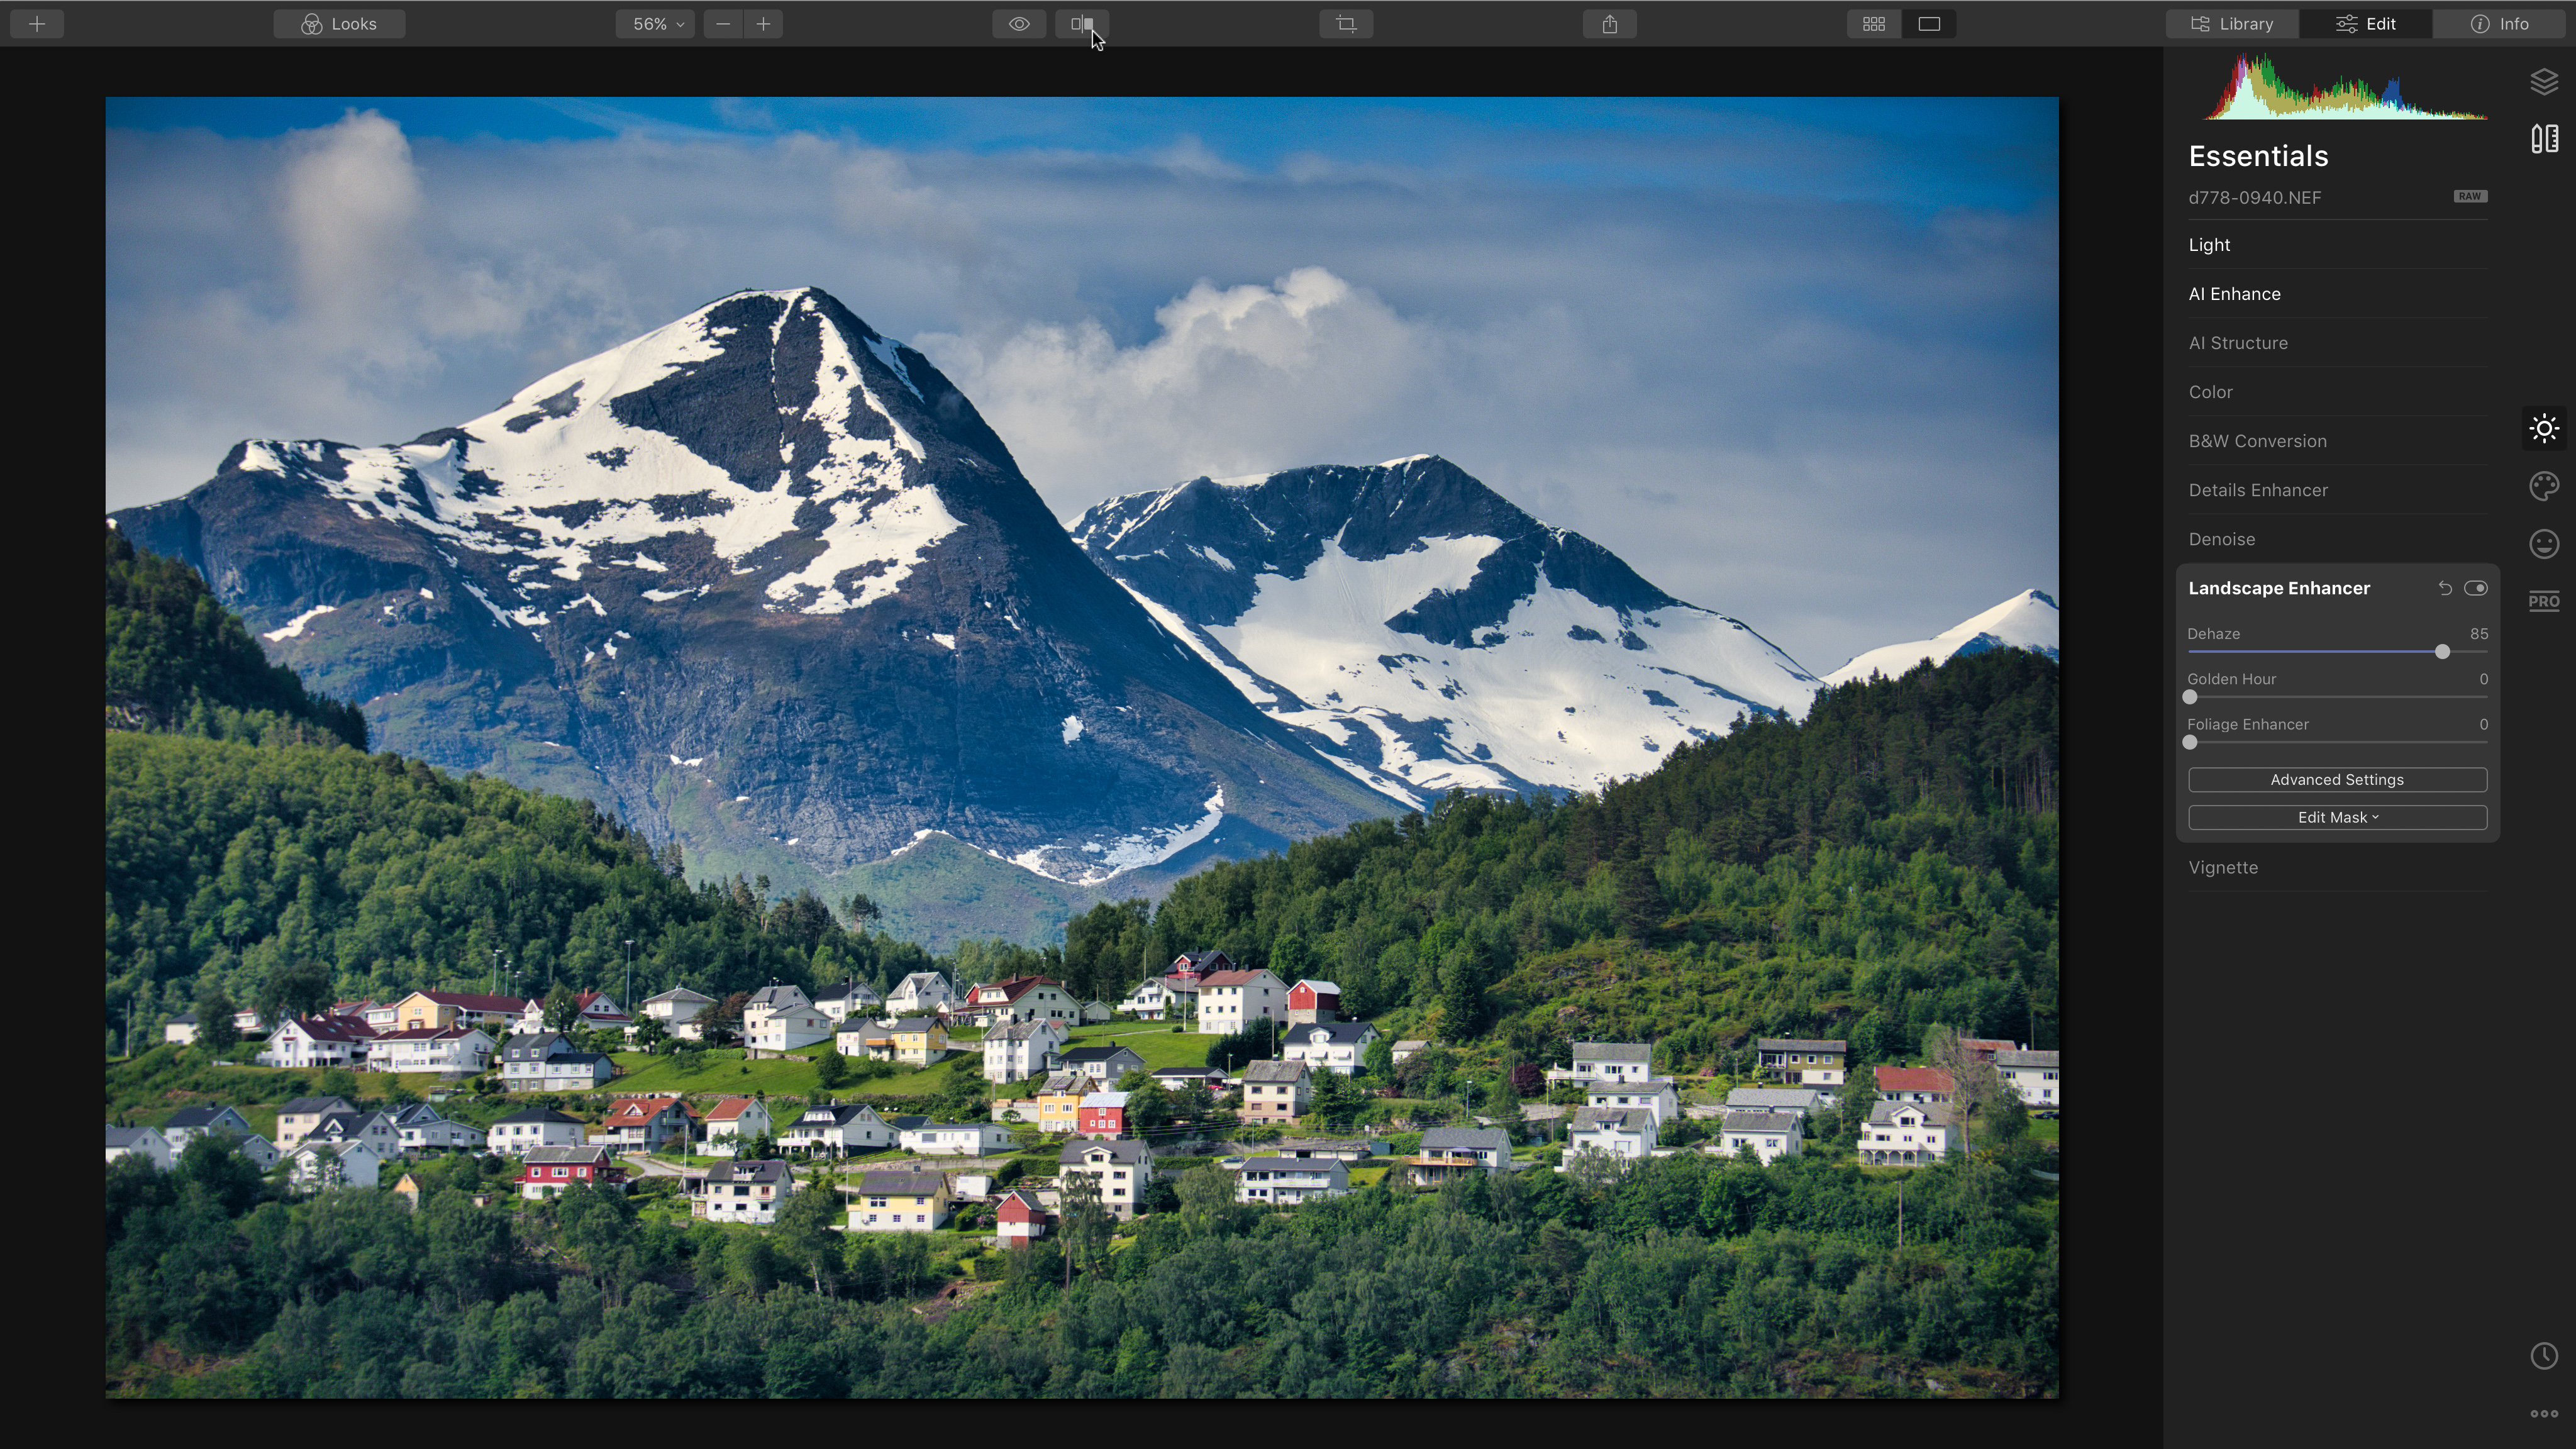
2. Landscape Enhancer
The Landscape Enhancer Panel incorporates three tools that were separate in previous versions of Luminar. Let’s start with Dehaze: this restores some depth and contrast to mountains in our picture by compensating for the slight haze. Luminar’s Dehaze slider is subtler than other programs, so don’t be afraid to push the slider to higher values.
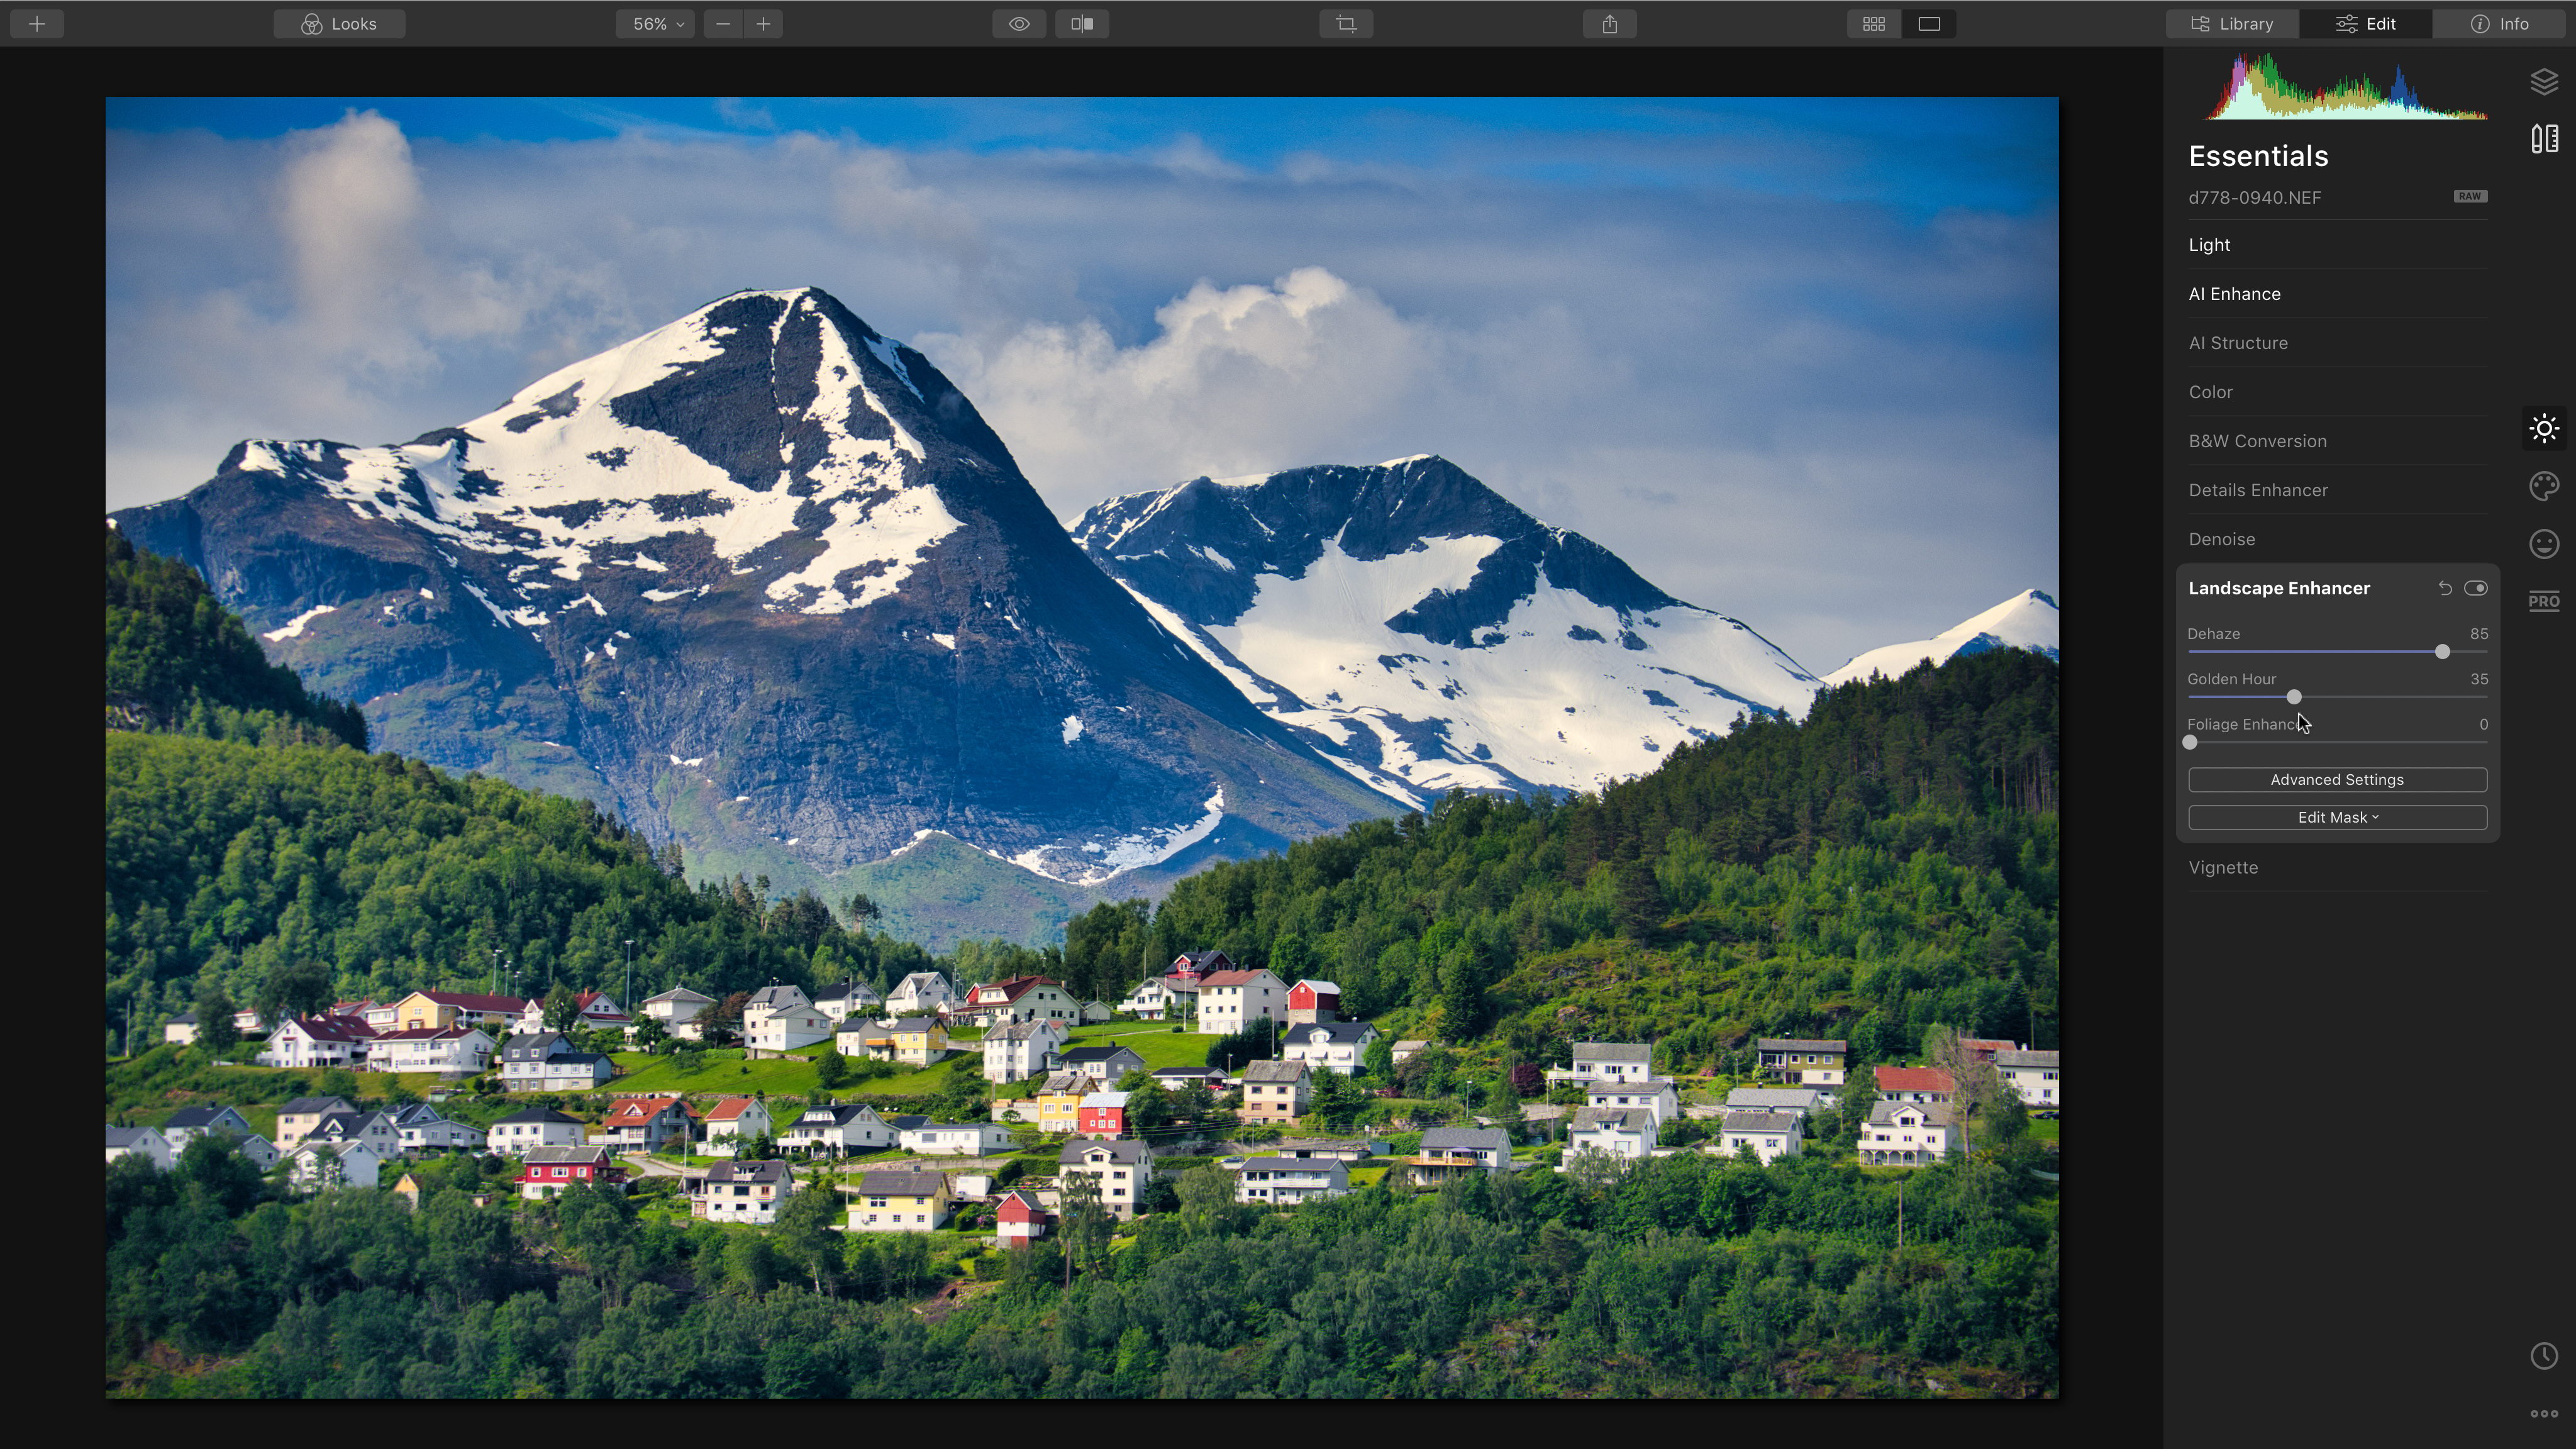
3. Golden Hour
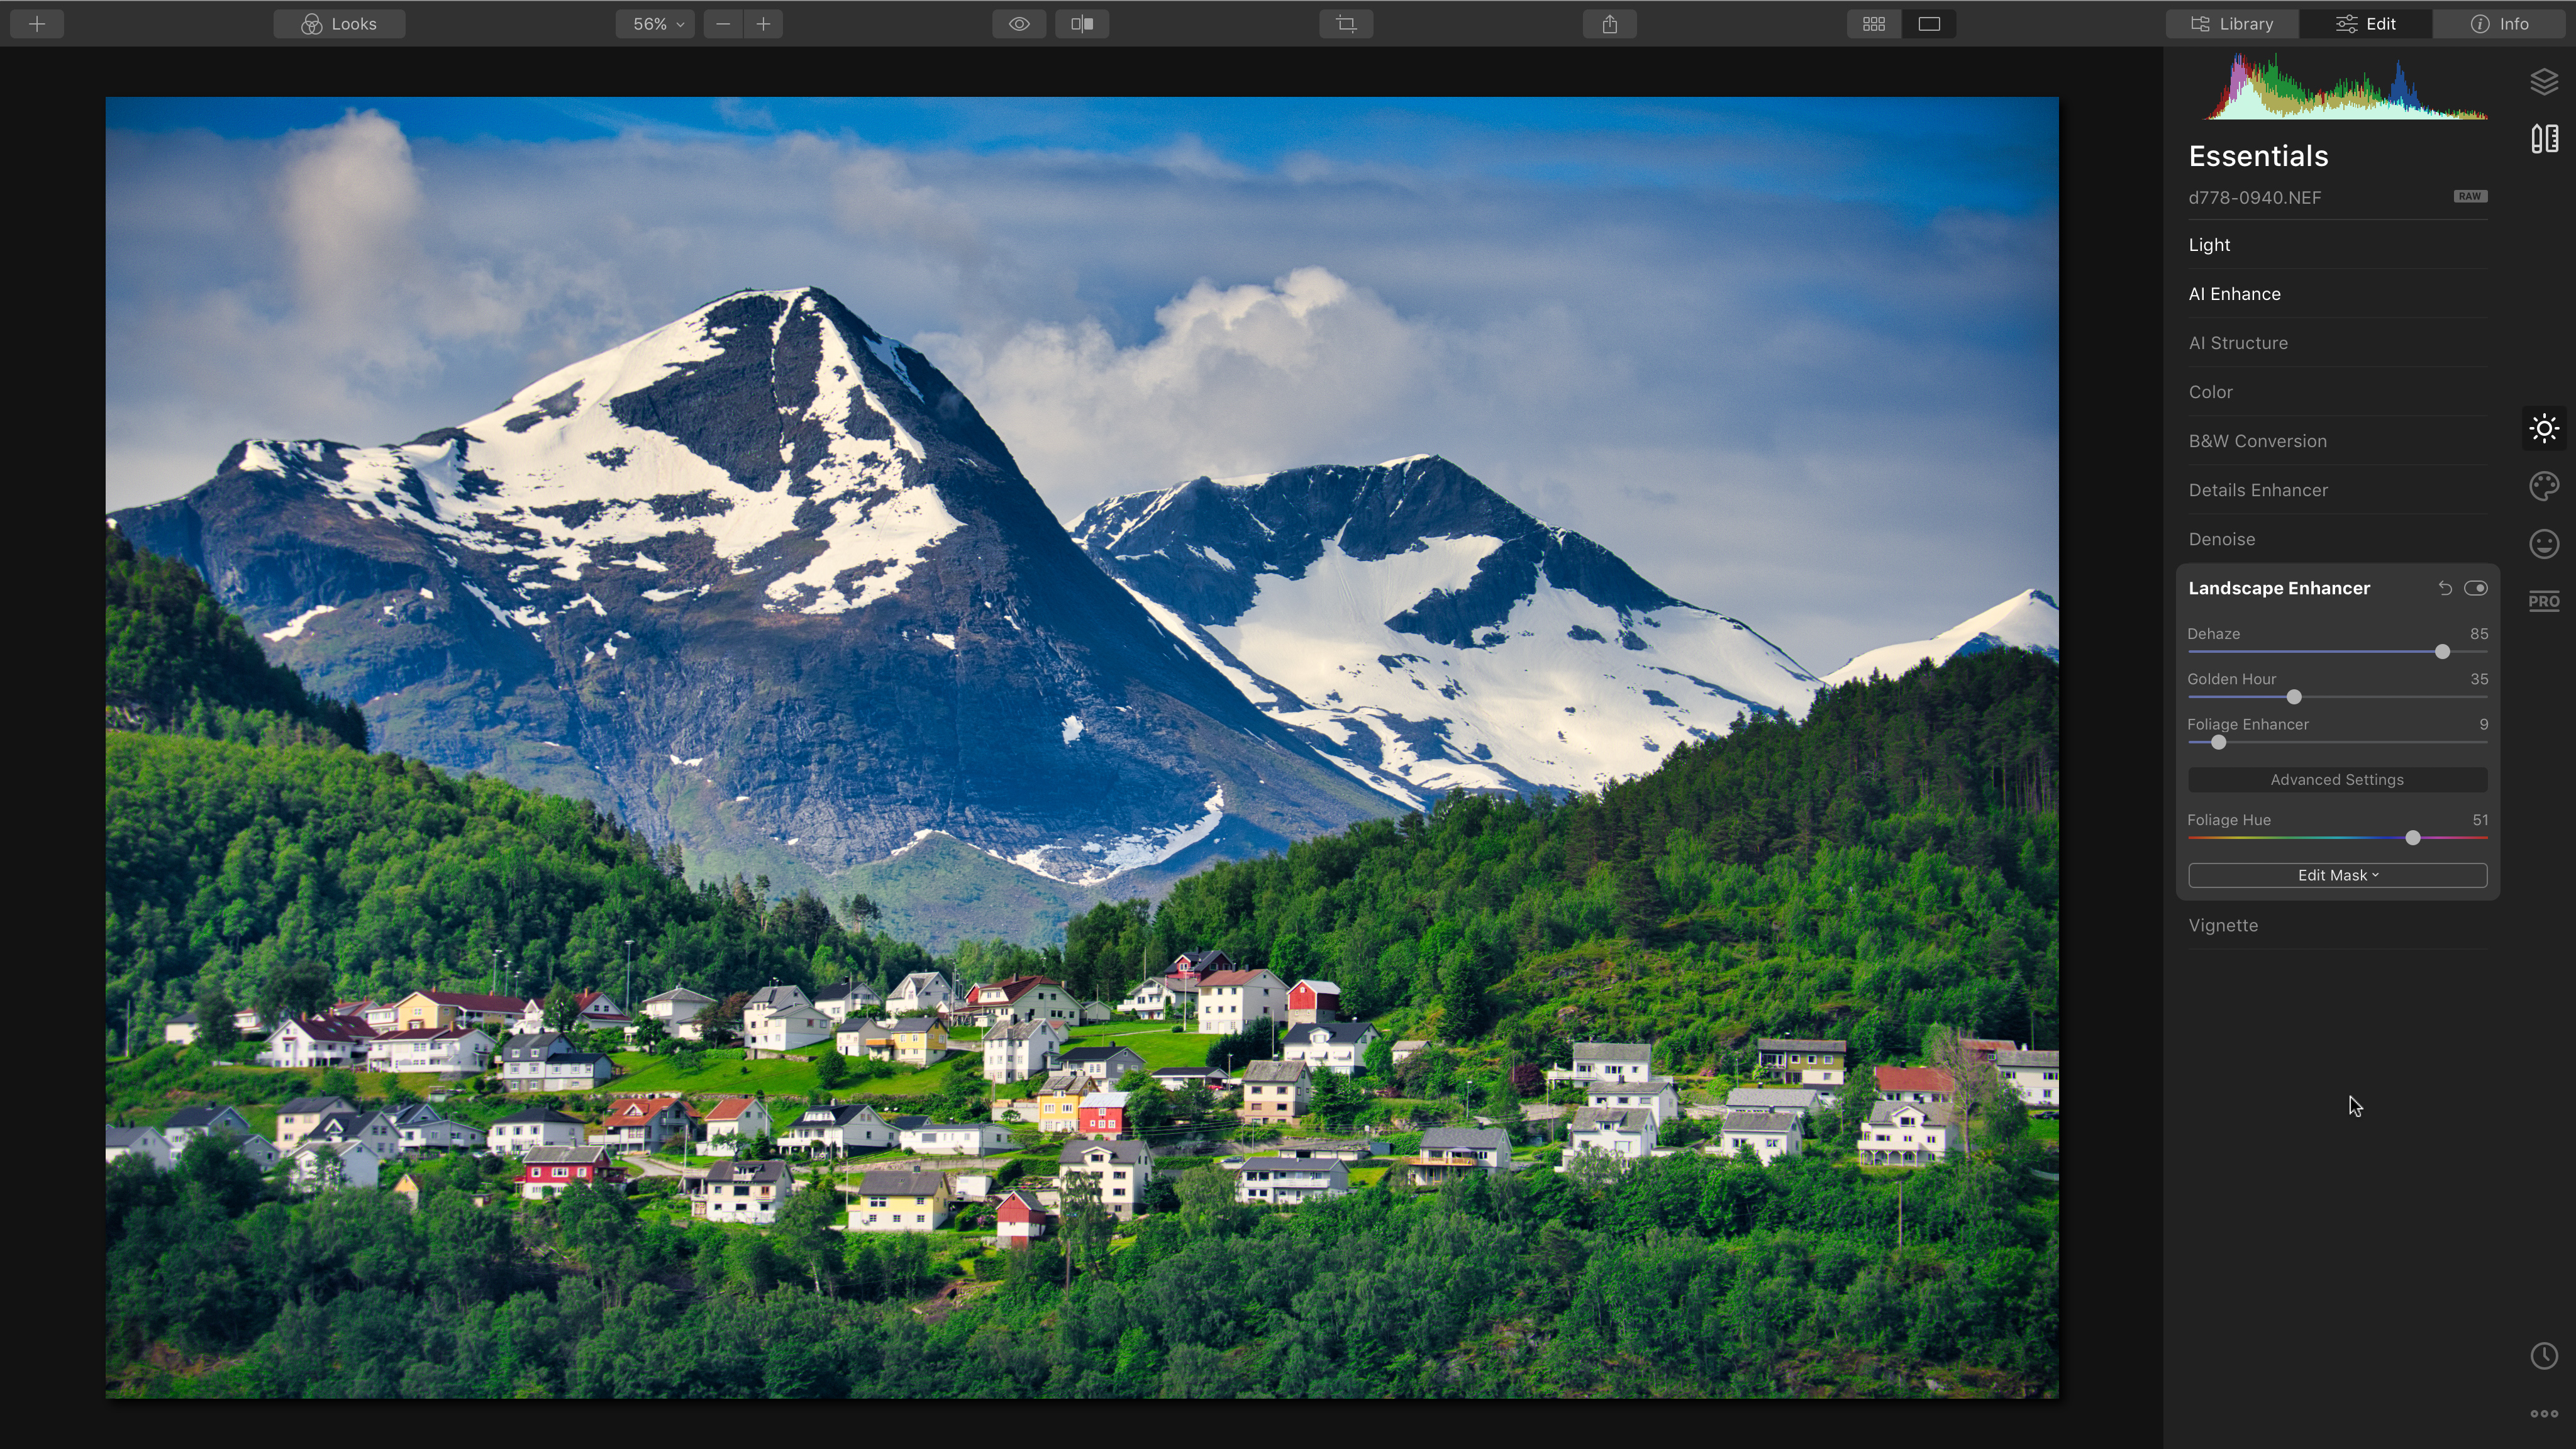
Next, we can use Golden Hour to add a little warmth. Very often, digital cameras can leave landscapes looking quite cold – or colder than we like to think of them, at any rate. Be careful here, because this can also push the saturation quite high. This is another tool that’s smarter than it looks, as it warms the landscape but doesn’t distort the tones in the sky.
4. Foliage Enhancer
As the name suggests, this picks out all the greenery in a landscape for enhancement while leaving the rest of the image unaffected. This is very sensitive, so even a low value can really make foliage leap out. If you click the Advanced Settings button, you get a Foliage Hue slider, which we can use here to make the trees and grass a much cooler, lusher green.
5. Masking the effect
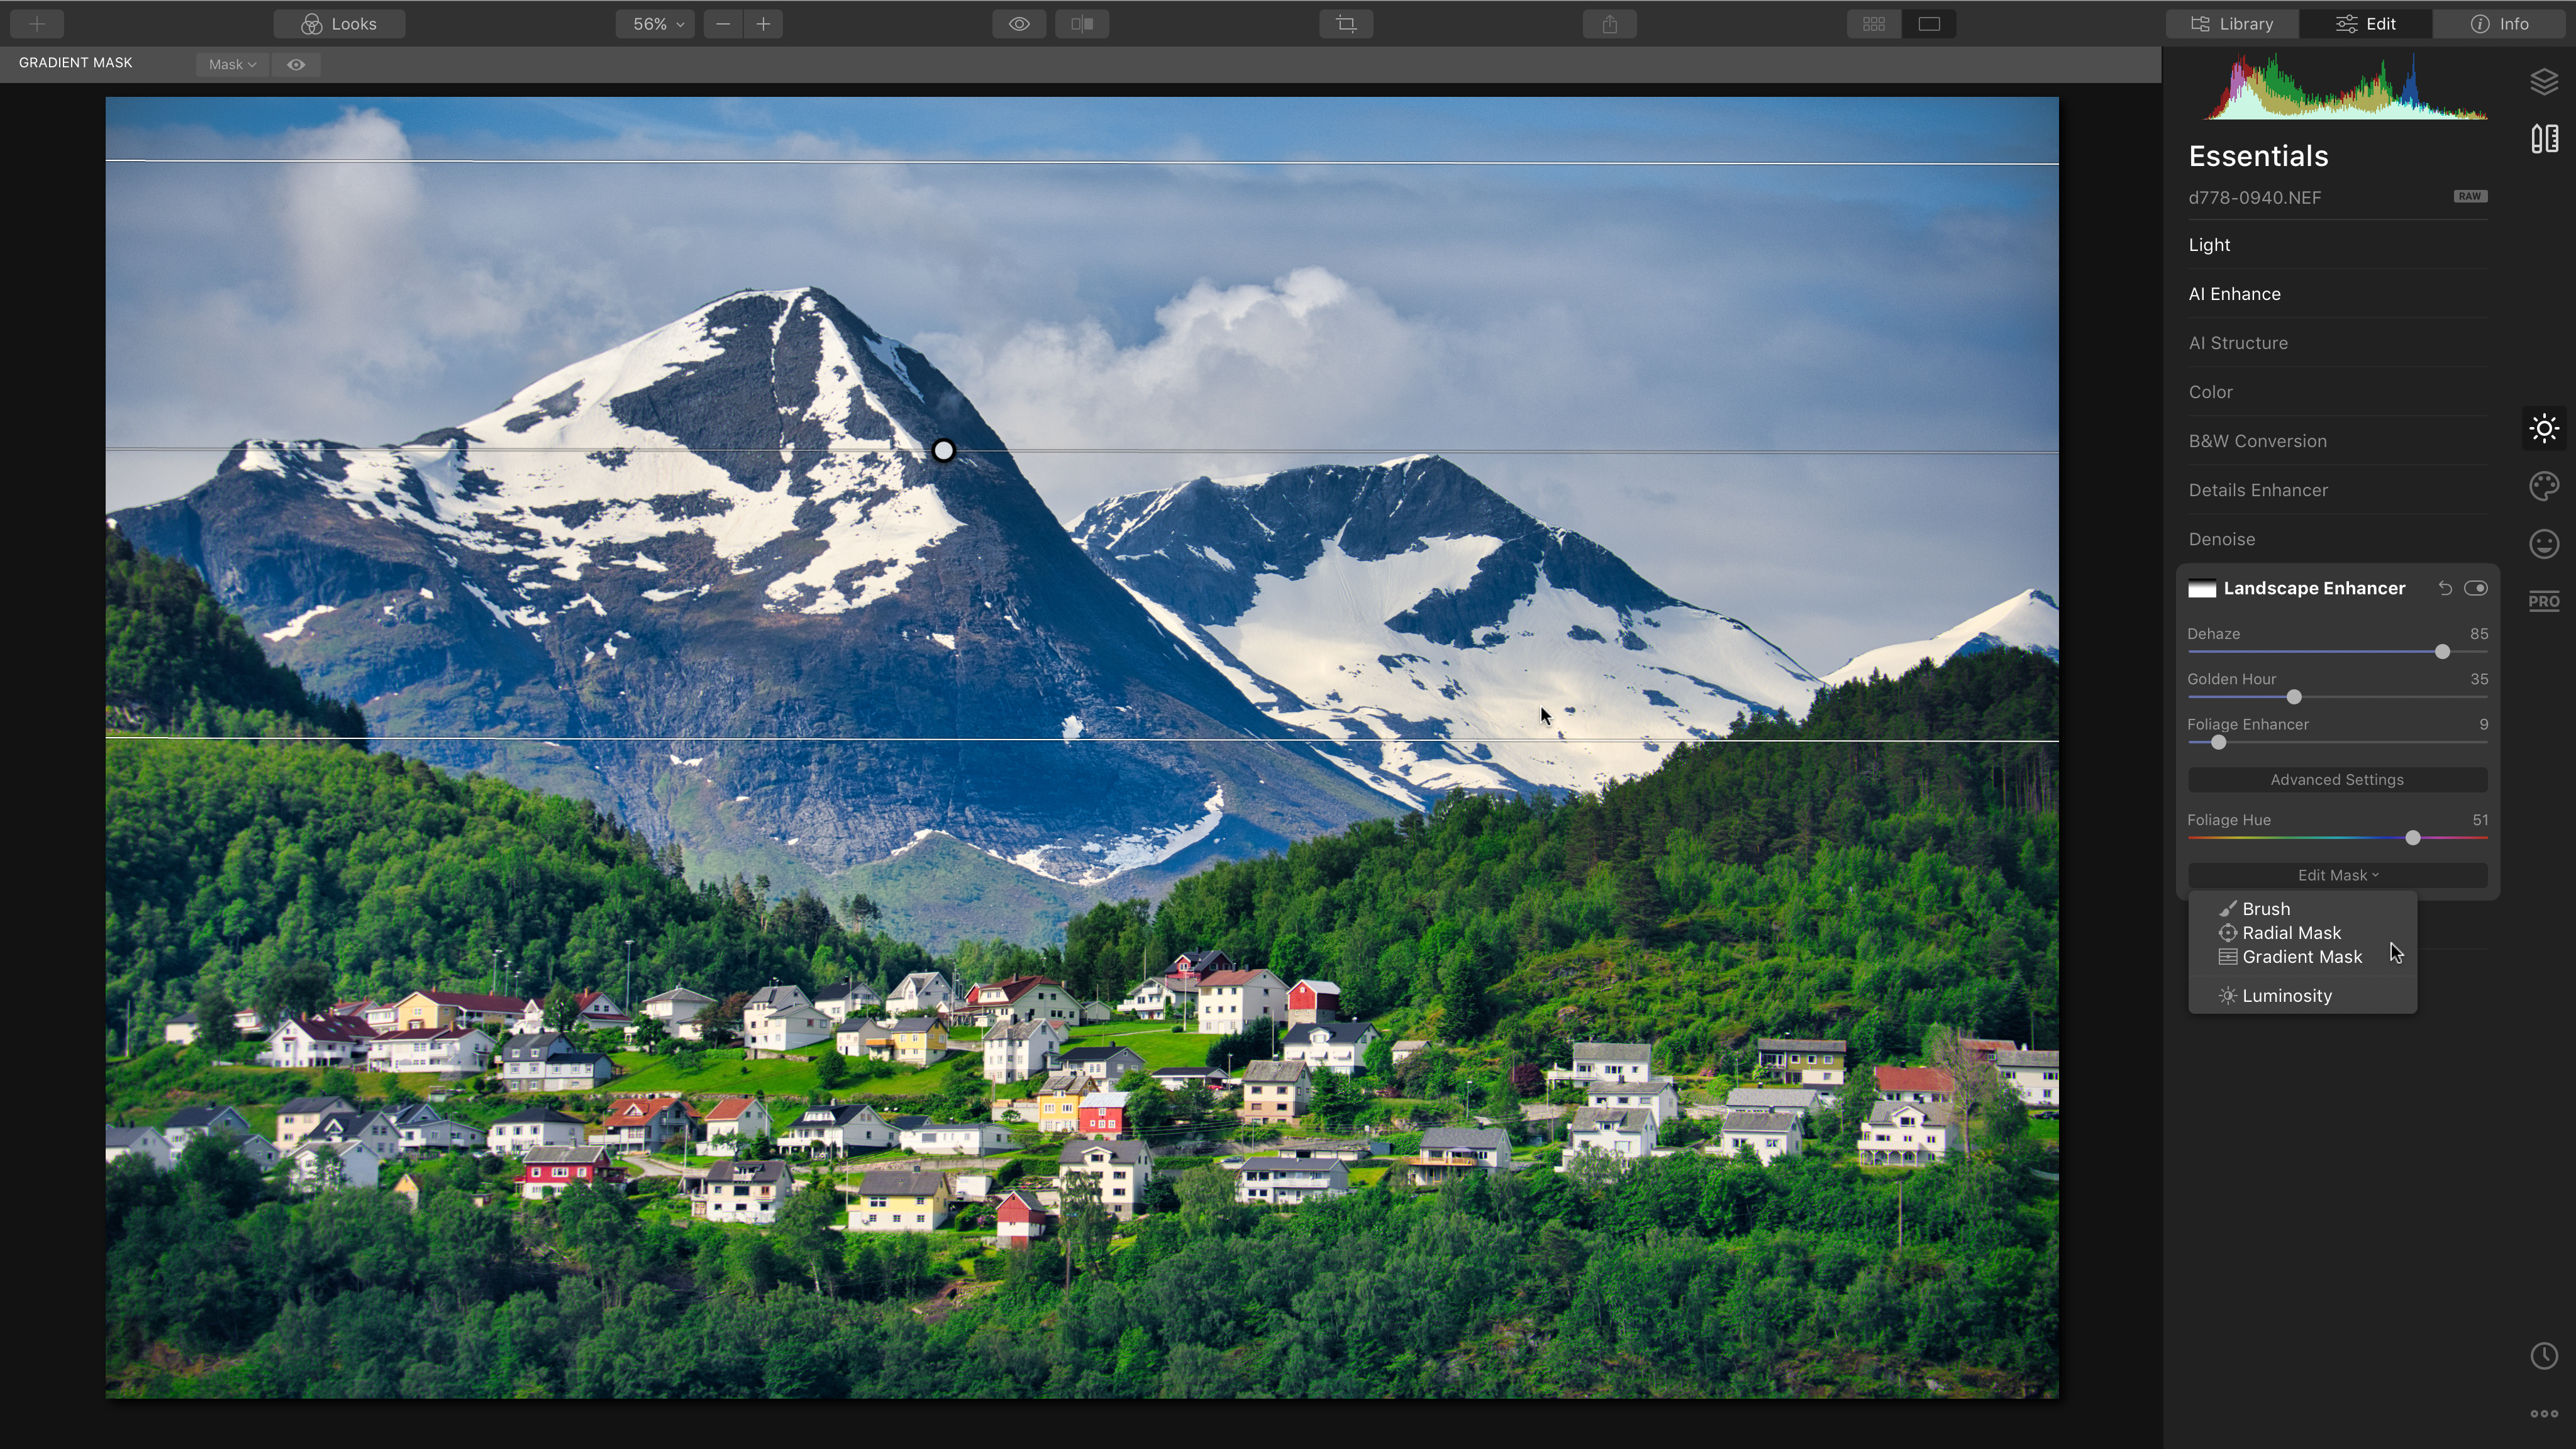
Once you’ve applied all these enhancements, you may spot that some areas of the scene look a little over-enhanced. Like most Luminar panels, the Landscape Enhancer has a mask option via the Edit Mask button, so here we can create a Gradient Mask to remove the effect of the filter from the sky and the top of the mountains to produce a more natural-looking background. You position the mask carefully, then click the Done button.

Explained: The Luminar 4 Sunrays filter
If the sun is hidden in your shot, why not add one of your own?
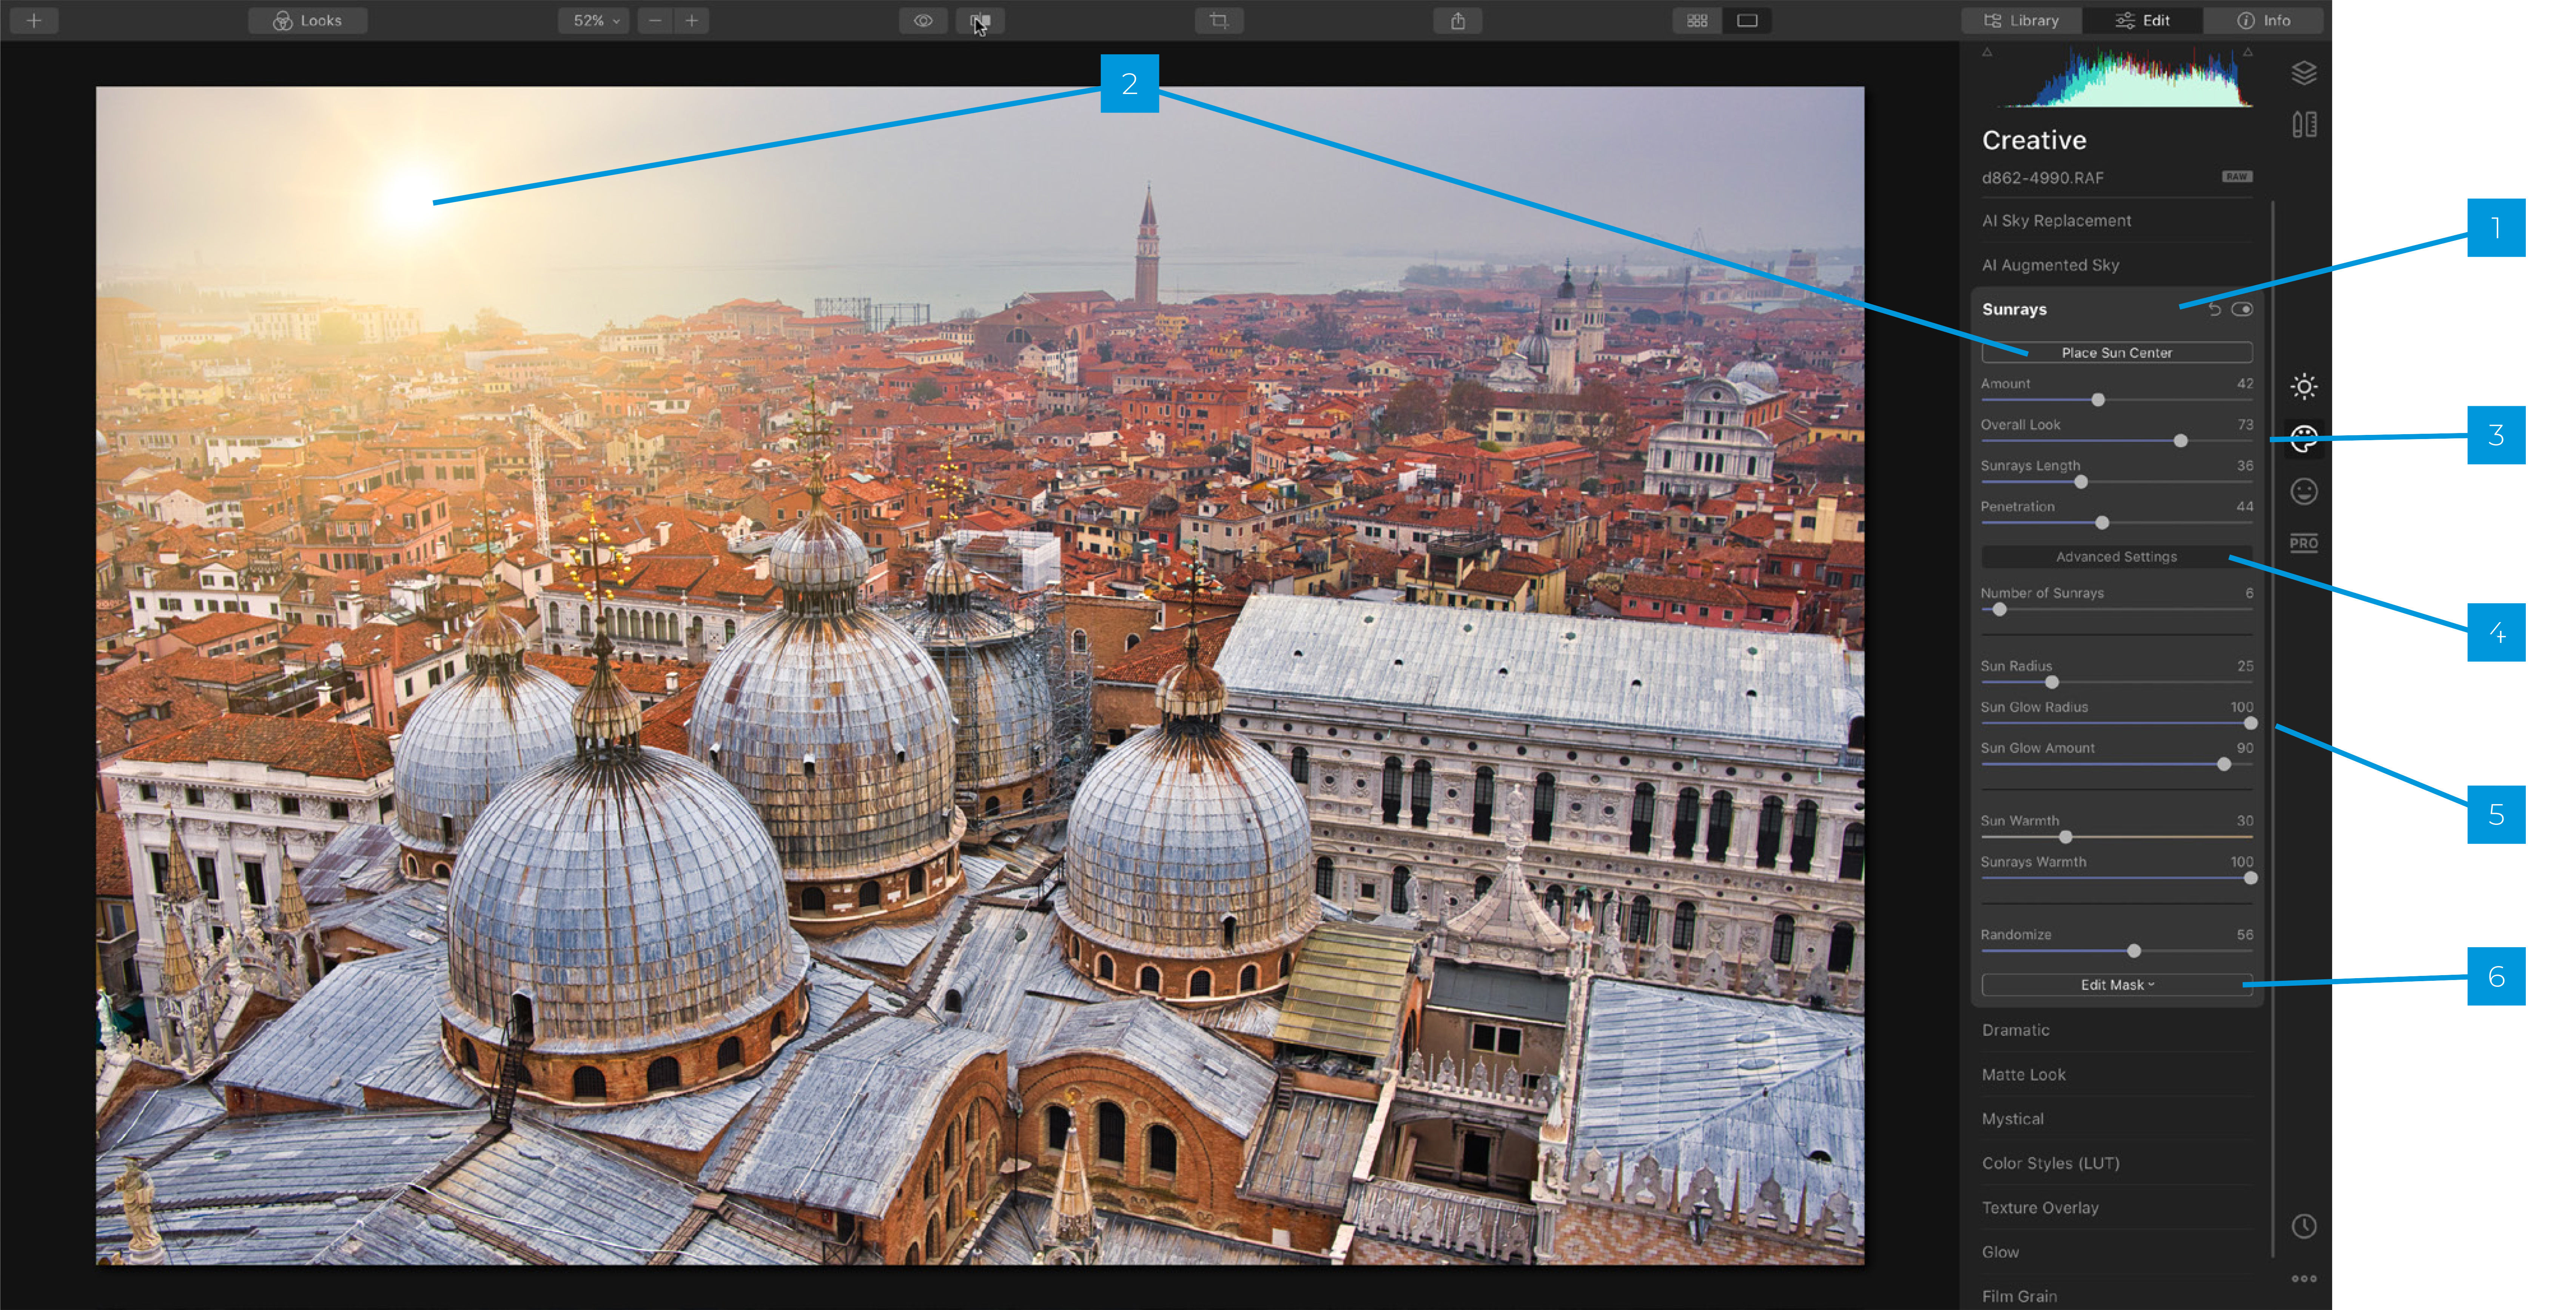
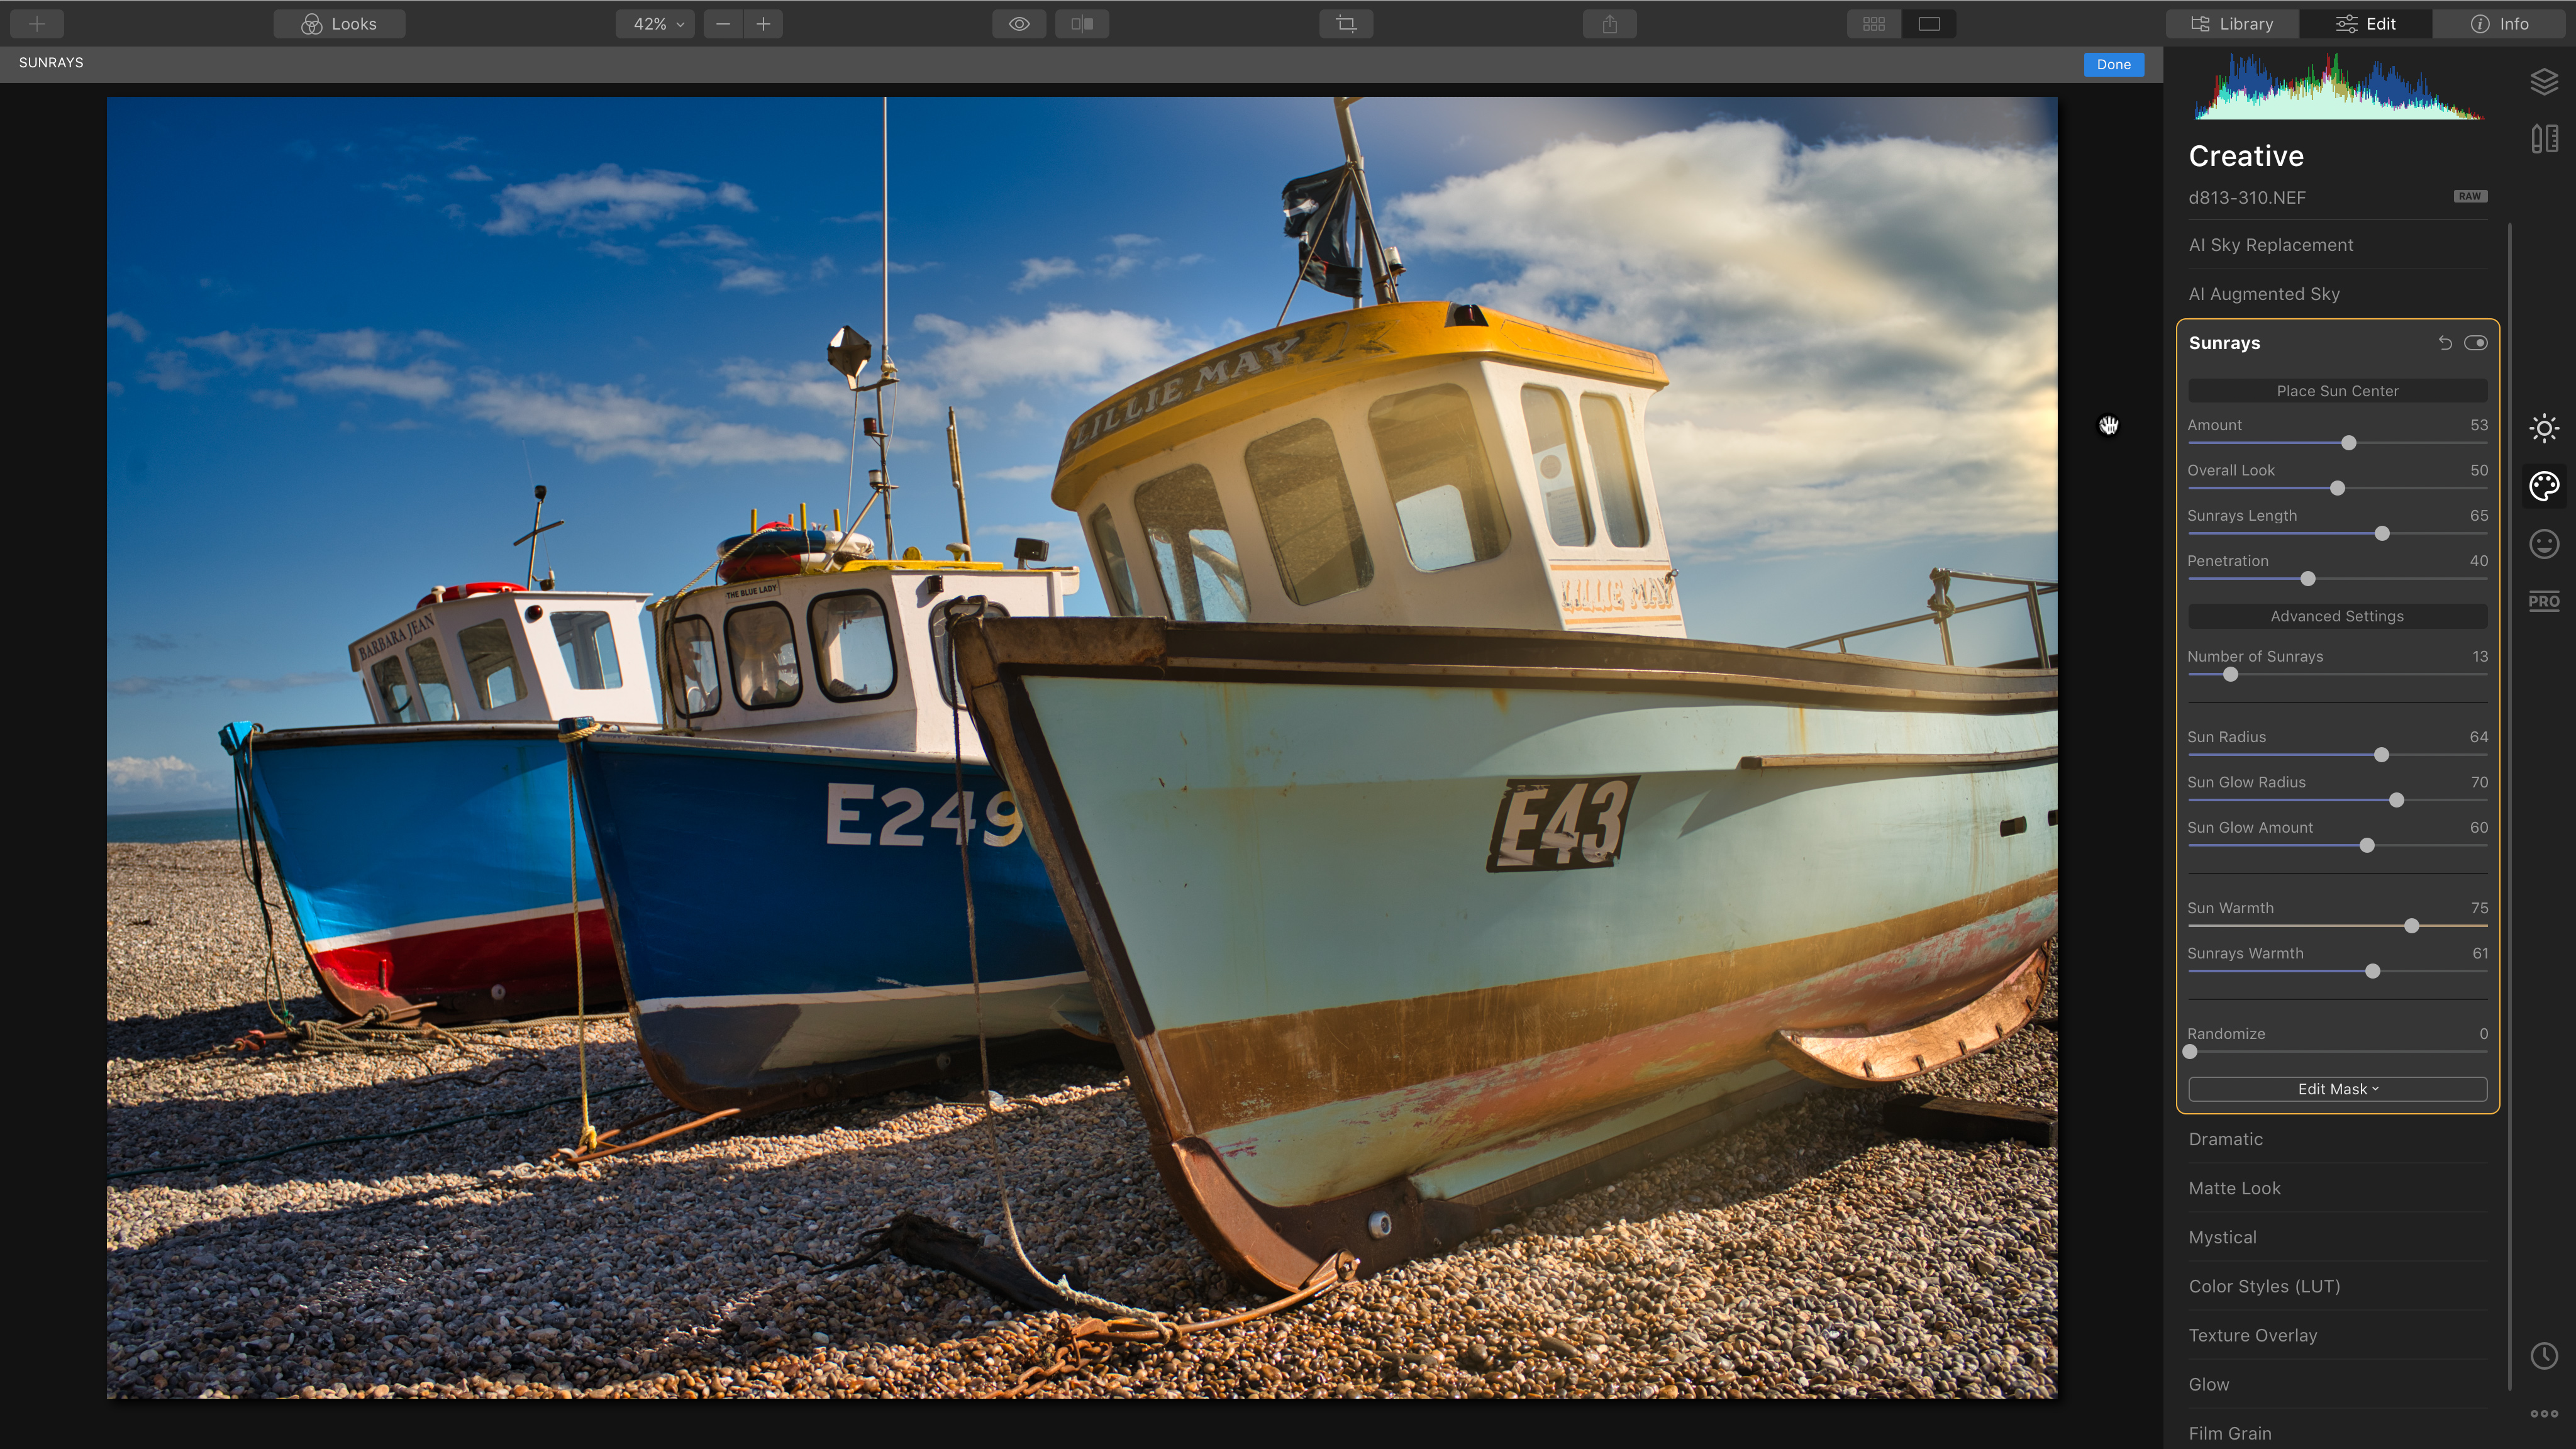
The Sunrays filter has a lot of controls for blending in the lighting effect with your scene, to make the finished result look more natural.
1. Sunrays
You’ll find the Sunrays filter in the Creative Workspace. As with all the Luminar 4 filters, you can use it in combination with other adjustments.
2. Place Sun Center
Where do you want the sun to be in the frame? You click the Place Sun Center button, then move the sun around. You can change its position at any time if you need to.
3. Basic controls
Amount, Overall Look, Sunrays Length and Penetration are the four basic controls. There is some interaction and crossover between them, so just experiment!
4. Advanced Settings
The Advanced Settings button opens up a whole new section of adjustments below. Many of Luminar’s other filters have advanced settings.
5. Glow controls
Sun Radius, Sun Glow Radius and Sun Glow Amount are really useful for giving the sun a soft, spreading glow, rather than obvious ‘rays’.
6. Edit Mask
As with most Luminar tools, you can create a mask to shield parts of the picture from the filter’s effect if you need to.

Transform your landscapes
Here are three more landscapes enhanced in Luminar 4

Fishing boats
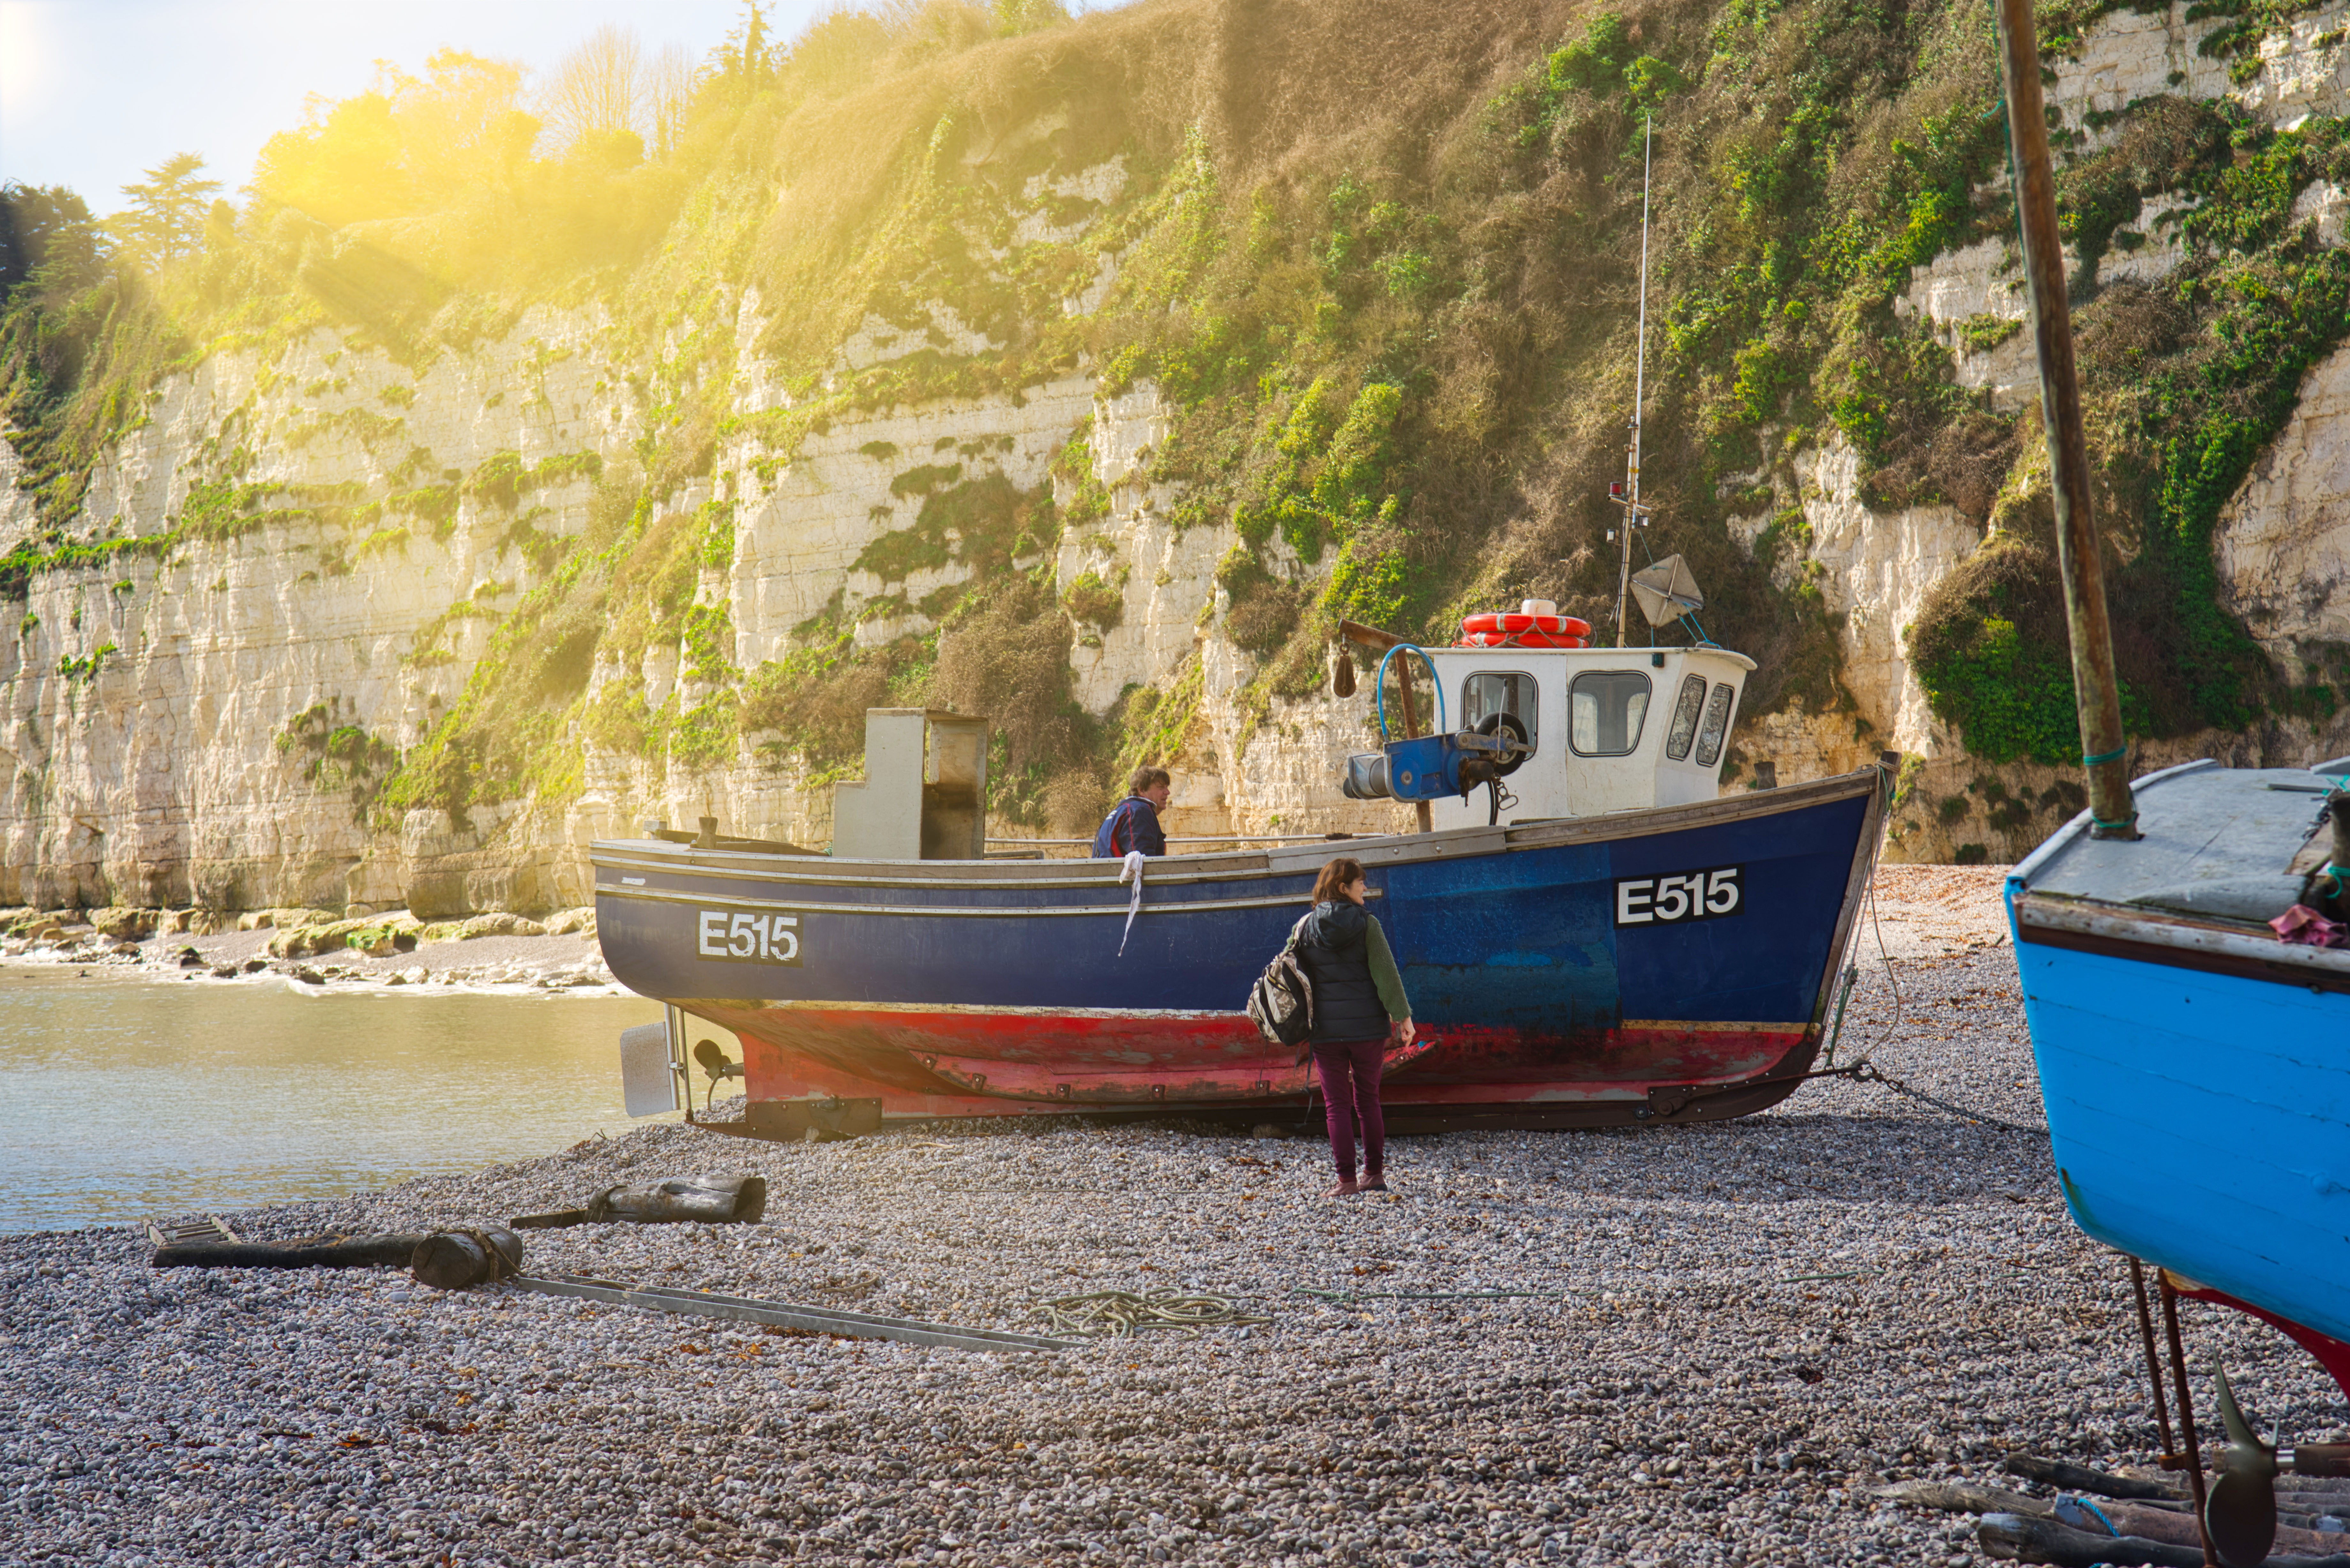
This beach scene had the ingredients for an attractive shot, but it was taken in the middle of the day, when the lighting and the colors were flat. A combination of the Landscape Enhancer and the Sunrays filter has created the depth and color of late-afternoon ‘golden hour’ lighting.
Trees reflected
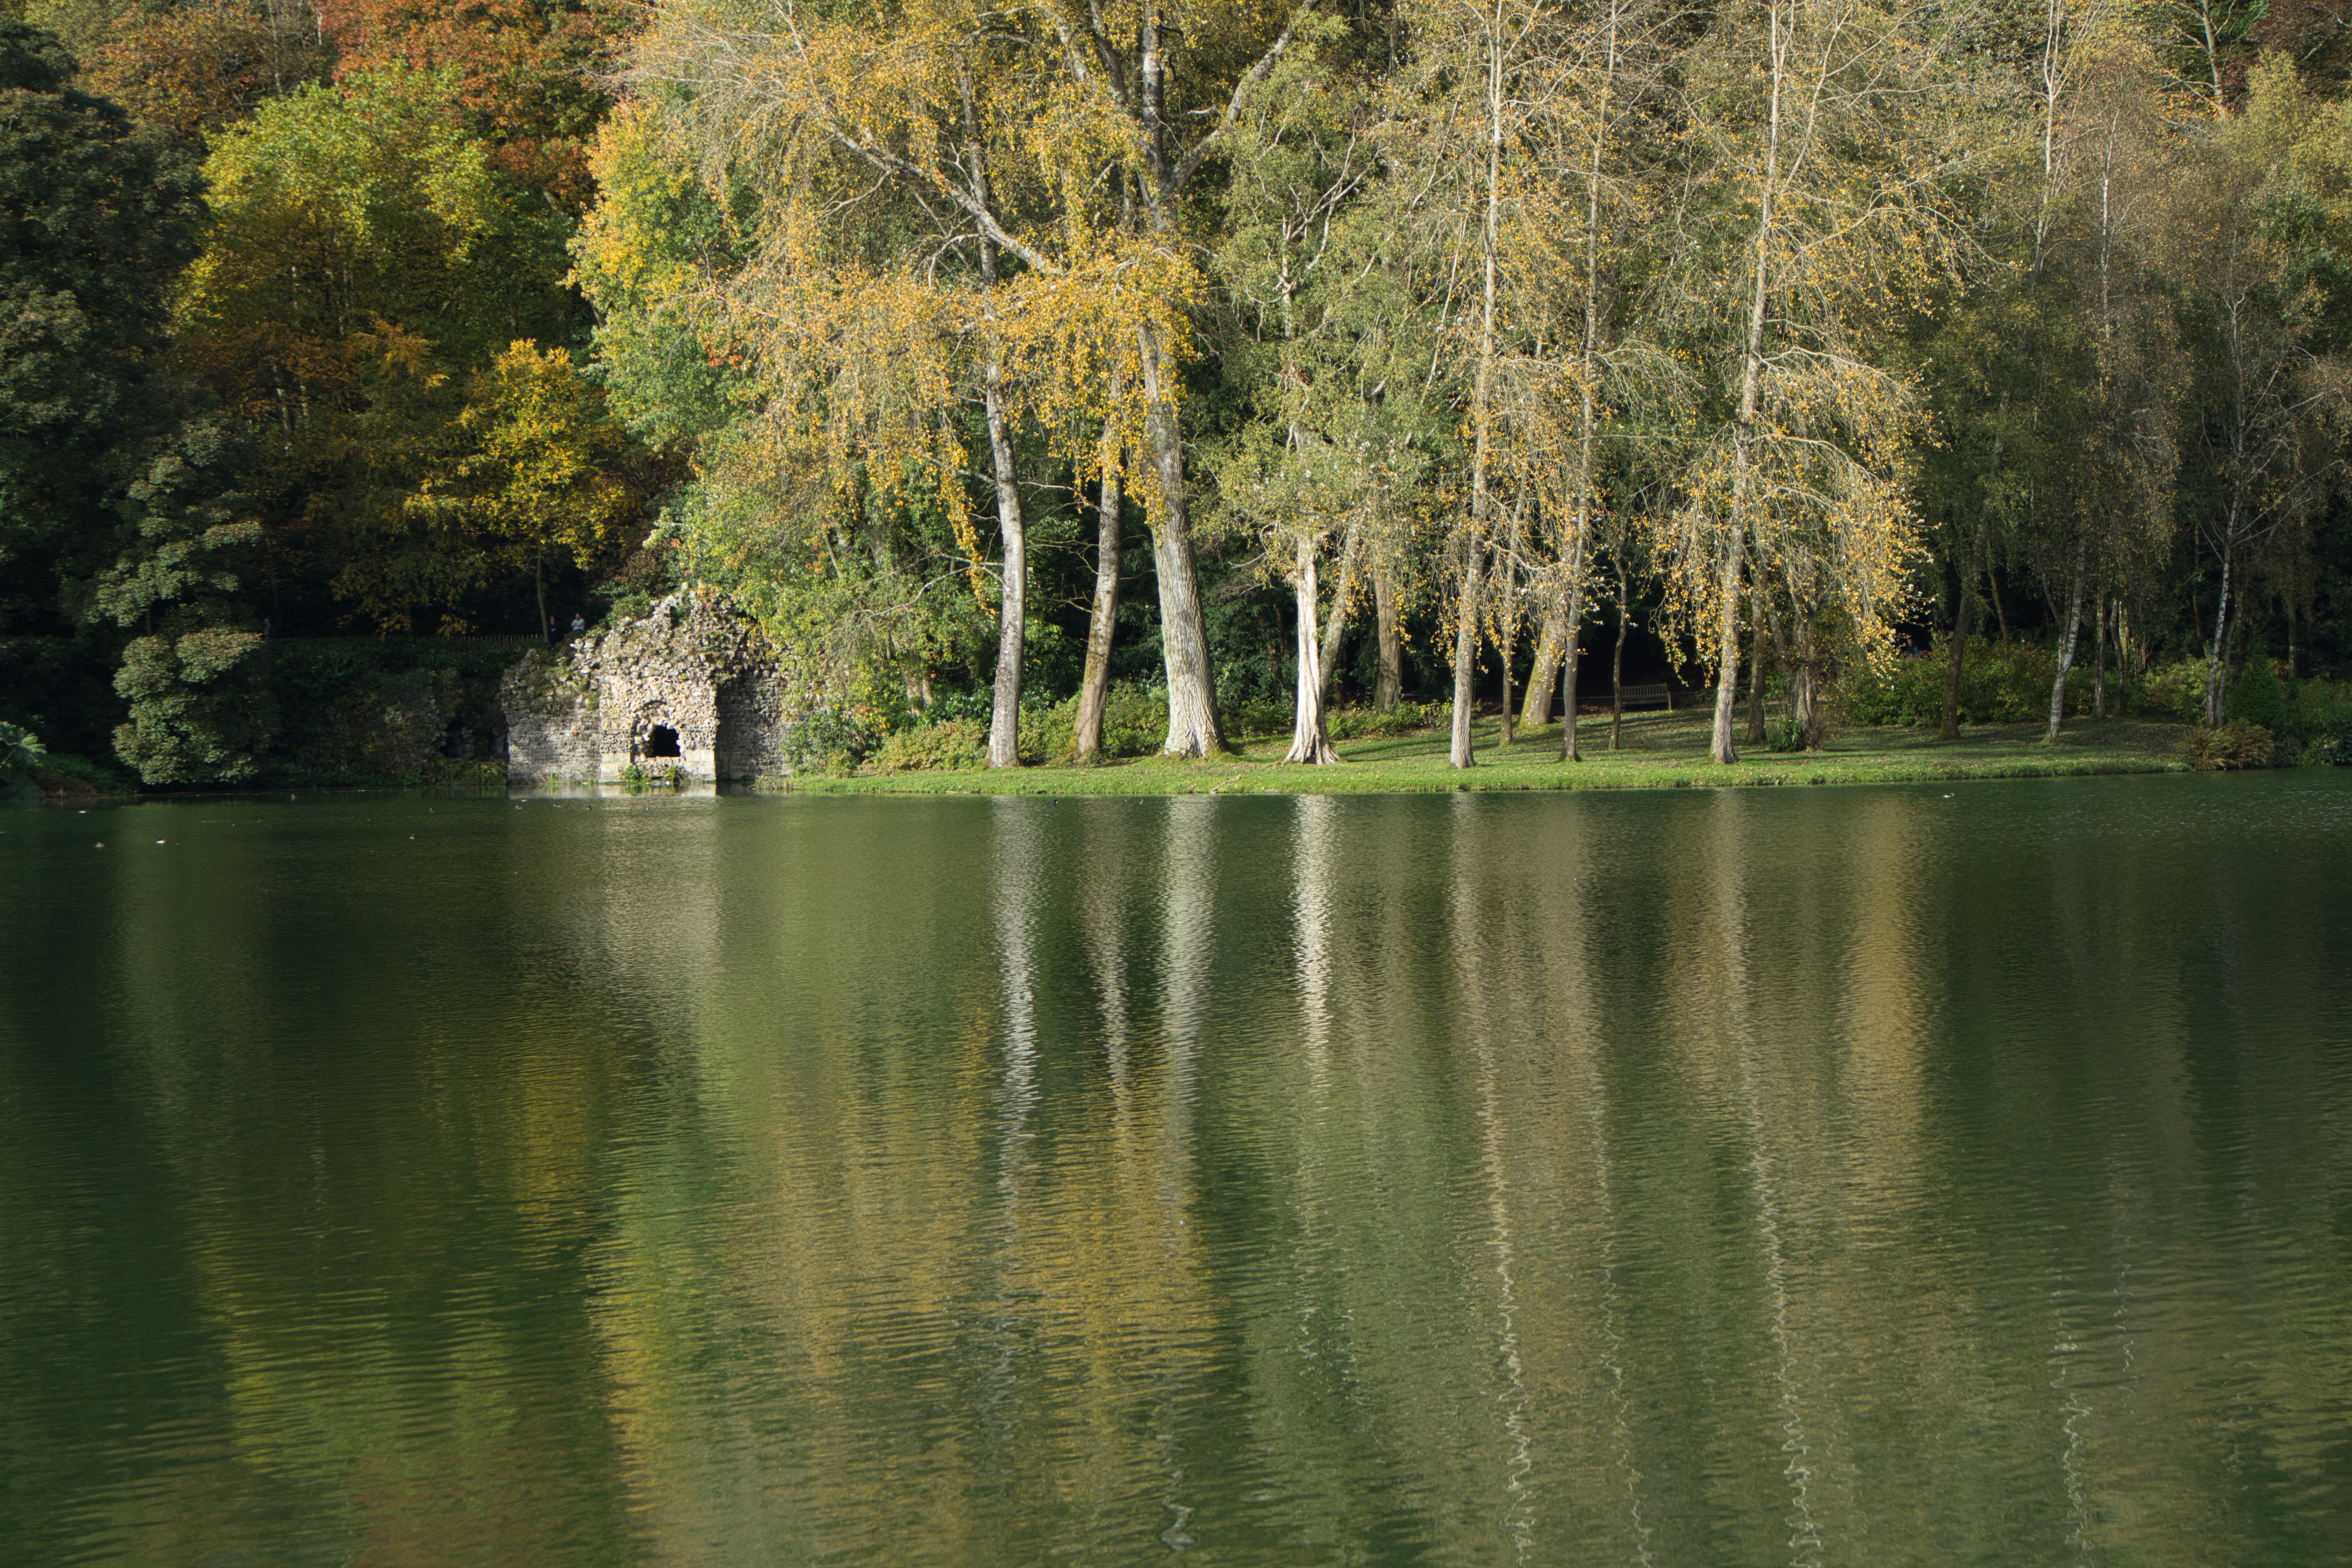
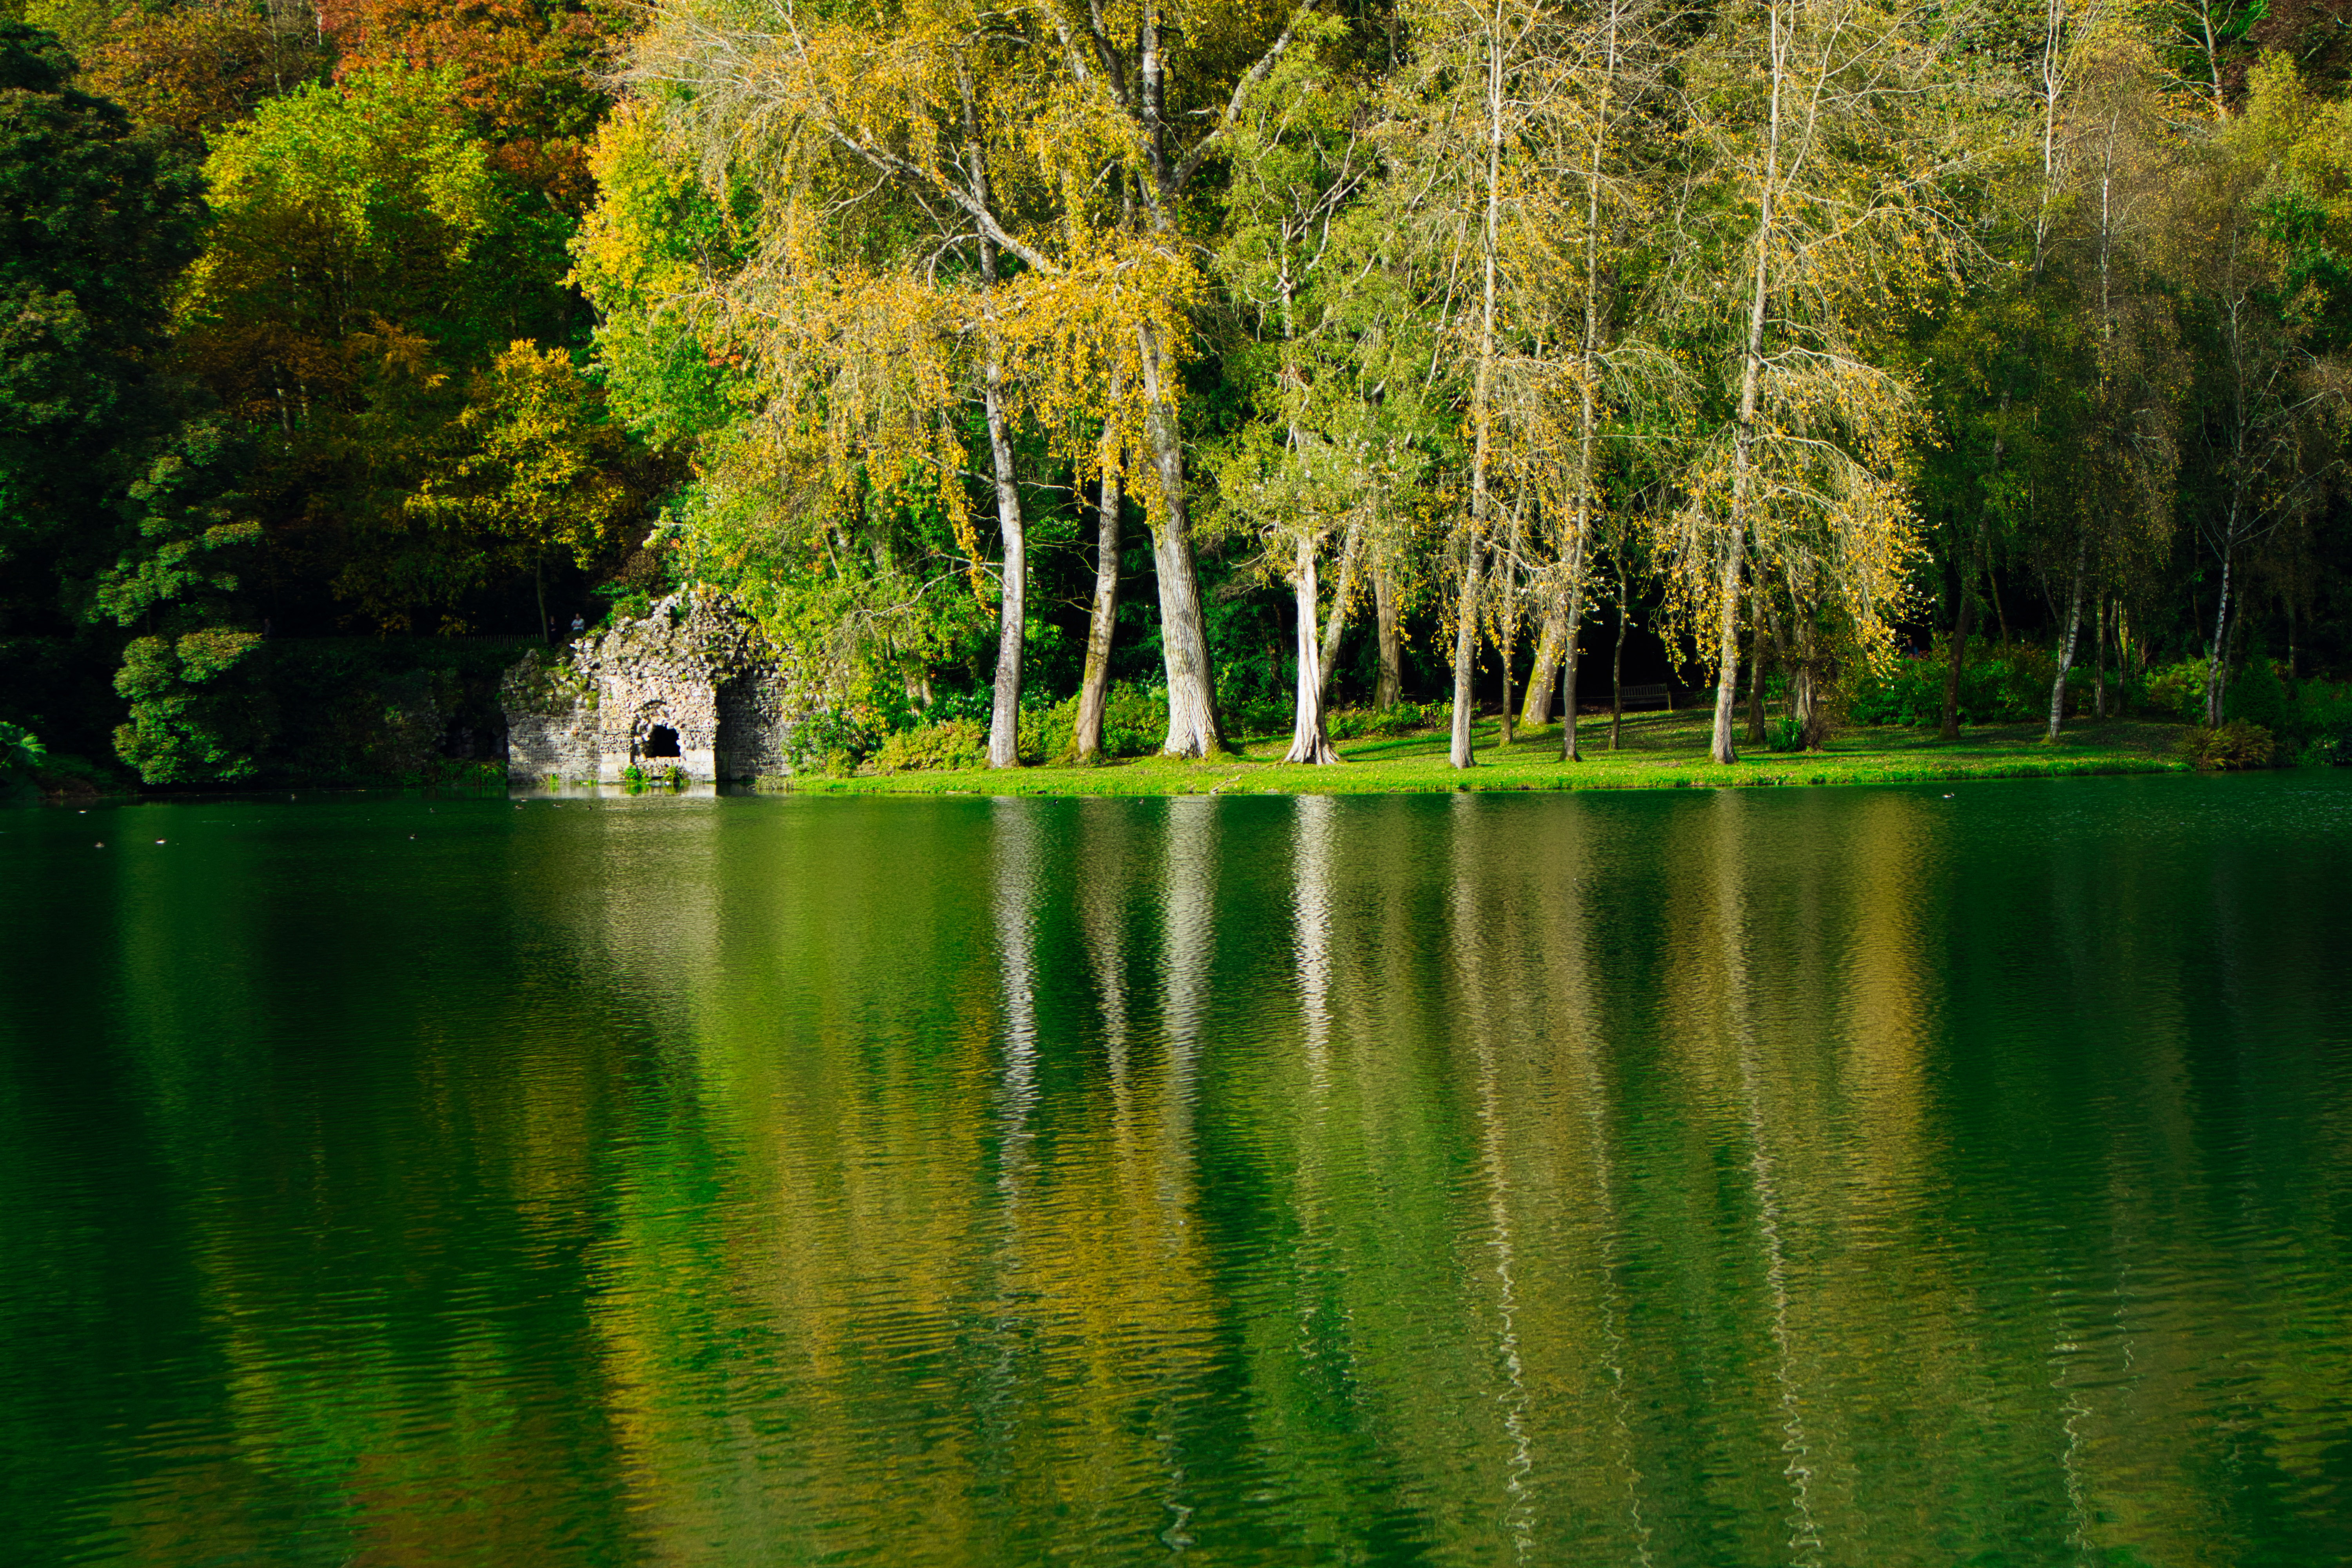
Here’s another picture taken in the middle of the day; the composition and the reflection of the trees in the water looked great, but the scene just looks flat, hazy and a little weak. The Landscape Enhancer has fixed that with a combination of Dehaze and Foliage Enhancer adjustments.


Evening sky
Very often you’ll need two or more tools to get the effect you want. The Landscape Enhancer Panel has reduced the haze, added a warm tone and made the foliage greener, but we also needed the help of the AI Sky Replacement tool and a Gradient Mask to blend in our replacement sky.

5 great tips for enhancing your landscape photos
Luminar’s editing tools are designed to be used together, so although this article concentrates on the Landscape Enhancement filters, there are lots of others you can use to improve your pictures. Some of these can give your landscapes a look that’s a little outside the ordinary, and some can make the regular landscape tools work just that little bit better. Don’t forget that you can change your adjustment settings any time you like in Luminar, and experiment as much as you want.
1. Saturation
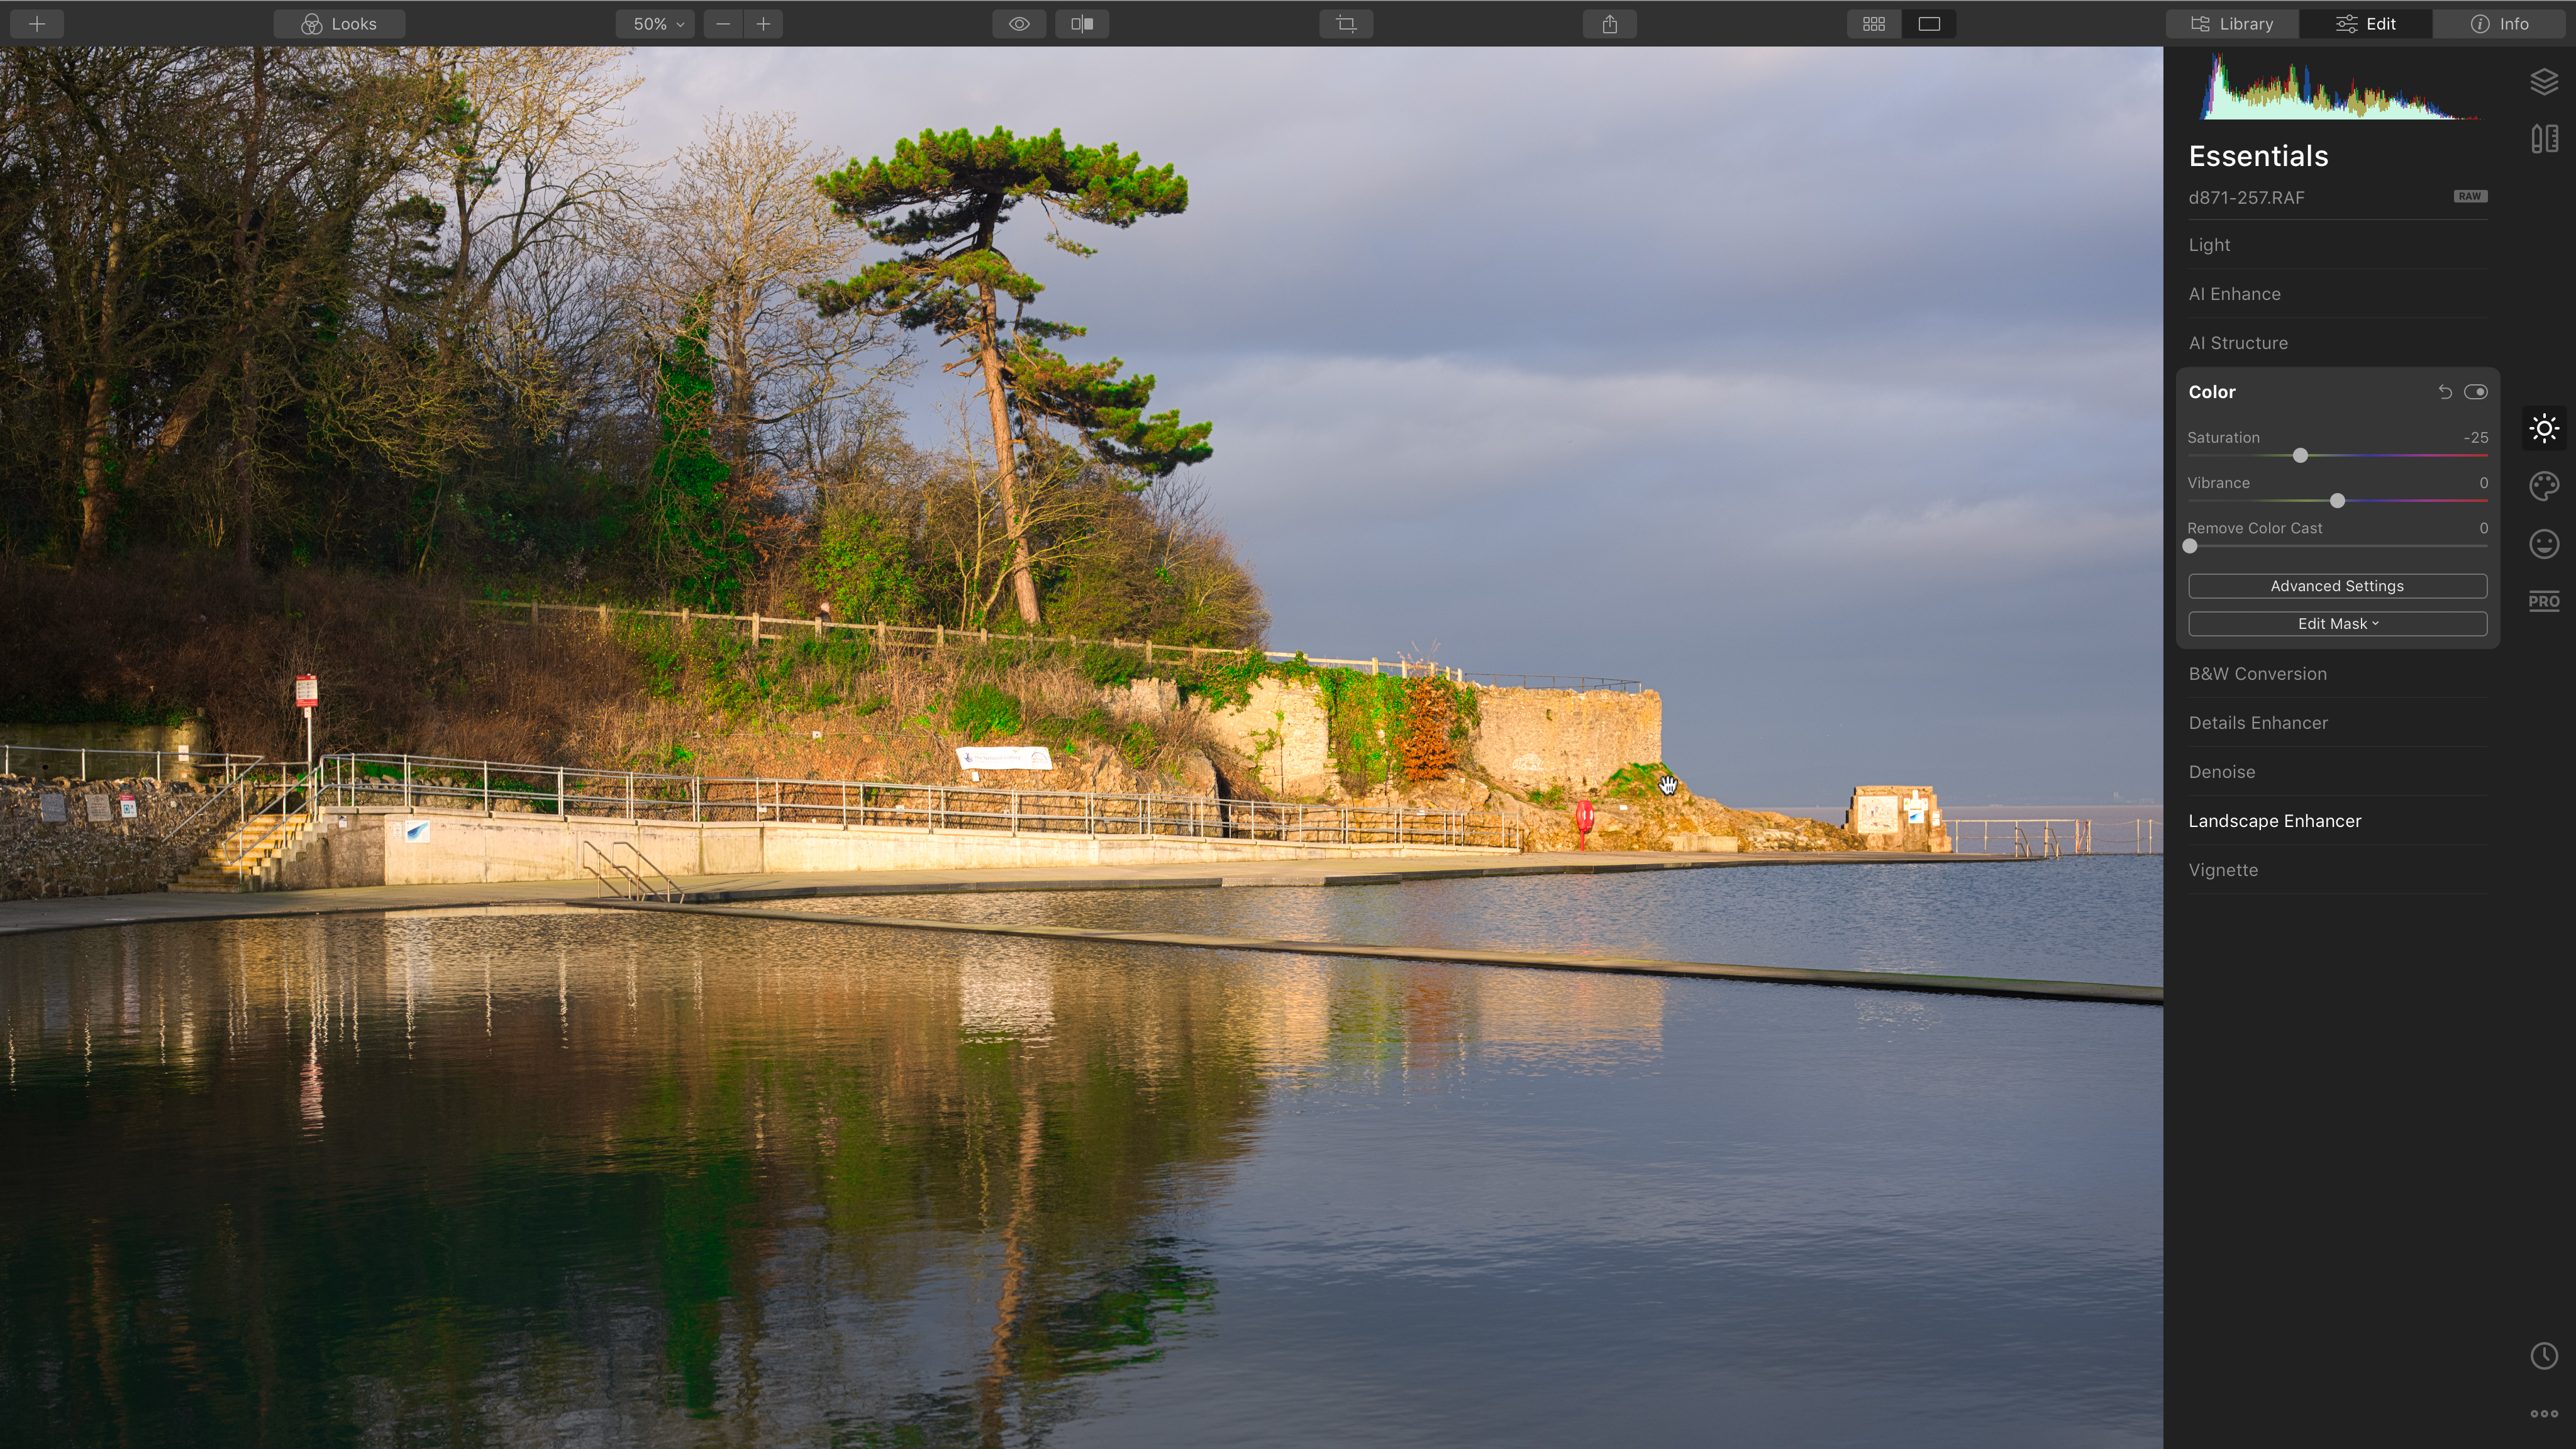
Sometimes, when you set Dehaze, Golden Hour and Foliage Enhancer, it pushes the saturation too high. The solution is to swap to the Color Panel and drop the Saturation value a little – try -25%.
2. Hide the sun
You can use the Sunrays filter without having the sun visible in the frame – you still get the atmospheric lighting effect. To do this, click the Place Sun Center button and move the sun just outside the frame.
3. Do lens corrections first
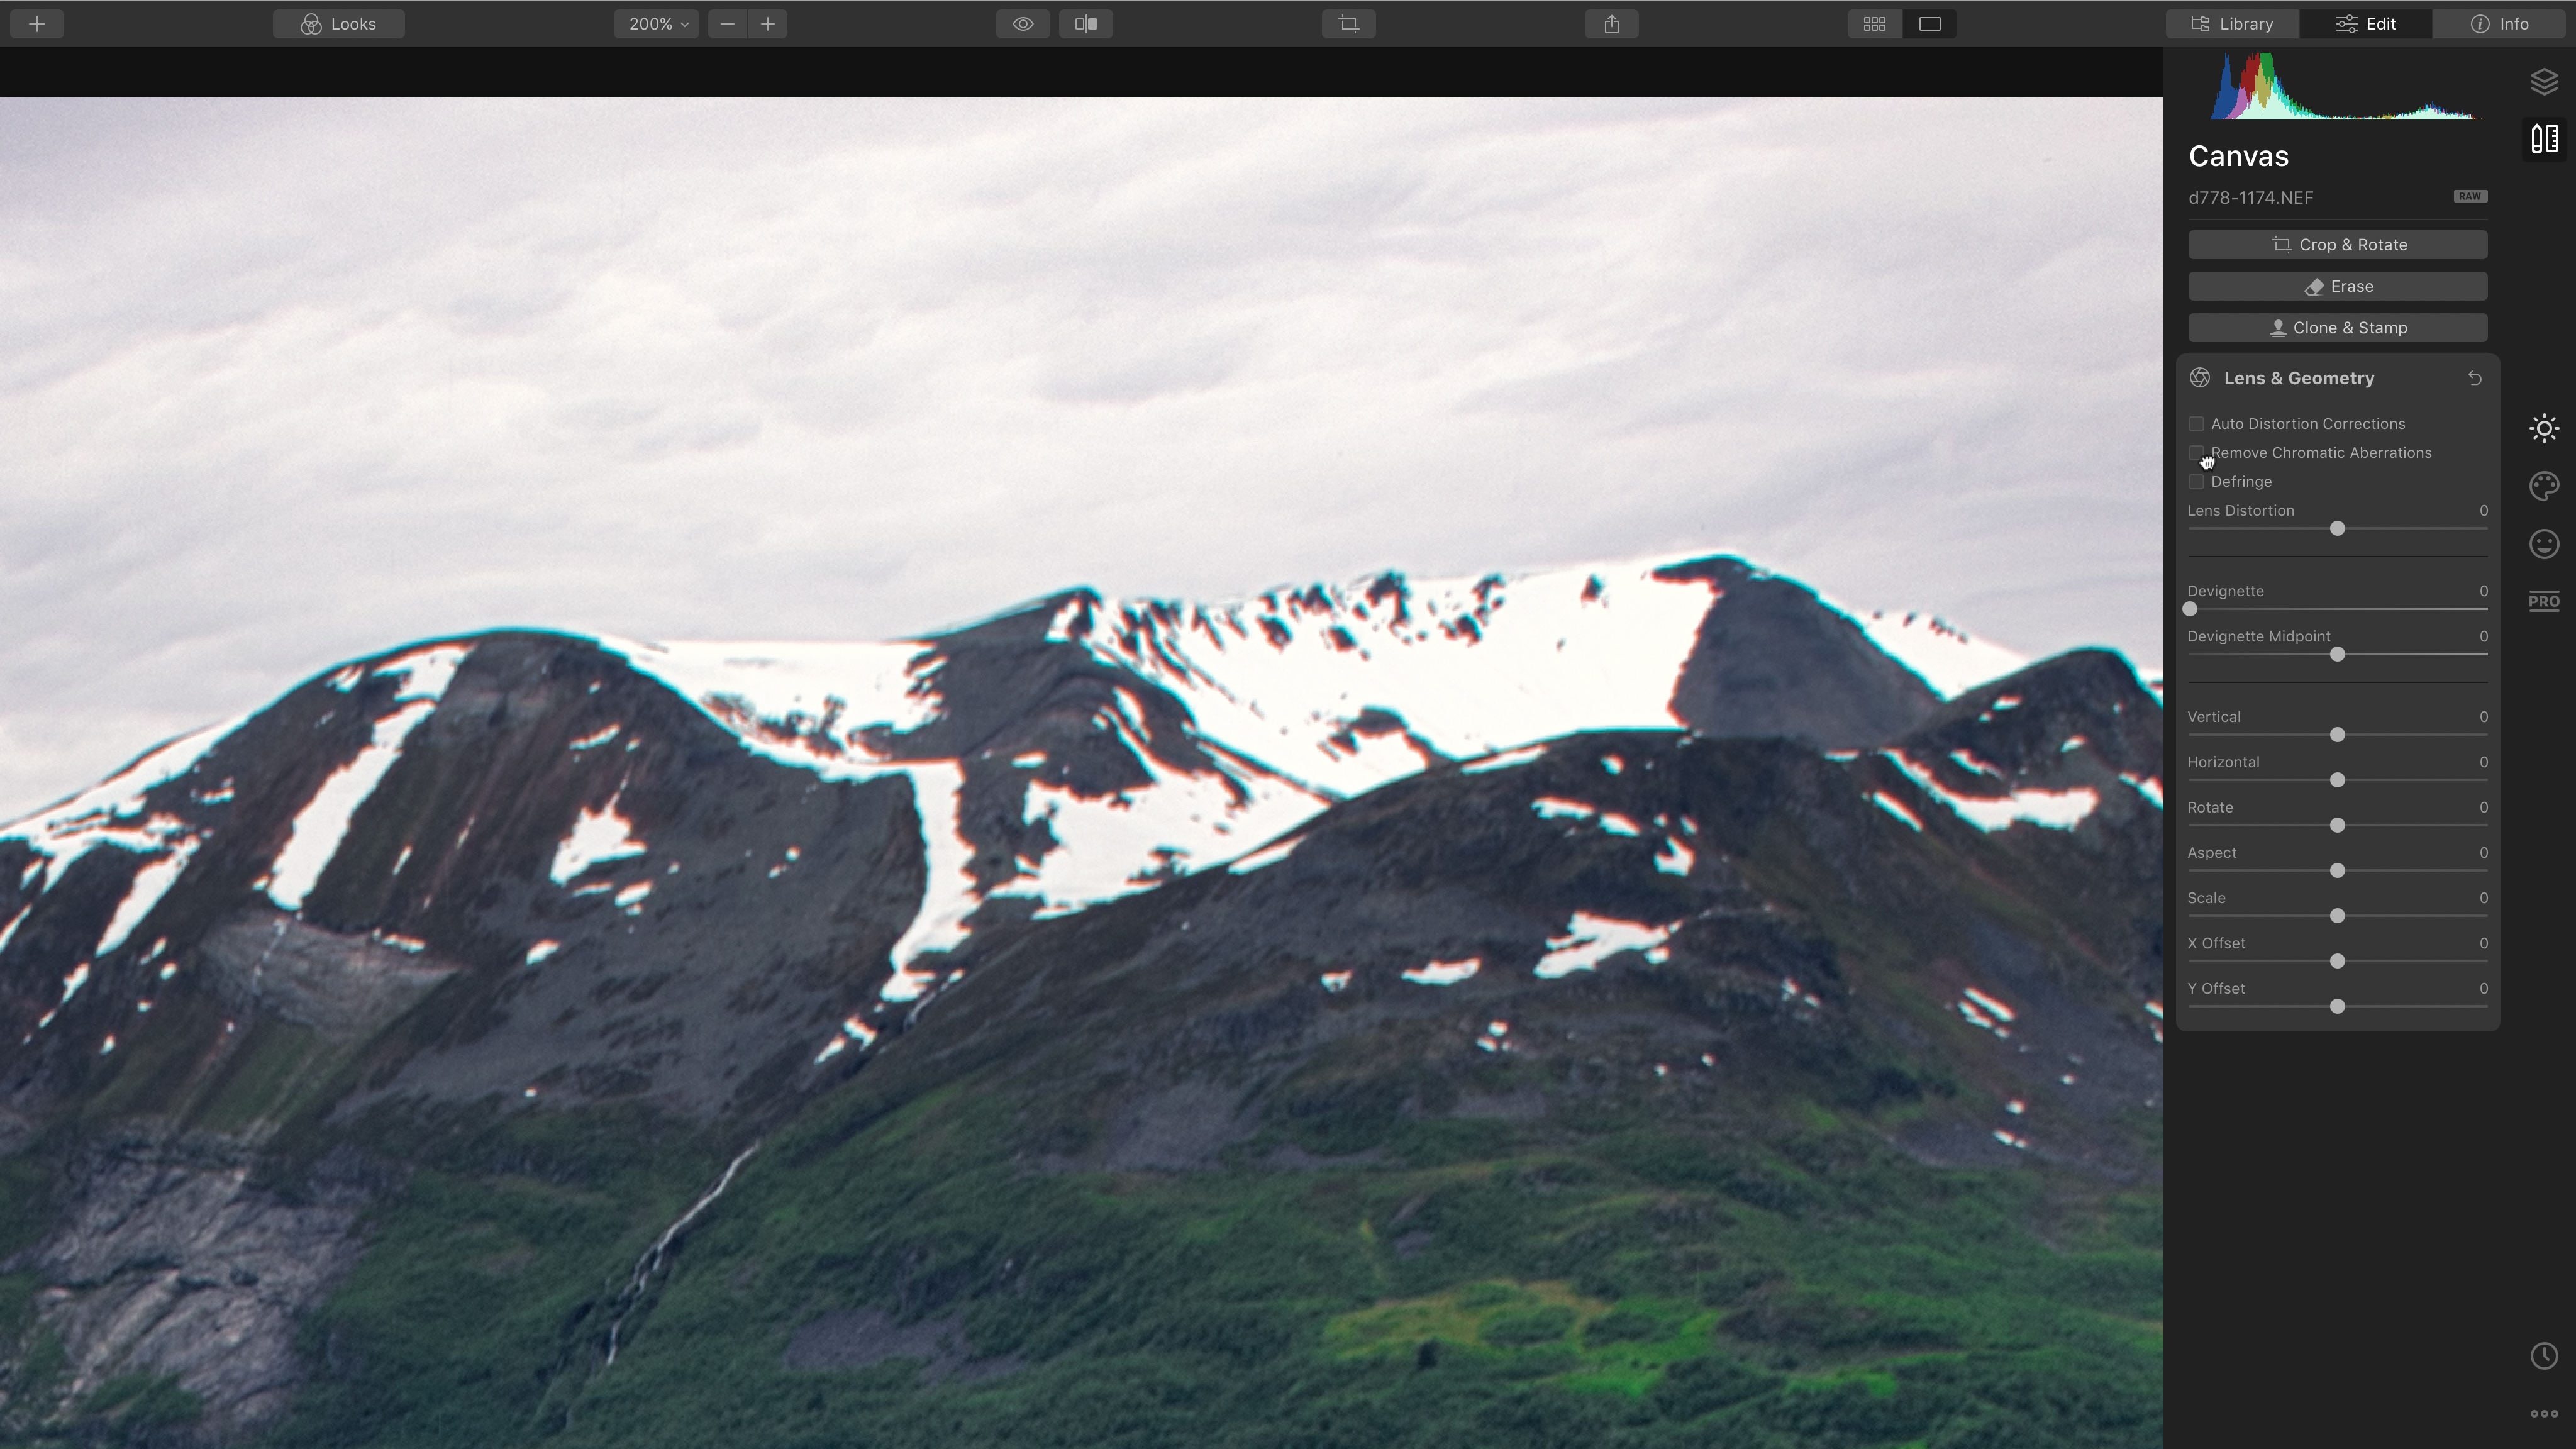
Some lenses produce chromatic aberration, seen here on the mountain tops. If you’re shooting raw, use Luminar’s Lens & Geometry Panel to correct this first.
4. Dramatic effect
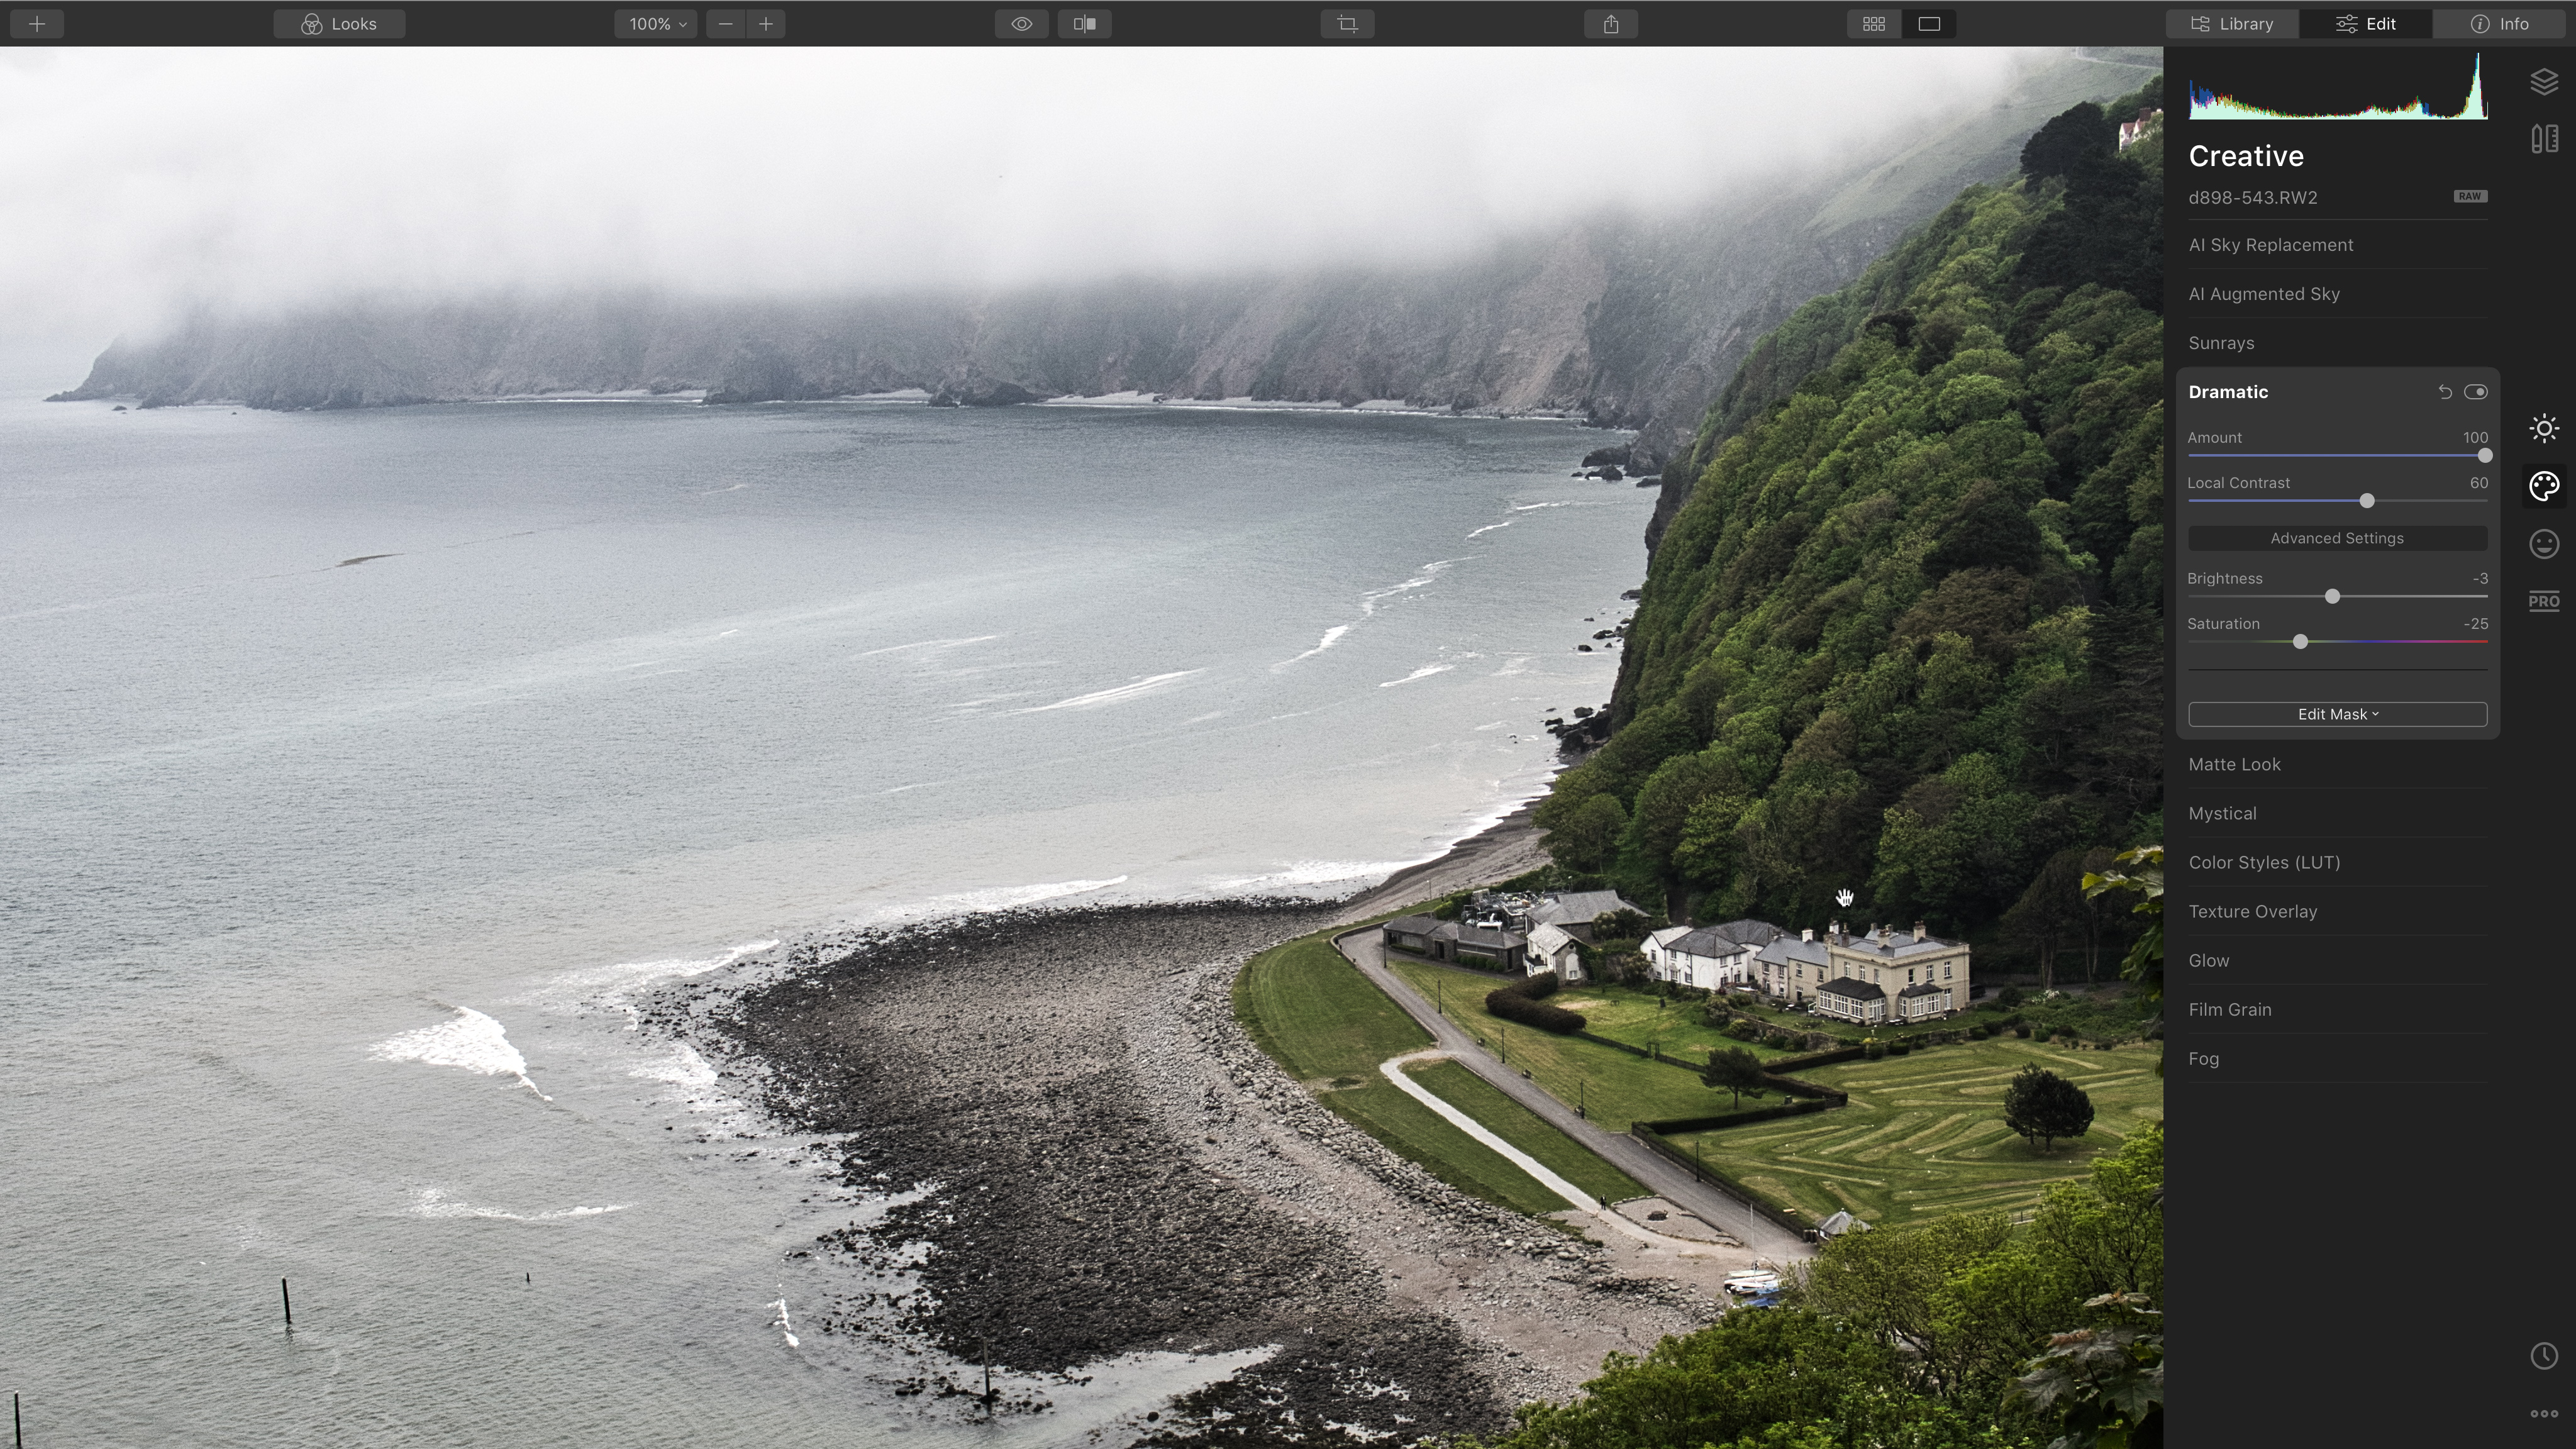
If your landscape is moody and dark, you can intensify this with the Dramatic Panel. This gives a high-contrast, low-saturation look. The Local Contrast slider increases the definition of objects.
5. Soft focus glow
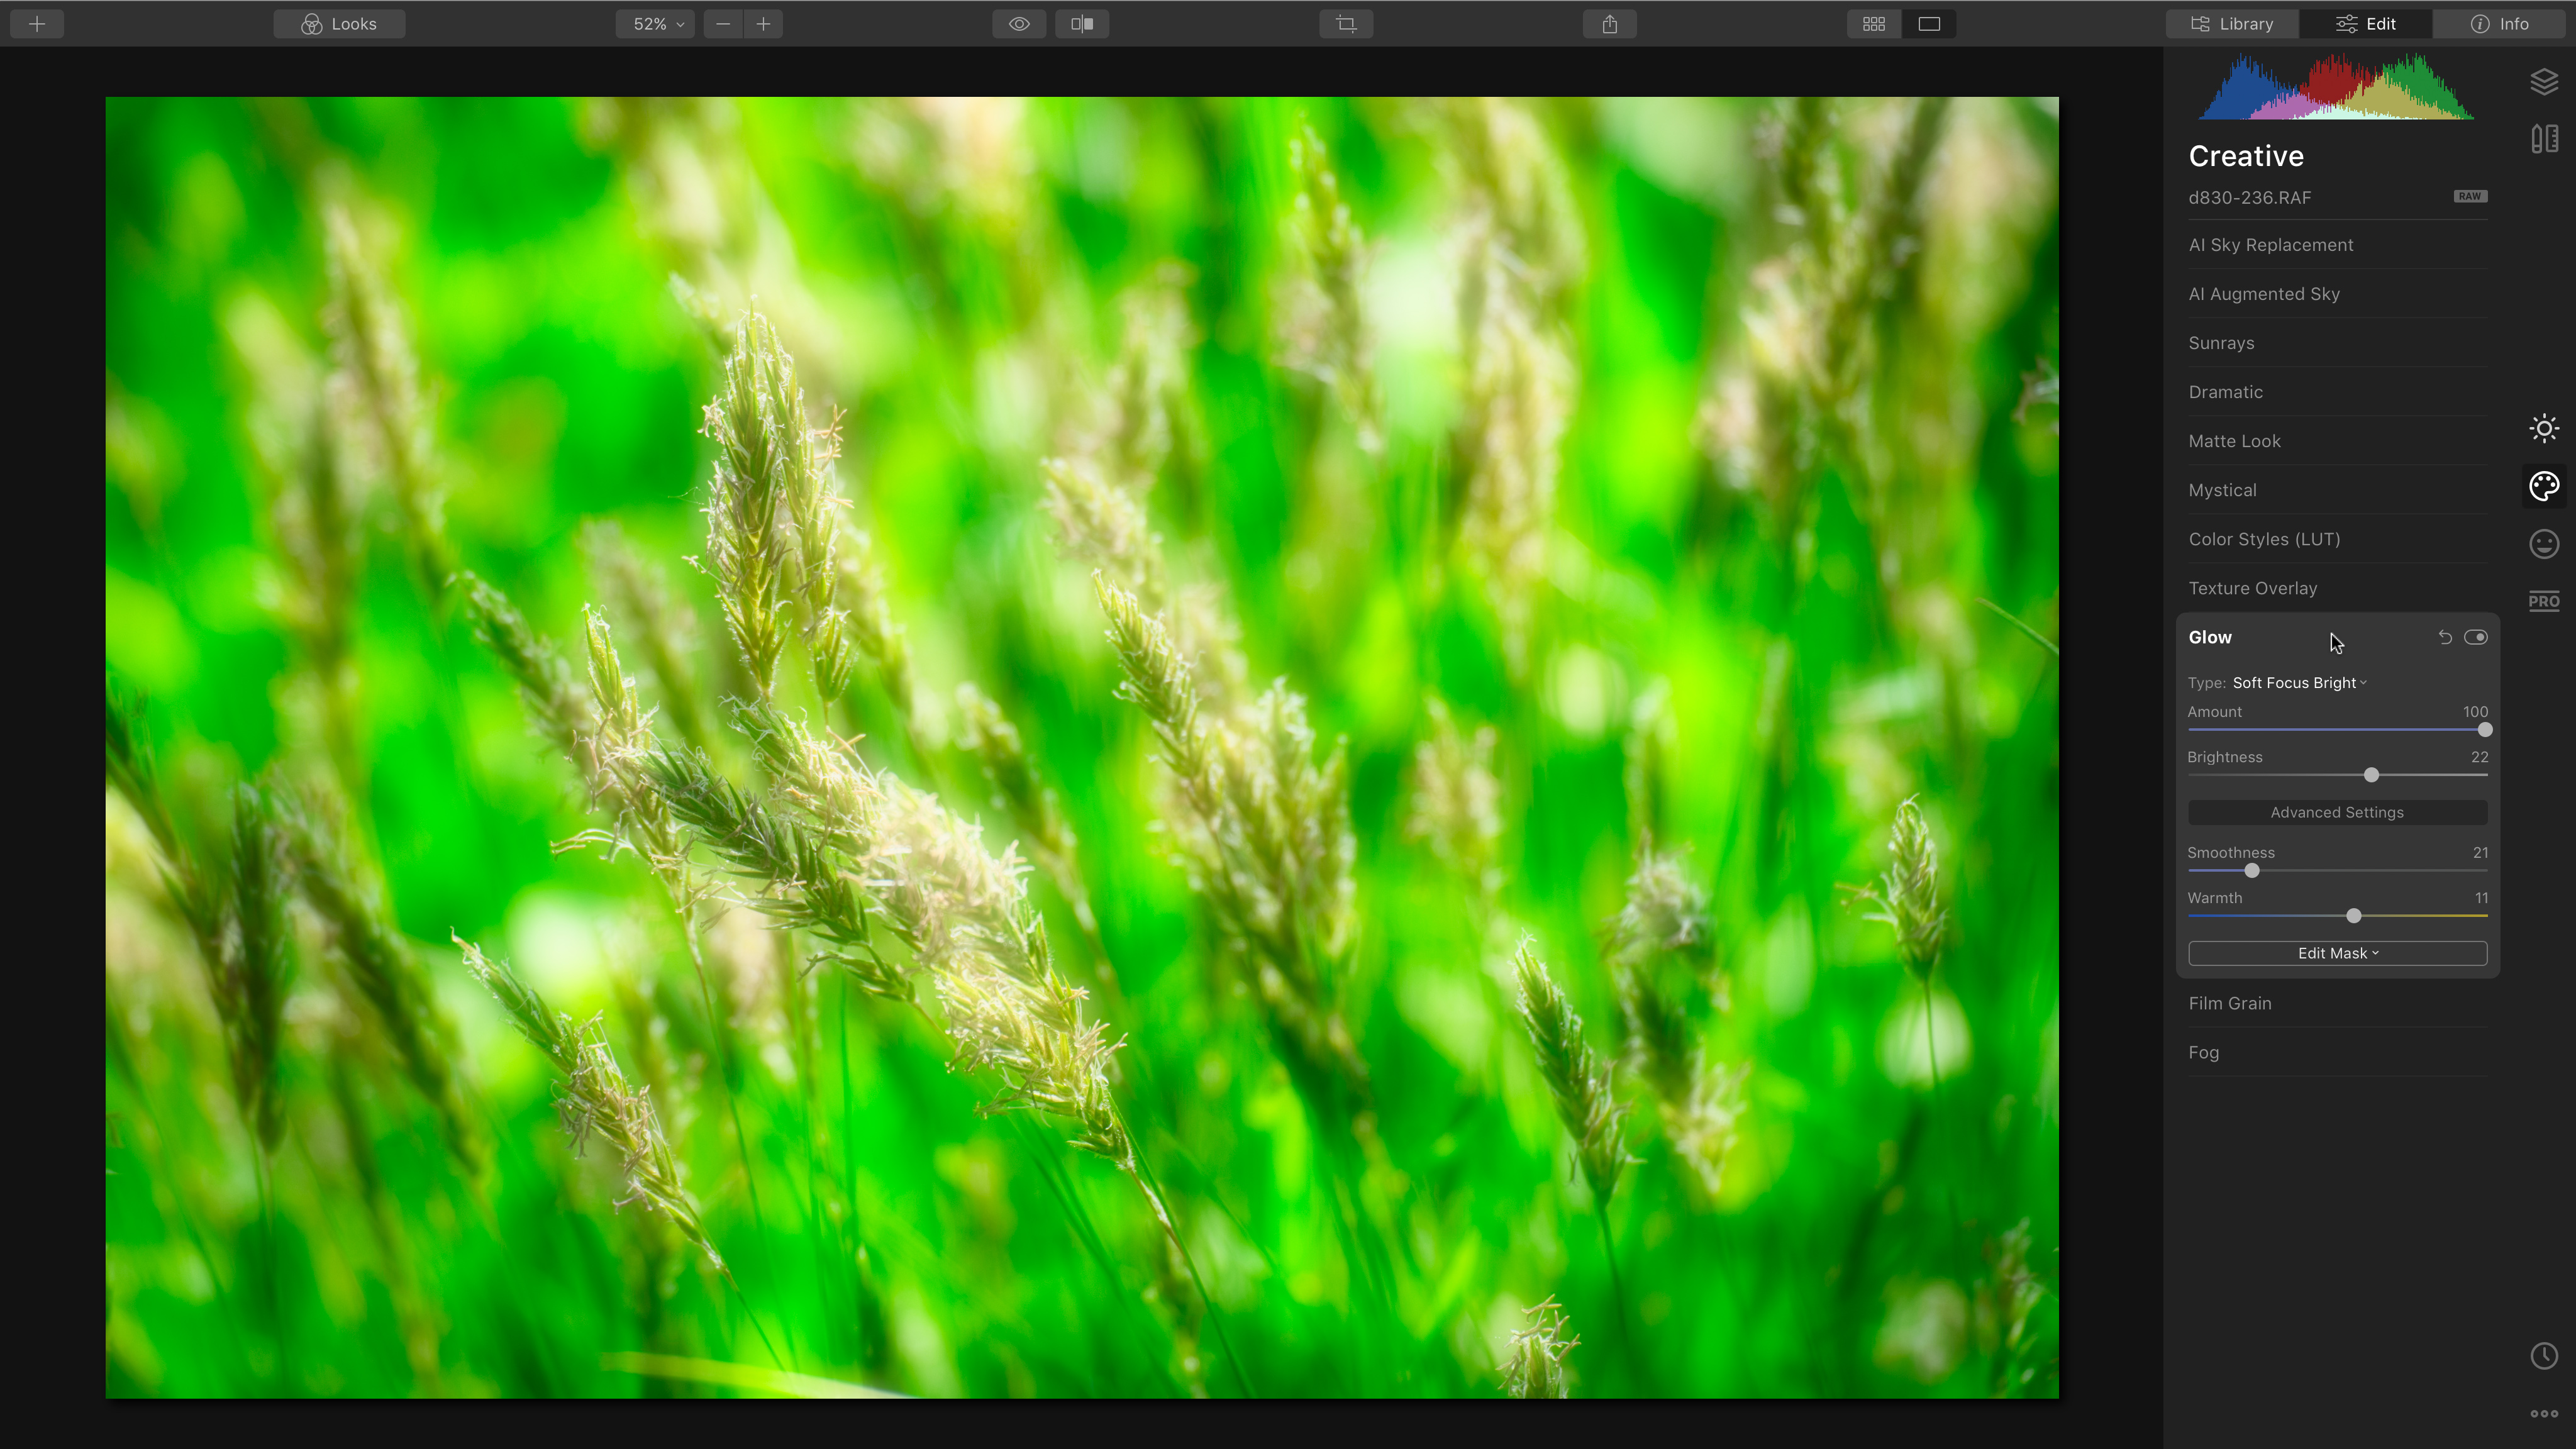
Landscapes don’t have to be dramatic and hard-edged. Sometimes a soft, dreamy glow is much more attractive and evocative. For this, use the Glow
filter in the Creative Workspace.

How to get a copy of Skylum Luminar 4
If you don’t have Luminar 4 already, you can download a free 7-day trial from the Skylum website. It’s available in both macOS and Windows versions and as all the features are fully functional, you can follow this tutorial yourself. If you decide to go ahead and buy Luminar 4, you can use the exclusive discount code DCW20 to save £10 / $10 on the full purchase price.
Visit skylum.com to learn more.
Get the Digital Camera World Newsletter
The best camera deals, reviews, product advice, and unmissable photography news, direct to your inbox!
Digital Camera World is one of the leading authorities on camera and photography news, reviews, techniques, tutorials, comparisons, deals and industry analysis. The site doesn't just specialize in cameras, but all aspects of photography, videography and imaging – including camera phones, gimbals, lenses, lighting, editing software, filters, tripods, laptops, printers, photo books, desks, binoculars and more.
Whether you're using, looking to buy or trying to get the most out of a compact camera, action camera, camera drone, cinema camera, beginner camera or professional camera, Digital Camera World has a roster of experts with combined experience of over 100 years when it comes to cameras, photography and imaging.

