
Astrophotographers and stargazers in North America are in for a real treat. On Thursday night (March 13) there’ll be a total lunar eclipse that’ll continue into the early hours of Friday (March 14). The moon will be completely shrouded by Earth’s shadow for just over an hour – this period is called totality – so there’s no excuse not to miss one of the celestial highlights of the year.
During totality, the moon will turn into a ‘Blood Moon’. This incredible phenomenon happens as light from the sun passes through Earth’s atmosphere, filtering out blue light. The change in the moon’s color makes this event particularly suited to capturing a lunar multiplicity (detailed below).
What's more, all of this happens to coincide with the 'Worm Moon' full moon, which reaches full illumination on March 14 to boot, creating a 'Blood Worm Moon'. According to Space.com, totality will begin at 02:59 (EDT), 02:26 (ET), 01:26 (CT), and 00:26 (MT) on March 14, with Pacific Time kicking off on March 13 at 23:26.
UK and European photographers won’t get a total lunar eclipse, where Earth’s shadow completely engulfs the moon, but they’ll get a partial lunar eclipse early on March 14, but moonset will cut its visibility short. According to Royal Museums Greenwich, the UK event will reach its climax at 06:58, but since the Moon will have set at this time, the visual climax will be at 06:19. The eclipse itself will begin at 03:57.
So, if you want to capture this must-shoot event for astrophotographers in 2025, read on for more information and tips, below. And if you want a comprehensive guide on what's going on in the night sky this month, check out astrophotography in March 2025.
What is a lunar eclipse?

A lunar eclipse is not to be confused with a solar eclipse, which is when the moon passes directly between the sun and Earth, and blocks the sun. A lunar eclipse is when the Earth is blocking the sun as the moon passes by during its orbit. There are two stages to a lunar eclipse, when the moon passes into the Earth’s penumbra and umbra shadows, respectively.
The penumbra is the softer part of the shadow, while the umbra is the hard part of the shadow that turns the moon its blood-red color. A total lunar eclipse only happens if the moon is fully enveloped by the umbra shadow, if only part of the moon is covered, then a partial lunar eclipse happens.
How to photograph a lunar eclipse

Capturing a lunar eclipse isn’t much different from photographing the moon. There are a variety of ways you can choose to tackle your image, but before all of that, there are a few things to consider. While lunar photography isn’t as affected by light pollution as other forms of astrophotography, it’s worth checking a light pollution map and finding somewhere dark if you want to capture the best-quality images possible. That said, you can photograph the moon from anywhere – you may even choose to use the city as a backdrop. You’ll also want to use a weather app such as Clear Outside, to ensure that the night is clear enough to capture the images you intend.
How to photograph a lunar eclipse: What gear do I need?

When it comes to gear, one of the best low-light cameras is an optimal choice, but any of the best mirrorless cameras and best DSLRs will do. Bear in mind that an APS-C or Micro Four Thirds camera will get you closer to the action at wider focal lengths due to the 1.5x and 2x crop factor, respectively. You could also use the new Nikon P1100 or its predecessor the Nikon P1000 and take advantage of their monster 125x optical zooms.
When it comes to lenses, you can use the best wide-angle lenses, the best standard lenses, or the best telephoto lenses. Which you choose will depend on your intended composition. A wide-angle lens is great for framing a sprawling landscape below the night sky and capturing multiple exposures to create a multiplicity composite of the eclipse’s various phases. A standard lens can be used to frame a landscape or cityscape with the moon behind, and if you want to enhance the size of the moon as it looms above a foreground subject, crop into the scene using a telephoto lens. Telephoto lenses are also great for isolating the moon and capturing a more detailed study of Earth's natural satellite.
You may need to boost your ISO at longer focal lengths to achieve a fast enough shutter speed to prevent motion blur from the satellite’s movement. But if you want the best-quality images possible, you can use one of the best star trackers to precisely track the moon, allowing you to shoot at longer shutter speeds without experiencing motion blur. But this isn't essential.
What is essential is one of the best tripods. This'll make sure your setup is kept nice and steady, preventing camera shake, and allowing you to fix your frame, should you opt to capture a multiplicity. The best camera remotes will allow you to fire the shutter without touching the camera and inadvertently introducing camera shake, while many also come with a useful intervalometer (more on that latter).
How to photograph a lunar eclipse: How do I focus on the moon?
I still find manual focus to be the most accurate method of focusing on the moon. Rather than simply setting your lens to infinity, frame your image and then zoom into the moon via your camera’s rear LCD and adjust focus until the edge of the moon’s surface is sharp. When you take your first shot, it’s a good idea to zoom into playback and check the sharpness again.
How to photograph a lunar eclipse: What camera settings do I use?

Matrix or evaluative metering will try to brighten the entire scene, so spot metering is the way to go, so you can meter for the moon itself. For the best image quality try to stick to ISO100 or ISO200, but don’t be afraid to push your ISO higher if you need to. When it comes to shutter speed, 1/125 to 1/250 sec should be sufficient to freeze the moon. Depending on the focal length you’re using, go below 1/125 sec and you may start to introduce motion blur.
I recommend using an aperture between f/5.6 and f/11. This gives you room to widen your aperture if you need to increase your shutter speed, without going so wide that the moon’s edges begin to look soft.
How to capture a lunar multiplicity
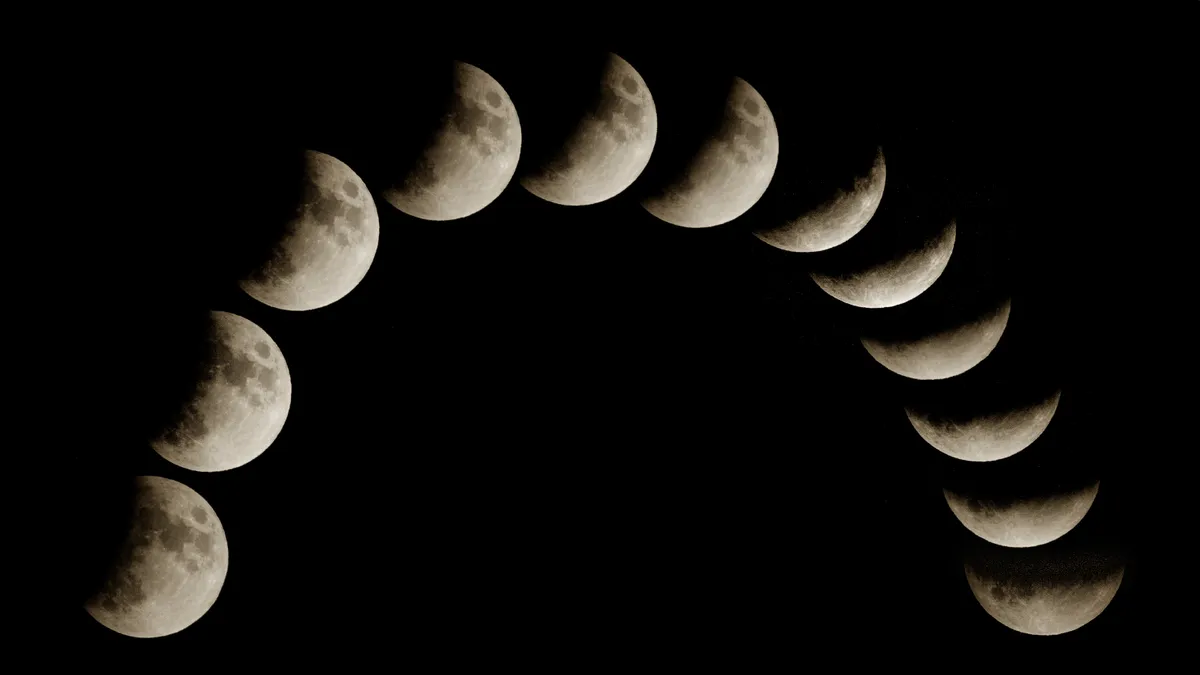
A fun way to capture the various stages of a lunar eclipse is to create a moonstack. This is when you create a composite of various images of the moon throughout the eclipse. How many images you include is up to you, but you’ll want to start before the climax, so you get shots of the moon as it moves through the penumbra, into the umbra, and back out again.
You can choose to capture a moonstack within a landscape or create a frame-filling moonstack against the night sky (pictured). Key things to remember are that the moon appears to move in an eastward direction, so make sure you leave room within your composition for it to move into. You’ll then need to decide on a consistent interval. This will change depending on how many moons you want to feature in your stack, but I like to shoot at a faster interval than I intend. If you have too many shots you can always omit some, but if you choose an interval that’s too long, you can’t turn back time.
You can set a timer on your phone and manually fire the shutter. But it's far easier to use your camera's intervalometer or a remote shutter release with an intervalometer. If you opt for the hands-free approach, do make sure you keep tabs on your battery. A cold night will drain it faster and you don’t want to miss any shots. Once you've captured enough images, you can combine them in a layer-based editing suite such as Adobe Photoshop or Affinity Photo 2.
You may also like...
If you're into astrophotography, check out this image that comprises 12,220 photos on 70 nights over four years. You can also find out about how NASA photographed the rare occurrence of the moon crossing the face of the Earth. And may also be interested in the best telescopes for astrophotography.

You must confirm your public display name before commenting
Please logout and then login again, you will then be prompted to enter your display name.
