Affinity Photo vs Photoshop
With Serif's Affinity Photo offering a budget alternative to Adobe Photoshop, is it time to switch your image editor?
Watch video: Affinity Photo Vs Photoshop
Start here
• Affinity Photo tutorials
The tutorials
1. Affinity Photo vs Photoshop
2. RAW editing with Affinity Photo
3. Focus merge with Affinity Photo
4. Replace a sky in Affinity Photo
5. Moody mono in Affinity Photo
6. Six Affinity Photo landscape tips
7. Color correction in Affinity Photo
8. Live Filters in Affinity Photo
9. Create a classic wet plate look
10. Remove objects in Affinity Photo
11. Paint an abstract portrait
12. Enhance skintones in Affinity Photo
13. Create HDR in Affinity Photo
14. Replace a sky in Affinity Photo
15. Affinity Photo double exposures
16. Affinity Photo Denoise tool
Our image-editing advice has usually centered around Adobe software. This isn’t because of unfair bias, it’s because – with Photoshop and Lightroom – Adobe have consistently offered the best photo editing tools, and they’ve done so since the dawn of digital photography, so it is still one of the best photo editing software applications around.
Read more: Affinity Photo 1.8 review
But, since Adobe embraced the subscription model in 2013, plenty of photographers – unhappy with the idea of paying for an image editor ad infinitum – have been looking elsewhere. Whether you’re a casual user or a pro the good news is, there are other options out there, and some of them are actually good…
This brings us to Serif’s Affinity Photo. It’s an image-editor very much in the Photoshop mould. Anybody who’s familiar with Photoshop will recognize lots of crossover features. We get layers, adjustments, brushes, healing tools, Raw editing and more. It lacks the depth of Photoshop, but the feature set will be more than enough for most users. For those finding it hard to justify the monthly fee demanded by Adobe for Photoshop, Affinity Photo is a slick, capable alternative yet costs under £50/$50.

Is Affinity Photo better than Photoshop?
There are a couple of places where Affinity Photo does defeat Photoshop. One neat touch is non-destructive resizing. In Photoshop, layers must be converted to Smart Objects to do this, but in Affinity Photo it’s the default, so layers can be resized larger or smaller with no loss in quality. Another excellent feature is Live Previews. Found within several tools, it gives you an idea of how an effect will look before you’ve added it, which saves on endless undoing and redoing. Best of all is the Live Brush preview, which shows exactly how the brush will apply color, including any opacity or blend mode settings. Handily, it works when painting layer masks too.
If you’re thinking about making the switch, there are a few similarities and differences between Photoshop and Affinity Photo worth bearing in mind. Here, we’ll look at some of the features, including some that can even outdo Photoshop…
Affinity Photo vs Photoshop: six differences
Simply swipe or click through our six-step tutorial below on the differences between Affinity Photo and Photoshop…
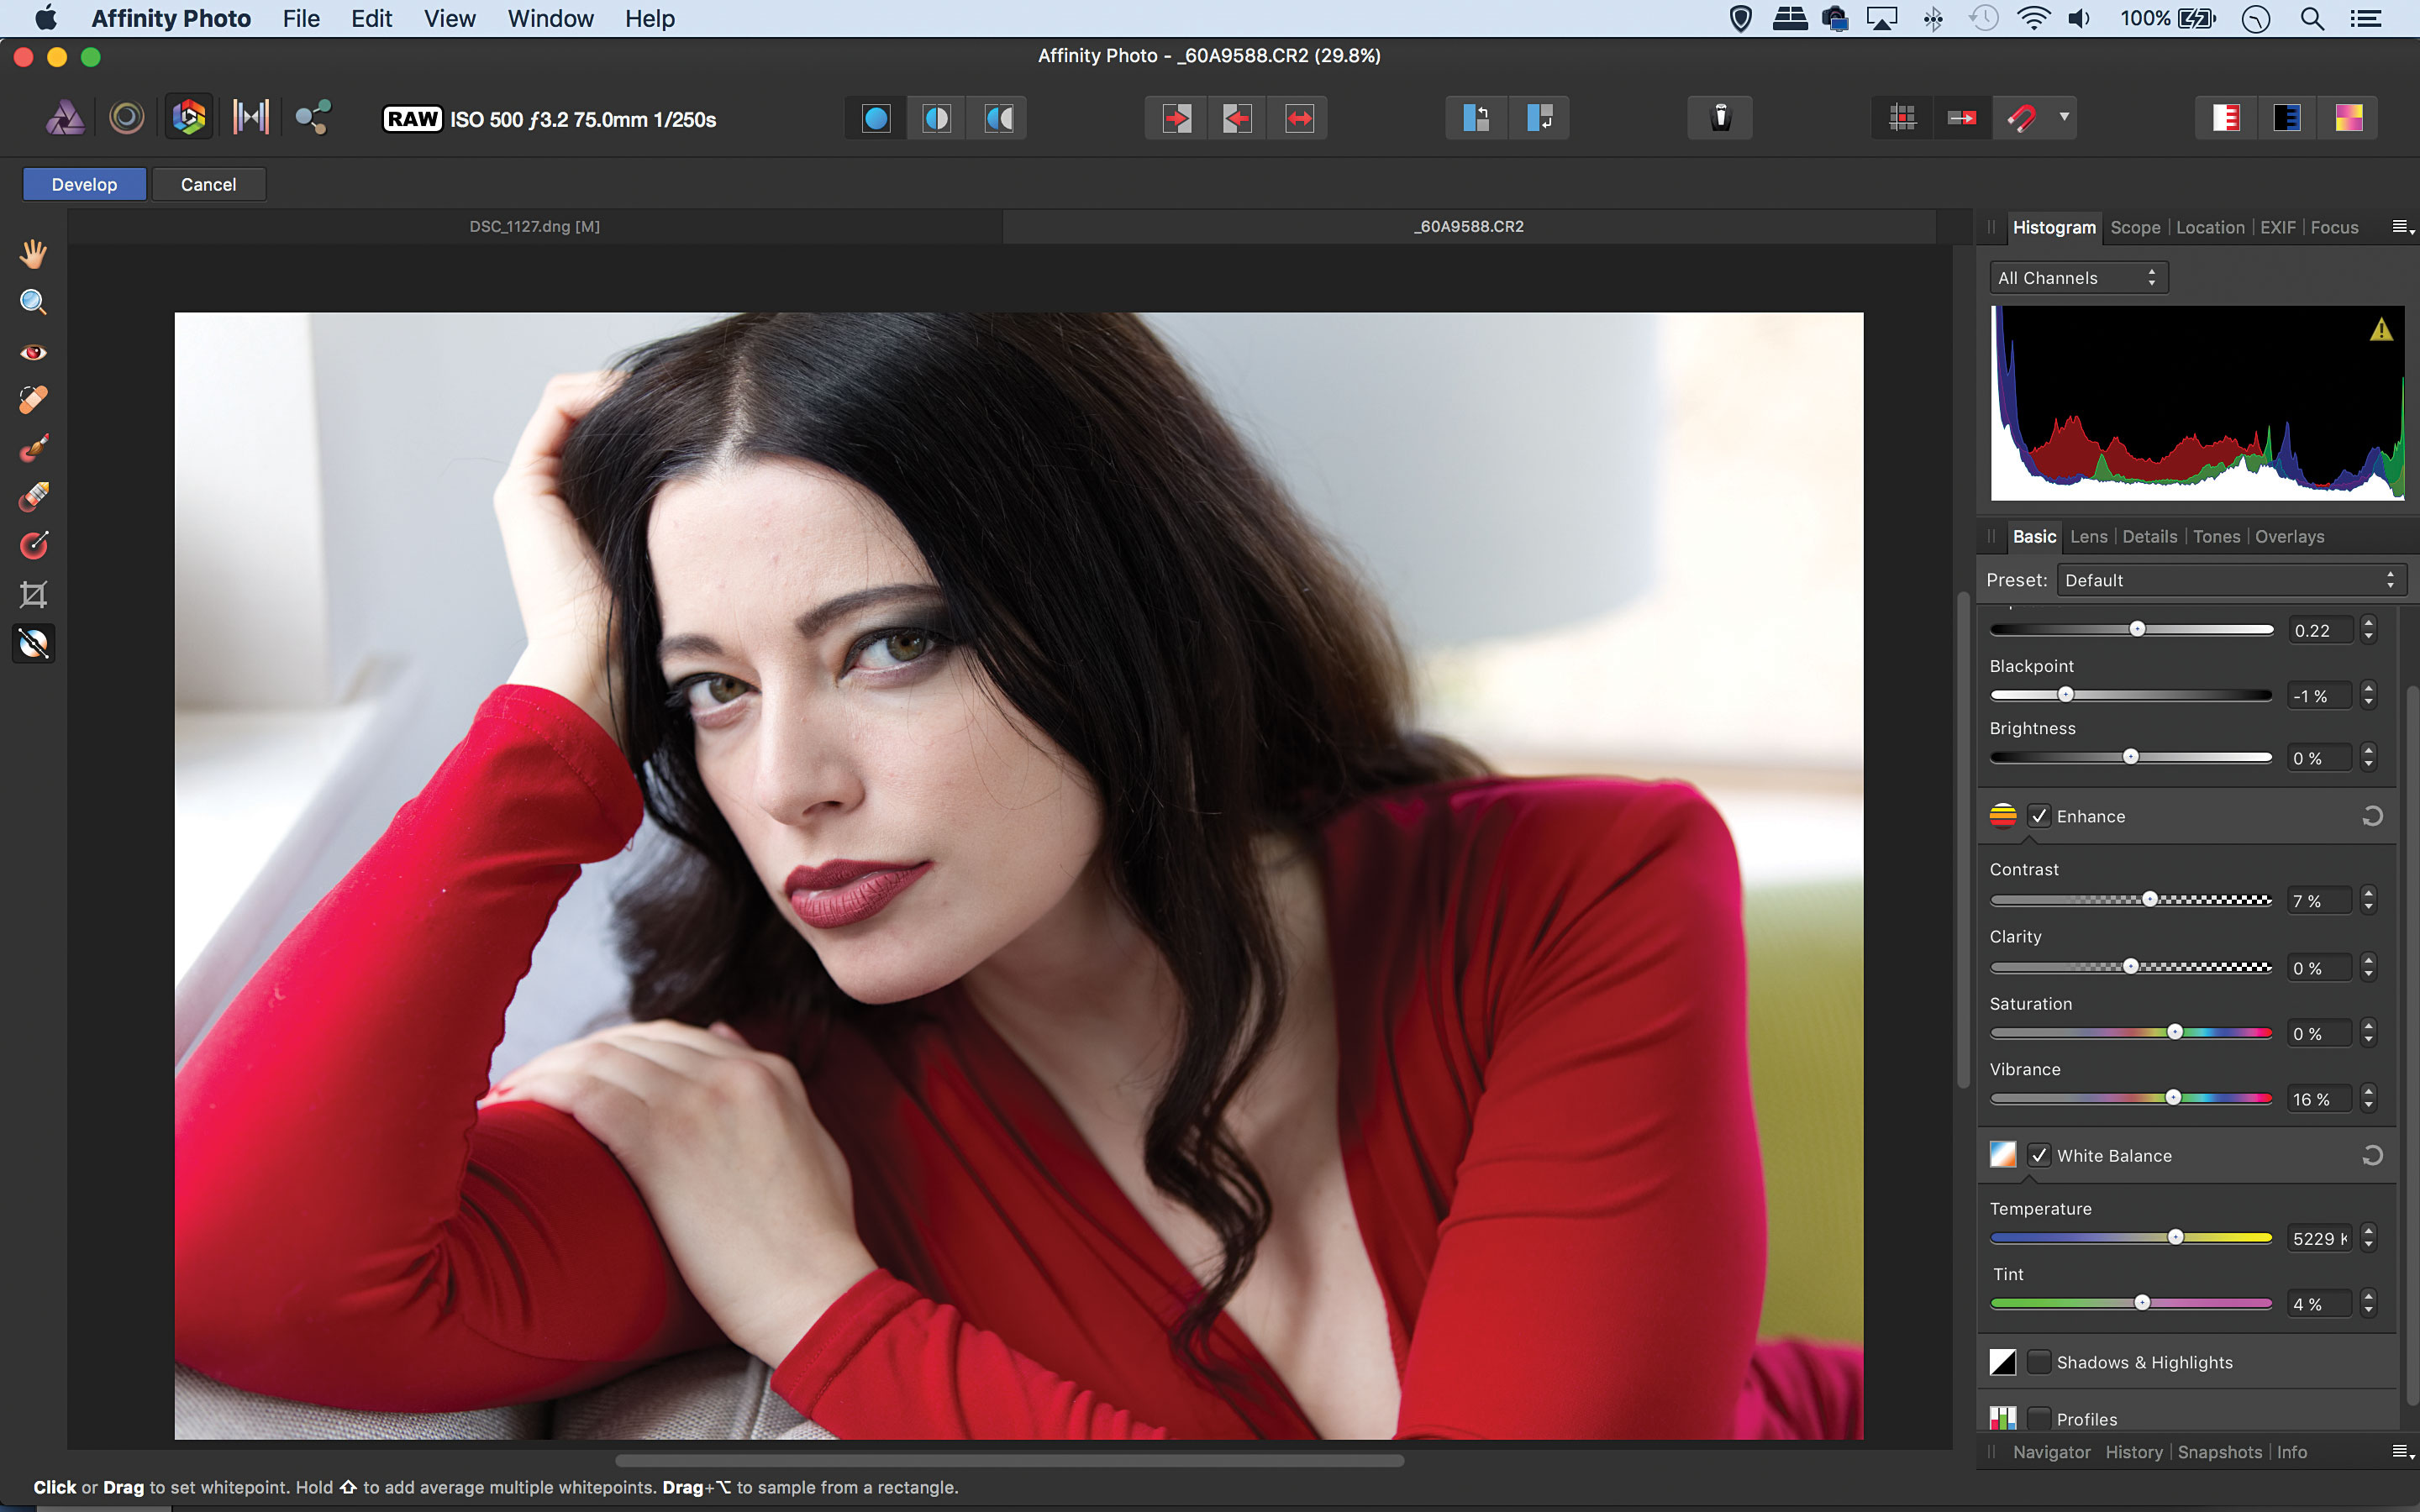
1. Choose a Persona
One of the biggest differences with Affinity Photo is the Persona system. Accessed by buttons in the top left corner, these are divided into Photo, Liquify, Develop, Tone Mapping and Export. Each brings different tools to the fore. So, if you open a Raw photo into Affinity it’ll appear in the Develop Persona.
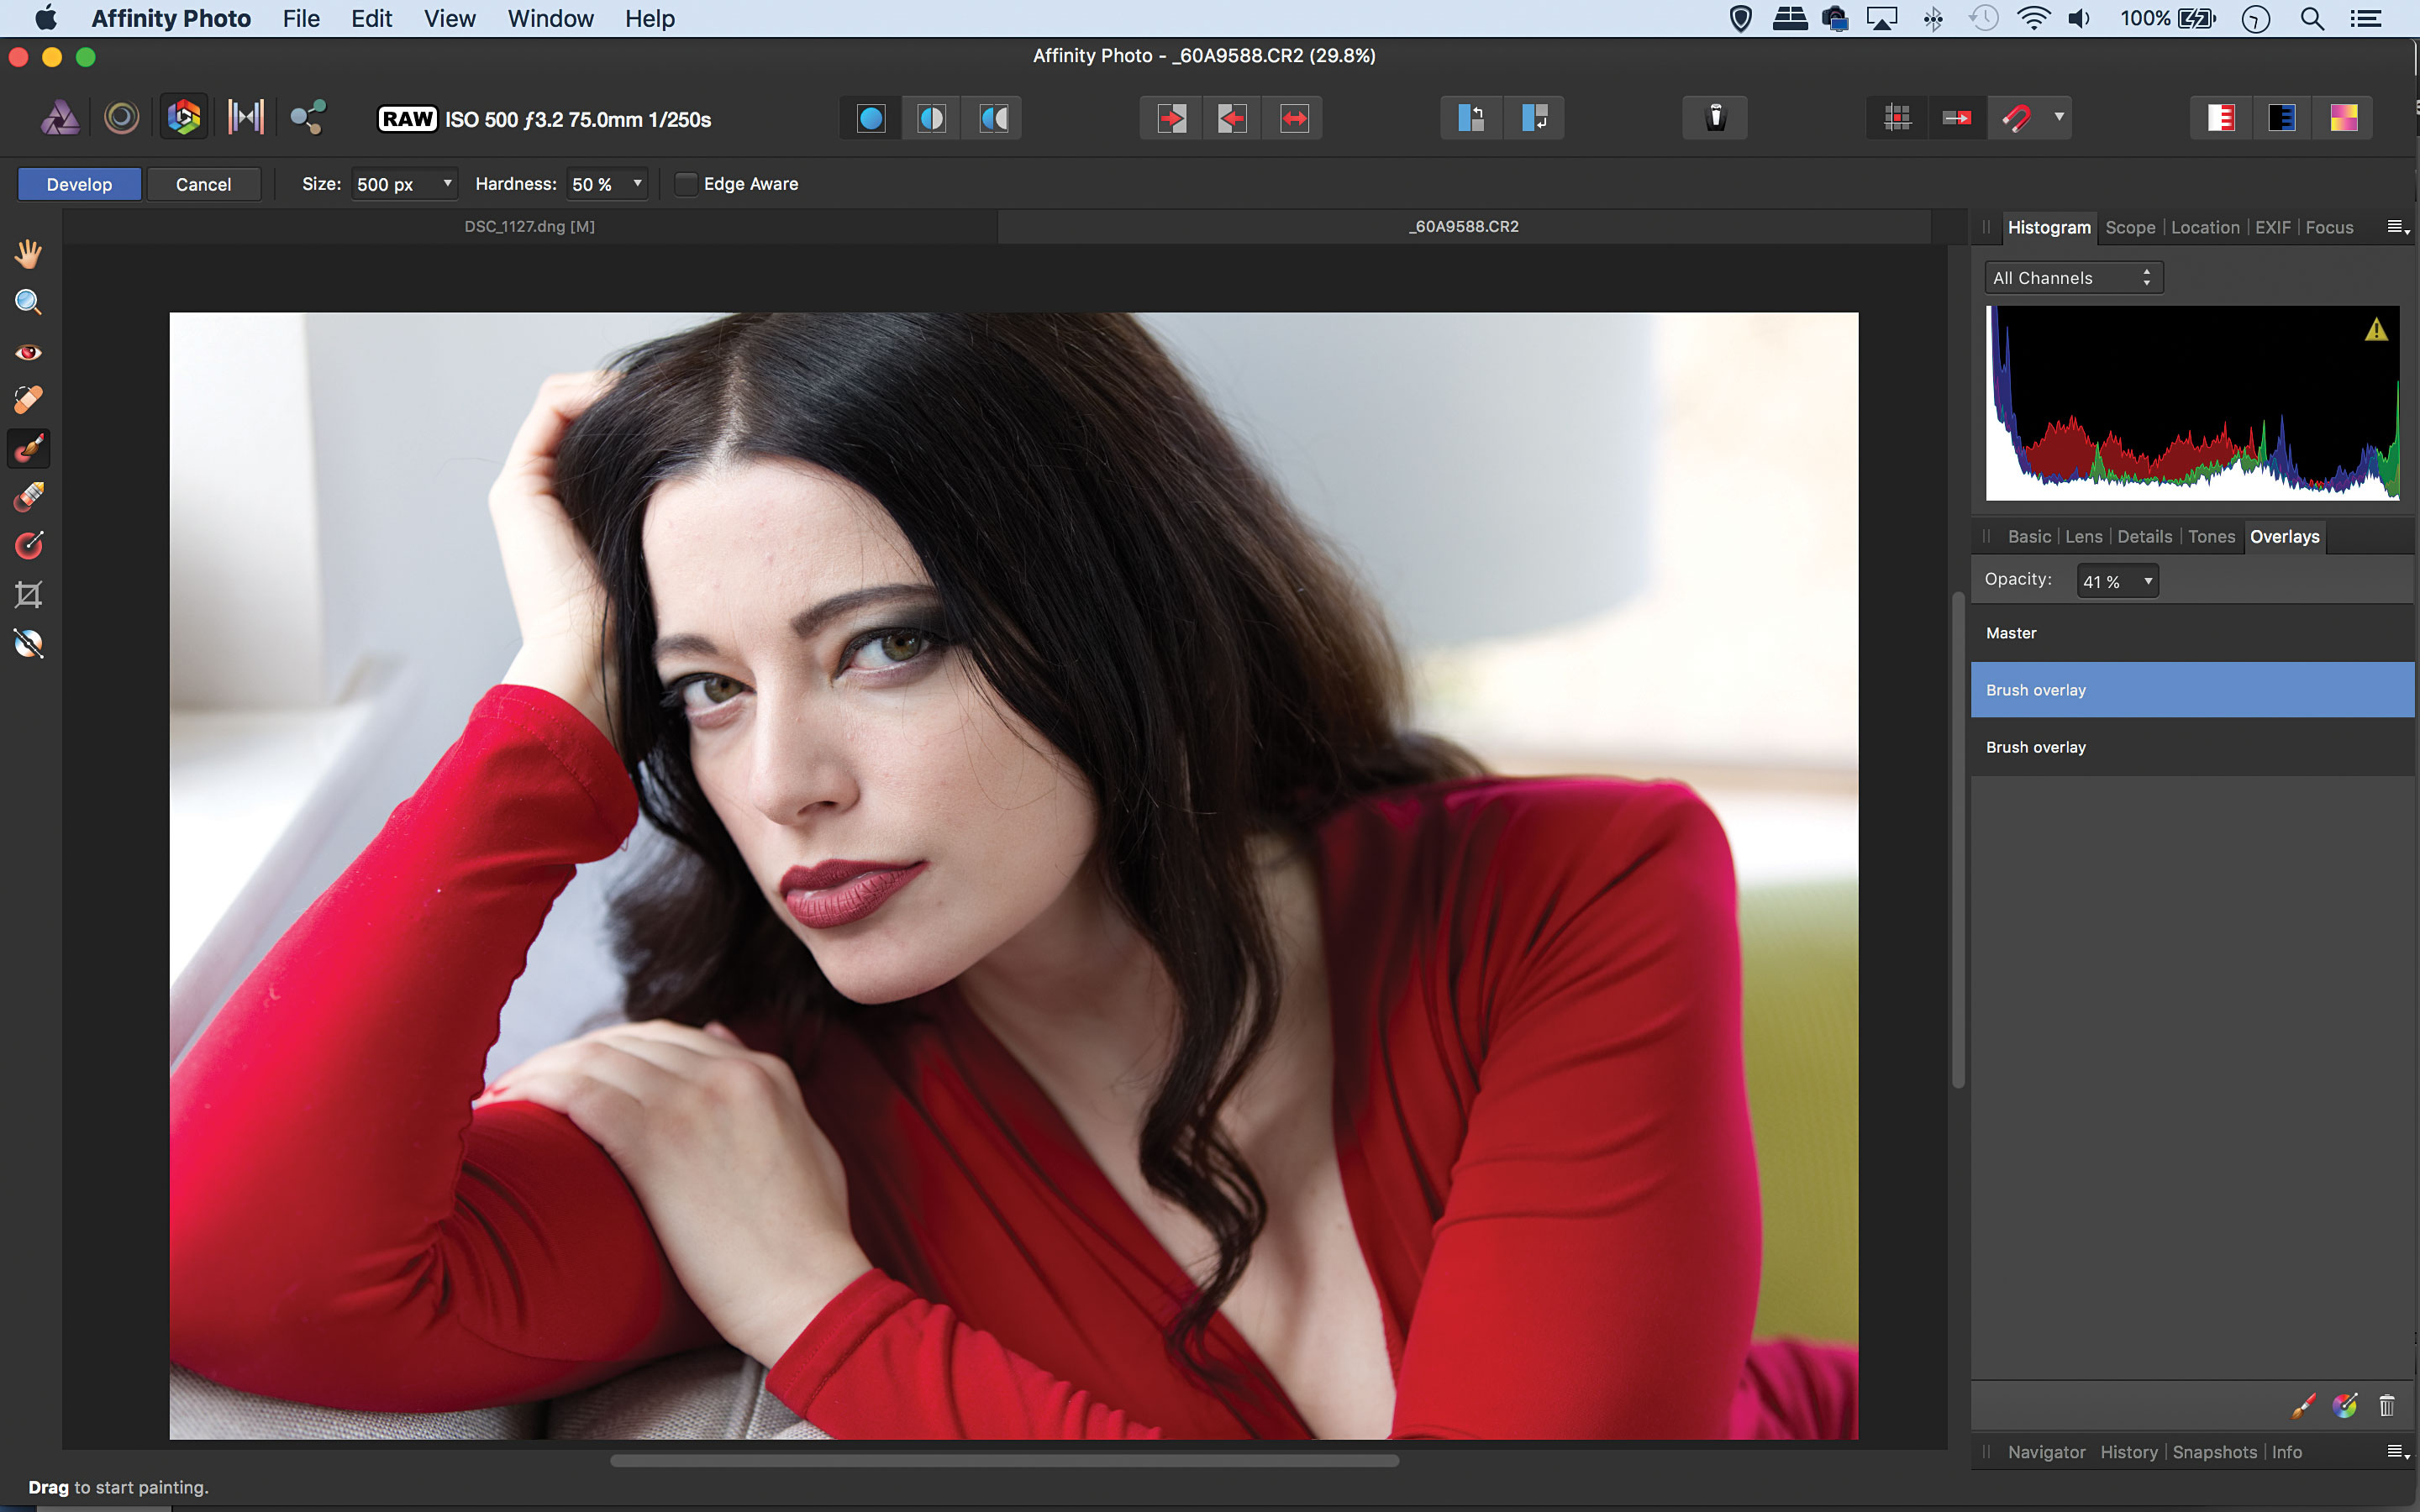
2. Raw tools
The Develop Persona is Affinity Photo’s Raw editor (although we can edit other file formats here too). We can begin by enhancing tones and make selective tonal tweaks with Overlays. Once done, we can click the Develop button to commit the changes and send our image into the Photo Persona for further editing.
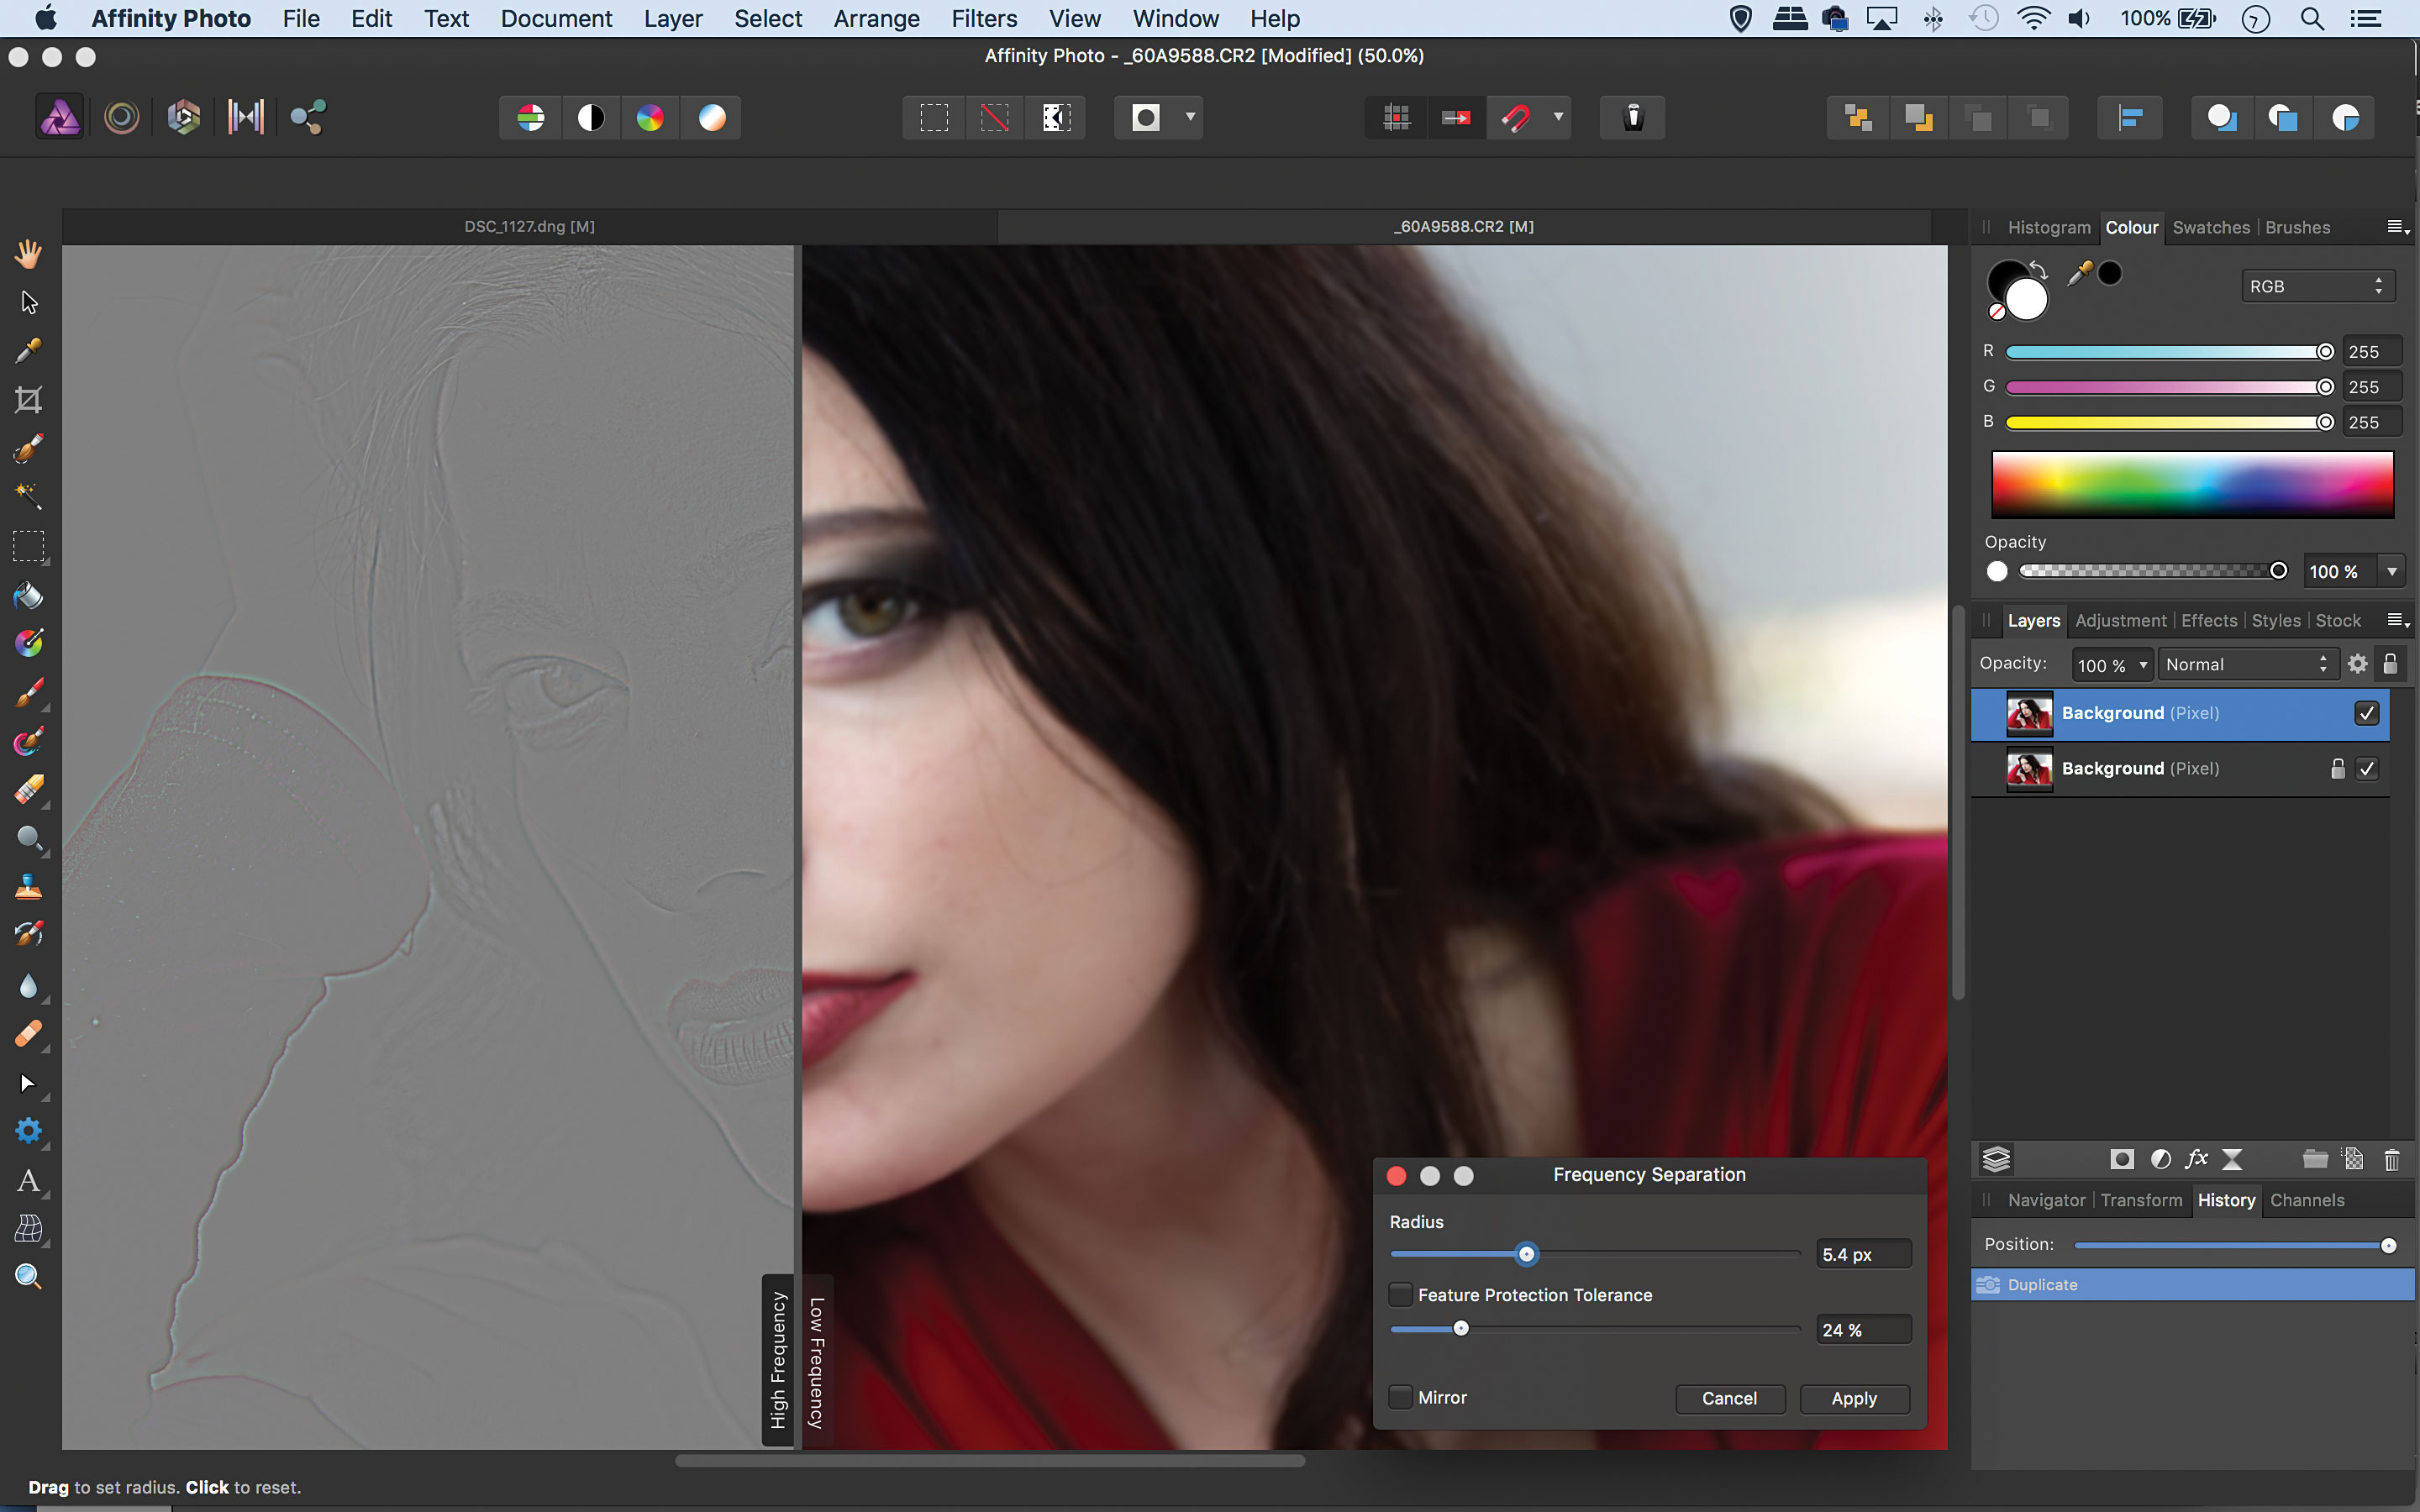
3. Frequency separation
This is an excellent retoucher that separates detail and tone – great for skin. You’ll find a dedicated command under Filter>Frequency Separation. A handy split-screen view lets you compare high and low-frequency settings. Once done, we can clone and heal each frequency layer for high-end retouching results.
4. Intelligent selections
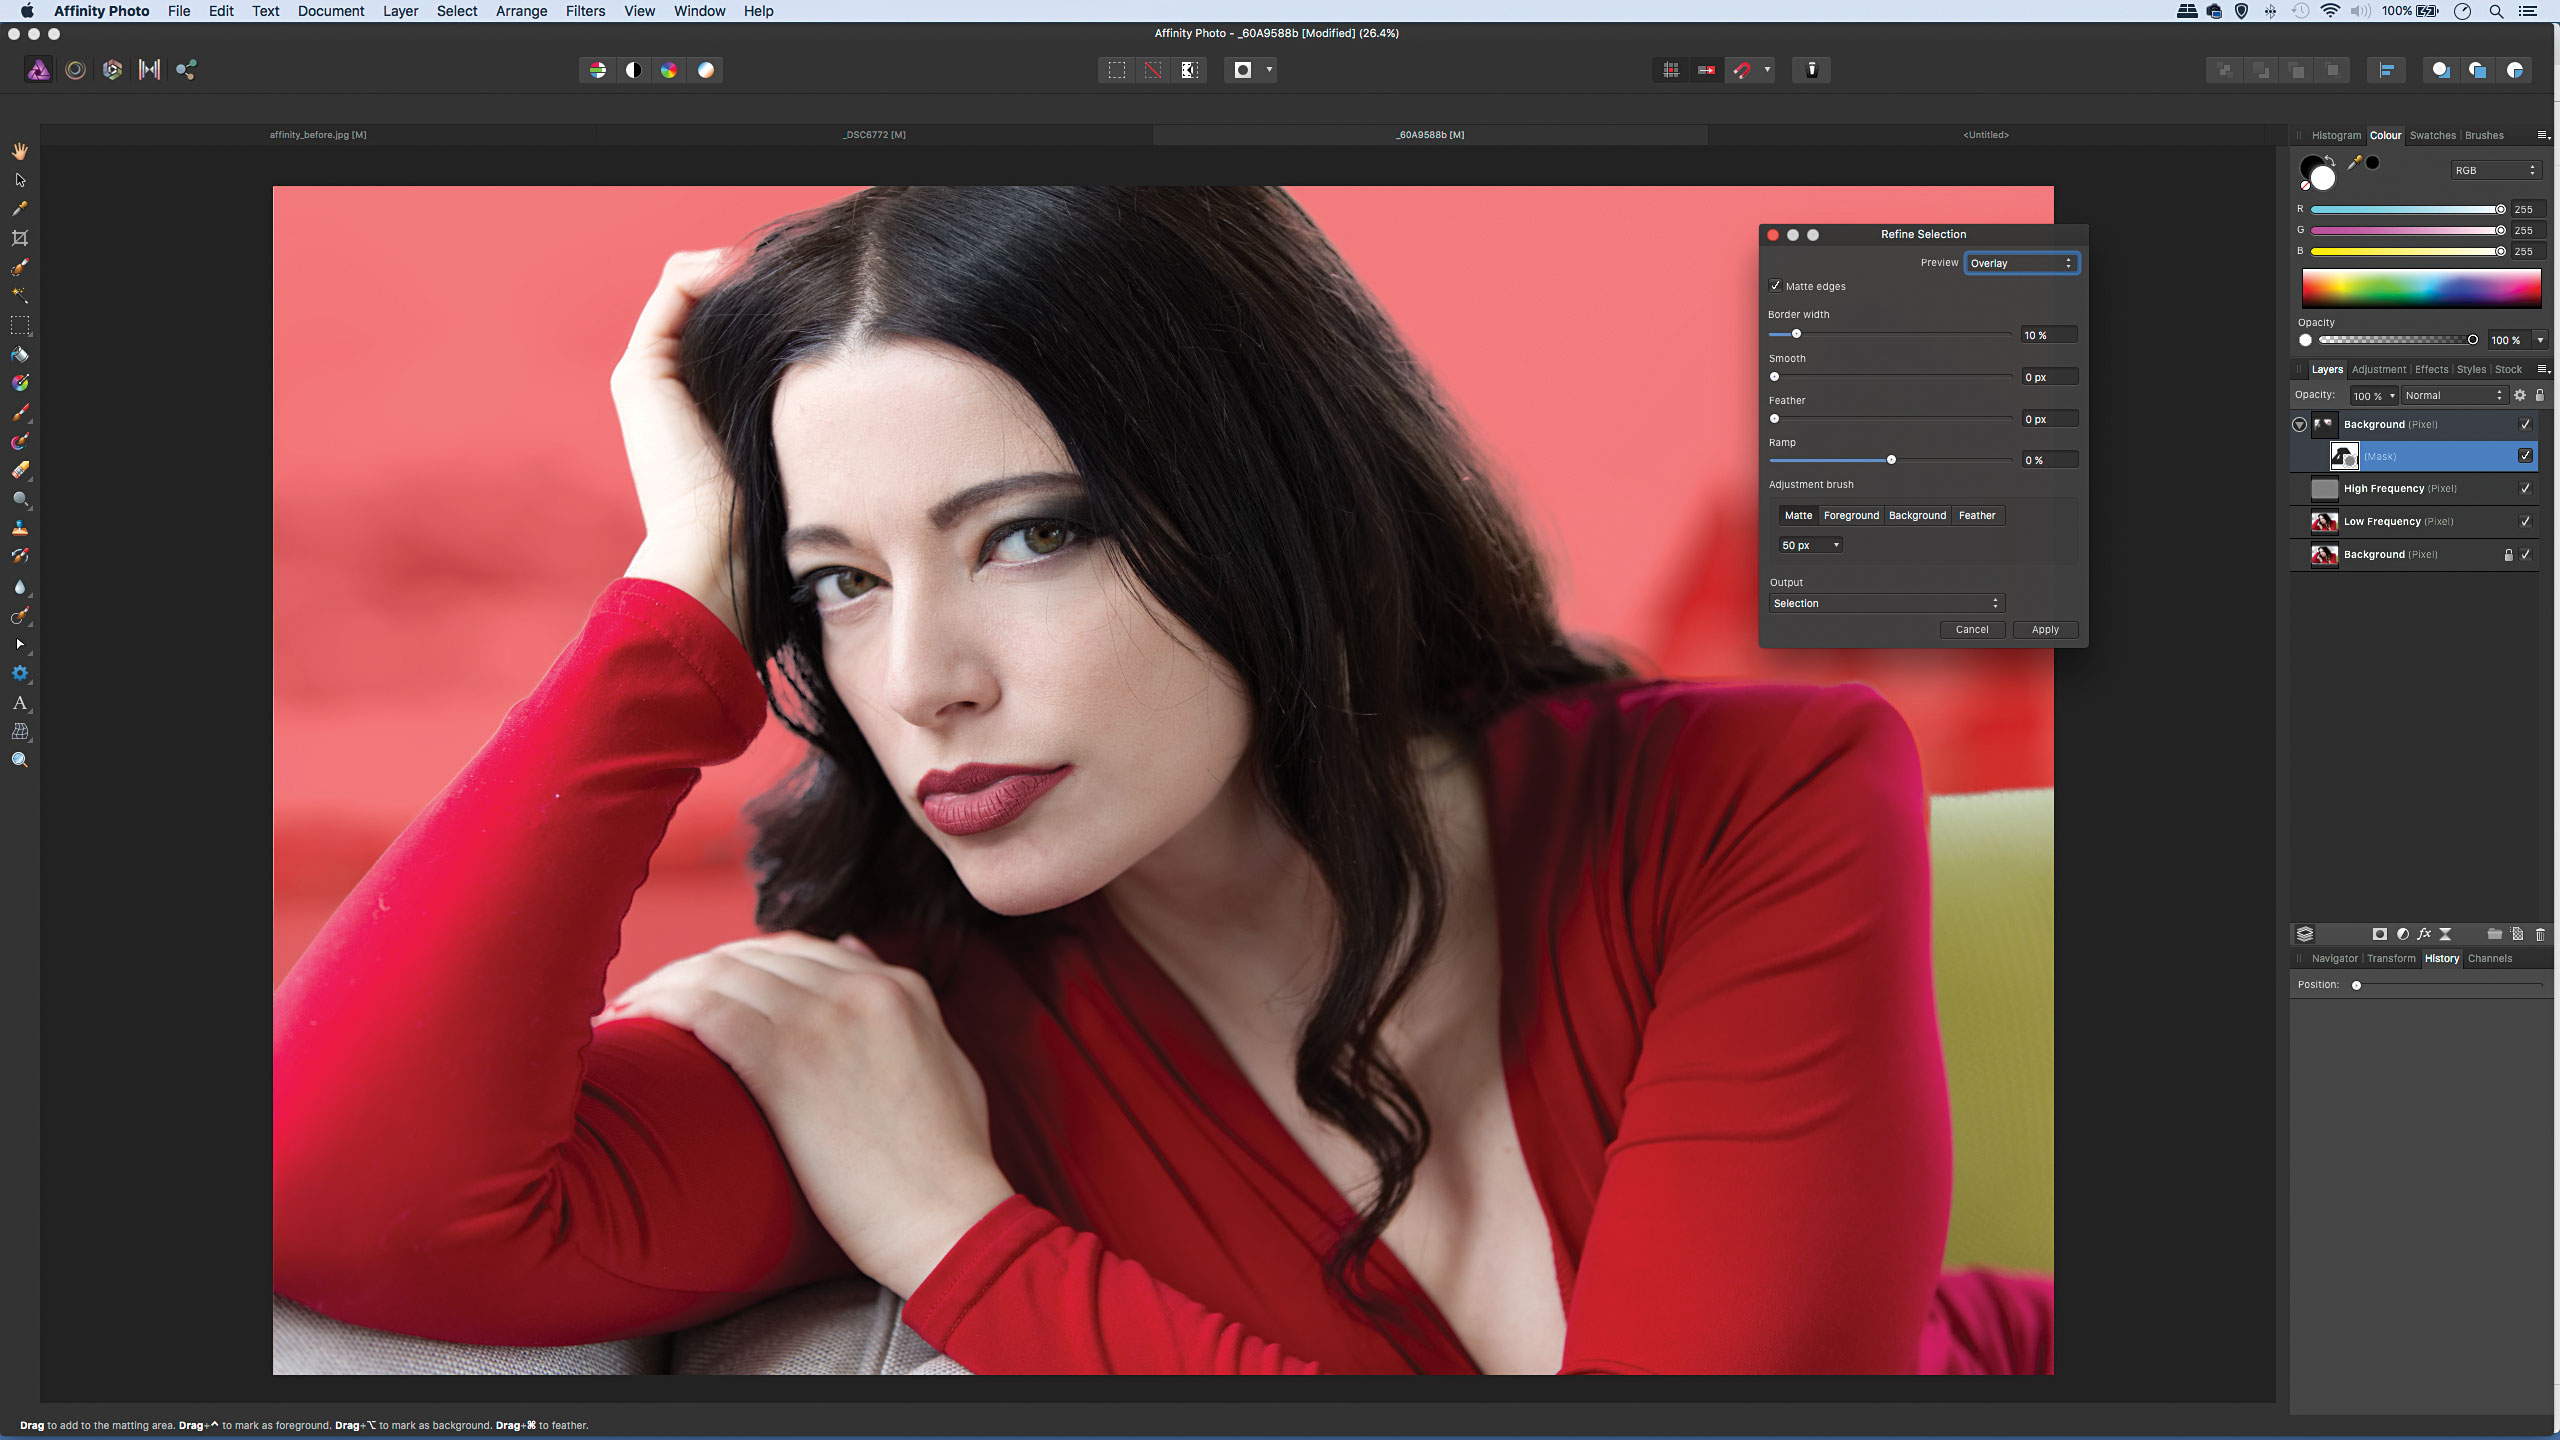
It’s easy to change backgrounds with Affinity’s selection tools. Use the Selection Brush to paint over the backdrop and go to Select>Invert Selection. Click Refine and use the settings to improve the selection. Next, click the Add Mask icon in the Layers panel, then copy in a new image and drag the layer below the portrait.
5. Blending layers
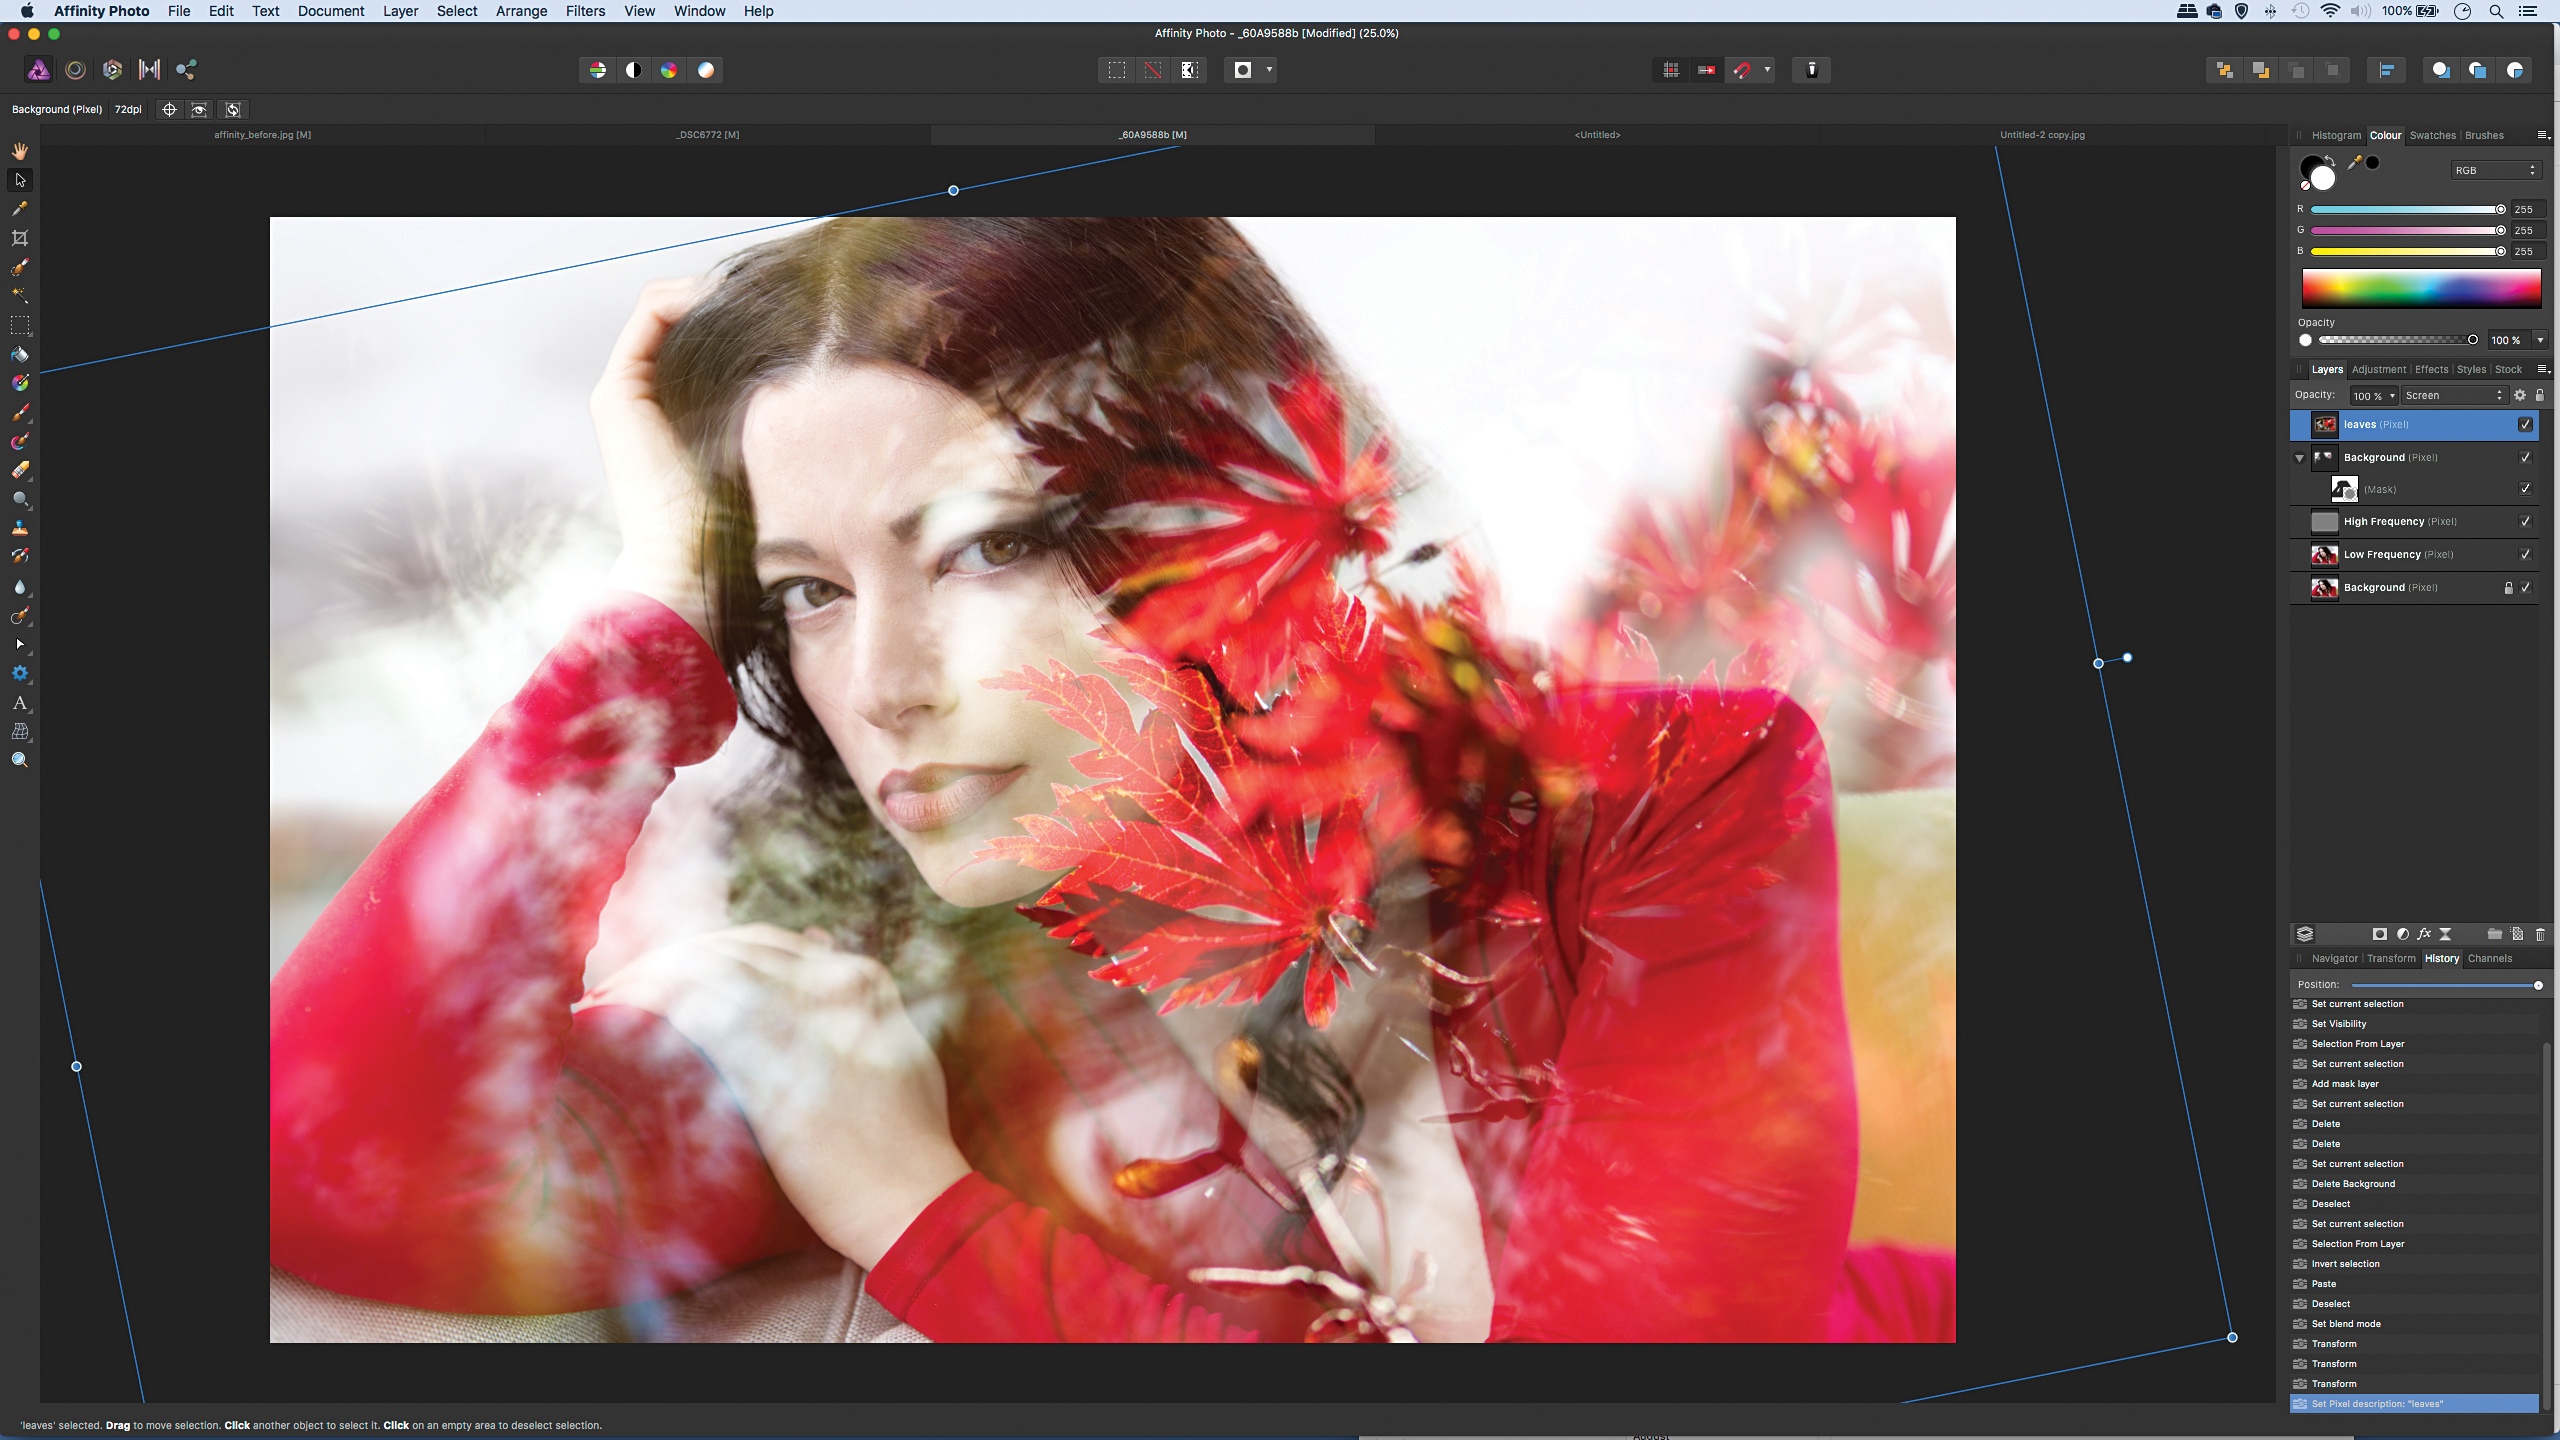
With Affinity’s layer blend modes we can quickly and easily blend two or more photographs into one. Here, after copying in this image of leaves, we can go to the Layers panel and change the blend mode to Screen, then add a mask and paint with black to hide the effect in undesirable areas, in this instance, the face.
6. Tonal tricks
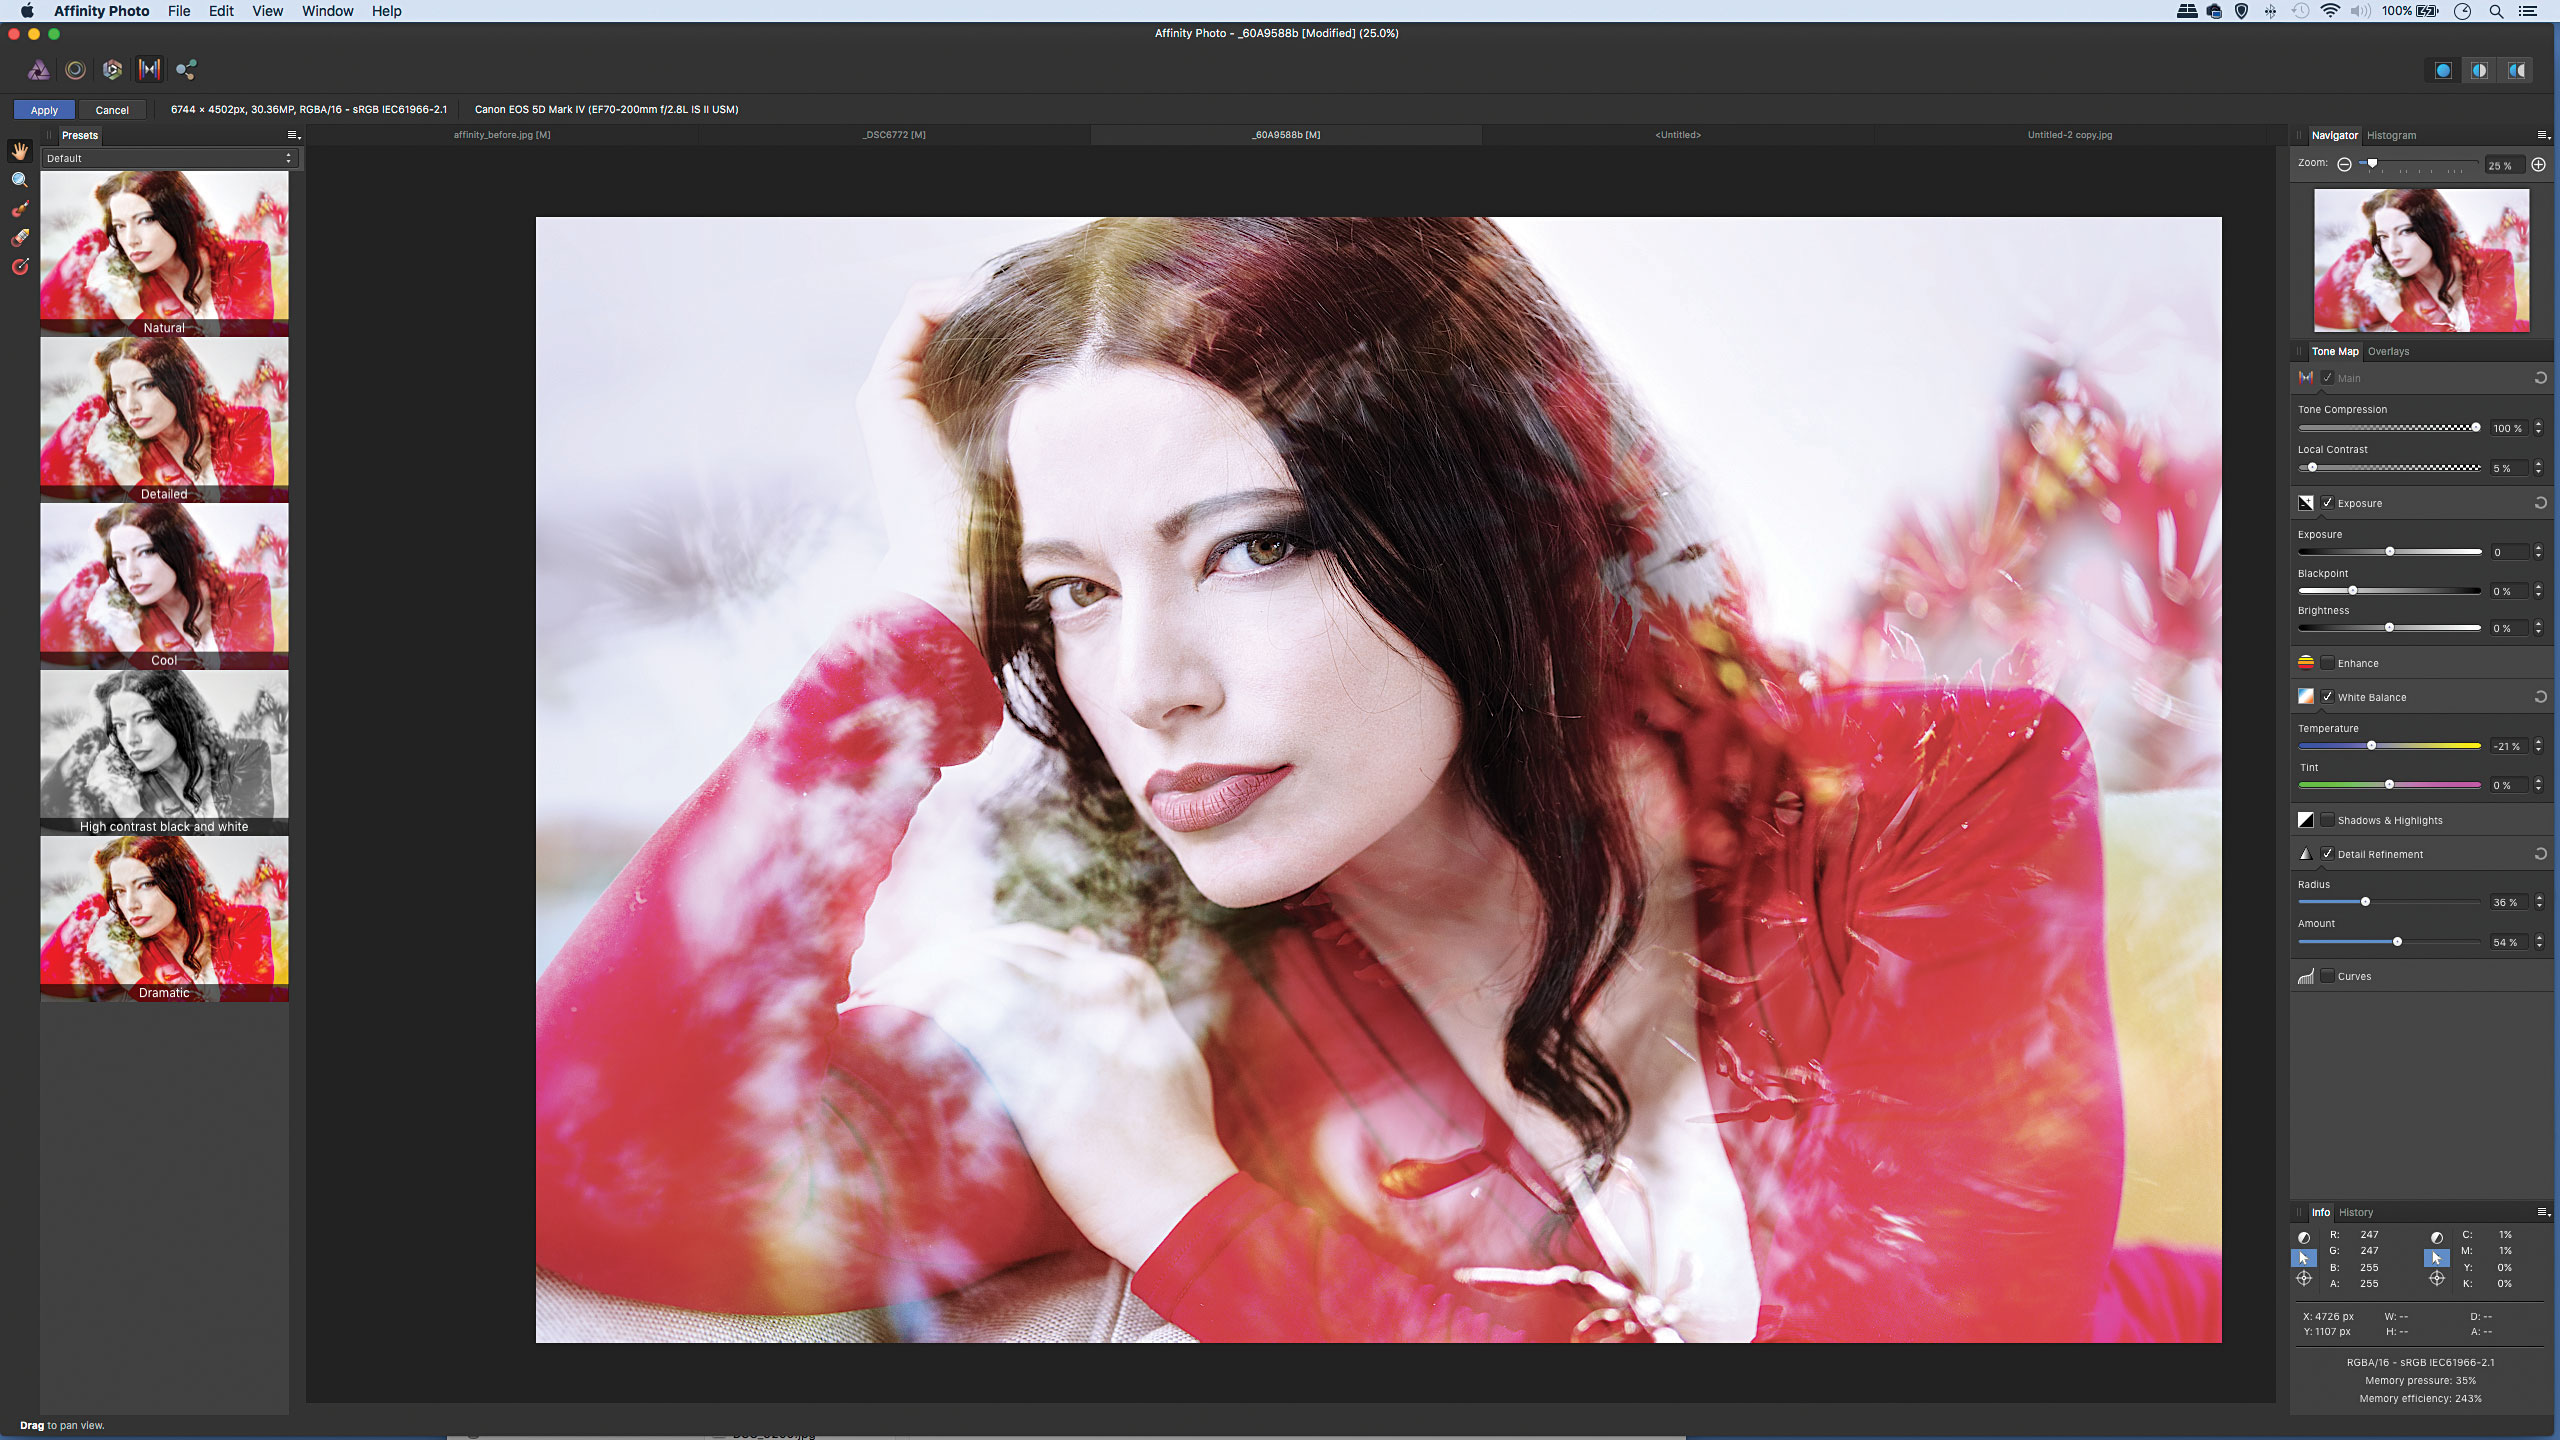
We can finish off by adding a tonal effect or two. First hit Cmd/Ctrl+Shift+Alt+E to merge a layer, then head to the Tone-Mapping Persona by clicking the top left icon. Normally this is for working up HDRs, but we can also use the tools here to tone normal photos. We’ve used the ‘Cool’ preset. Once done, click Apply.


About N-Photo magazine
This tutorial originally appeared in N-Photo, the monthly newsstand magazine for Nikon photographers. Why not subscribe to a print edition, and have the magazine delivered direct to your door every month?
Alternatively, we have a number of different digital options available, including:
• Apple app (for iPad or iPhone)
• Zinio app (multi-platform app for desktop or smartphone)
• PocketMags (multi-platform app ideal for Android devices)
• Readly (all-you-can-eat digital magazine subscription service)
If you wanted a printed version of any of our most recent issues we have a selection of back issues to choose from in our online store.
Read more:
• The best photo editing tools and accessories
• The best tablets for photo editing
• The best monitors for photographers
• Best graphics tablets for photo editing
• The best photo-editing laptops
• The best desktop computers for photo editing
• The best ultrawide monitors for photo editing
Get the Digital Camera World Newsletter
The best camera deals, reviews, product advice, and unmissable photography news, direct to your inbox!
N-Photo: The Nikon Magazine is a monthly publication that's entirely dedicated to Nikon users. As a 100% independent magazine, you can be assured of unbiased opinion from a trustworthy team of devoted photography experts including editor Adam Waring and Deputy Editor Mike Harris.
Aimed at all users, from camera newcomers to working pros, every issue is packed with practical, Nikon-specific advice for taking better photos, in-depth reviews of Nikon-compatible gear, and inspiring projects and exciting video lessons for mastering camera, lens and Photoshop techniques.
Written by Nikon users for Nikon users, N-Photo is your one-stop shop for everything to do with cameras, lenses, tripods, bags, tips, tricks and techniques to get the most out of your photography.

