Captain Composite! Shoot superhero portraits with a little Photoshop magic

Superhero portraits
(Image credit: Rick Smith)

Have you ever wanted to shoot a superhero portrait, but can't find a location befitting Earth's mightiest heroes? Perhaps you want to add the kind of dazzling Hollywood effects that are worthy of the Marvel Cinematic Universe, but your smoke bombs won't cut it? 

The secret to many of the best superhero portraits – and many kinds of fantasy and conceptual photography – is the art of compositing in Photoshop

Compositing, to me, equals escaping our reality and jumping into another, while respecting the rules of color and light to maximize the suspension of belief. I got into compositing as my extracurricular activity to my much loved wedding photography to be free creatively, and to use all that Photoshop offers us. 
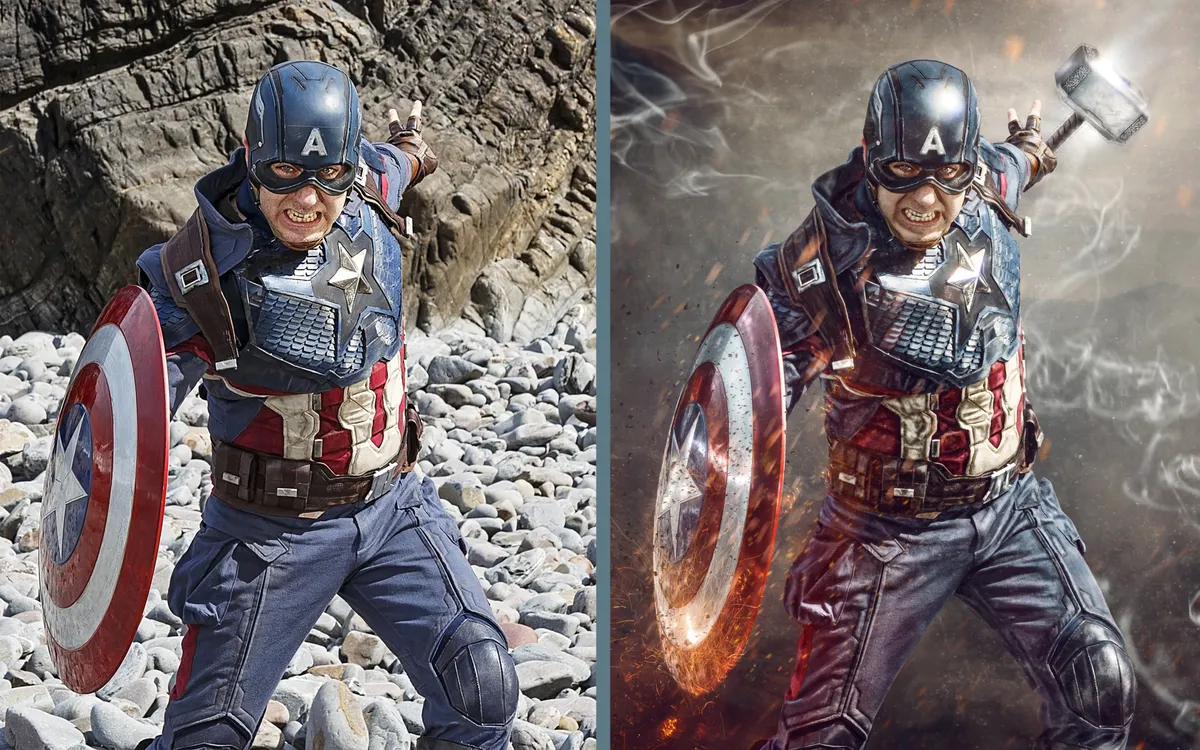
This can range from a sky replacement right through to this image, where I started off with my go-to Pen tool to cut Captain America  from reality and place him within a far more dynamic scene.

The original image (1/125 sec, f/10, ISO100) (Image credit: Rick Smith)

Top tips for shooting composites

01 Consider lighting direction
When shooting your base image, make sure that it looks like it will match the backdrop you're going to introduce later.

02 Have a strong vision
Have a concrete idea of the final image you want to create. It might help to write a list of what you want to achieve, and outline the steps needed.

03 Use quality stock
If you're using a stock image for your extra elements or background, make sure that they are high resolution to keep the quality across the image.

04 Center your subject
Having your main subject front and centre will stop the viewer's eye from wondering around the image, hiding any potentially obvious artificial artifacts.

05 Color to finish
When you're nearly done, use a color gradient or a gradient map to pull everything together, blending all the elements of your image as one.

Three simple steps to creating your composite

(Image credit: Rick Smith)

01 Get cutting

Although there are a few ways to cut out images in Photoshop, I usually go with the following method. I start by duplicating my layer, so I always have an untouched reference point to return to if need be. 

I then zoom in close to the point where I want to start my path, select the Pen tool and begin to map my path around my subject. Once the path is complete, right-click to open the options where you can make a selection; I choose a feather of 1 to soften the edge slightly, then inverse the selection and the process is complete.

(Image credit: Rick Smith)

02 Dodge and burn

Once I have cut my subject from the background using the Pen tool (although time-consuming, the results are beautifully precise) I use inverted curves adjustment layers to dodge and burn and really get the subject popping. Often I'll double up my layers and, in this instance, add an additional inverted color dodge layer to paint that extra 'shine' element to the metallic objects in the image.

(Image credit: Rick Smith)

03 Add your elements

I added in Thor's hammer using a few duplicated layers. Using both the motion and radial blur filters on the masked smart object gives the feeling of the hammer flying towards Captain America, and I also enhance the hammer with light flares. The shield was brought to life with a mix of photographs, on a screen blend mode, of bonfire sparks and some flying debris to simulate action.

(Image credit: Rick Smith)

04 Color, glow, smoke, go!

When compositing I always color-match the subject and background using a color balance adjustment layer before color grading. For the latter, I employed the epic plug-in 'Infinite Harmony' to honor the scene from the movie, before adding the pinpointed glow-enhanced areas with my godsend plug-in 'Oniric'. Finally, using screen mode, I added masked smoke and dust layers for additional drama and texture. You can see the full before and after below!

(Image credit: Rick Smith)

Read more:

Superhero shots using a DIY green screen
Get creative with composites in Affinity
Home photography ideas
Portrait photography how to: essential tips and tricks
Photoshop tips

DCW team

Digital Camera World is one of the leading authorities on camera and photography news, reviews, techniques, tutorials, comparisons, deals and industry analysis. The site doesn't just specialize in cameras, but all aspects of photography, videography and imaging – including camera phones, gimbals, lenses, lighting, editing software, filters, tripods, laptops, printers, photo books, desks, binoculars and more. 

Whether you're using, looking to buy or trying to get the most out of a compact camera, action camera, camera drone, cinema camera, beginner camera or professional camera, Digital Camera World has a roster of experts with combined experience of over 100 years when it comes to cameras, photography and imaging. 

Meet the DCW team

Read more
Three different portrait shots, showing a strobe effect, high contrast and film-noir style style
"For a more dramatic look, I add more lights to create high contrast and a dynamic that is hard to beat"
Light painting
I created these psychedlic silhouettes using this amazing in-camera photo technique
Stroboscopic flash portraits with a tennis player in a studio
Game, set and flash! Capture sensational stroboscopic portrait photos in a home studio
Real Zebra and Model in large mostly white room with a number of stuffed animals
“I didn’t use Photoshop (in the way you think) for these pictures – but everyone assumes I did”
Two images of a country home and garden (left) used to create a 3D anaglyph (right) on a blue to green gradient
I made a 3D anaglyph in Photoshop and can’t believe how well it works!
Portrait of vintage-clothed person looking shocked, color version on left side, black and white conversion on right side, with text 'How to photograph... film noir' in center of image
I broke ALL the rules to photograph this classic film noir portrait – harsh light and unflattering angles
Latest in Photo Editing
Backing up data is so annoying that most would rather…scrub toilets!
A screenshot of the Adobe Stock Customize tool
Adobe Stock now enables you to mass-edit with AI – but is it a nail in the coffin for stock photography, or another way for creators to earn money?
AIarty Image Matting
Cut the chaos: AI-powered background removal + free giveaway for photographers!
Neurapix before and after of smiling bride holding bouquet of flowers
“Neurapix reduced my editing time by 50%” – why this AI Lightroom plug-in is taking wedding photography by storm
Close-up image of a bird flapping its wings edited in DxO PureRAW 5 showing before and after sharpening, demosaicing, and noise reduction
DxO PureRAW 5 gets local adjustments, DeepPRIME 3, and more support for Fujifilm photographers
Three black-and-white images of modern architecture in London
I find black-and-white photography freeing in a world of color-graded imagery
Latest in Tutorials
Total lunar eclipse
How I’ll photograph the blood moon total lunar eclipse tonight, one of the best astrophotography events of the year
Wildlife portrait of a gannet in front of a clean green background
10 tips for wildlife photography from birds in flight to insect close-ups
Mountain valley during sunrise. Natural summer landscape
9 landscape photography tips I think every photographer should know
Bride and groom hold hands aloft backlit against the sun on their wedding day
Want to be a wedding photographer? Here are my 11 tips that will help you get there the RIGHT way
Colourful trees frame a small river, photographed with a long exposure
I love to shoot long exposures in the rain – here’s why I head to the woods!
What is ISO in photography?