Create super-charged sunsets in Affinity Photo
Give dull sunset colours a boost using Affinity Photo’s powerful Channel Mixer
Start here
• Affinity Photo tutorials
The tutorials
1. Affinity Photo vs Photoshop
2. RAW editing with Affinity Photo
3. Focus merge with Affinity Photo
4. Replace a sky in Affinity Photo
5. Moody mono in Affinity Photo
6. Six Affinity Photo landscape tips
7. Color correction in Affinity Photo
8. Live Filters in Affinity Photo
9. Create a classic wet plate look
10. Remove objects in Affinity Photo
11. Paint an abstract portrait
12. Enhance skintones in Affinity Photo
13. Create HDR in Affinity Photo
14. Replace a sky in Affinity Photo
15. Affinity Photo double exposures
16. Affinity Photo Denoise tool
17. Affinity Photo retouching
18. Restore old family portraits
19. Change clothes in Affinity Photo
20. Create super-charged sunsets
21. Fix faces with a flourish
22. Get creative with composites
23. Liquify faces with Affinity Photo
24. Make a tropical composite
25. Let it snow in Affinity Photo
26. Create an immaculate conception
Watch video: Super-charge sunsets in Affinity Photo
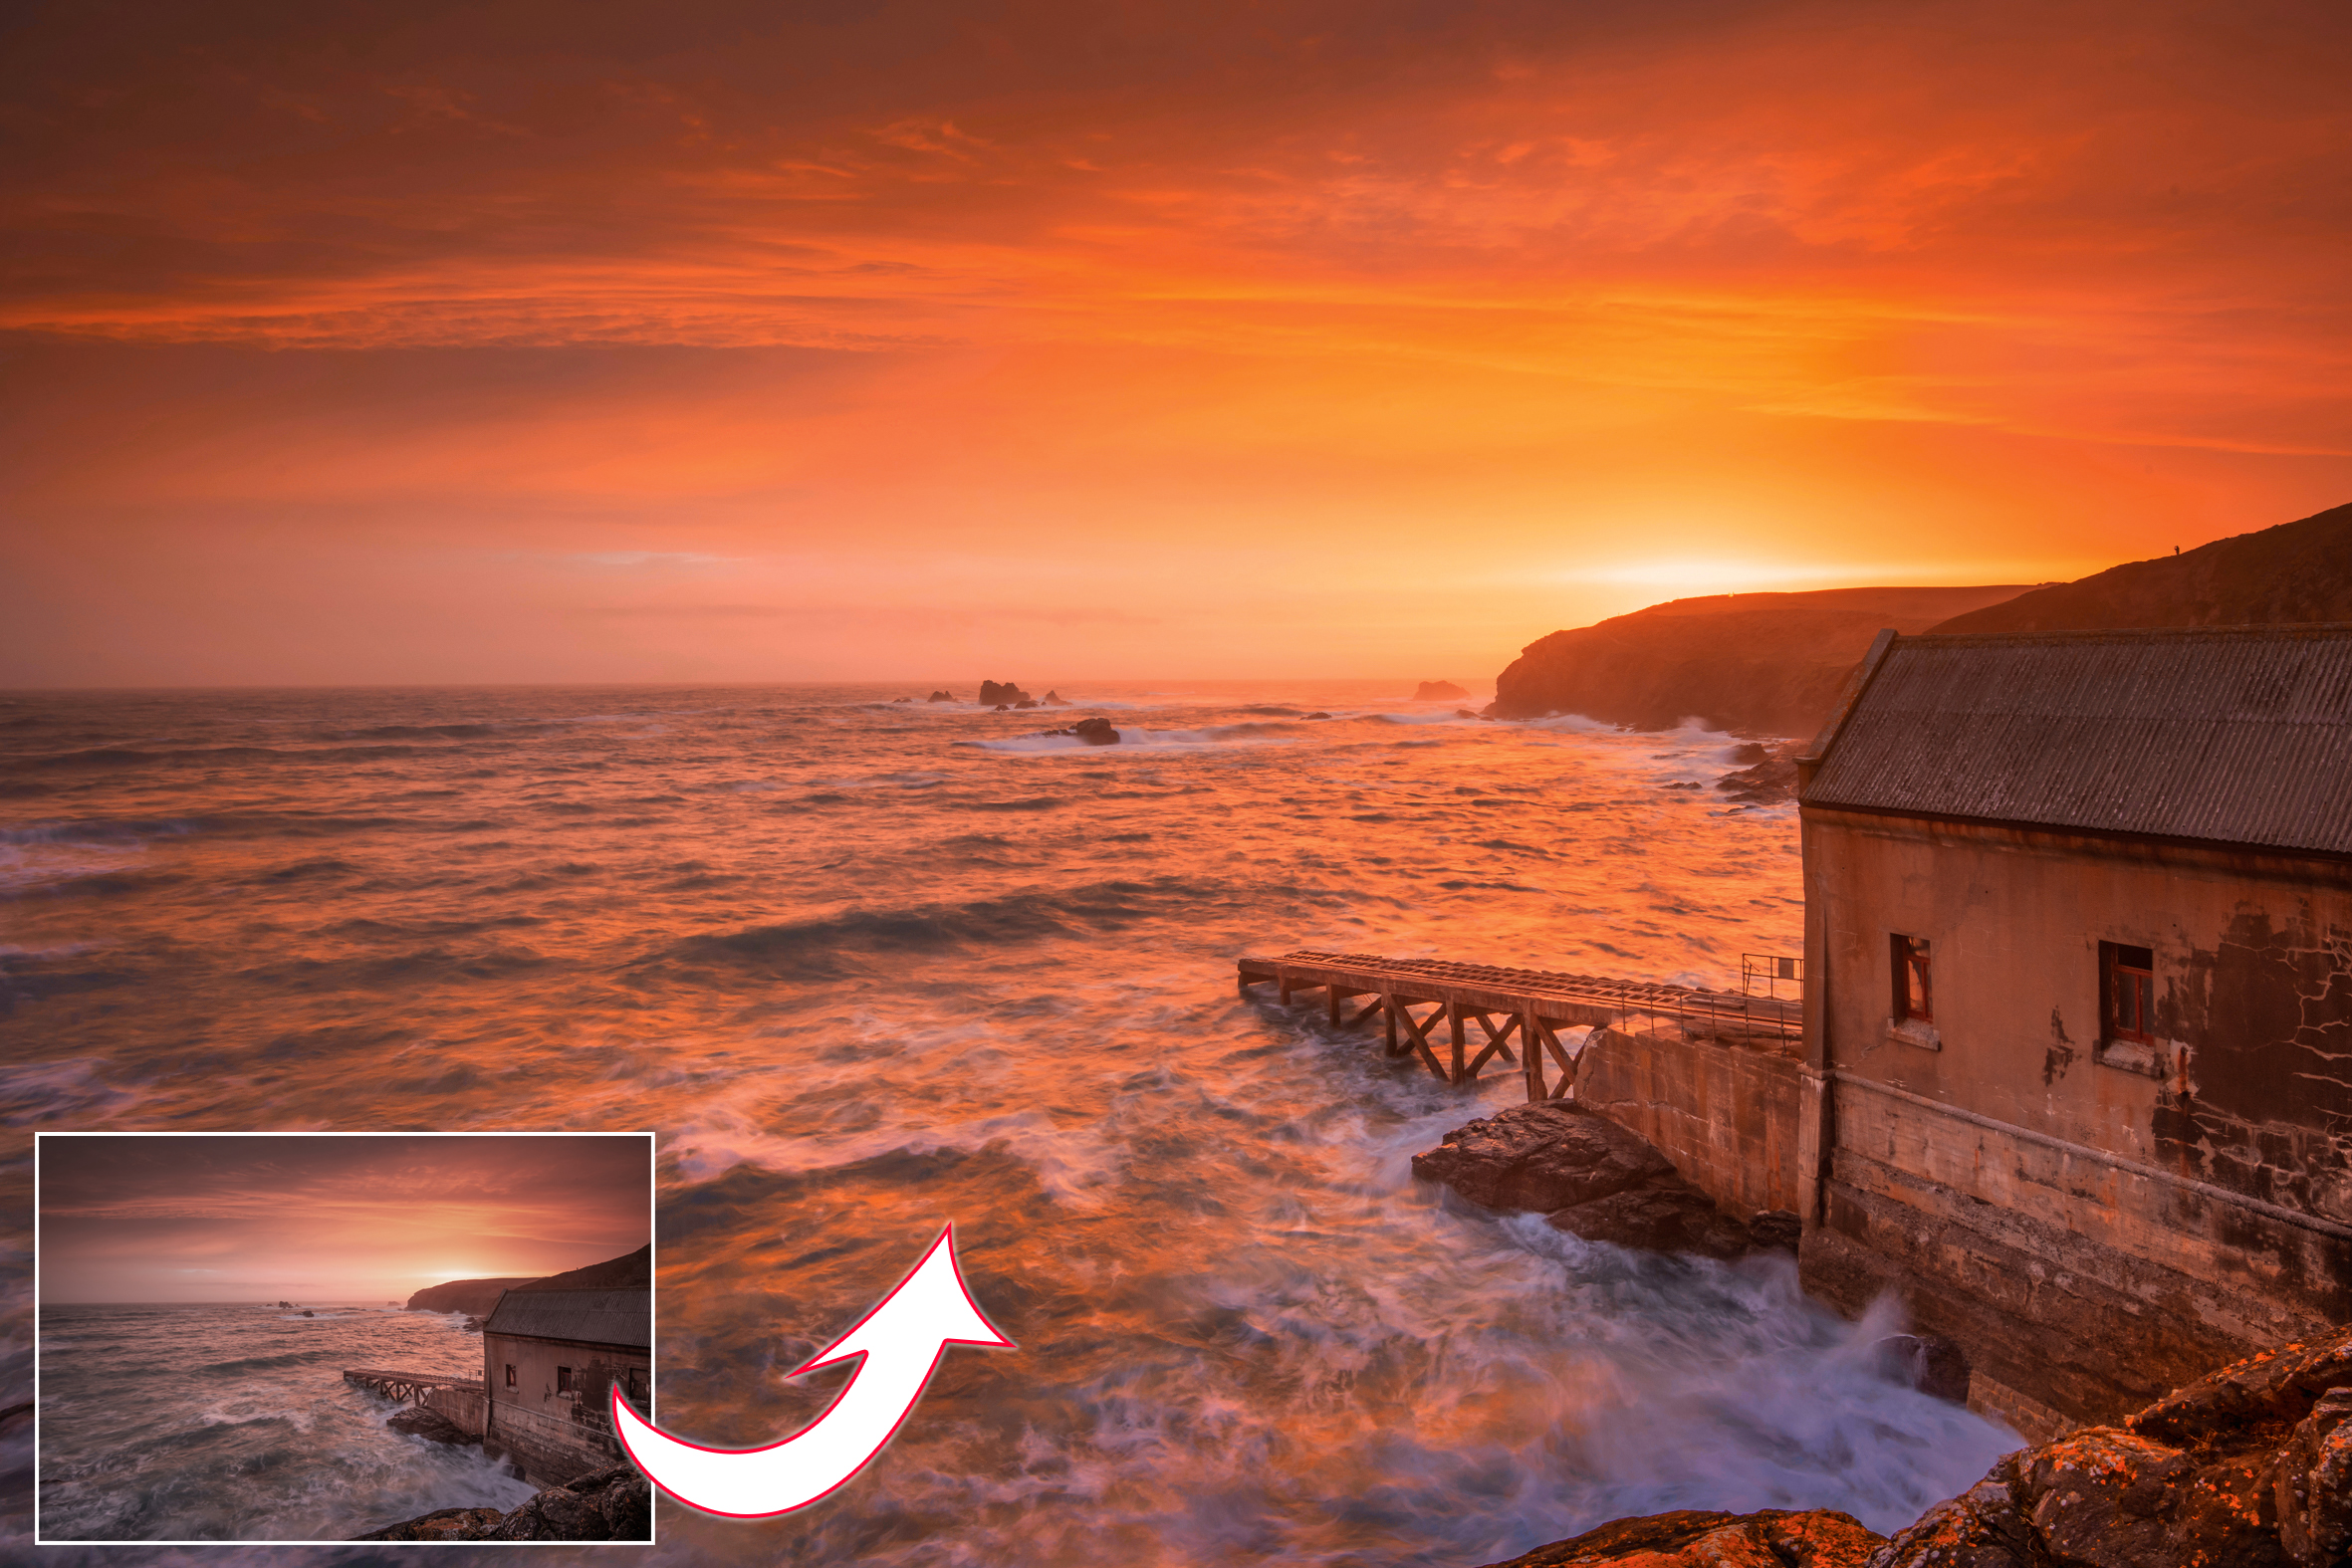
Have you ever returned from shooting a stunning sunset only to find your photos look slightly underwhelming? Those reds, yellows and oranges in the sky that seemed so bold at the time can occasionally come out rather dull. But with a few simple tweaks we can boost the sky, enhance the tones and produce an image that looks exactly how you remember it the day it was shot.
Affinity Photo has lots of colour boosting tools to choose from. In this tutorial, we’re going to use a neat trick that involves the Channel Mixer adjustment. As the name suggests, this useful tool lets us mix our red, green and blue colour channels.
Each pixel in our image is initially made up of a specific value for red, green and blue, on a scale from 0-255. By adjusting the Channel Mixer we can change the values and shift the colours one way or another.
As such, the Channel Mixer can do wonders for your sunrise and sunset photos, as it focuses on and boosts the colour ranges that appear in the sky, resulting in lush warm tones. What’s more, because the effect sits on its own layer, we have the freedom to change the strength at any time, either by duplicating the layer to make it stronger, or reducing the layer opacity to make it weaker.
If we want, we can also make it work selectively over the sky by using a layer mask, which is useful here both for reducing the effect in over-saturated clouds and increasing it in the waves.
Here’s how to use this non-destructive method to super-charge a sunset image.
Read more:
Step 1: Enhance the reds
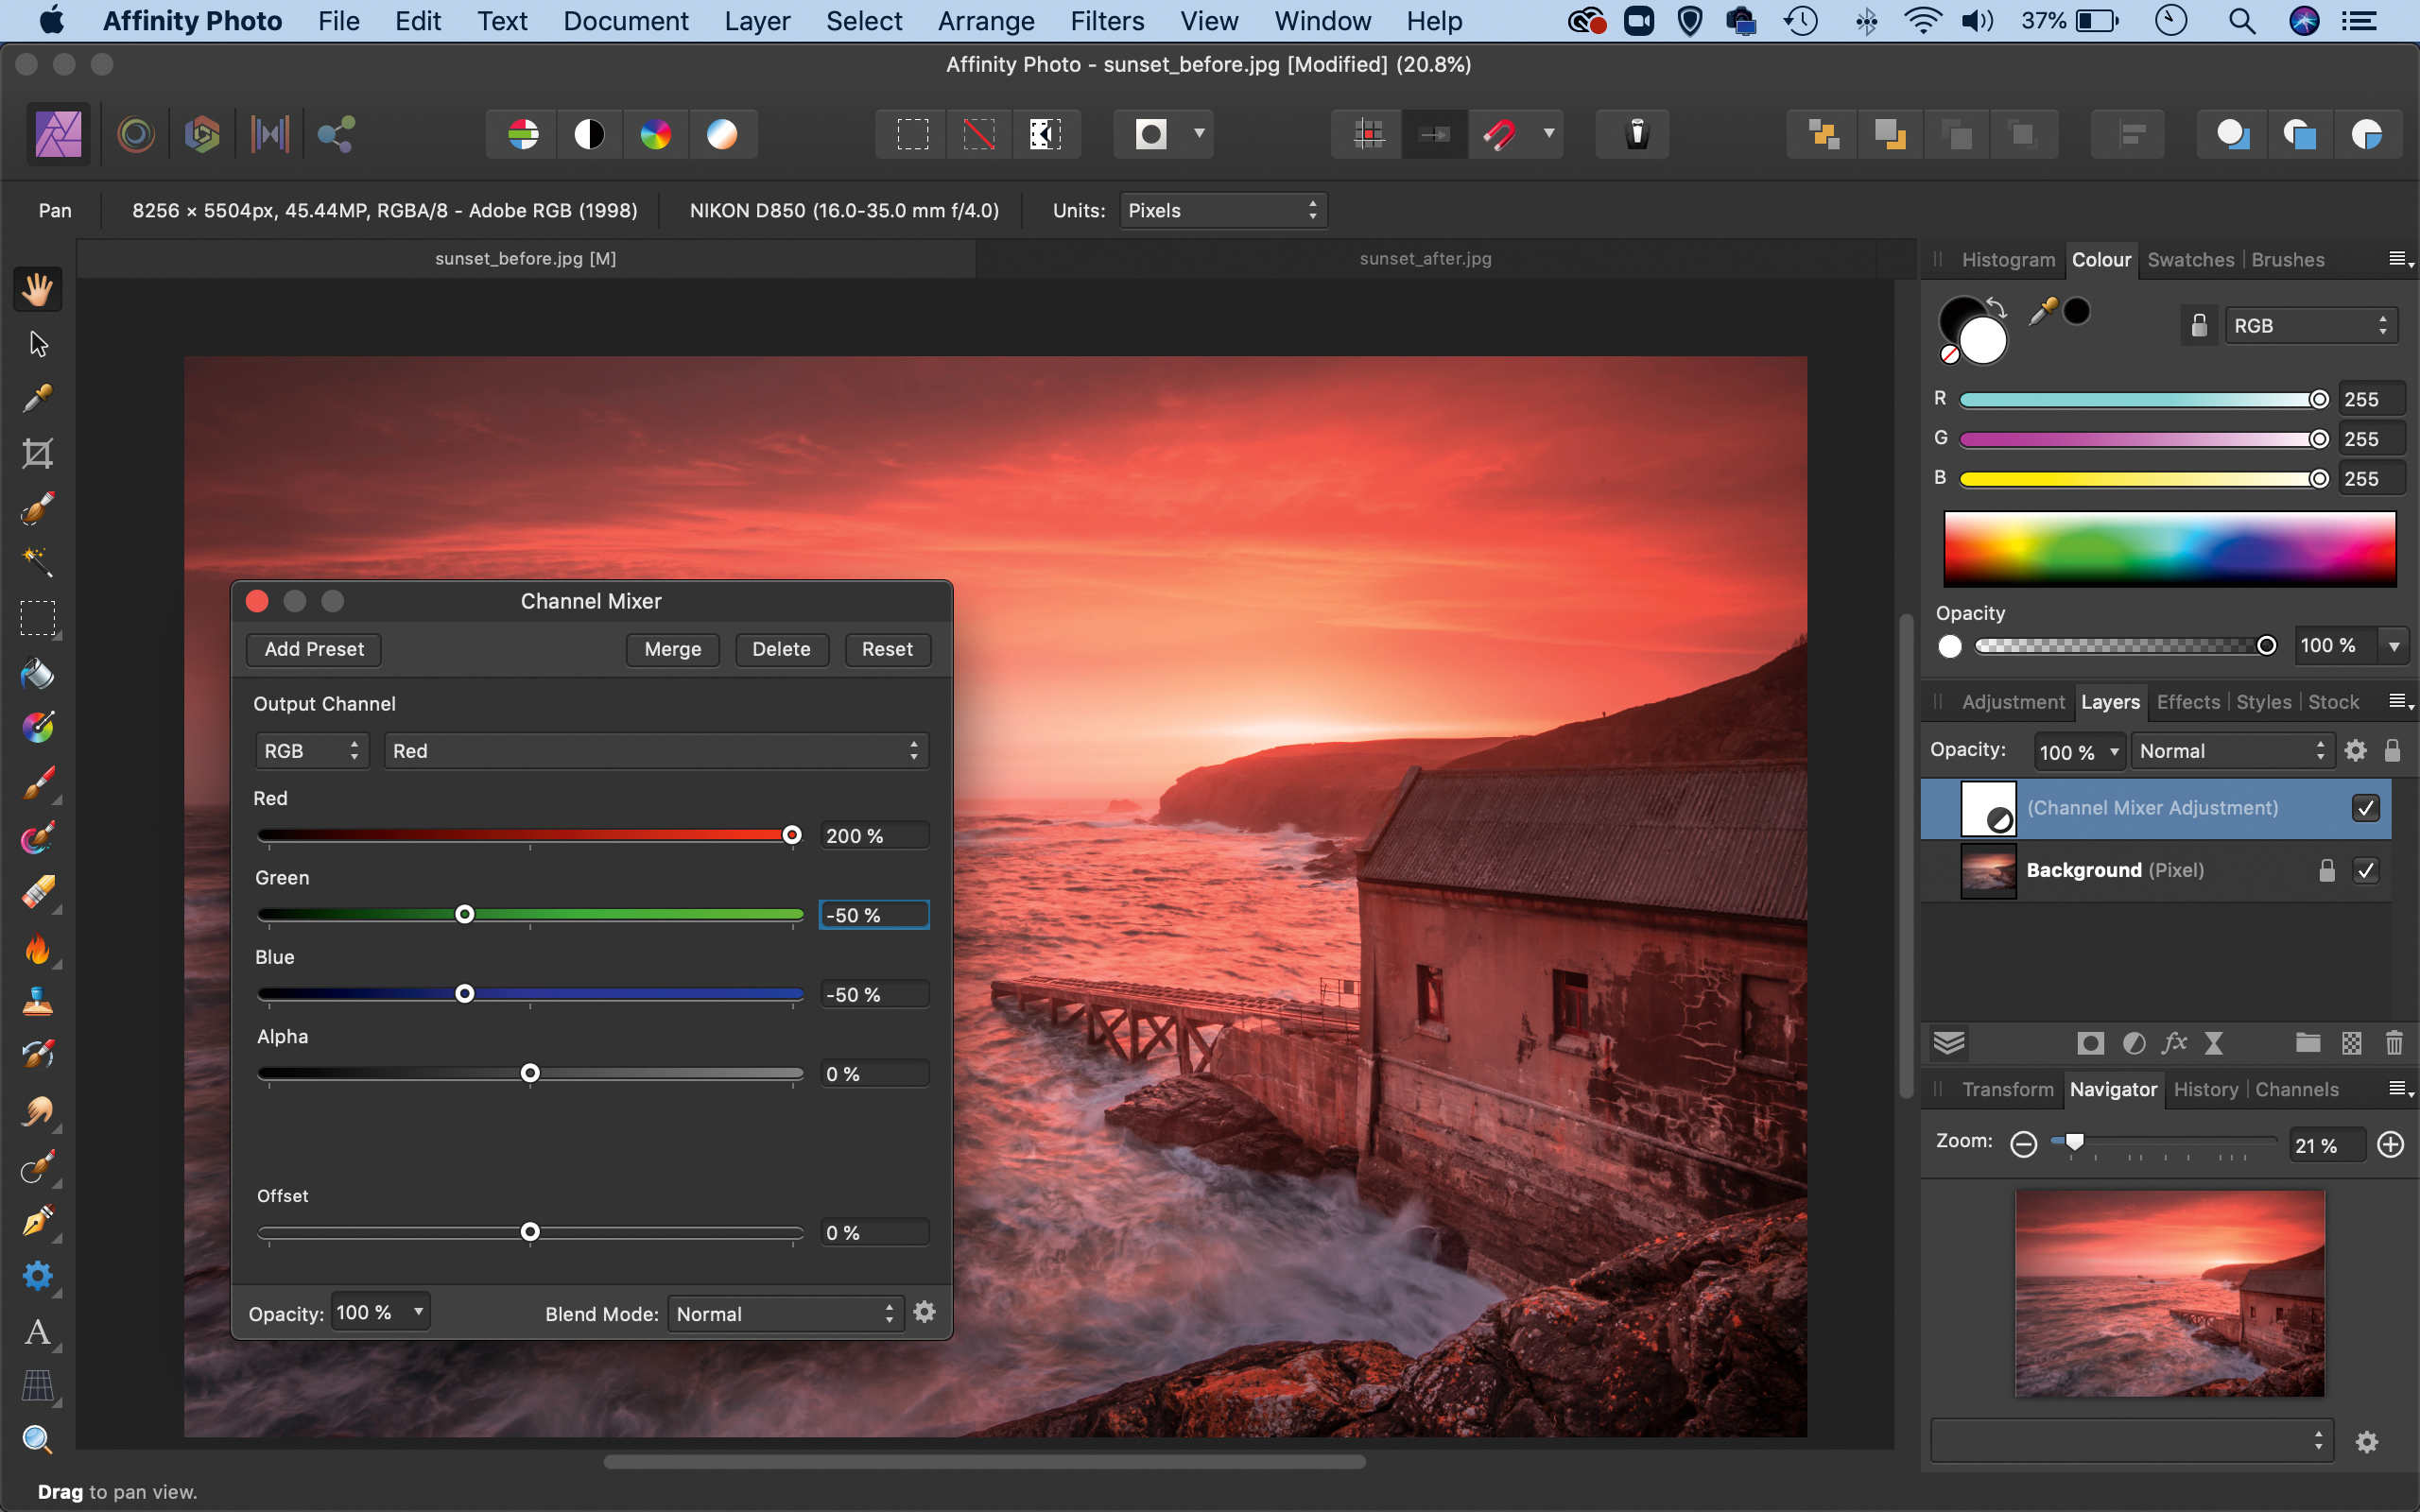
Open the sunset image into Affinity Photo and click the Photo Persona (top right). Go to the Layers panel, click the Adjustment icon at the bottom and choose Channel Mixer. Make sure Output Channel is Red, then set Red +200, Green -50, Blue -50. This boosts the reds.
Step 2: Set the blues
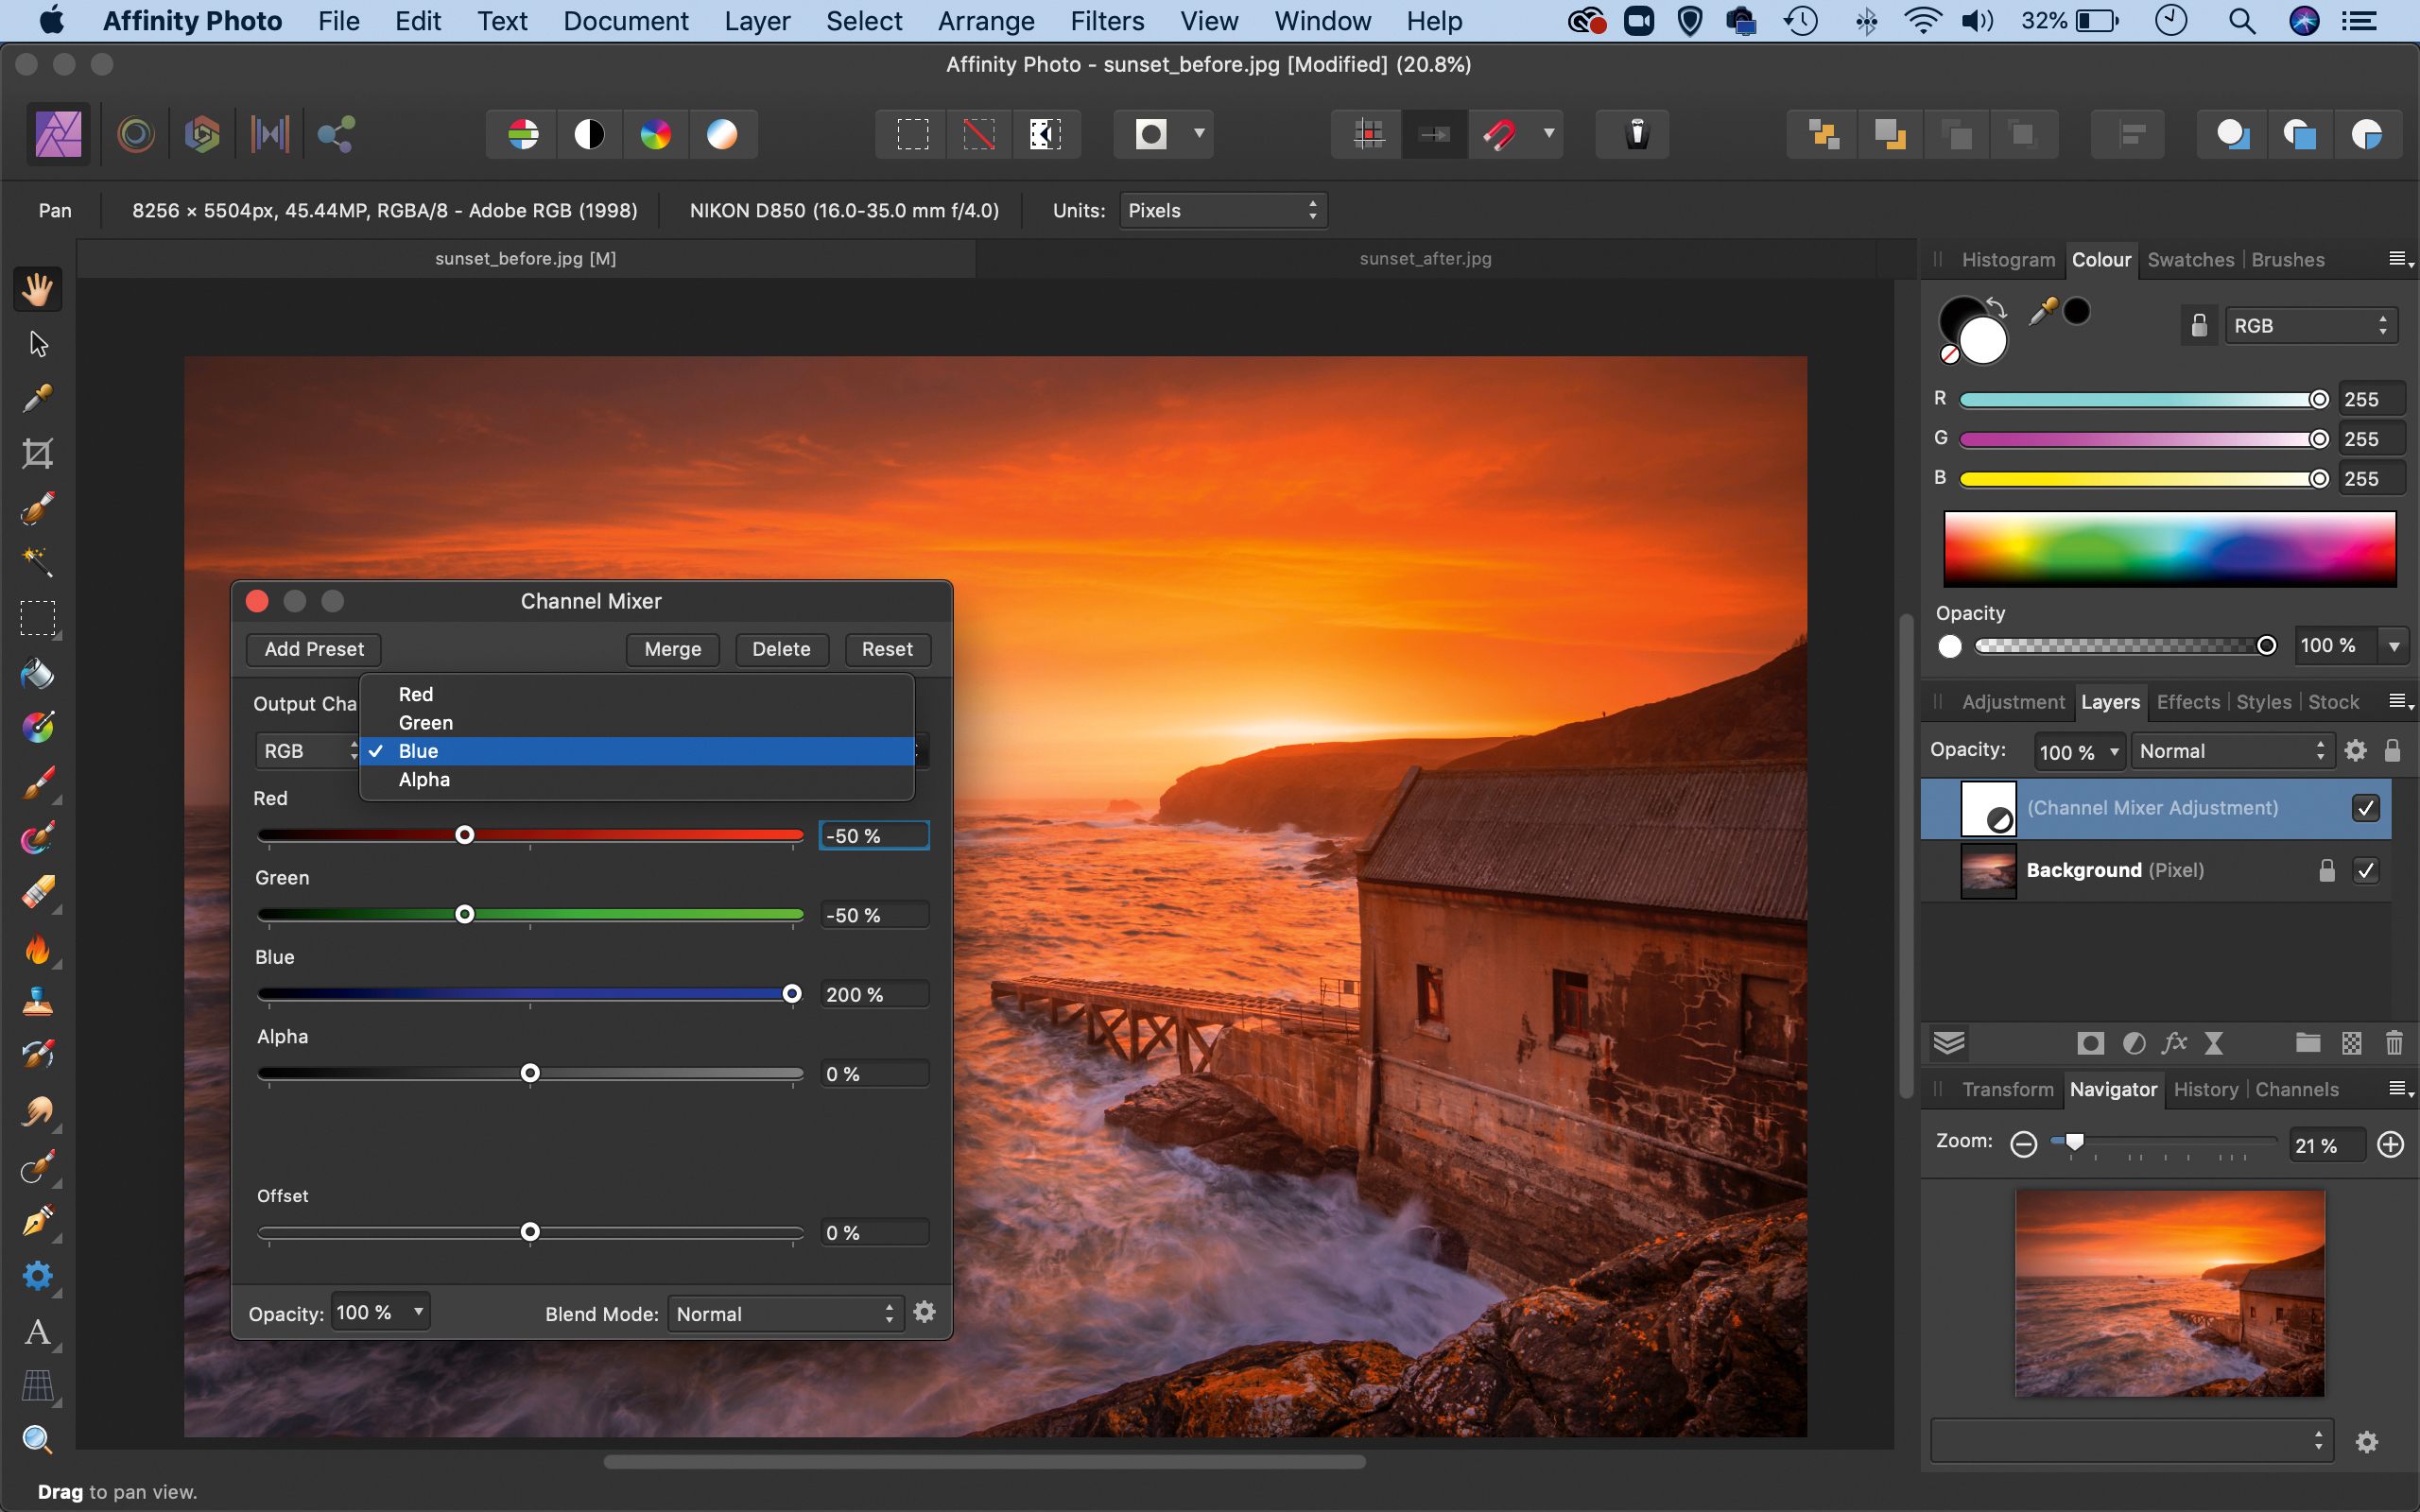
Next, go to the Output Channel dropdown and choose Blue. Set Blue +200, Red -50, Green -50. This adds a warm orange tone to the colours. If it’s not quite right for your image you can experiment with slightly different values. Just ensure the combined total of the three channels equals +100.
Step 3: Lower the opacity
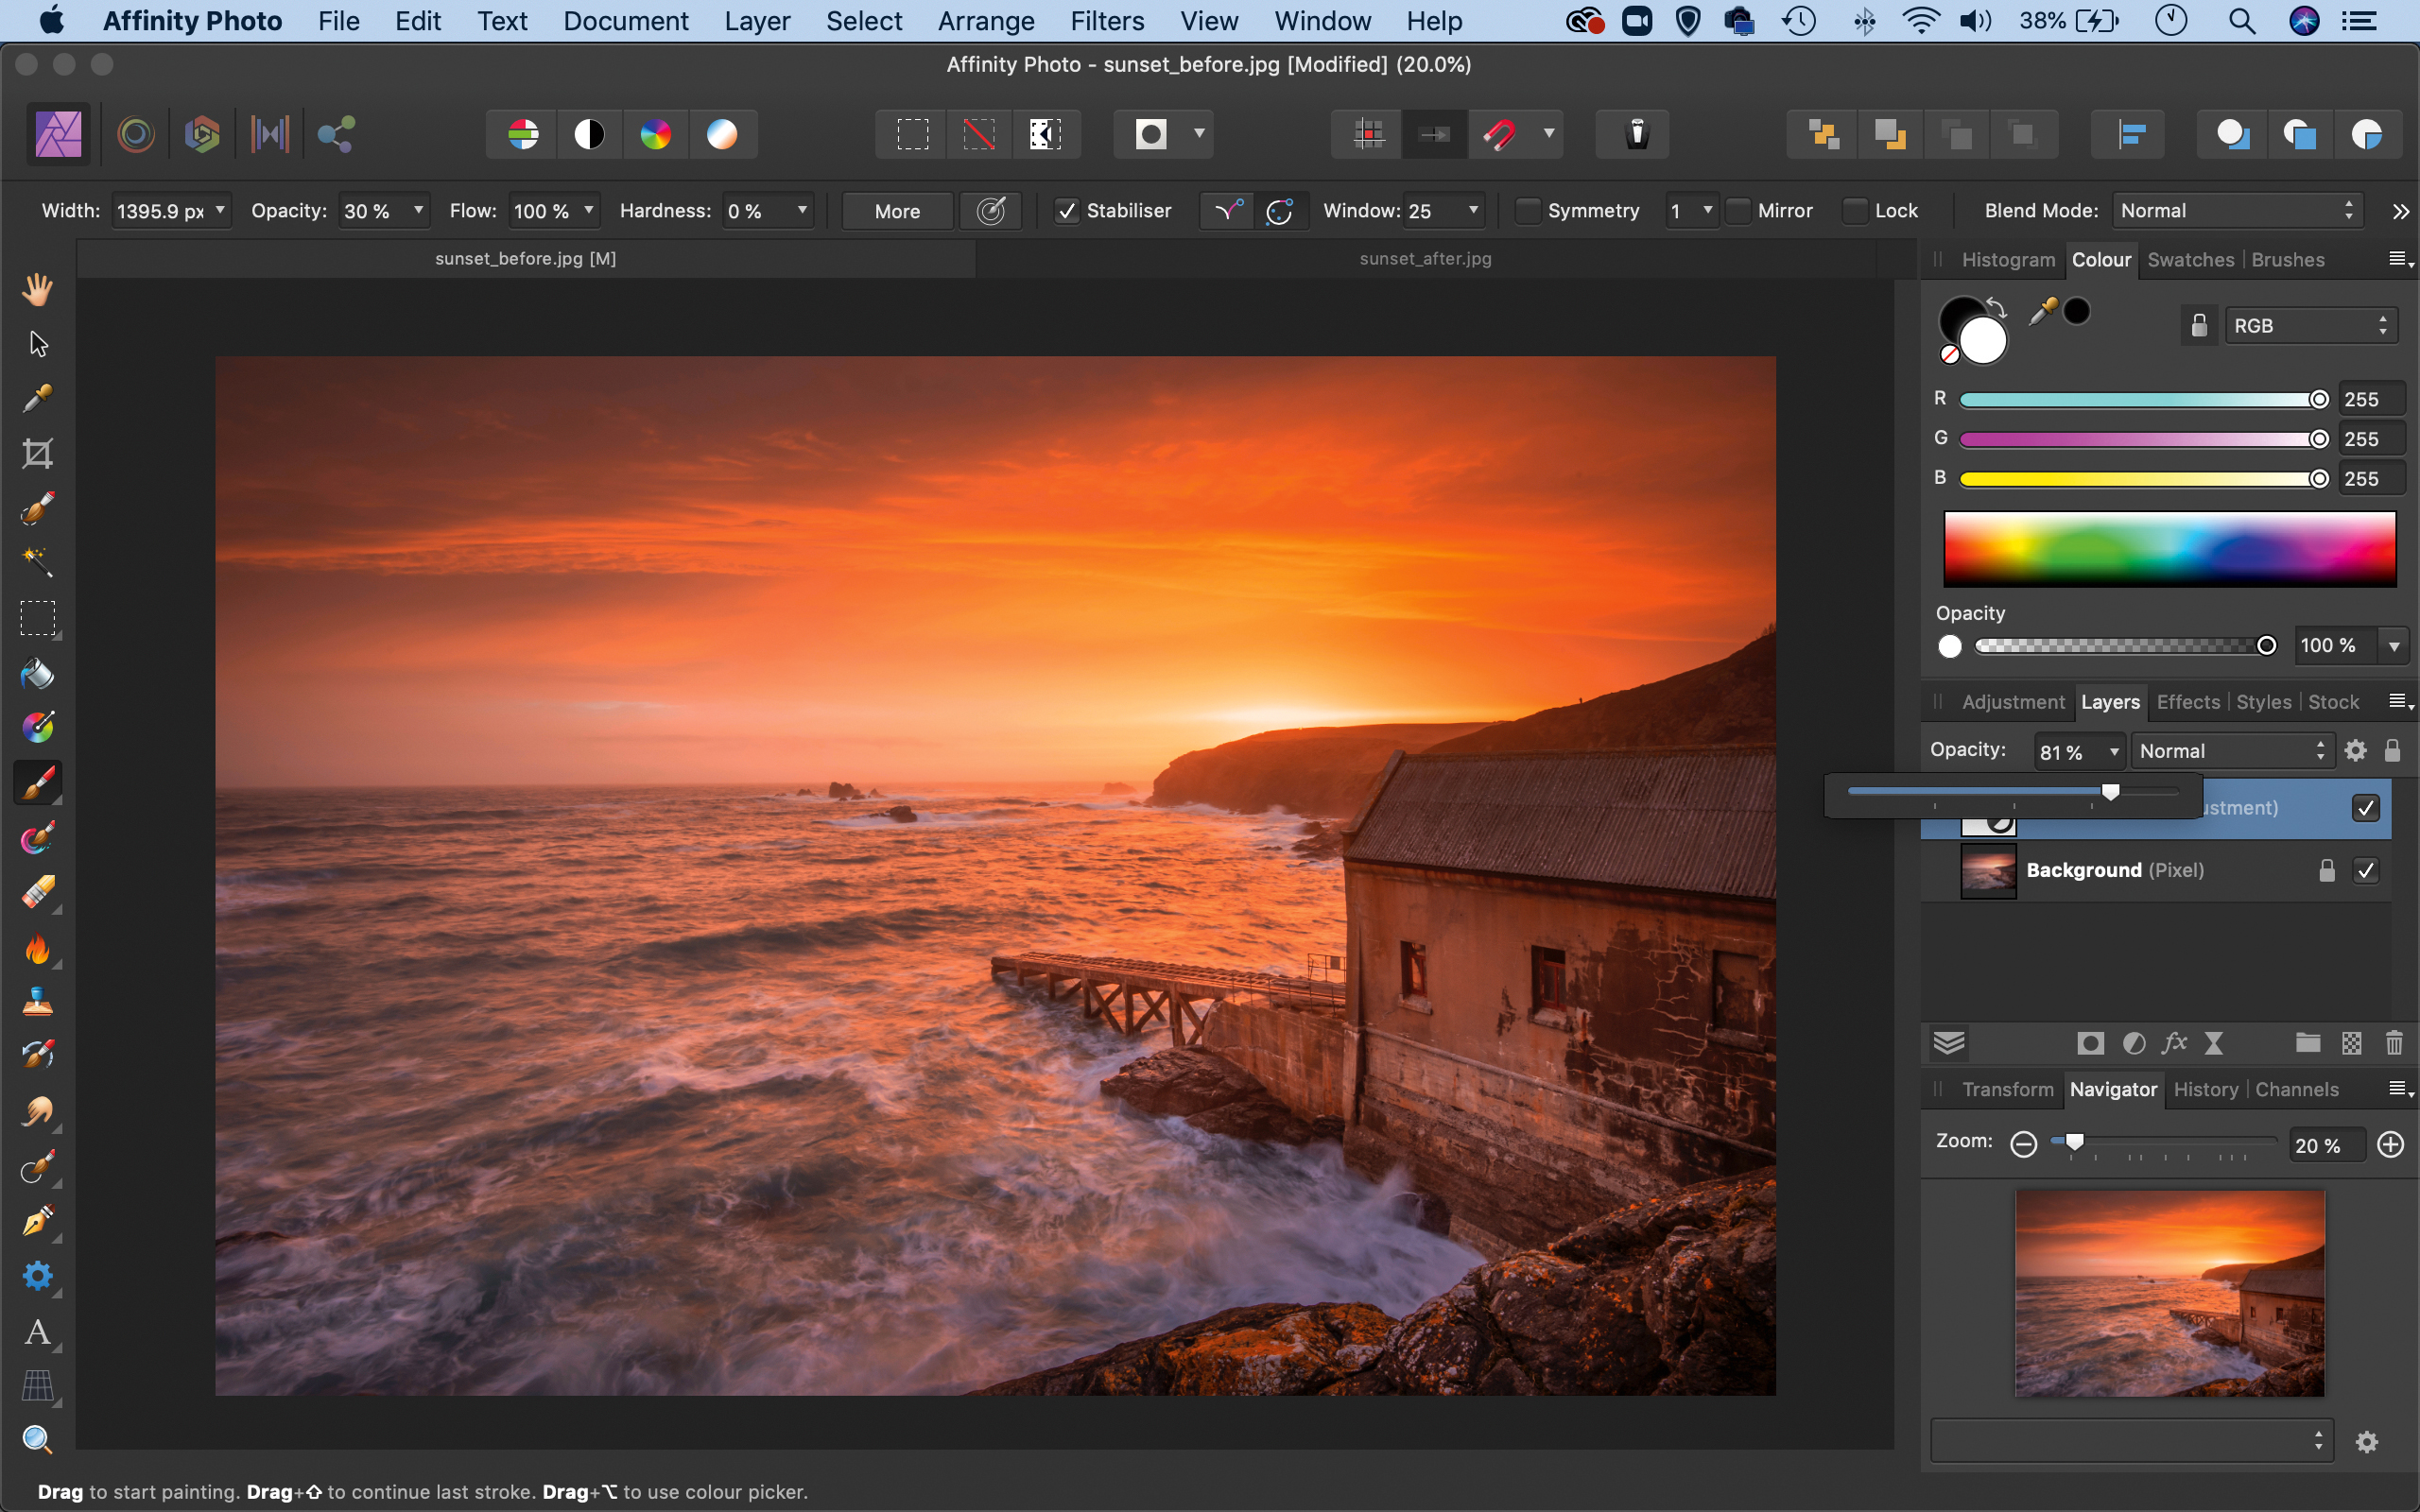
The initial effect is a bit strong, but we can tone it down. Go to the Layers panel and lower the opacity to around 80%. The boost in saturation can cause colours to blow out, resulting in a loss of detail. We can tone it down with a mask. Click the Layer Mask icon in the Layers panel.
Step 4: Tone down the clouds
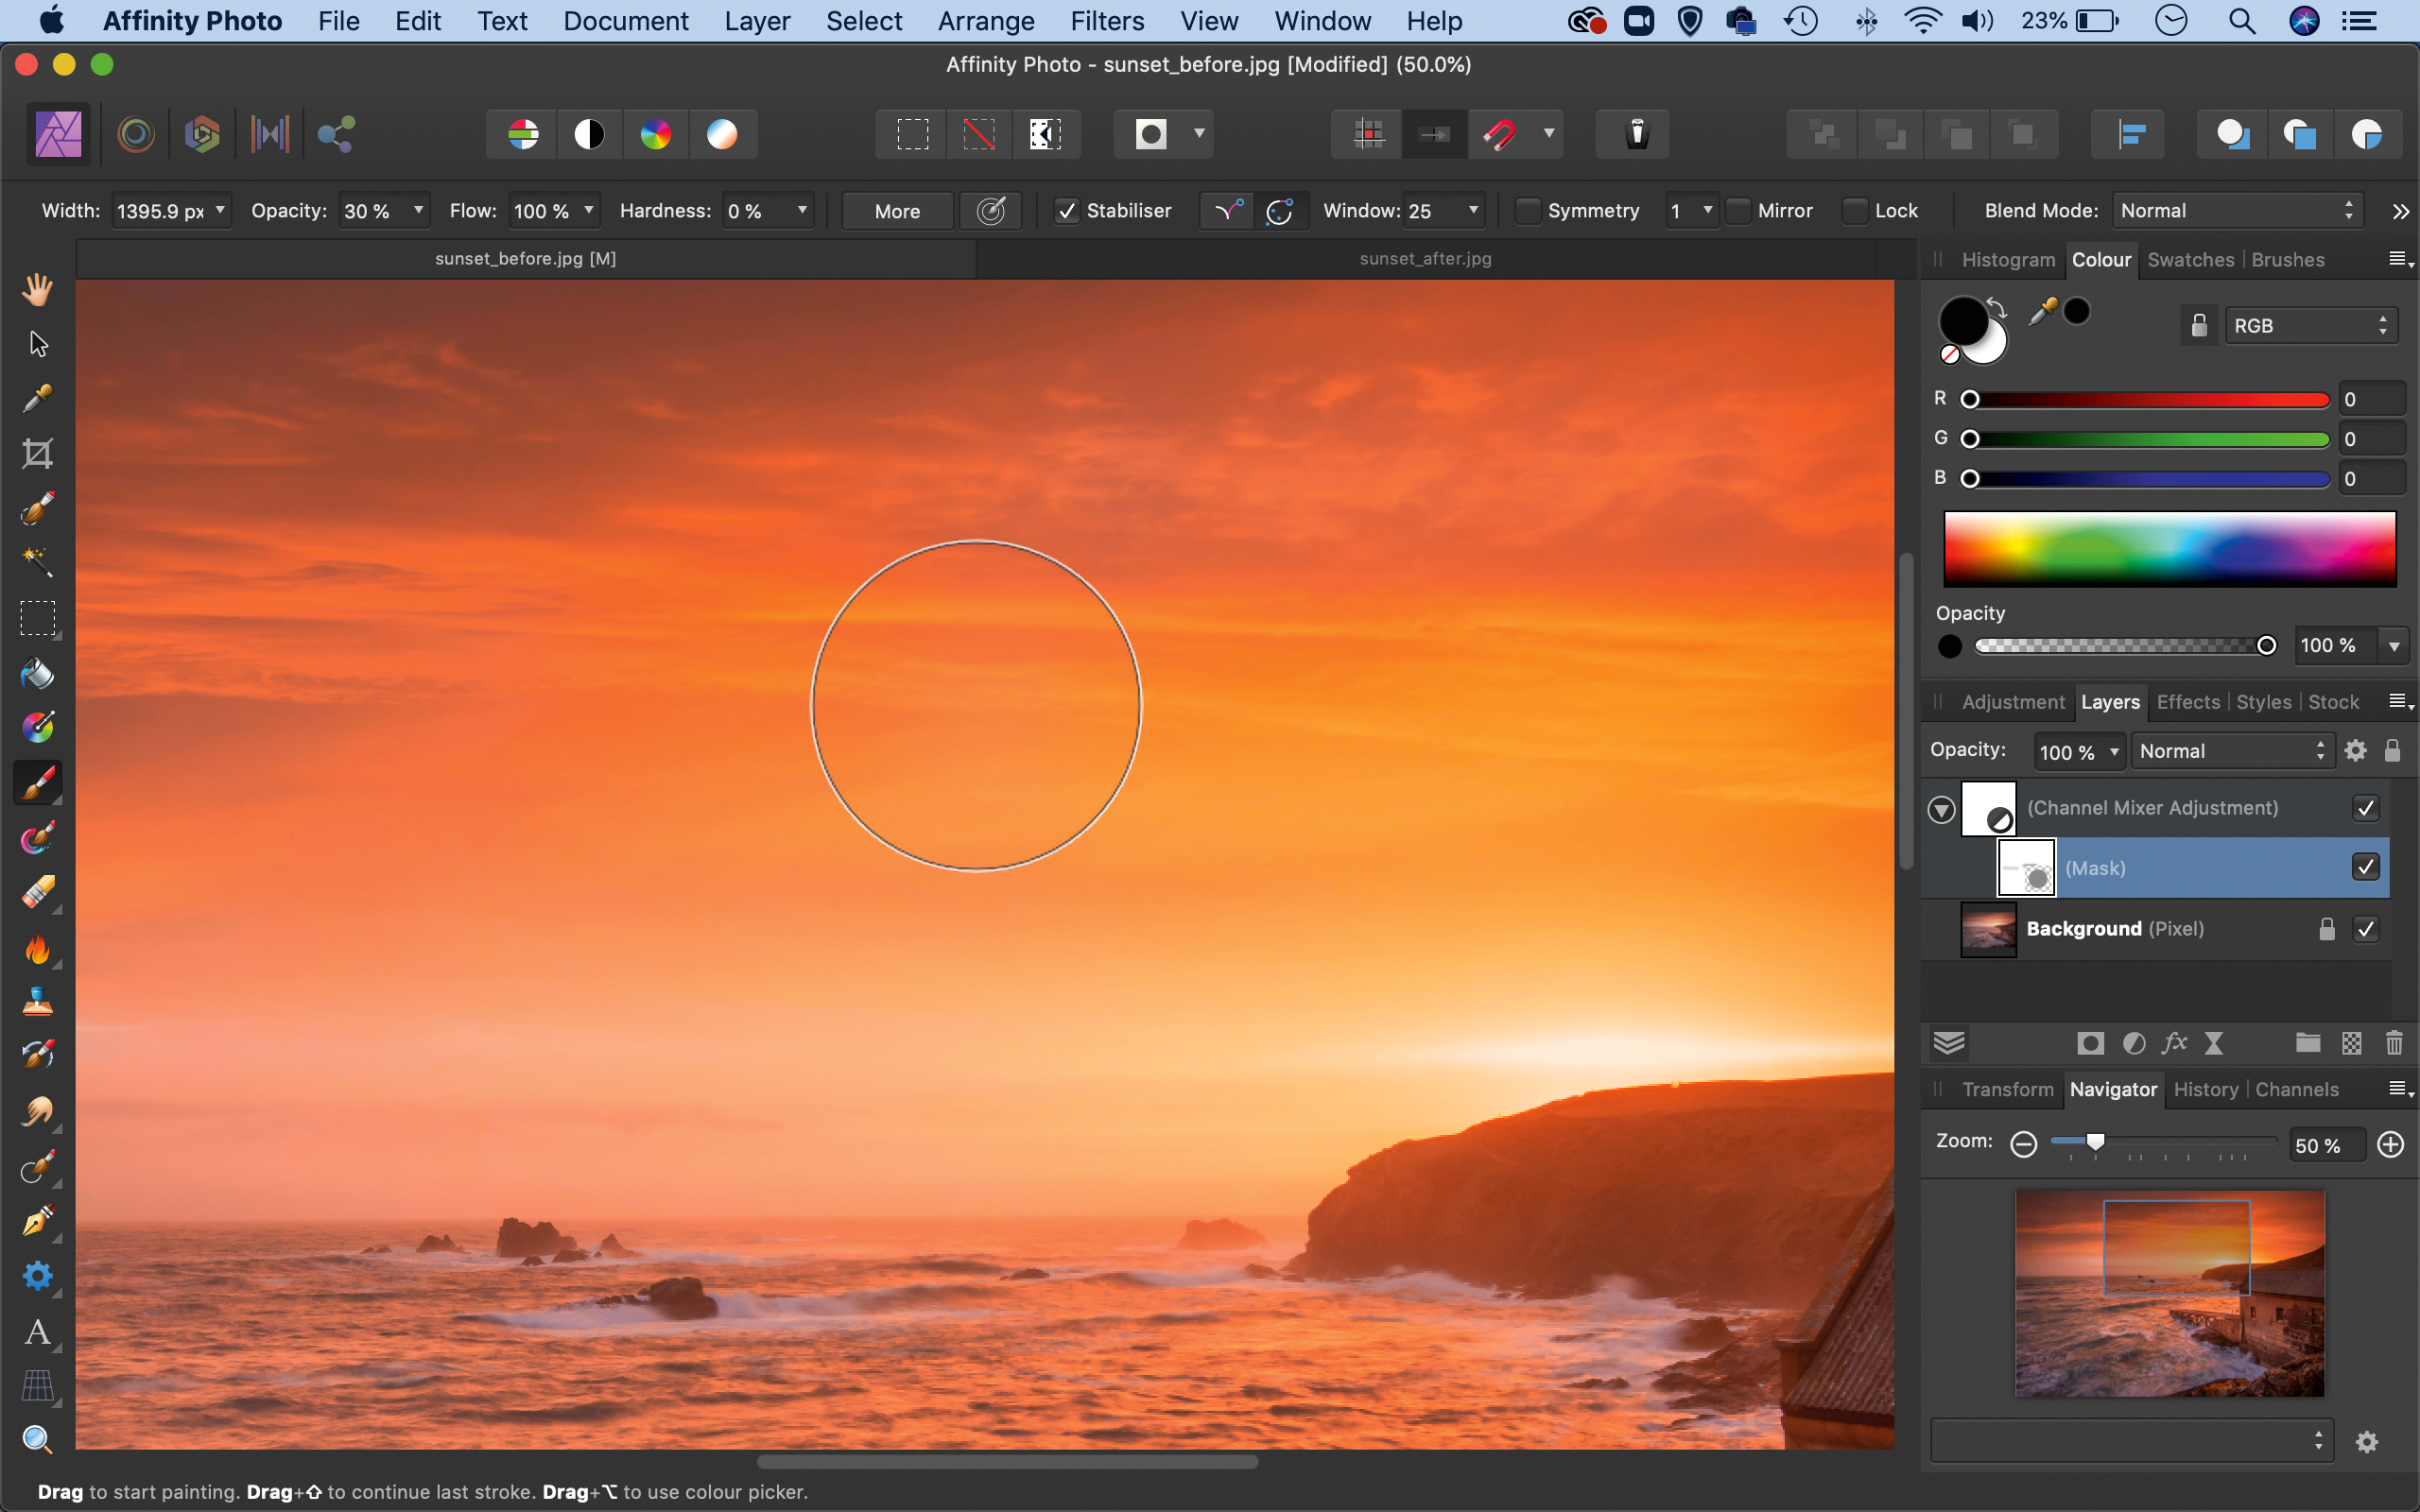
Next, grab the Brush tool from the toolbar (or hit B), then press D to set the primary colour to black, and press 3 to set the brush opacity to 30%. Zoom in to the clouds and then paint to selectively hide the effect in parts where it works too strongly over the colours. Use the ] and [ keys to resize your brush tip as you paint.
Step 5: Boost the waves
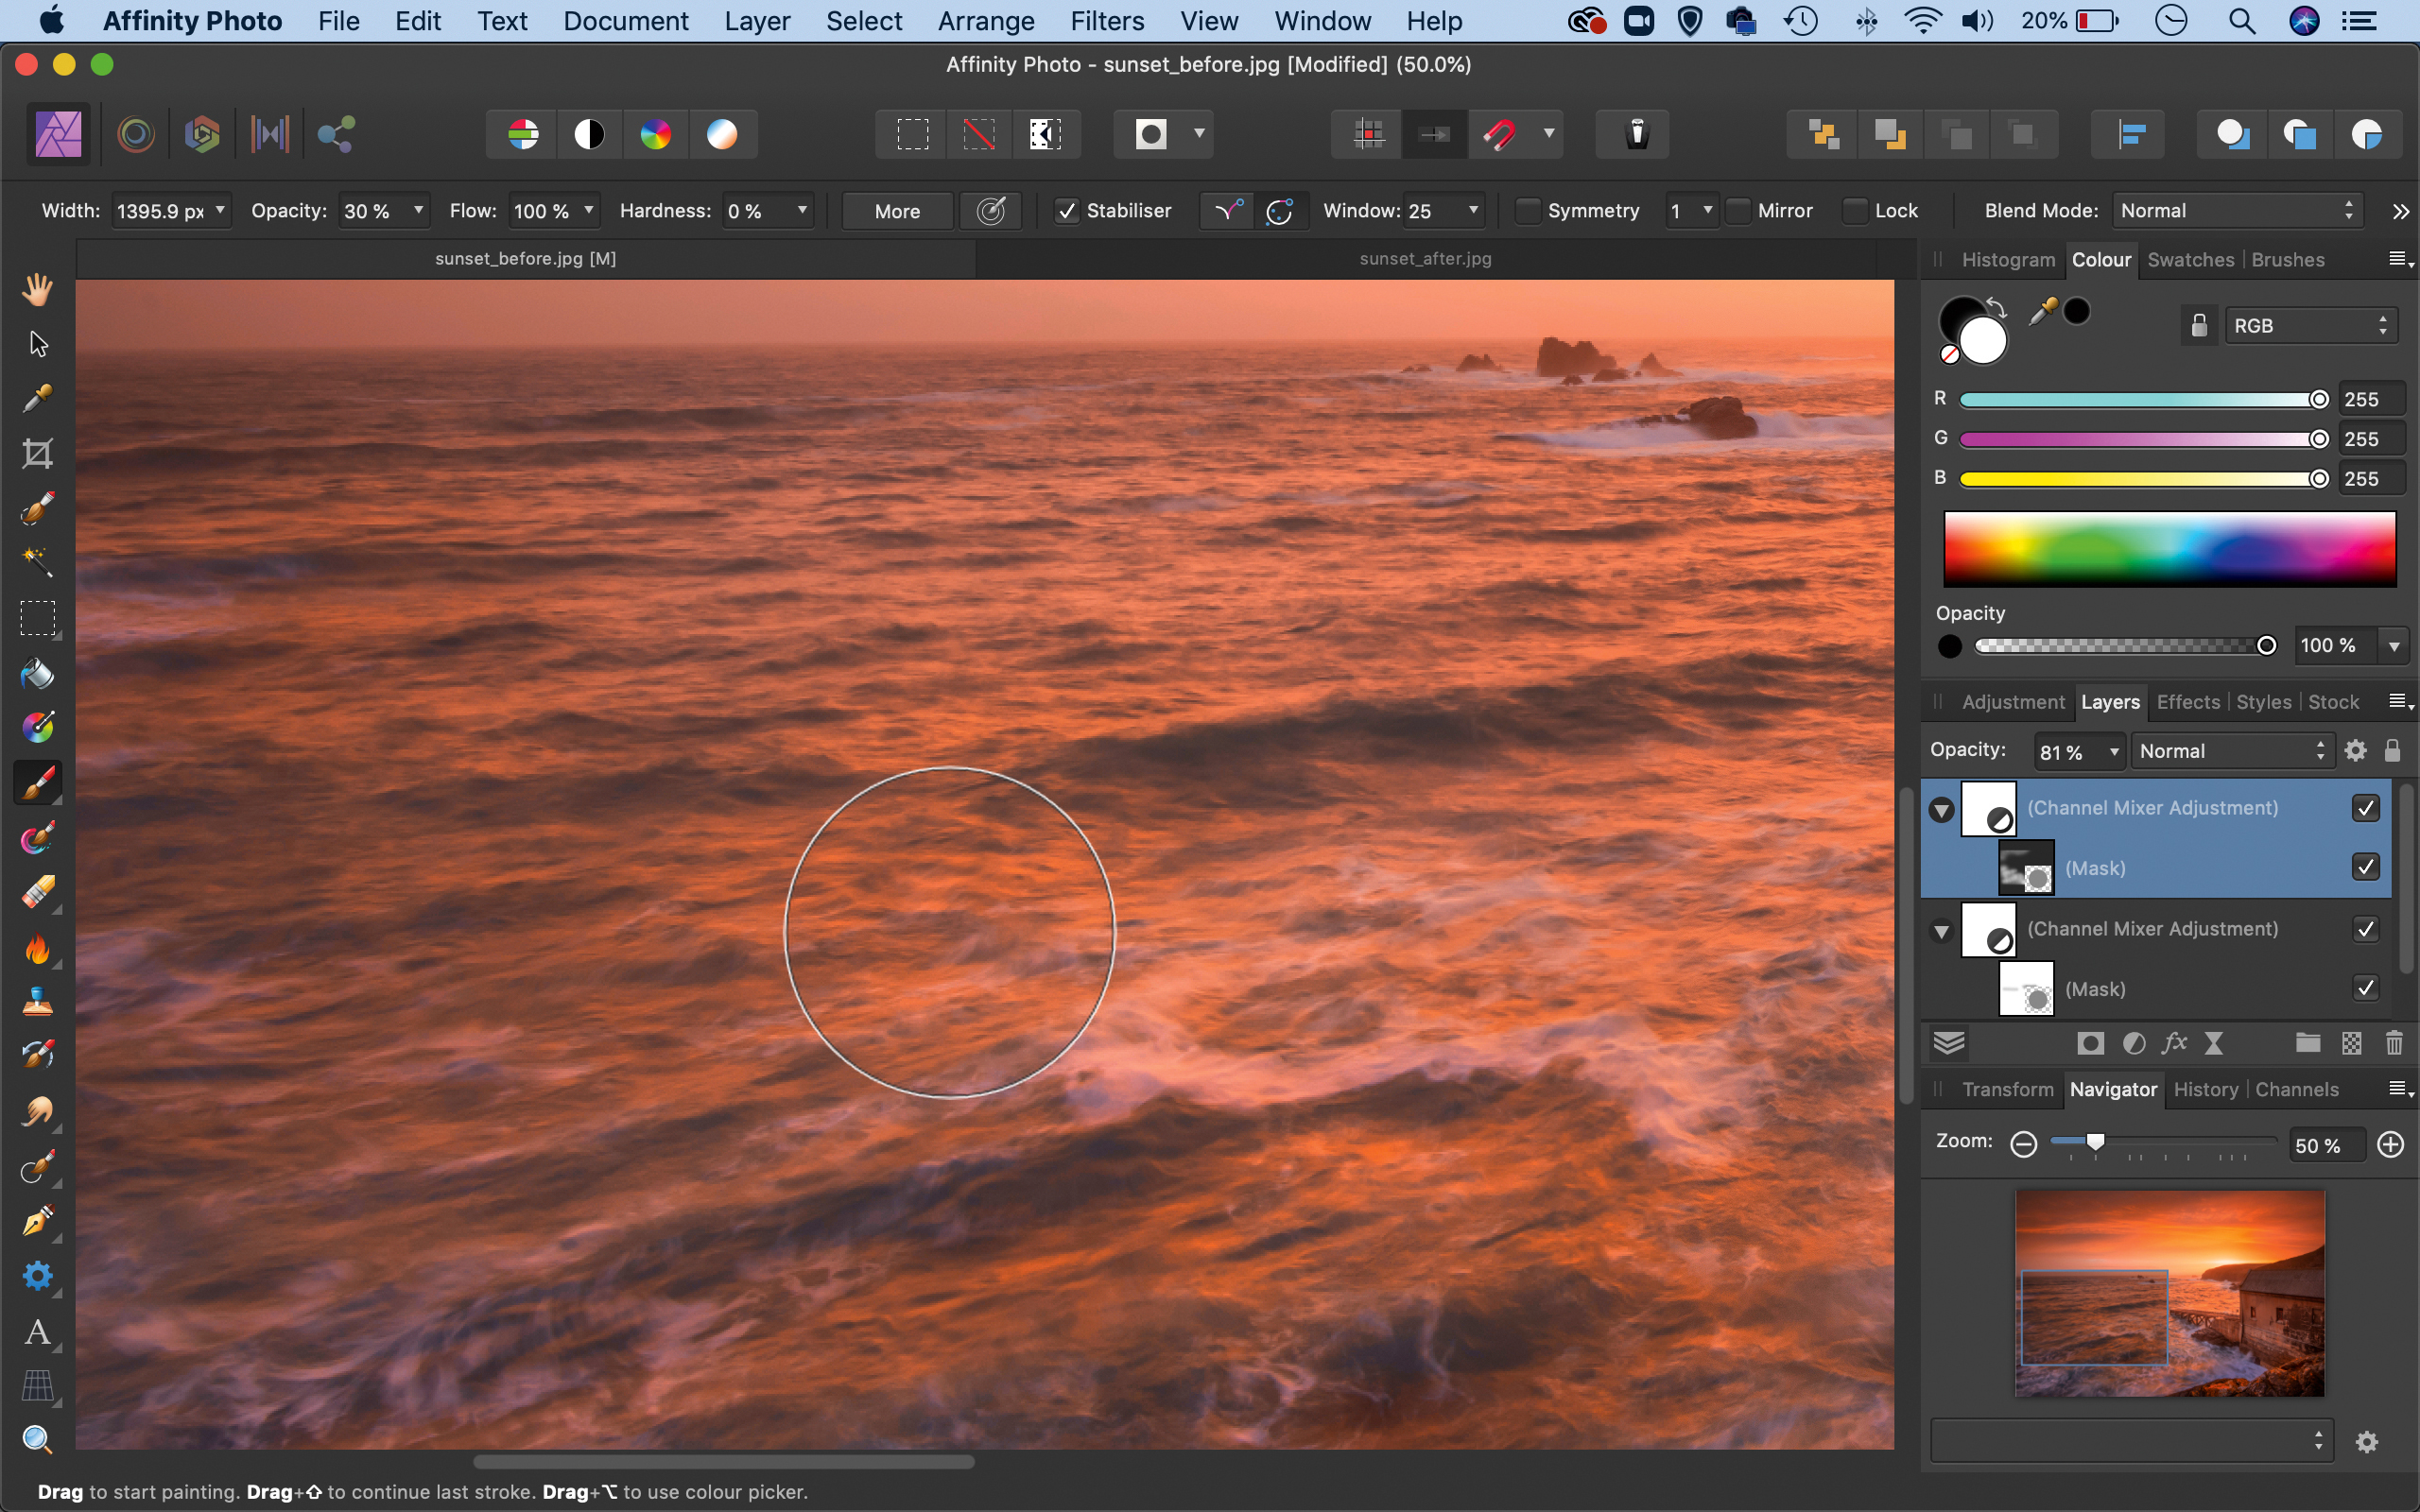
We’d like the colours to be slightly bolder over the water. We can duplicate the Channel Mixer layer with Cmd/Ctrl+J, then right-click the layer mask and Delete. Next, hold Alt and click the Layer Mask icon to add a full mask instead. This time, switch the primary colour to white and paint to reveal the effect over the waves.
Step 6: Make a preset
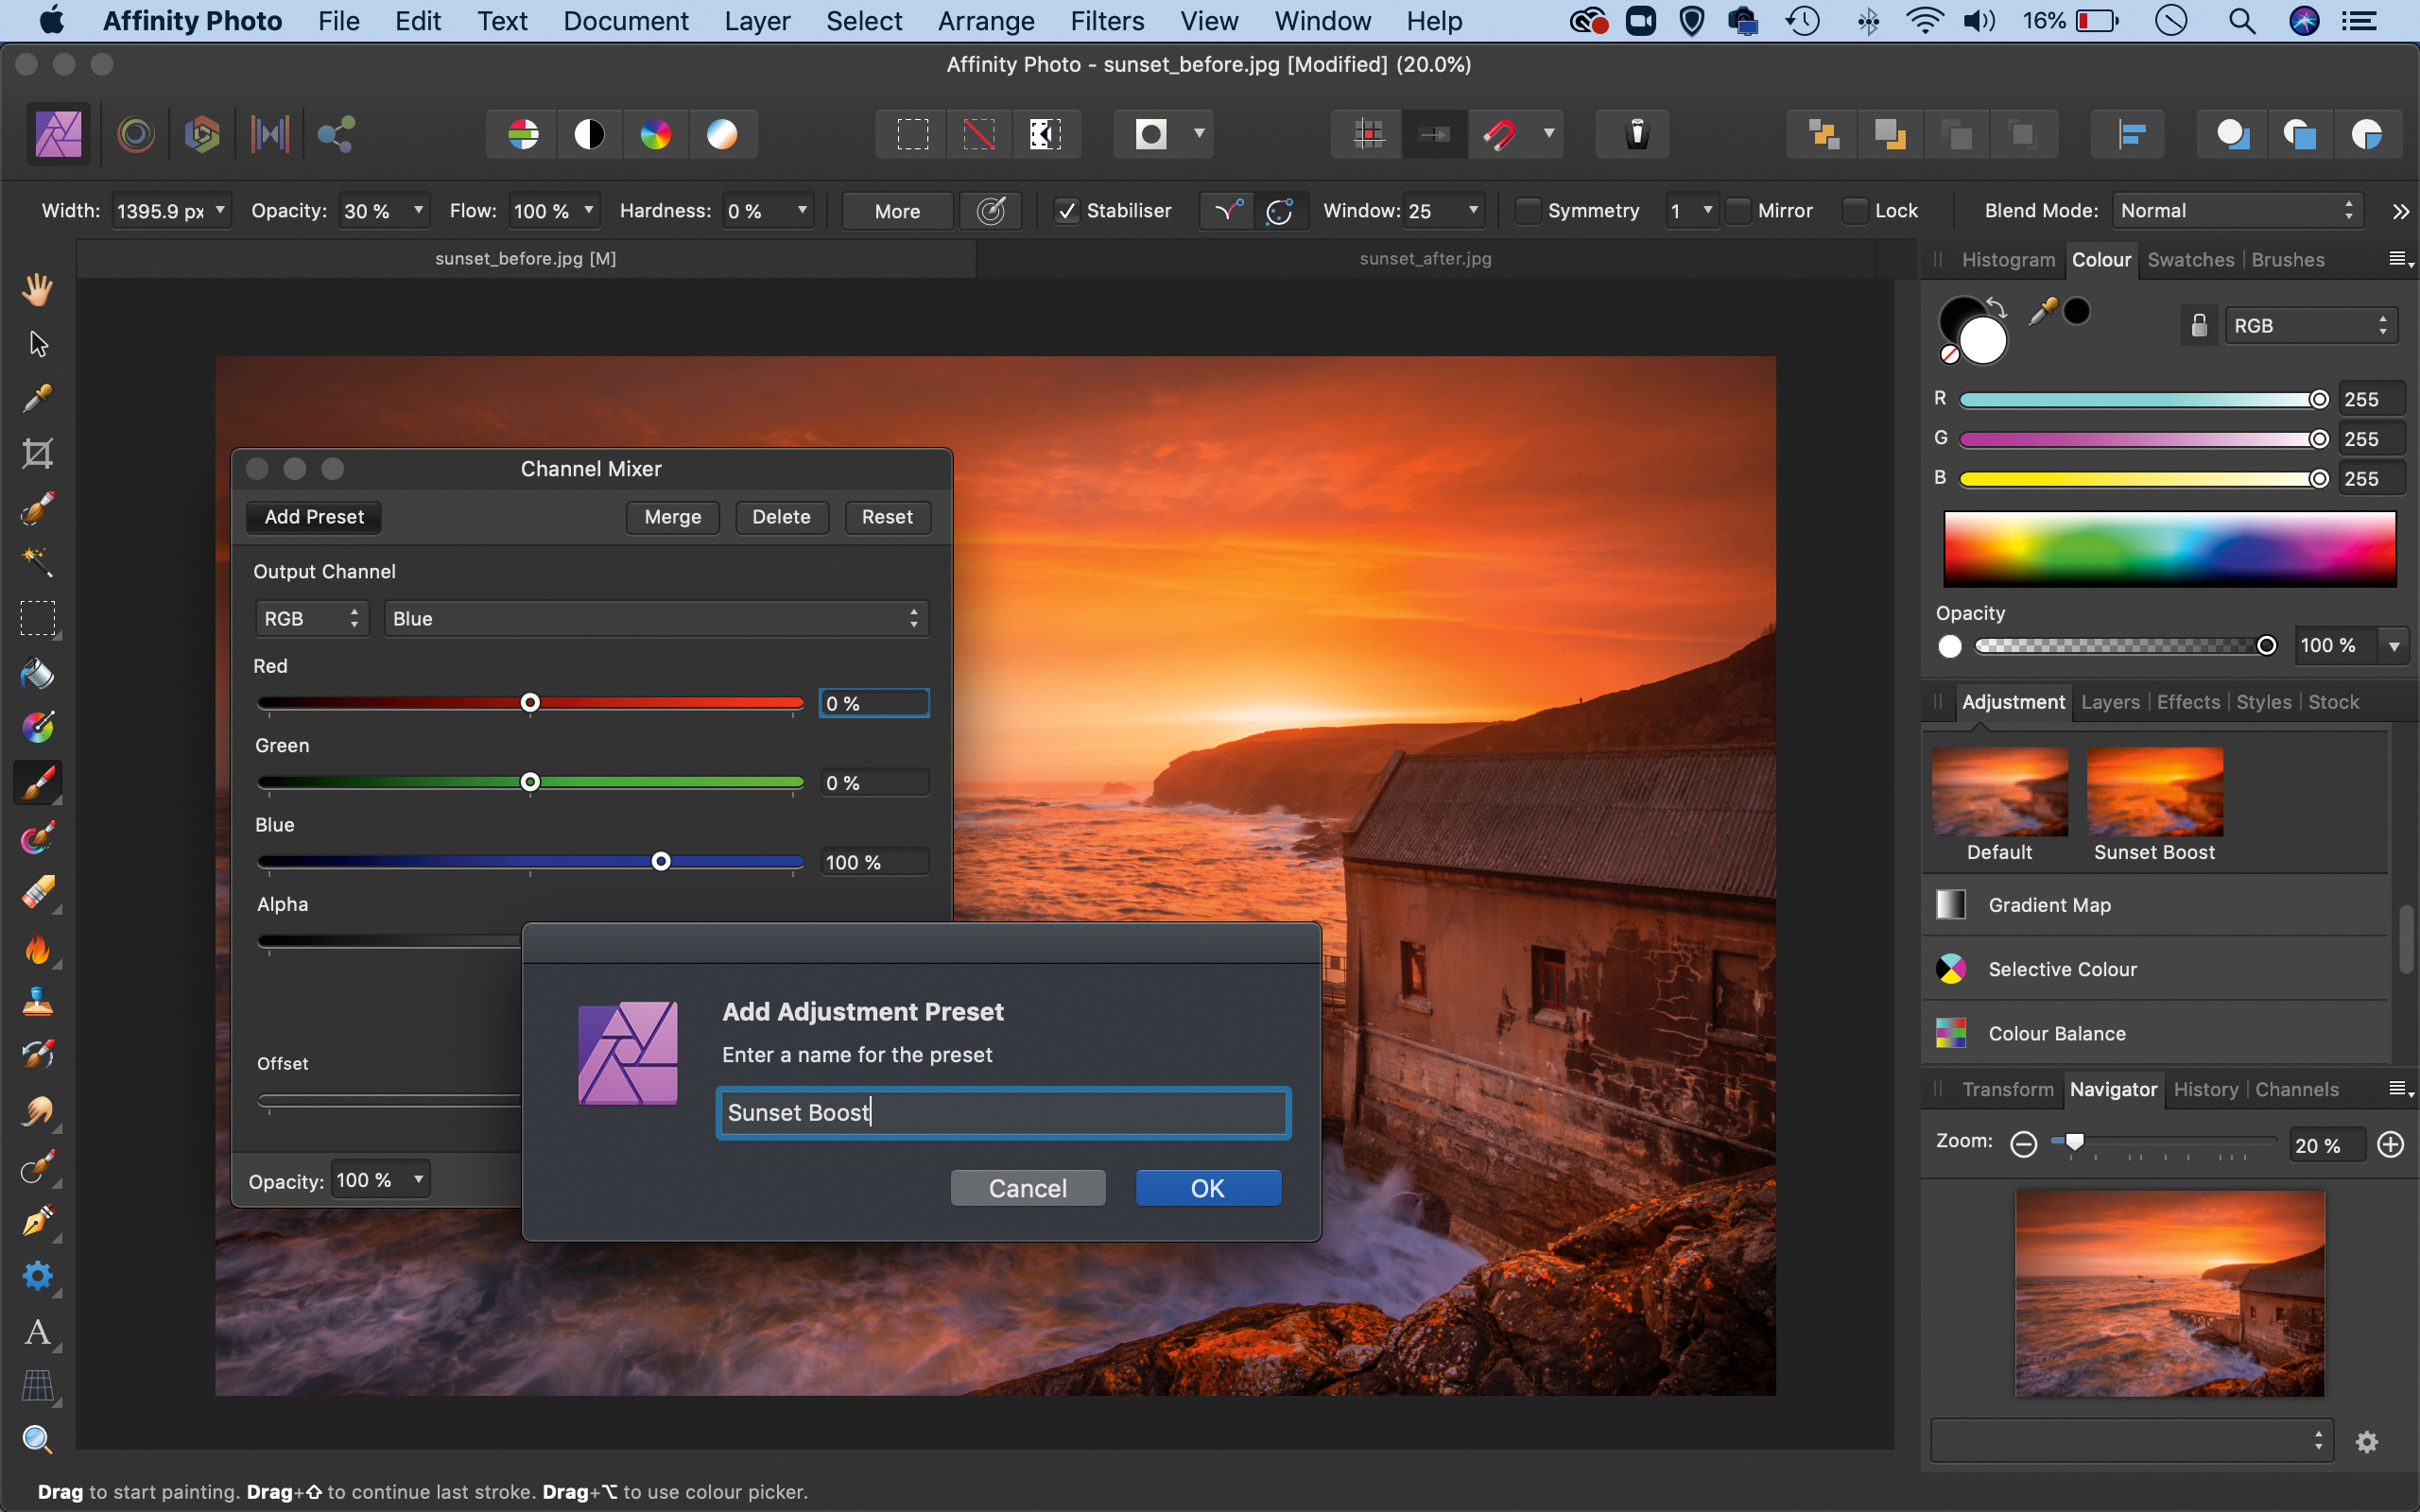
Double-click the thumbnail on either of your Channel Mixer layers to re-enter the settings. Click the Add Preset button at the top and give your preset a name. Click OK. You’ll find your saved preset in the Adjustment Panel under Channel Mixer, ready to be used again.
Quick tip
One method of making local enhancements to specific areas is with adjustment layers and masks. An adjustment layer works by affecting all the layers below it. It also gives the freedom to add a layer mask; we can then paint with black over the image to hide the effect in areas, or fill the mask with black to completely hide it, then paint white to reveal the boost in areas we want.
About N-Photo magazine
This tutorial originally appeared in N-Photo, the monthly newsstand magazine for Nikon photographers. Why not subscribe to a print edition, and have the magazine delivered direct to your door every month?
Alternatively, we have a number of different digital options available, including:
• Apple app (for iPad or iPhone)
• Zinio app (multi-platform app for desktop or smartphone)
• PocketMags (multi-platform app ideal for Android devices)
• Readly (all-you-can-eat digital magazine subscription service)
If you wanted a printed version of any of our most recent issues we have a selection of back issues to choose from in our online store.
Read more:
• Photography tips and tutorial videos
• The best photo editing tools and accessories
• The best desktop computers for photo editing
• The best photo-editing laptops right now
• The best photo editing software today
Get the Digital Camera World Newsletter
The best camera deals, reviews, product advice, and unmissable photography news, direct to your inbox!
N-Photo: The Nikon Magazine is a monthly publication that's entirely dedicated to Nikon users. As a 100% independent magazine, you can be assured of unbiased opinion from a trustworthy team of devoted photography experts including editor Adam Waring and Deputy Editor Mike Harris.
Aimed at all users, from camera newcomers to working pros, every issue is packed with practical, Nikon-specific advice for taking better photos, in-depth reviews of Nikon-compatible gear, and inspiring projects and exciting video lessons for mastering camera, lens and Photoshop techniques.
Written by Nikon users for Nikon users, N-Photo is your one-stop shop for everything to do with cameras, lenses, tripods, bags, tips, tricks and techniques to get the most out of your photography.

