Give models a change of clothes with Affinity Photo's Displace Filter
James Paterson shows how to map a pattern onto clothes and get to grips with Affinity Photo’s powerful Displace filter
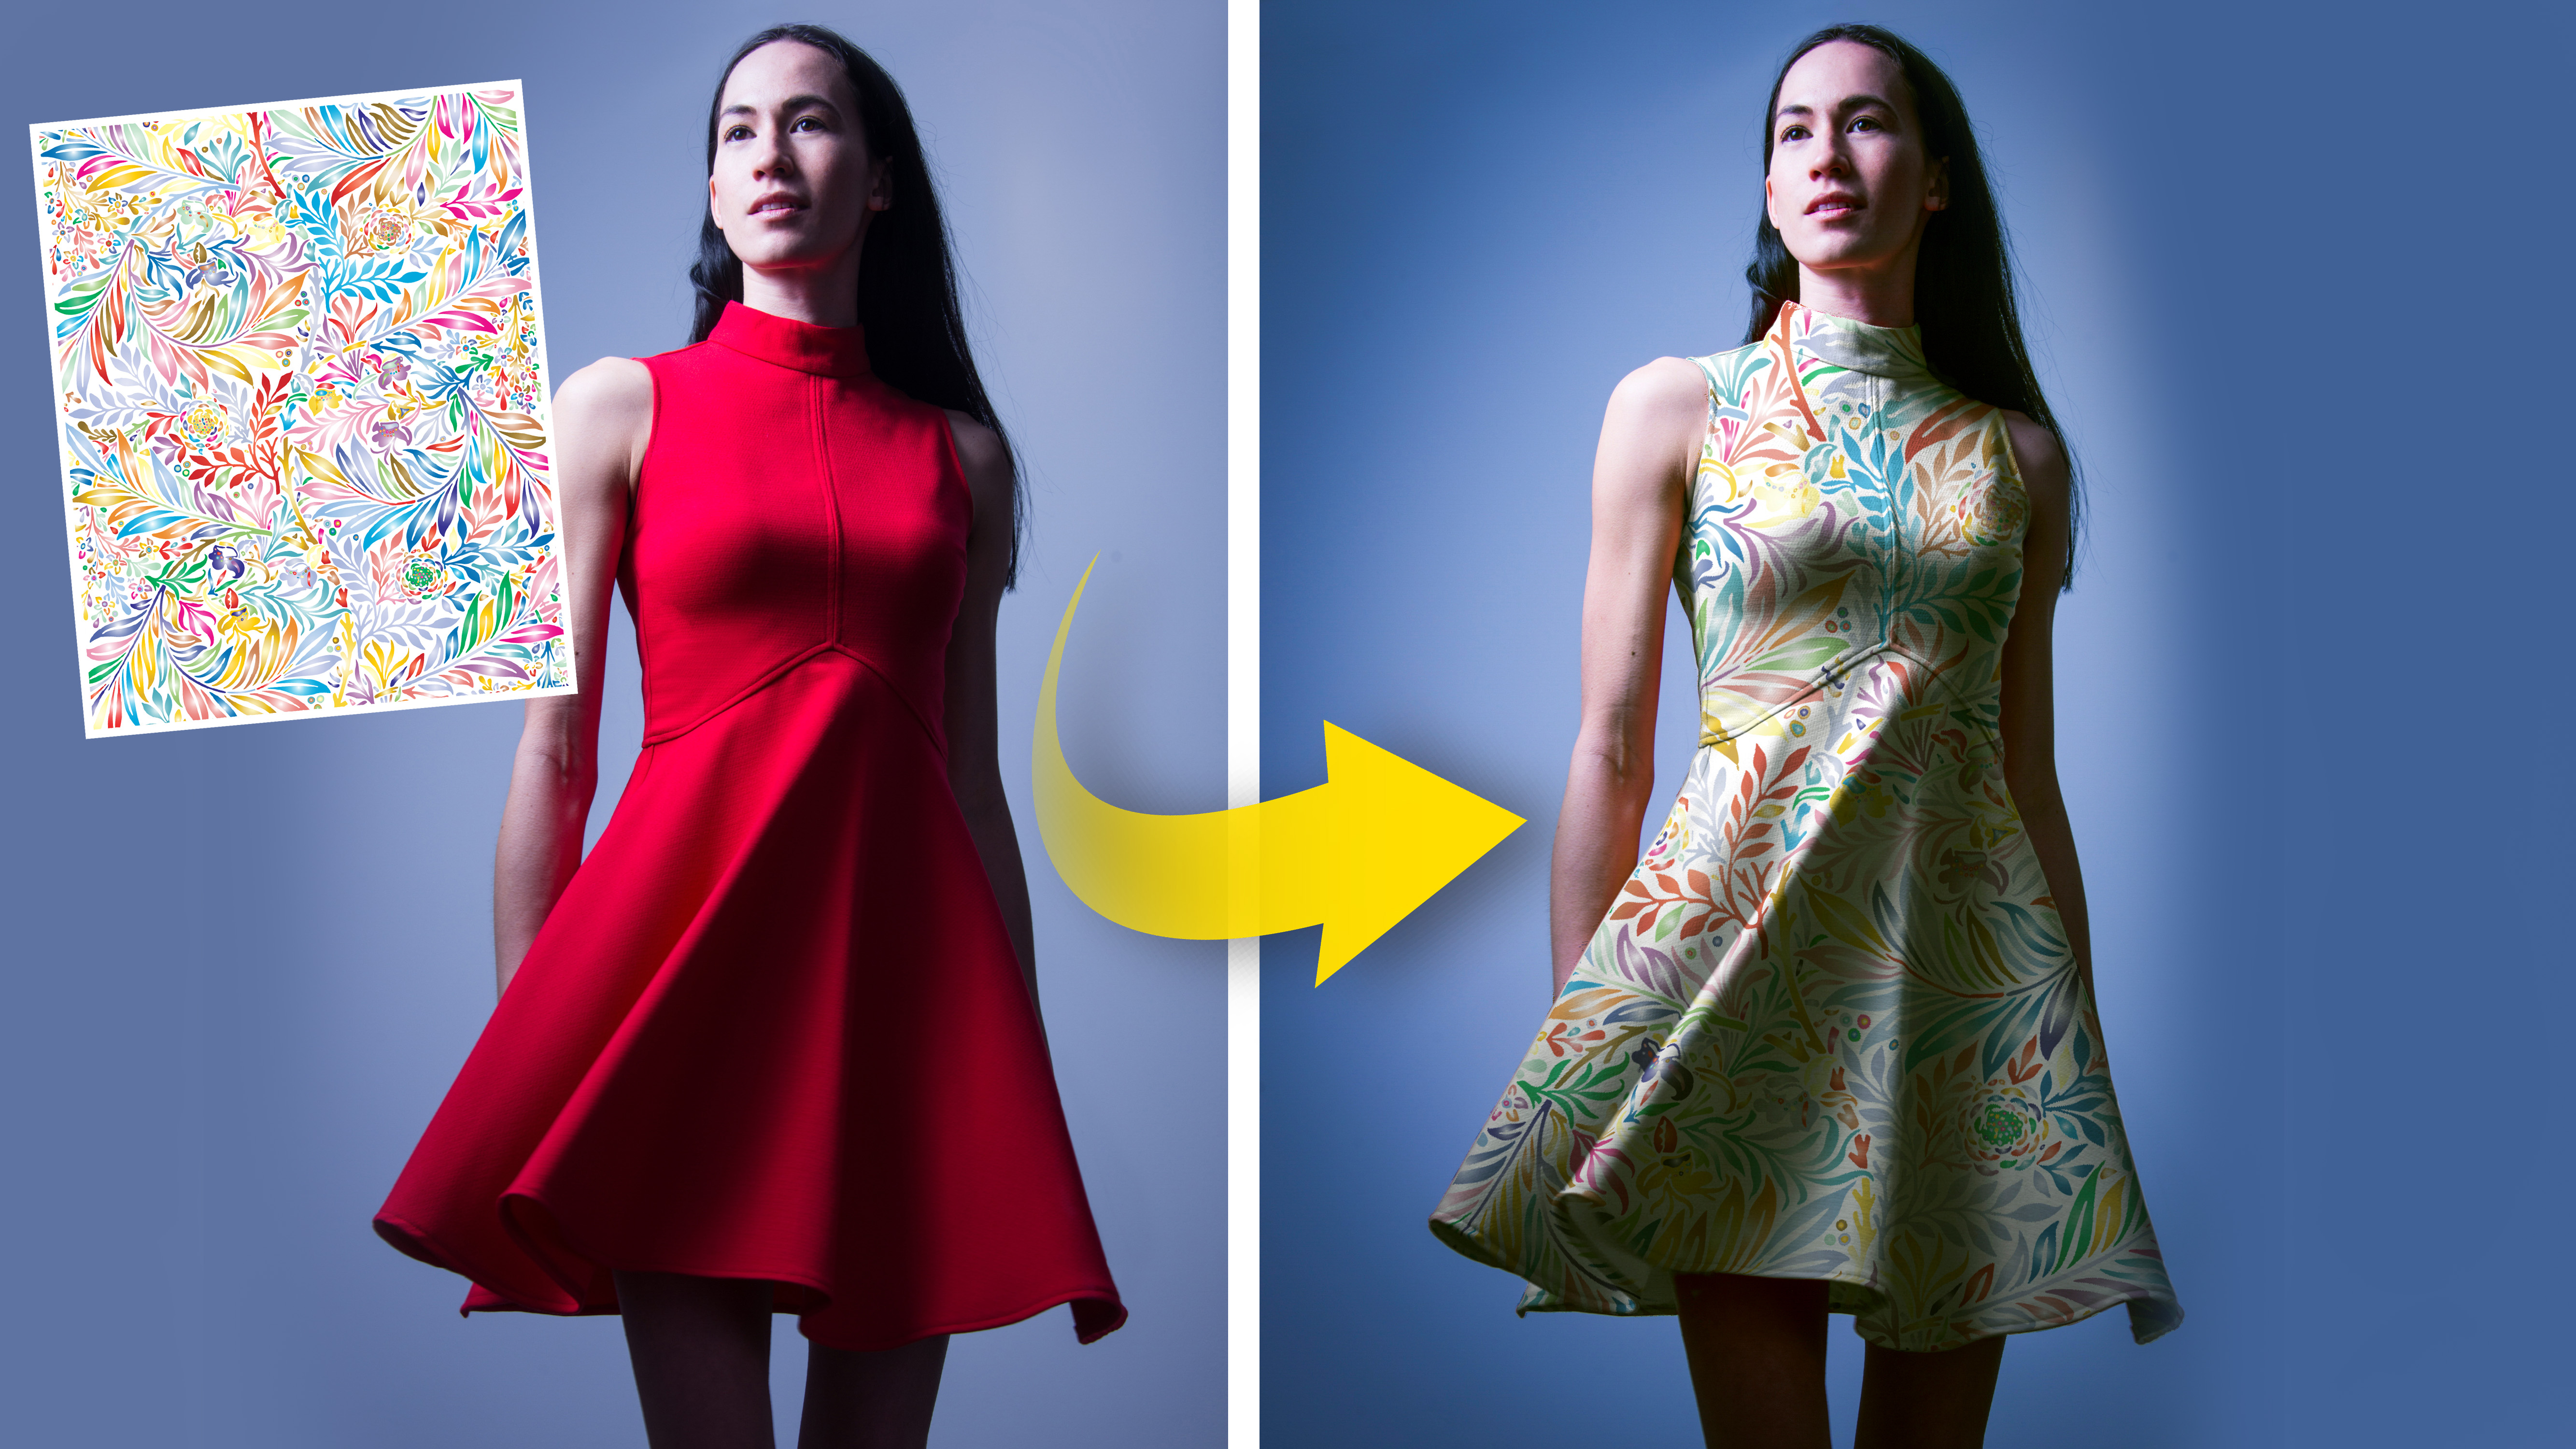
If you want to make composite images by combining photos, or bring in graphics and text, one of the biggest challenges is making it look like the separate elements belong together. Affinity Photo’s Displace filter can be useful in this regard, and here we'll show you how it can be used to change the clothes on a model – really helpful if you've got a whole campaign of clothes and limited time to shoot them.
Download the start image here to follow along with the image-editing tutorial.
Affinity's Displace filter allows you to distort the shape of an image or detail so that it conforms to the shapes on the image underneath, replicating the texture or surface undulations of one image onto another. We've used it to add a pattern to our subject’s dress. The filter skews the pattern so that the leaves look as if they’re curving around the folds in the fabric, rather than just added on top. You can use the same technique to combine all sorts of images in a believable way.
The Displace filter works alongside other fundamental compositing tools like selections and masks. We begin by isolating the dress with a selection, before converting it to a mask then using the mask on our pattern.
The Multiply blend mode allows us to blend the darker parts of the dress with the pattern. As well as the challenge of masking the new pattern to the dress, we also have to fix the reflections on the skin caused by the red of the original dress. We can tone this down using adjustments and masks.
1. Remove the red
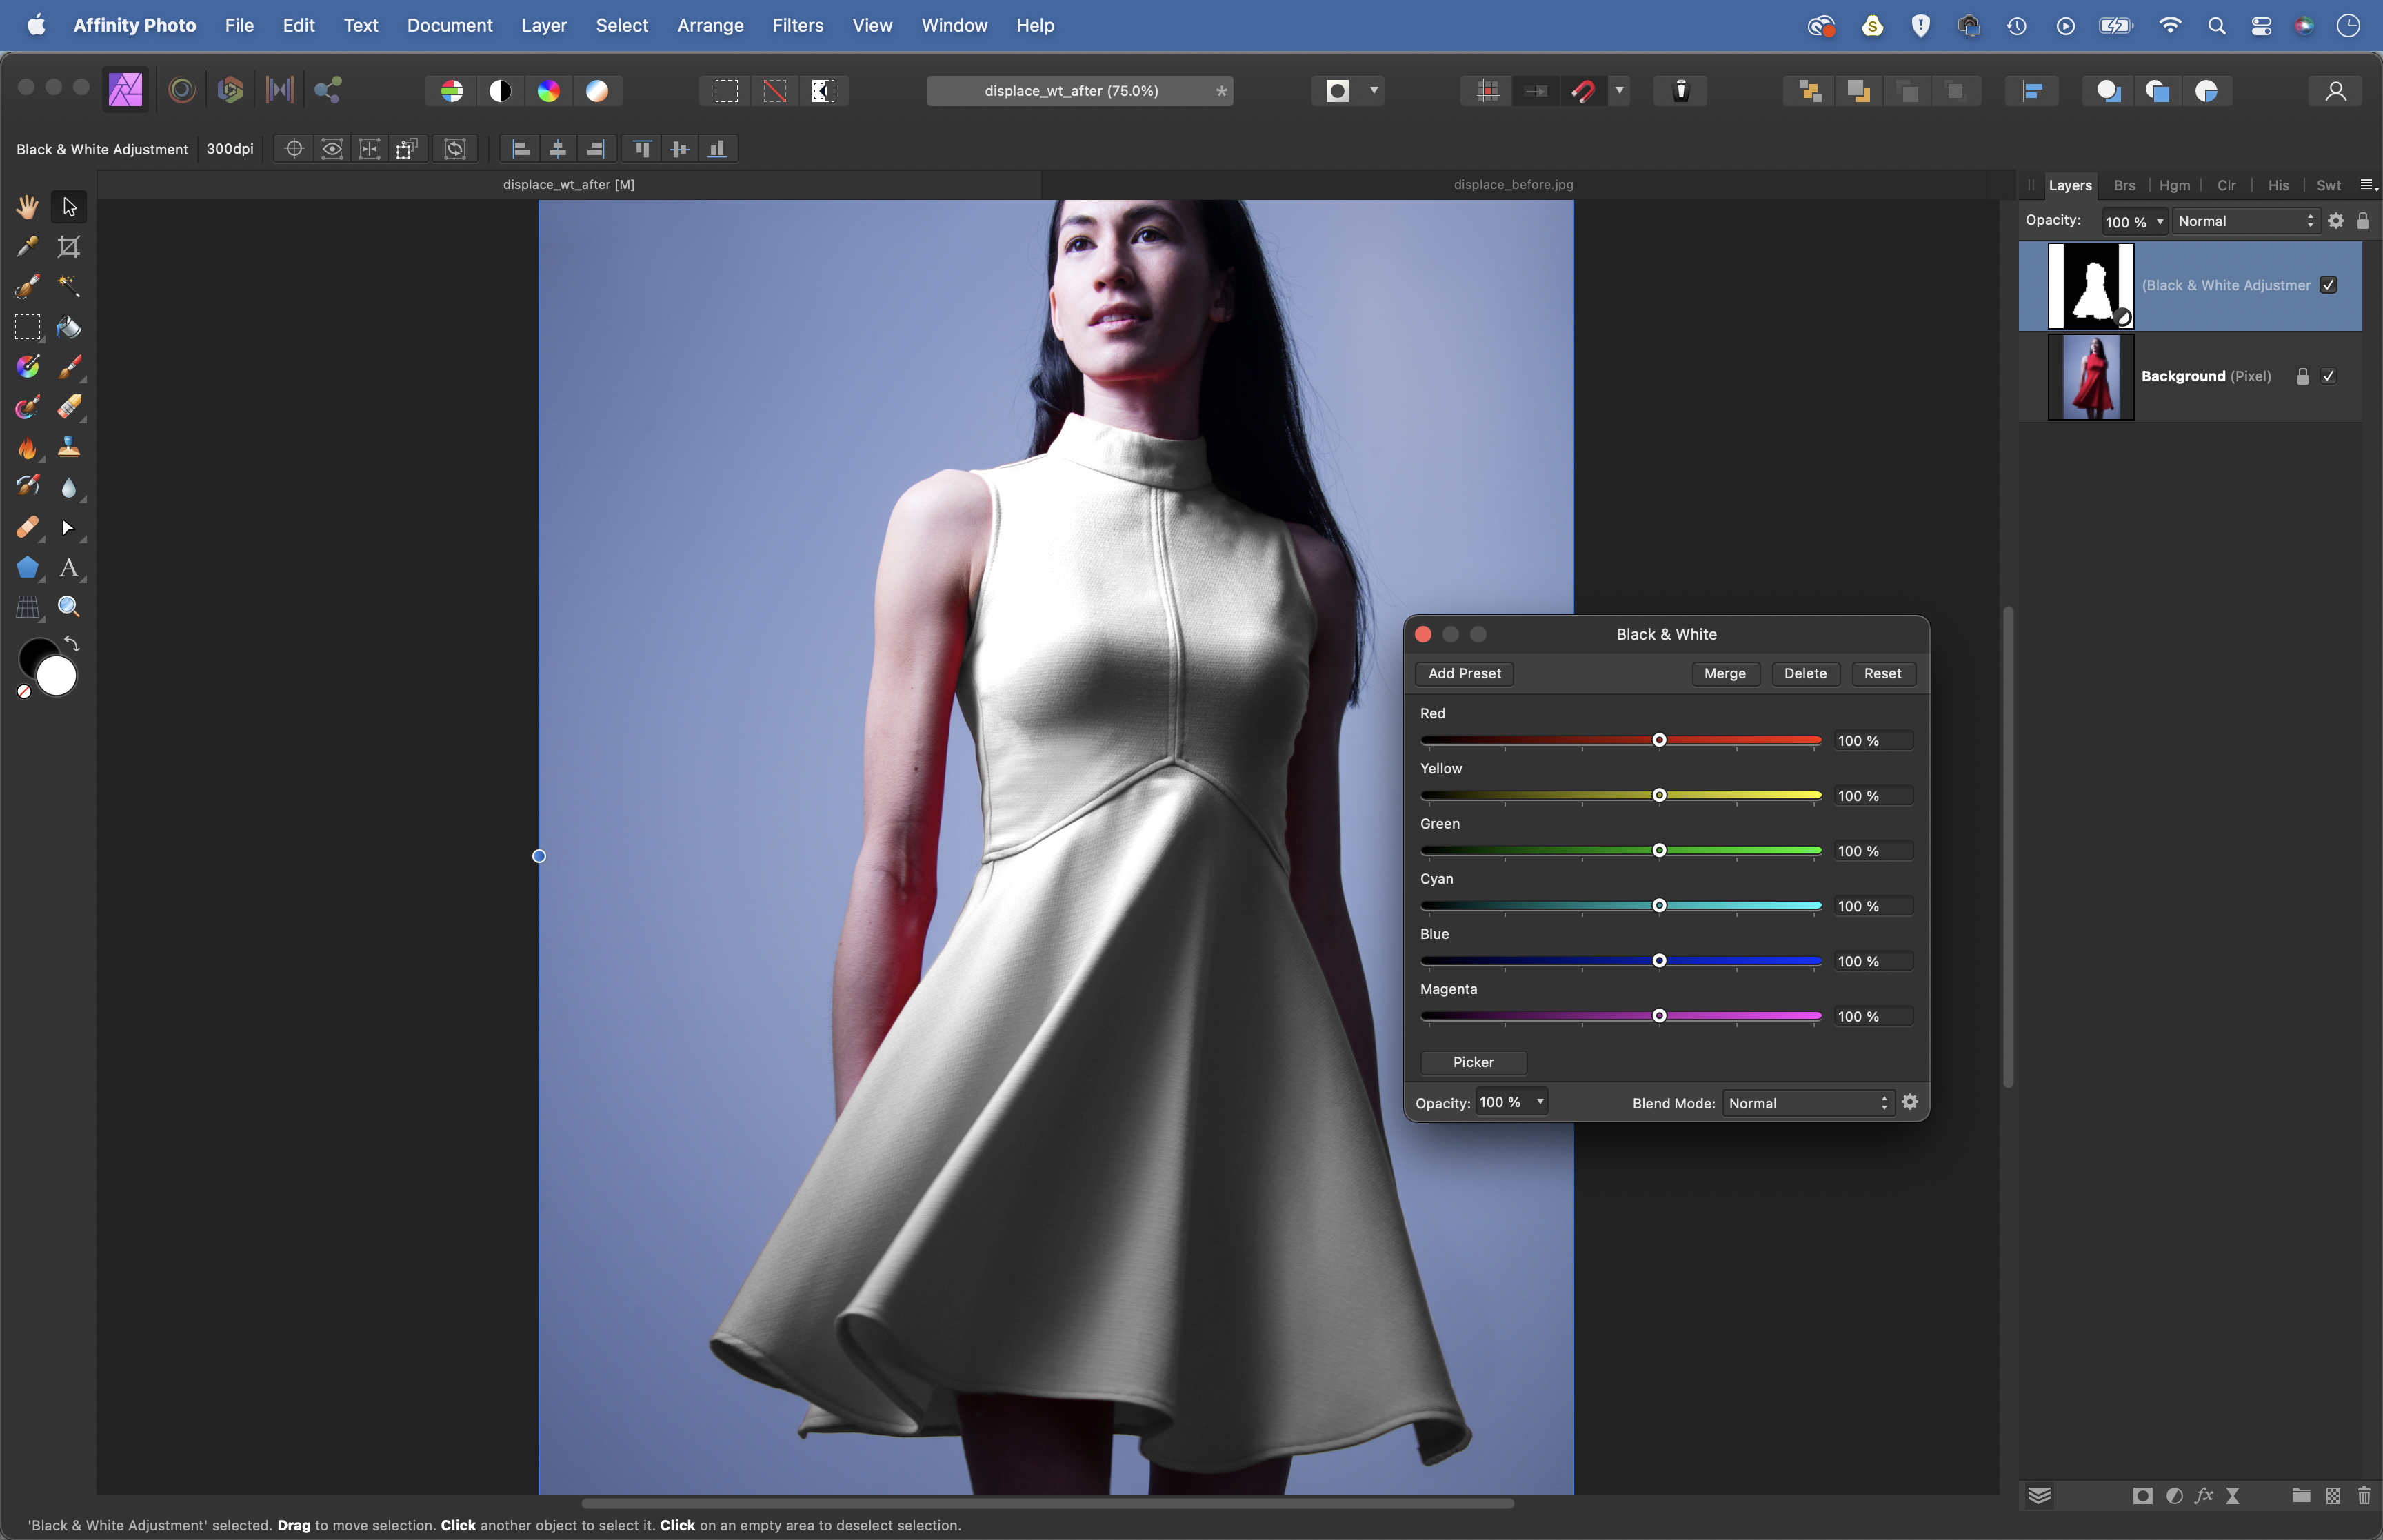
Open the portrait and grab the Selection Brush from the toolbar. Check ‘Snap to Edges’ in the options then paint to select the dress (hold Alt and paint if it goes wrong). Click the Adjustment icon in the Layers panel and choose Black and White. This will convert the selection to a mask.
2. Paste the pattern
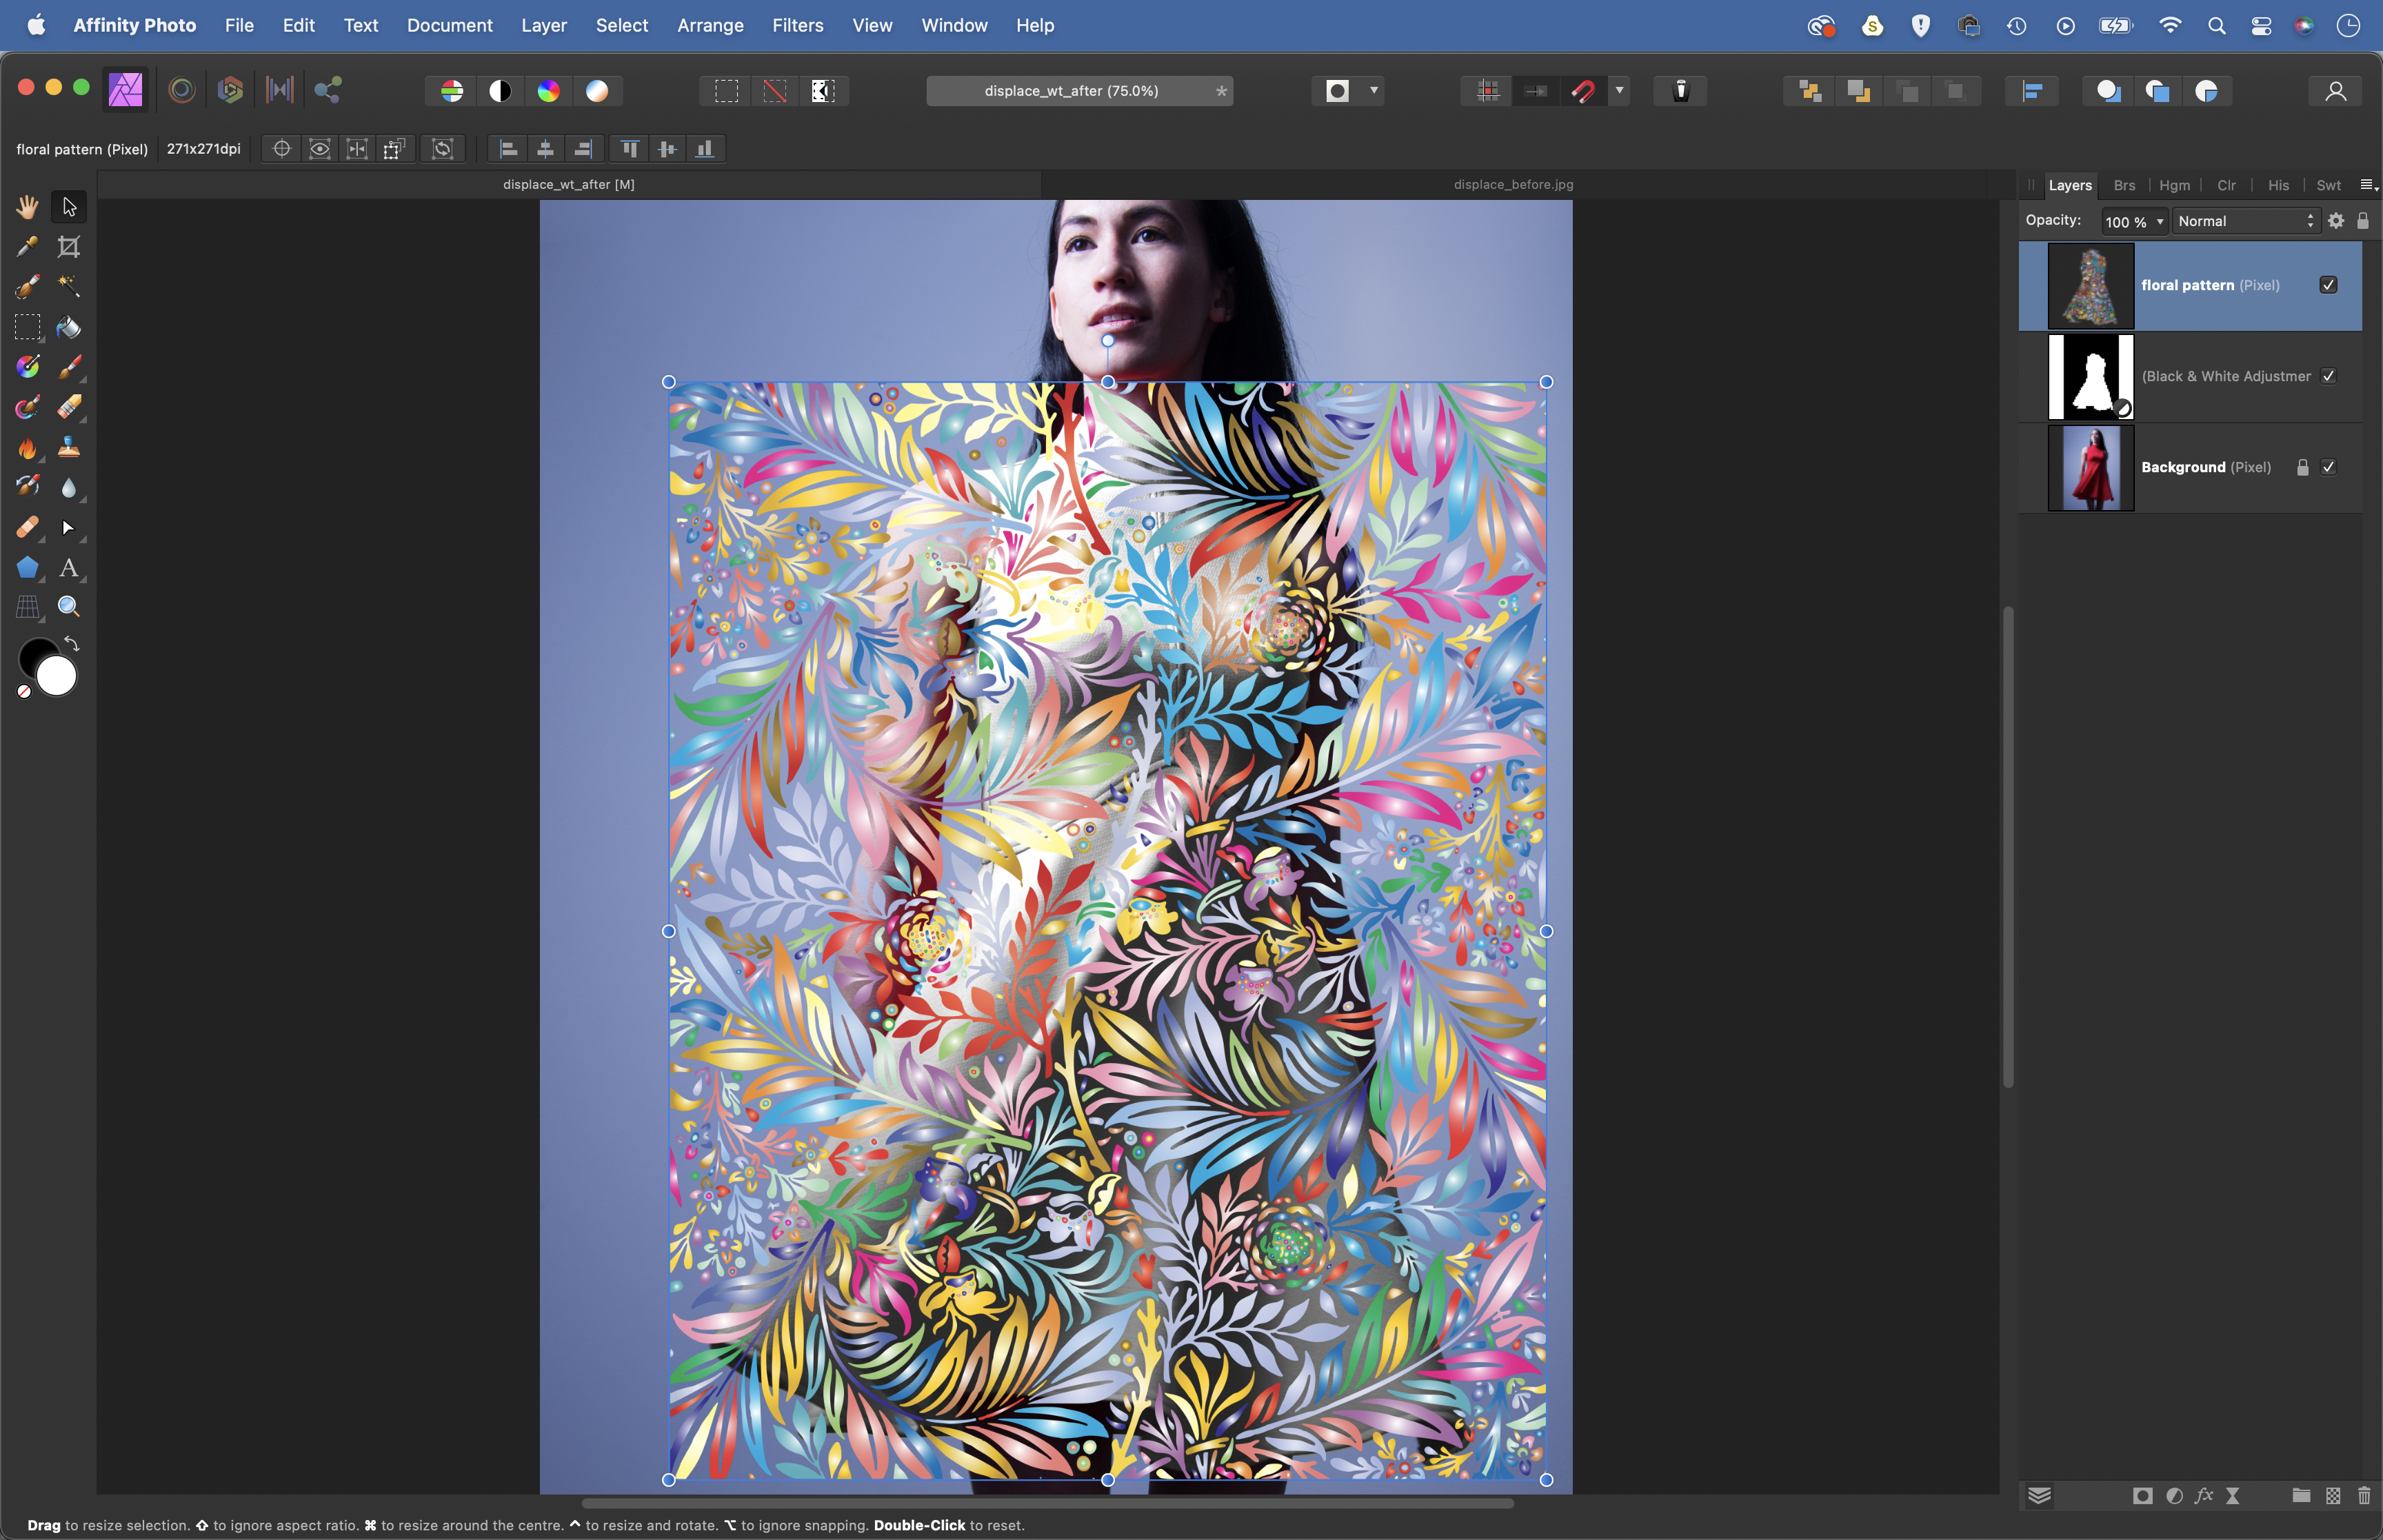
Check the mask and paint white to reveal, or black to hide, until it’s perfect. Next, open the texture image (we used a pixabay.com – search image no.6471792). Hit Cmd/Ctrl+C to copy, then paste (Cmd /Ctrl+V) it in. Get the Move tool then drag the corner of the bounding box to resize the pattern to fit over the dress.
3. Mask and blend
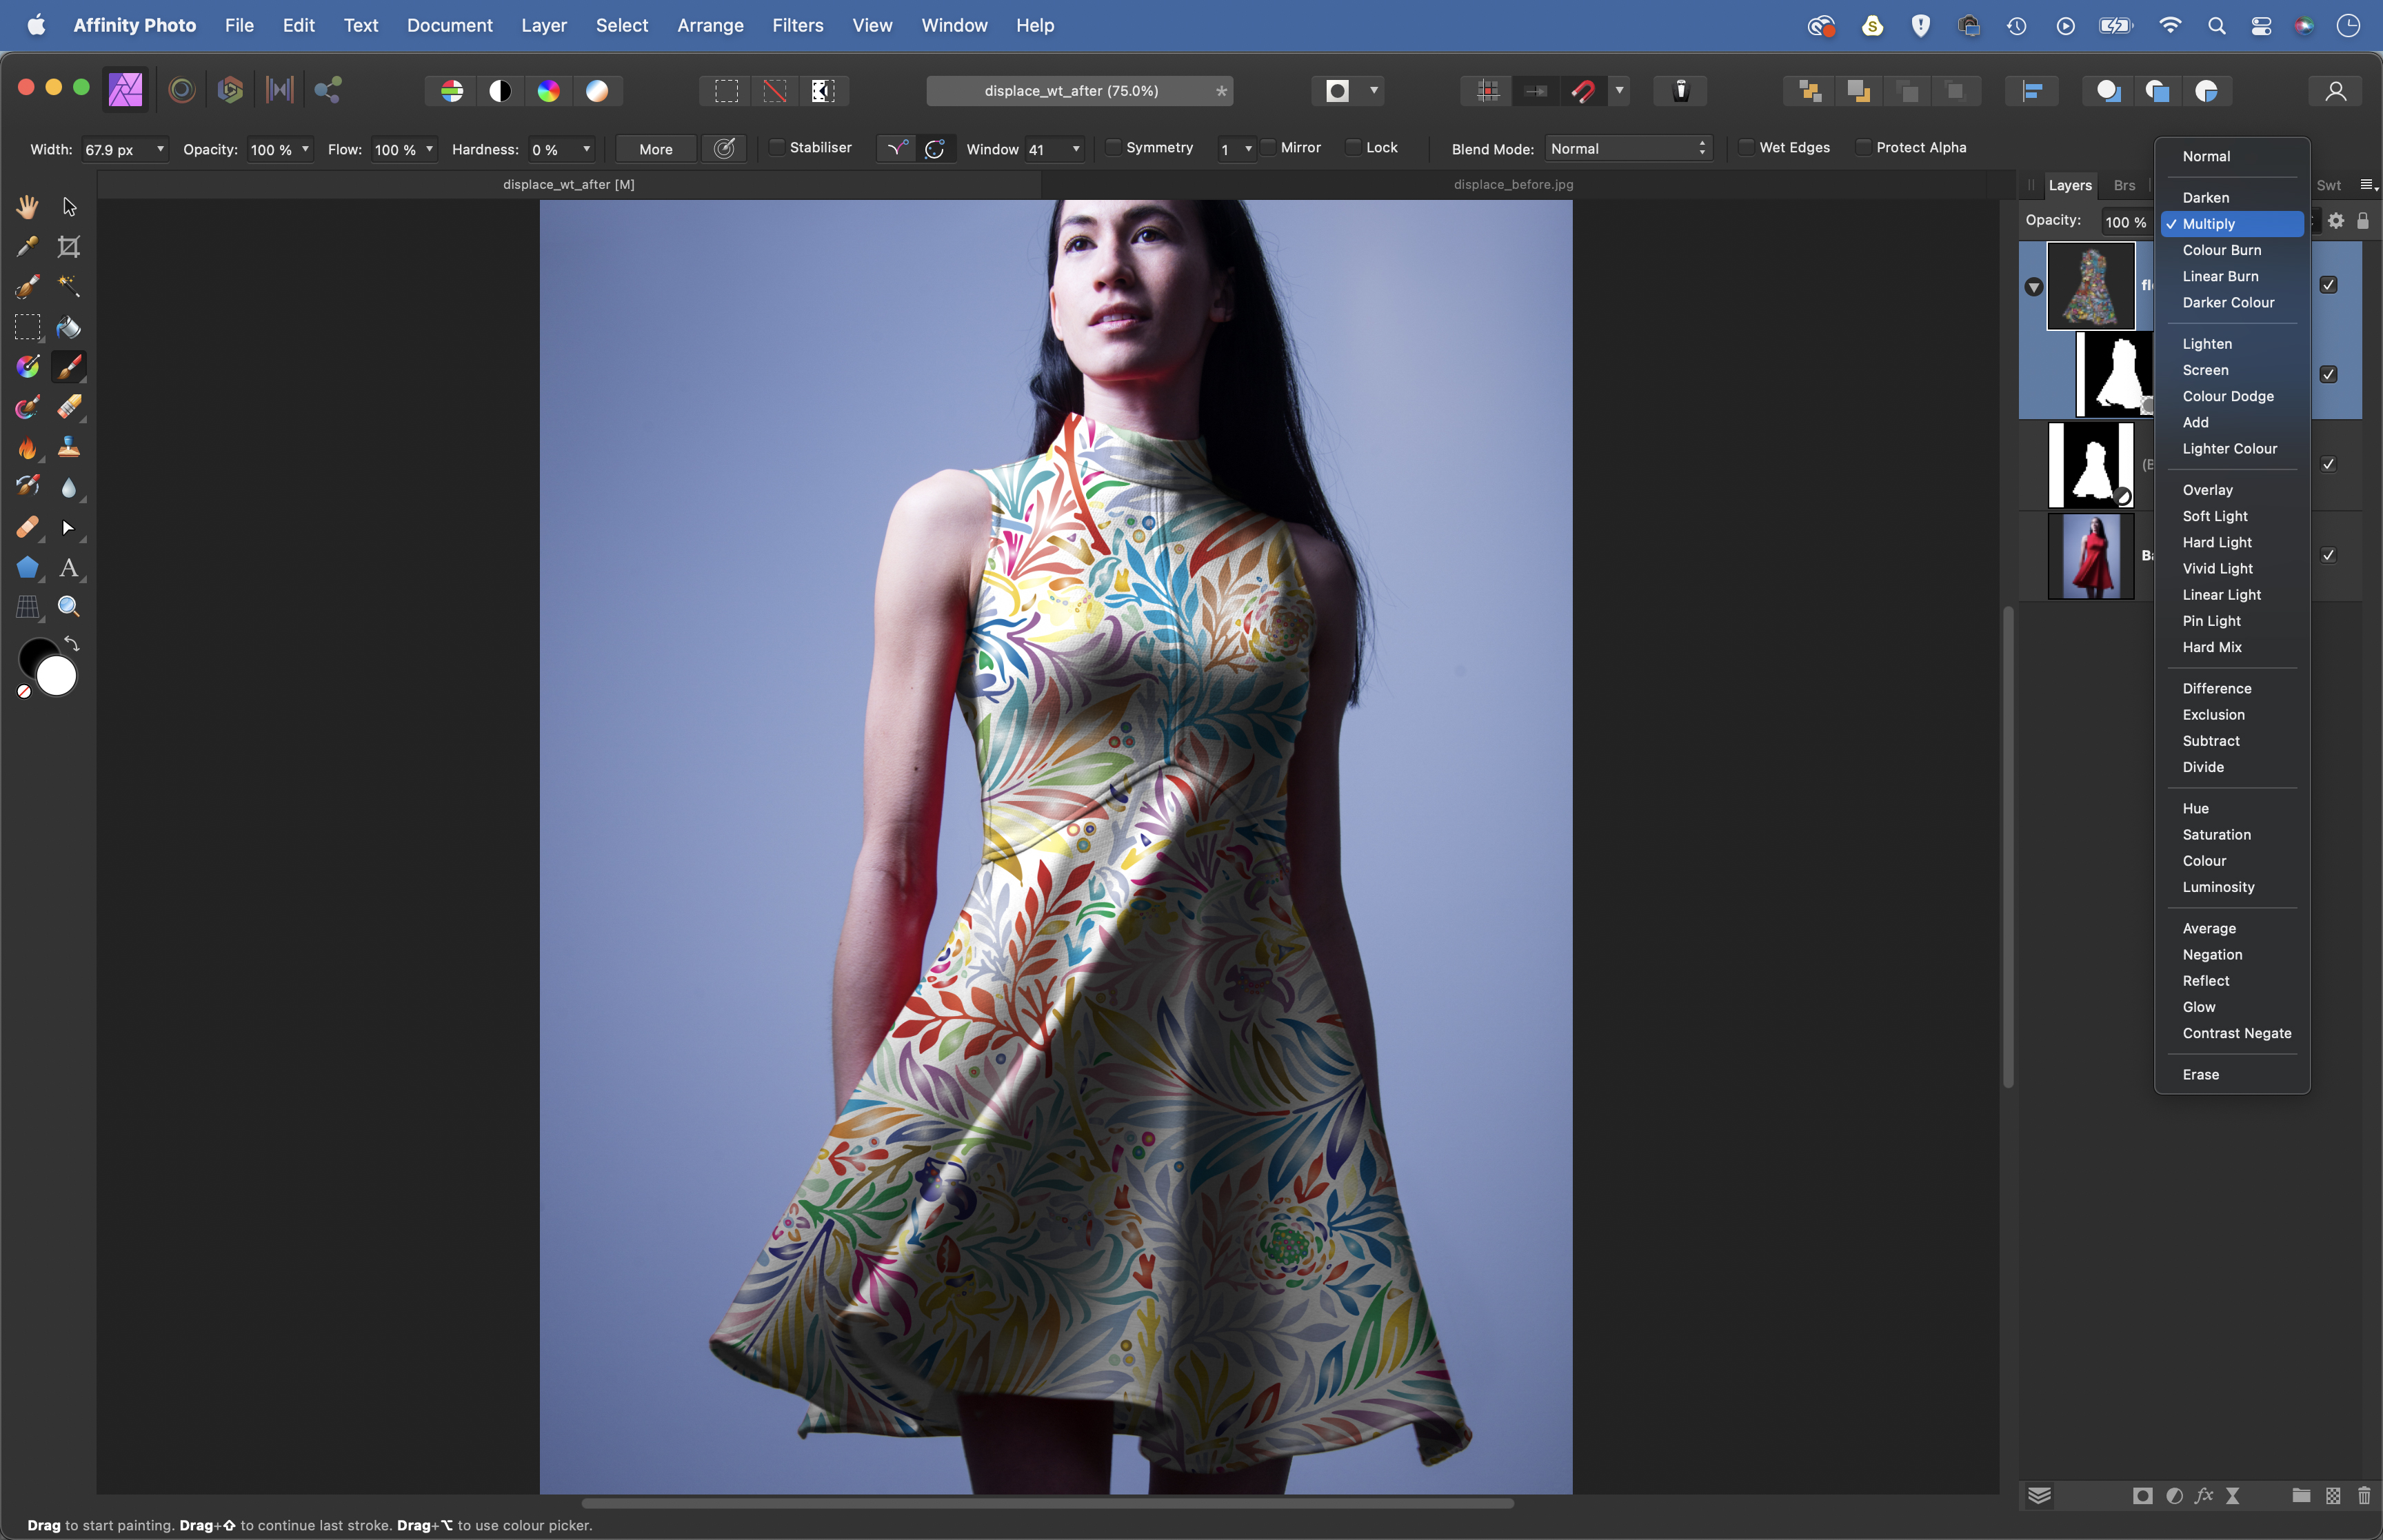
Hold Cmd/Ctrl and click on the mask of the black and white layer to load it as a selection, then highlight the pattern layer and click the mask icon at the bottom of the layers panel to convert the selection to a mask. Next click the Blend Mode dropdown in the Layers panel and change it from Normal to Multiply.
4. Displace the pattern
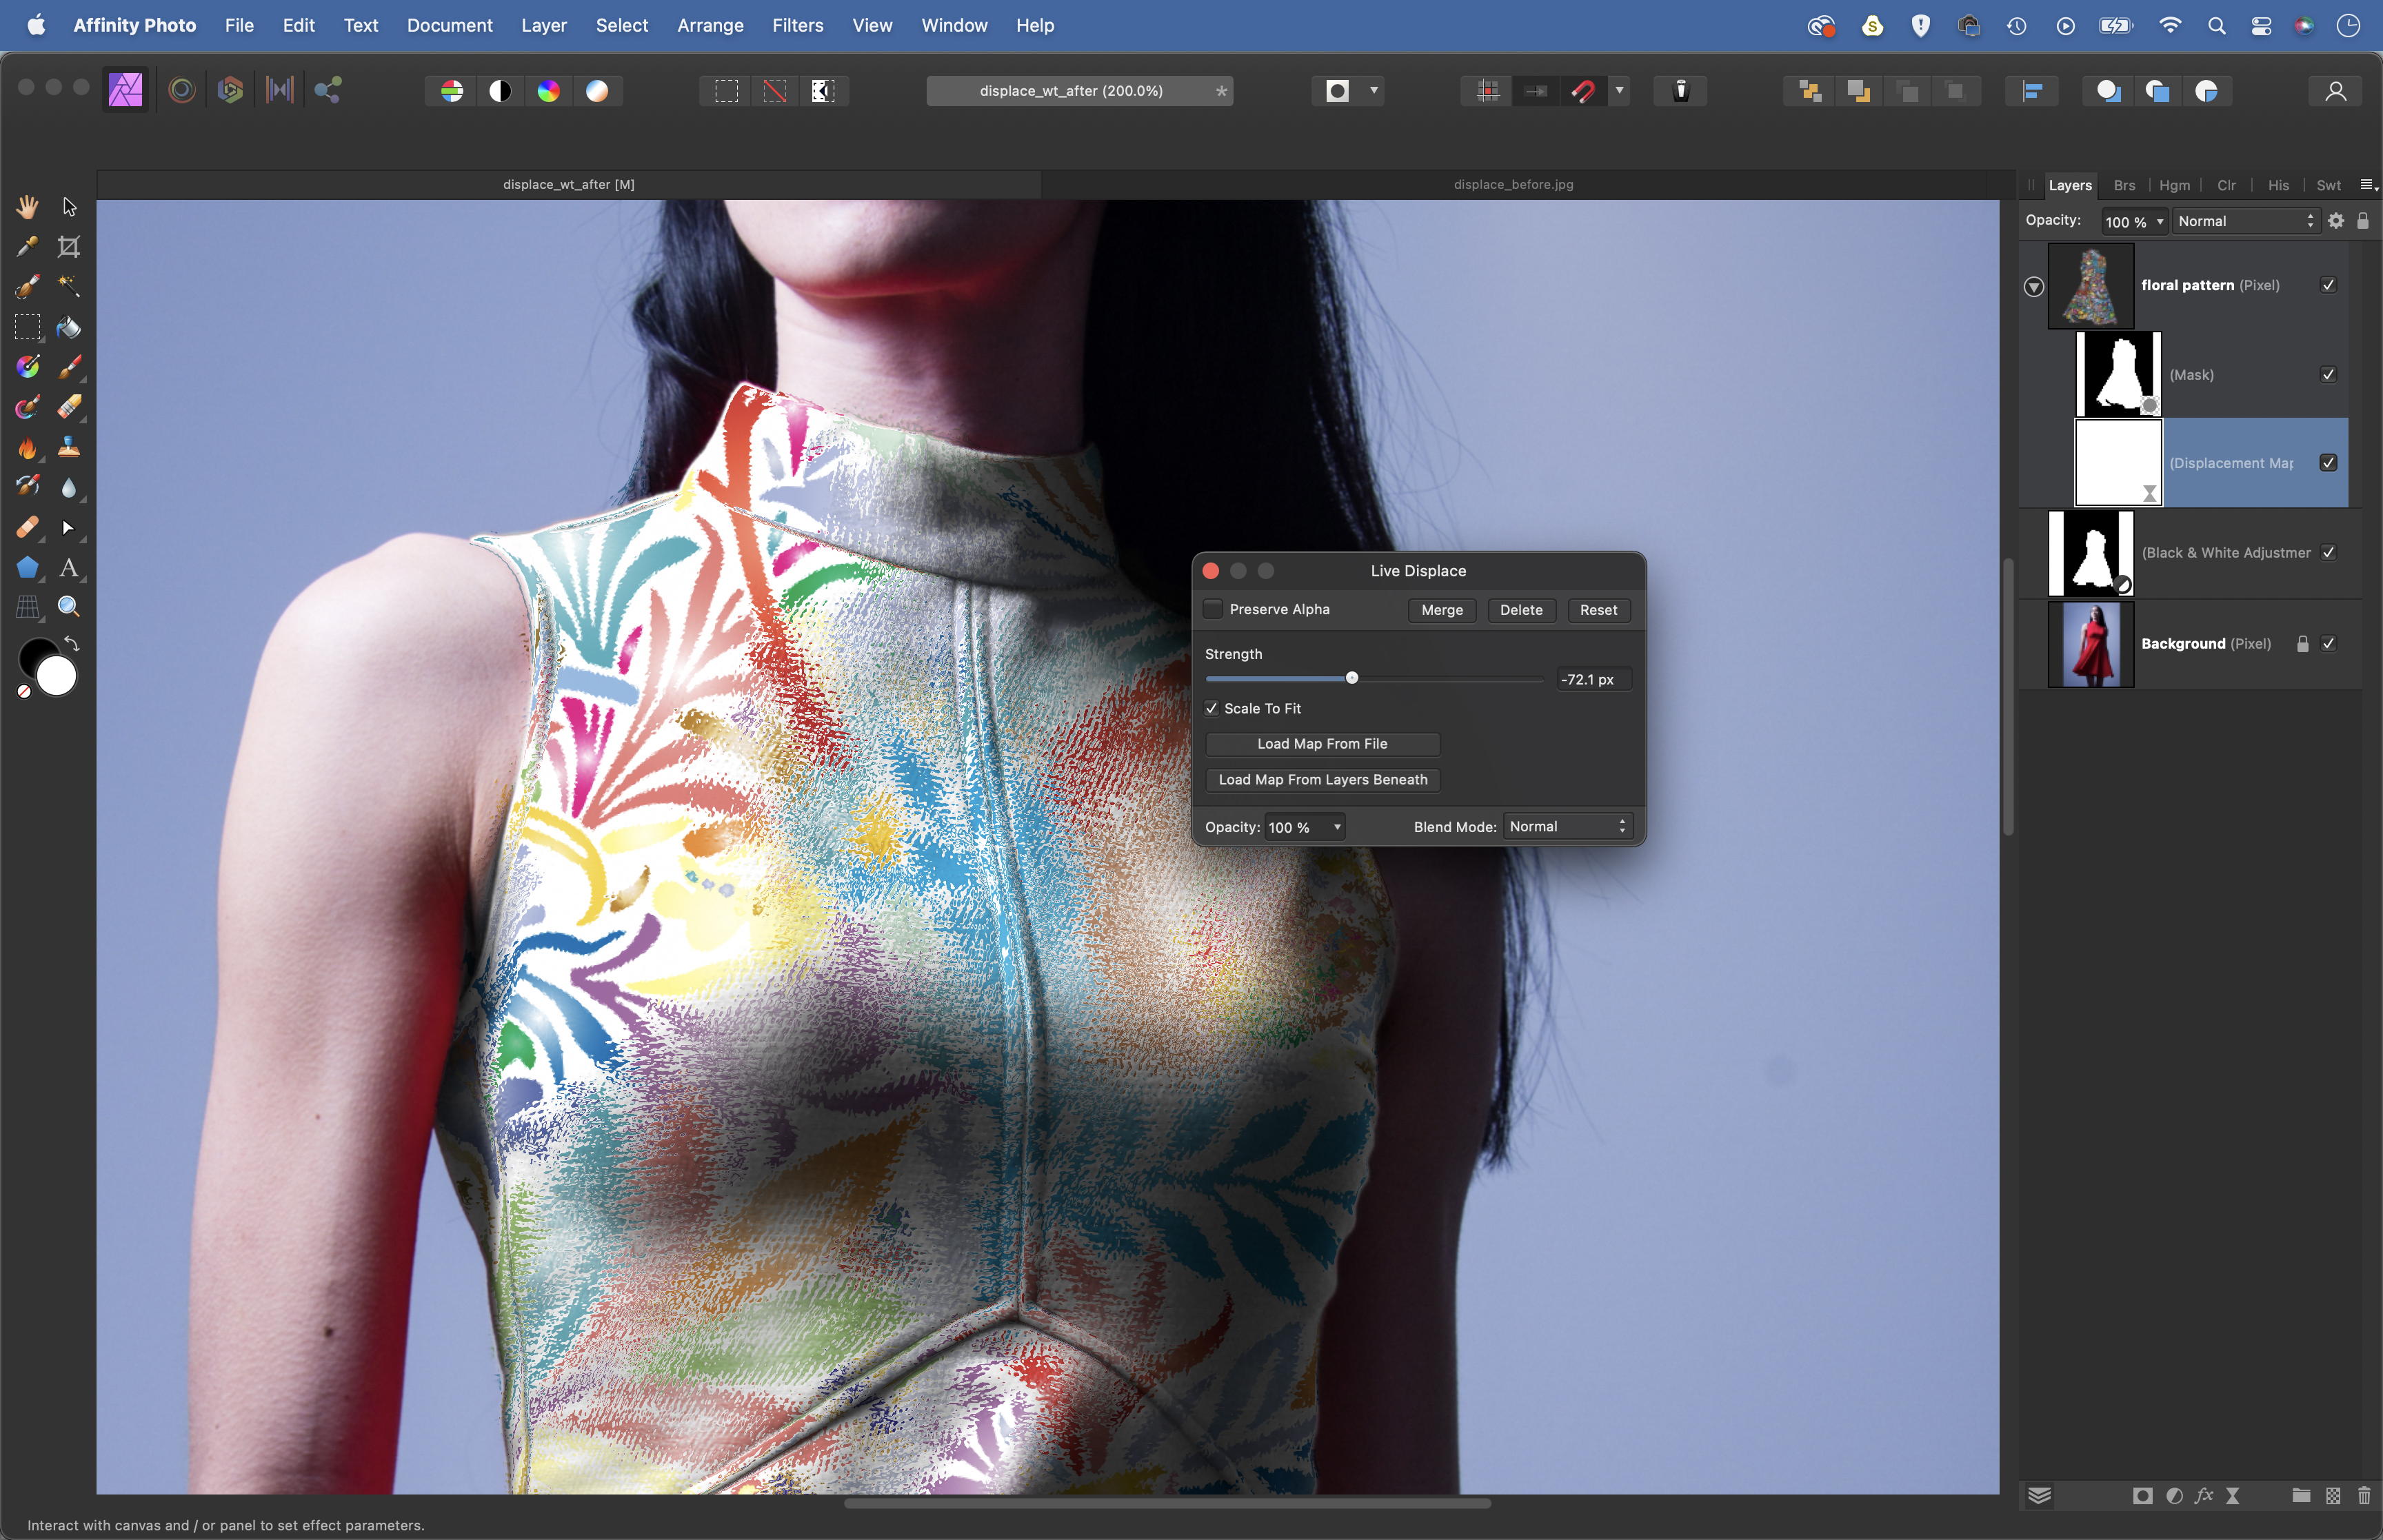
Go to Layer>New Live Filter Layer>Distort>Displace. Click ‘Load Map from Layers Beneath’ then adjust the slider to distort the layer. Here the texture of the dress ruins the effect, so we need to blur it. Highlight the bottom layer, Cmd/Ctrl+click the mask to load the dress selection again.
5. Blur the texture
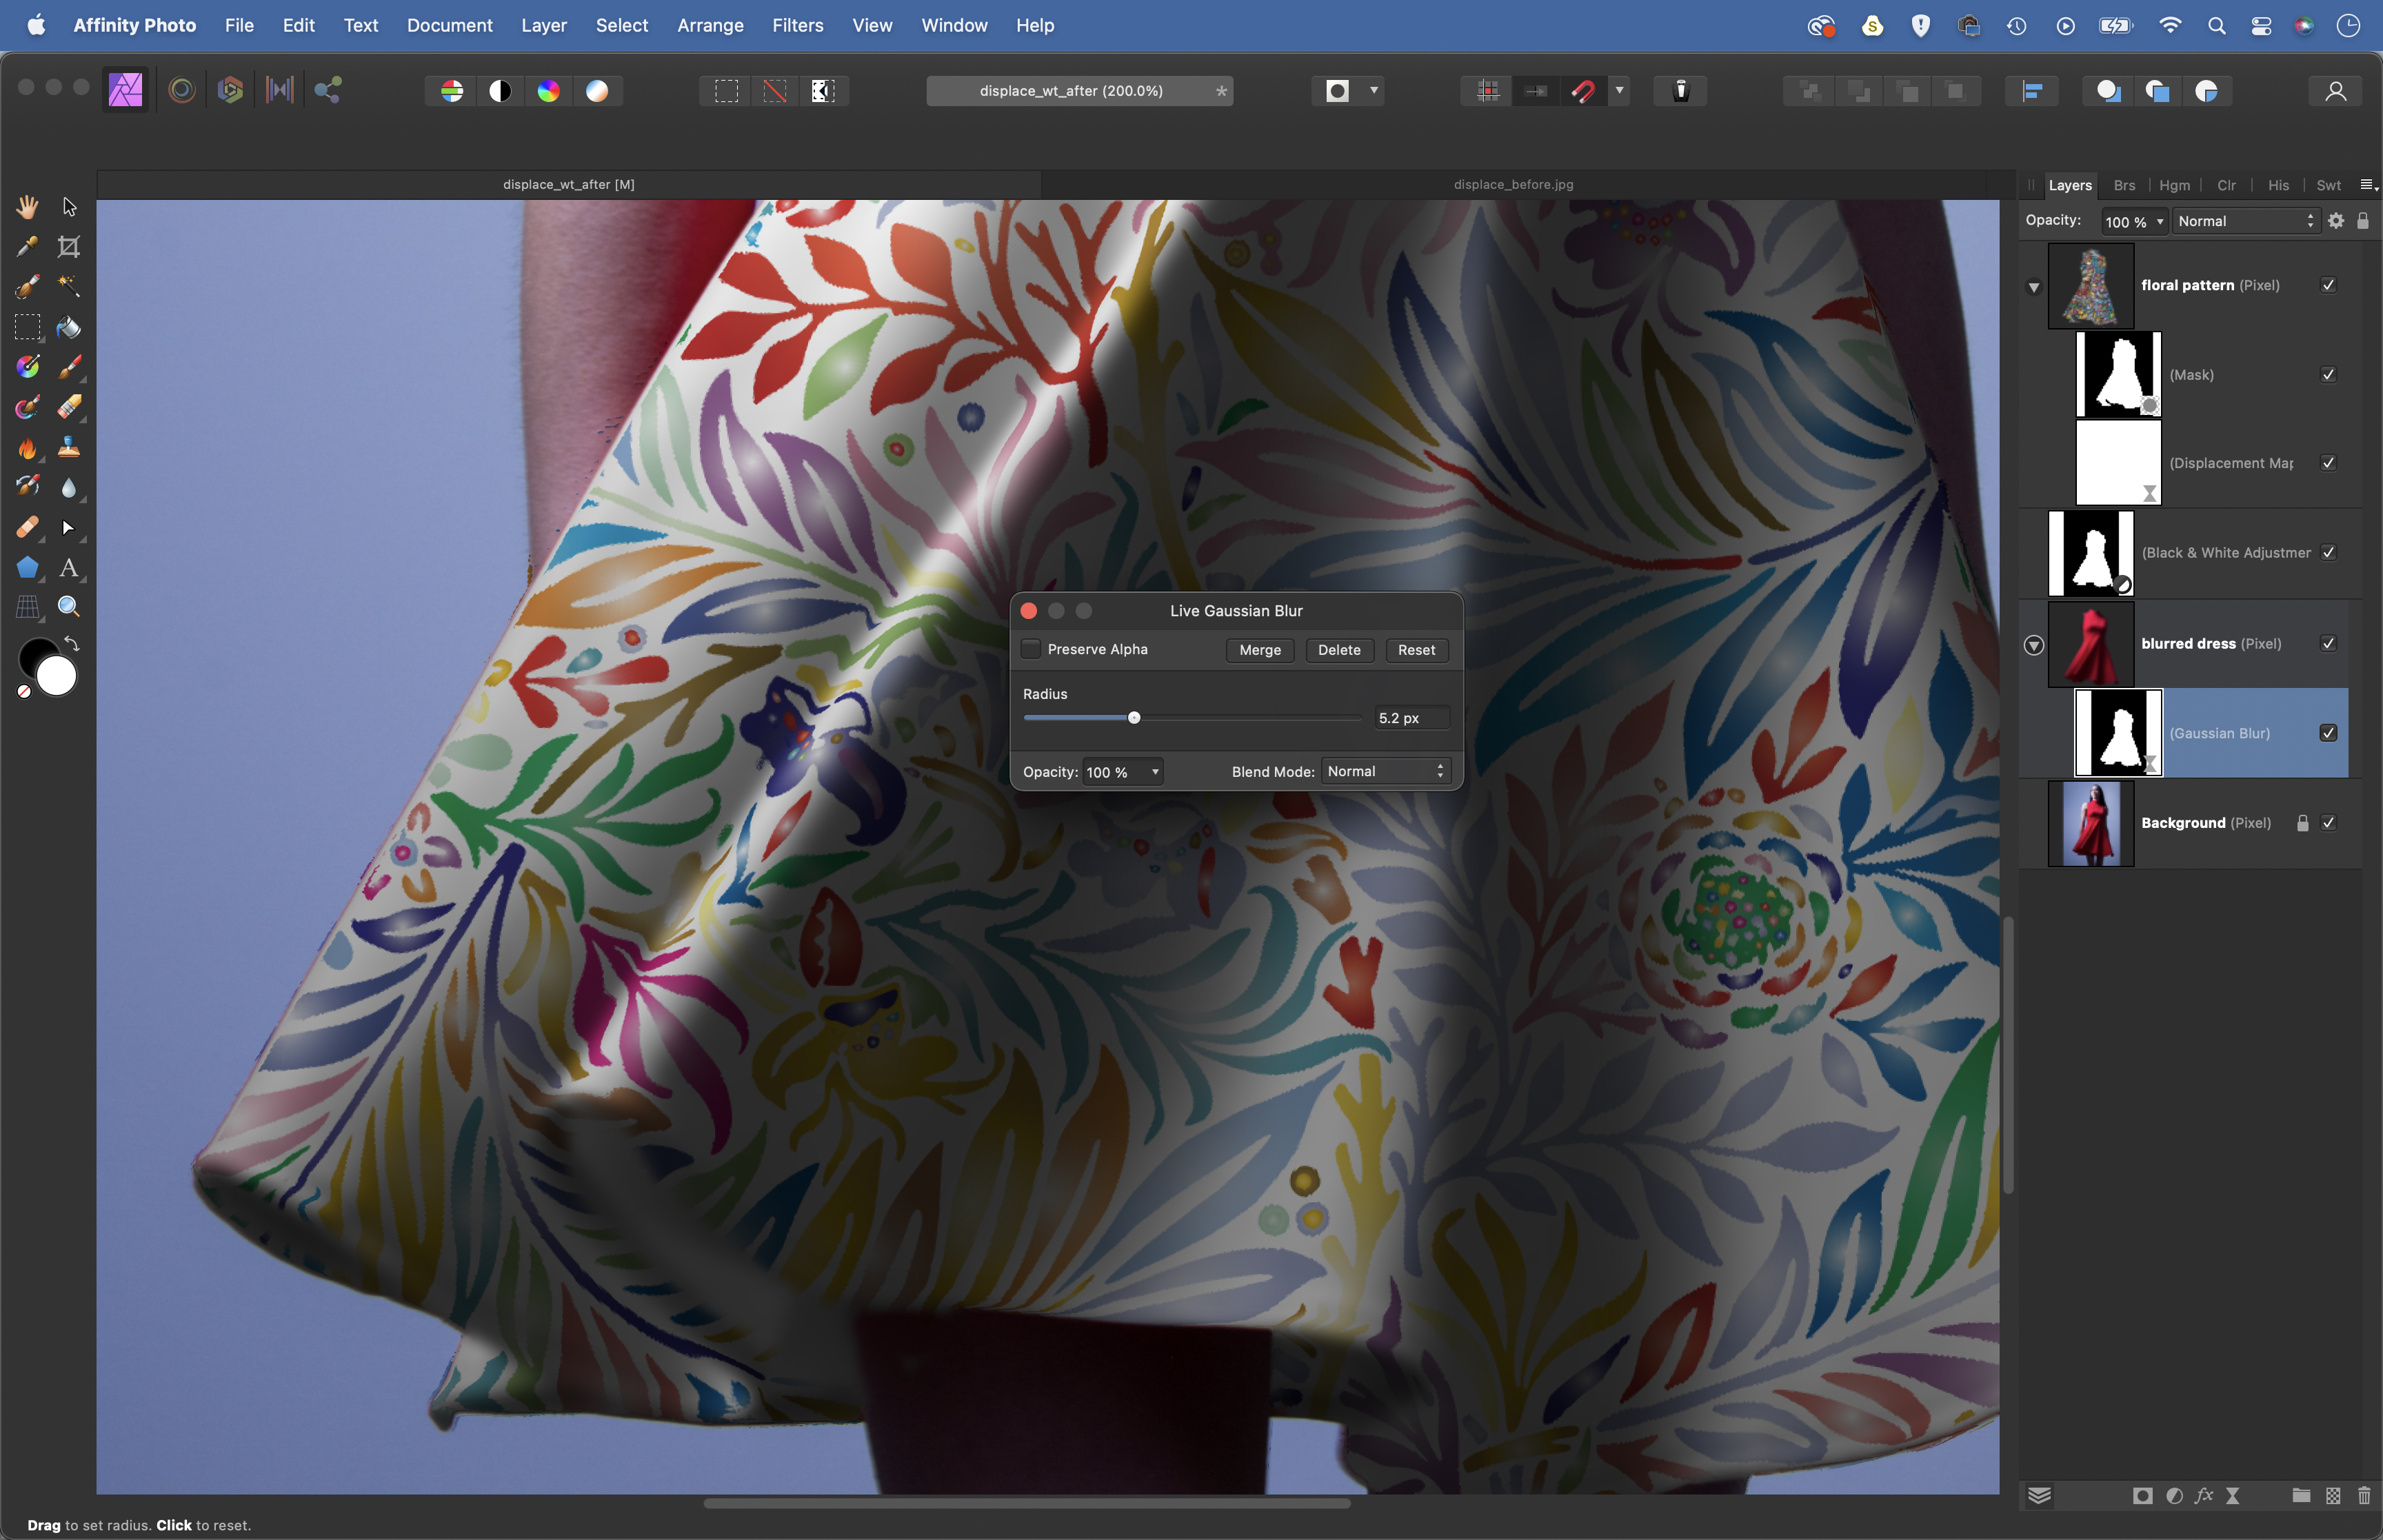
Highlight the bottom layer and hit Cmd/Ctrl+J to copy the dress to a new layer. Go to Layer>New Live Filter Layer>Blur>Gaussian Blur, and blur the dress by 5 pixels. Double-click the Displace Live Filter to open the settings and click the ‘Load Mask from…’ button. Click the tick to hide the dress. Hit Cmd/Ctrl+D to deselect.
6. Tone down red skin
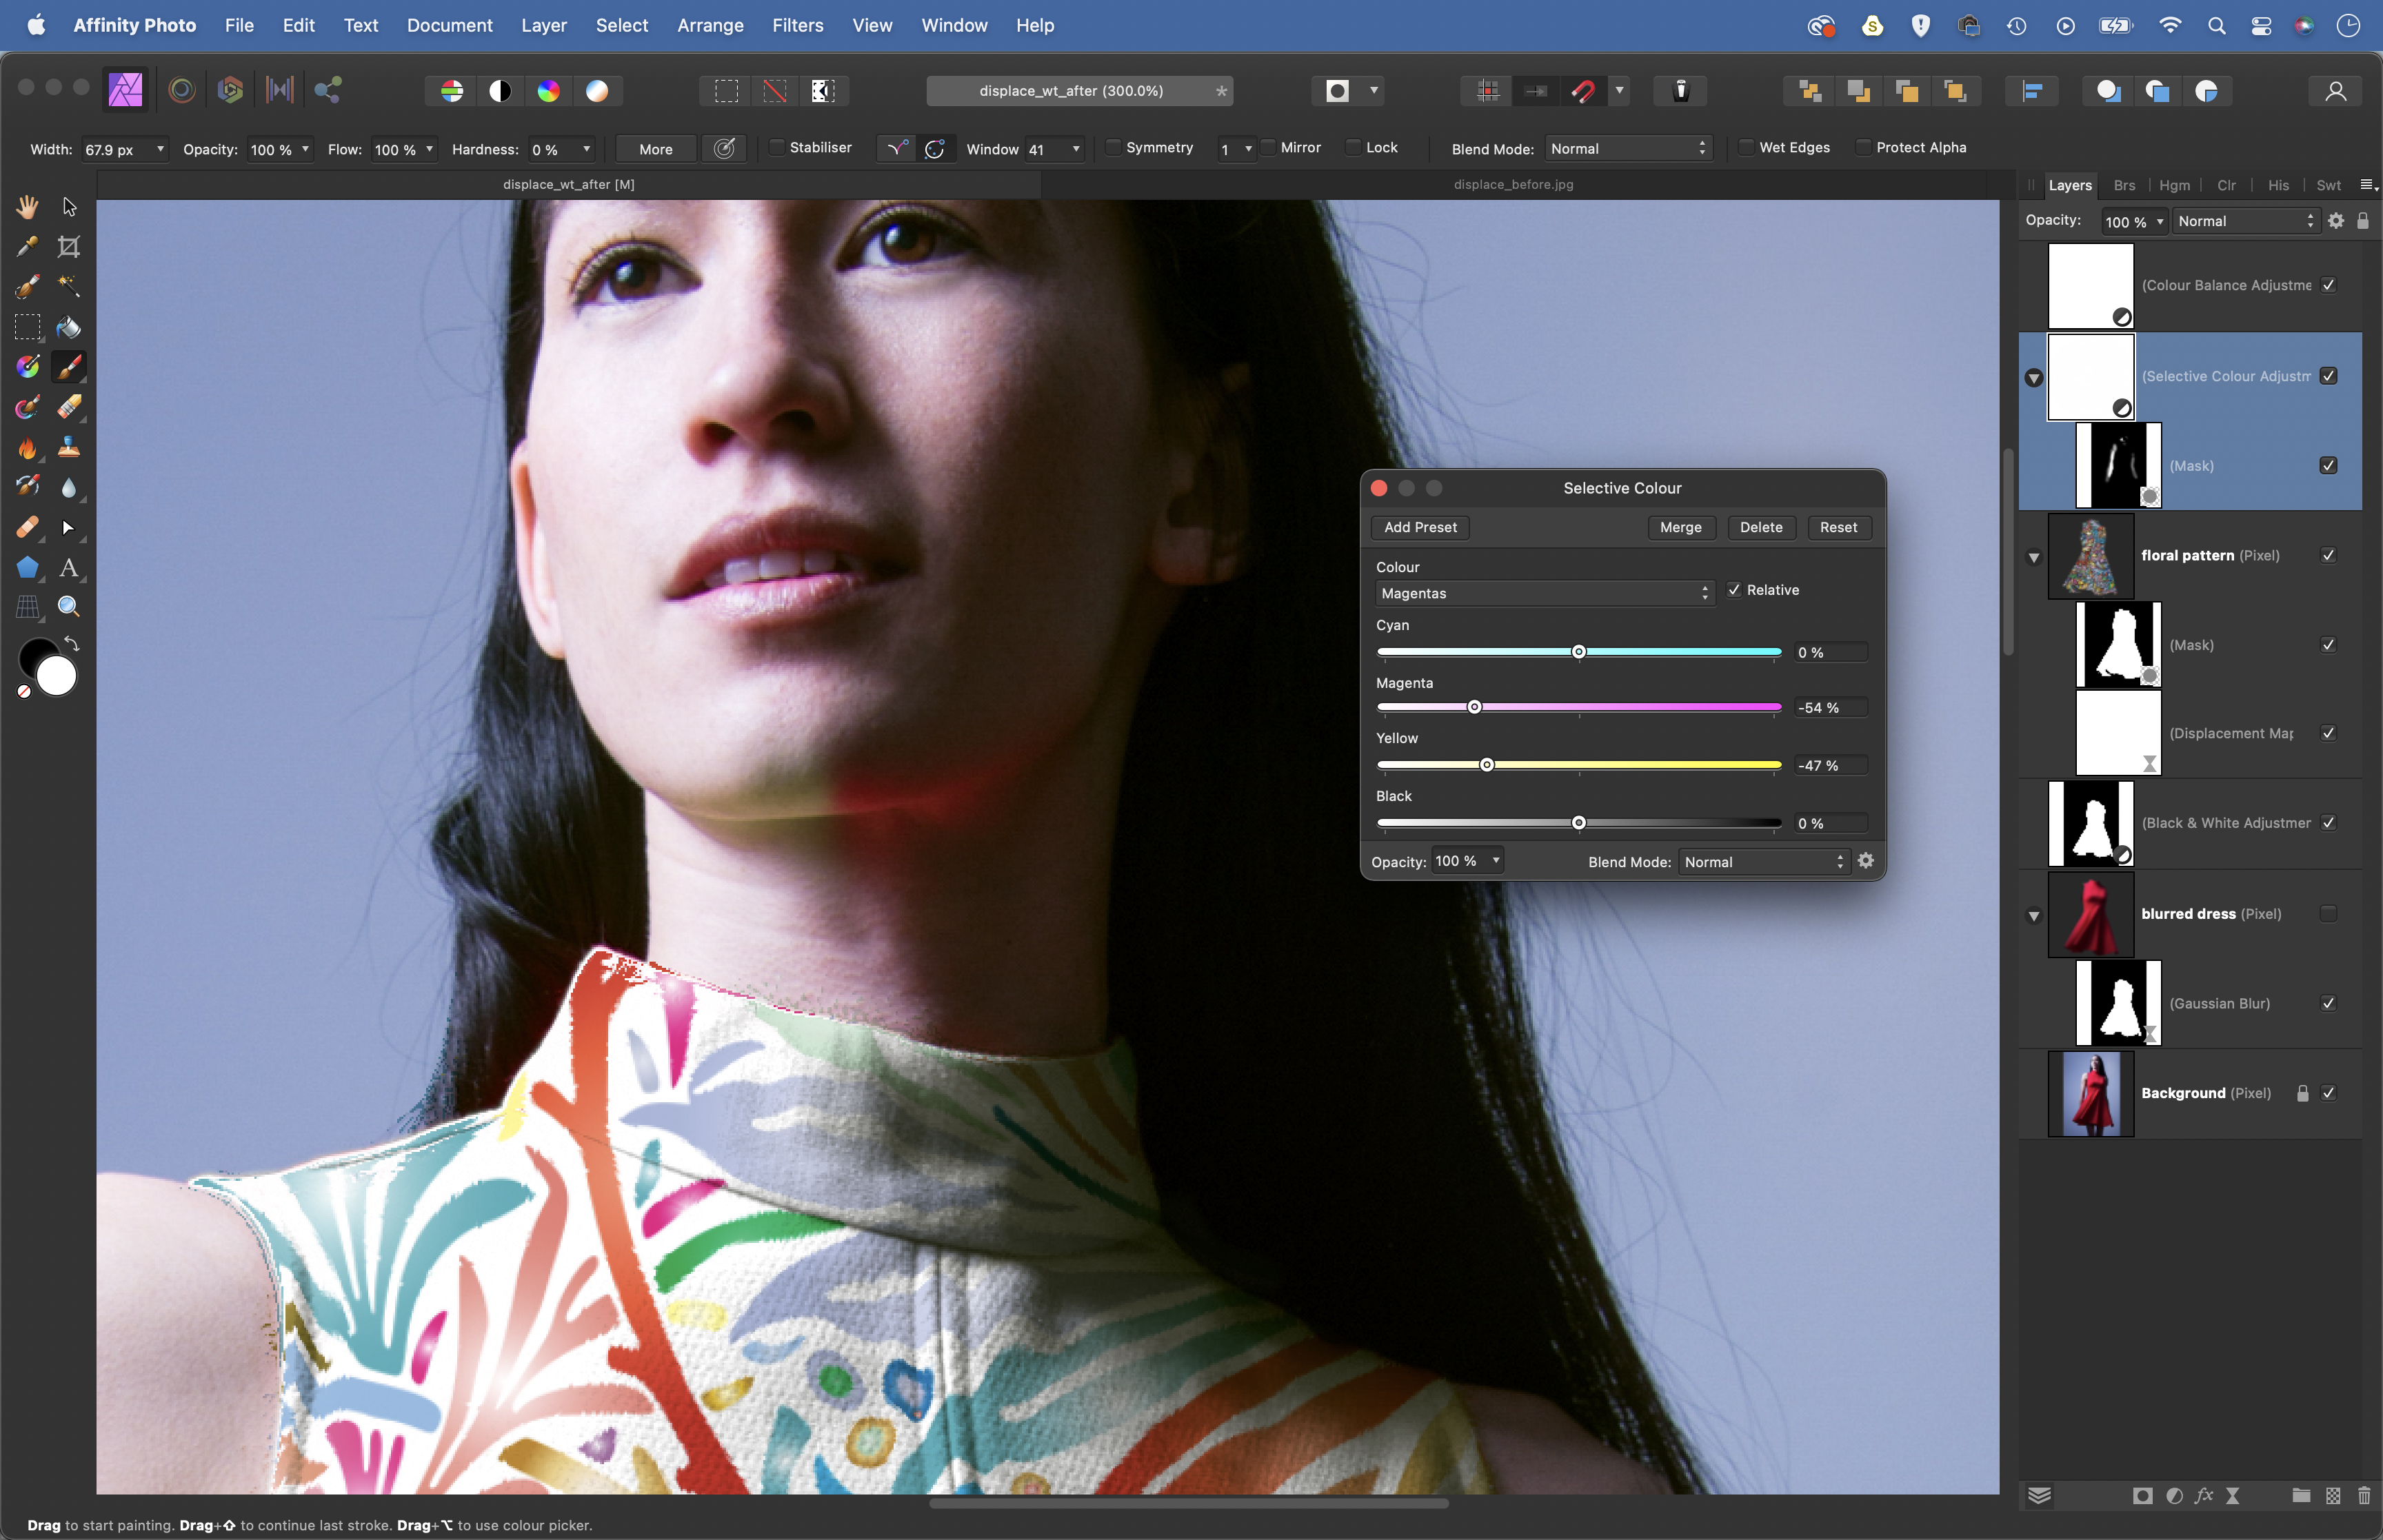
The skin looks too red where it meets the dress. Highlight the top layer, click the Adjustment icon and choose Selective Colour. Target the Reds, then reduce Magenta. Target Magenta and do the same. Hit Cmd/Ctrl+I to invert the layer’s mask to black, then paint white to reveal the colour along the arms and neck.
• See more of our Affinity Photo tutorials
PhotoPlus: The Canon Magazine is the world's only monthly newsstand title that's 100% devoted to Canon, so you can be sure the magazine is completely relevant to your system.
Read more:
Best photo-editing laptops
Best photo editing software
Best online photography courses
Get the Digital Camera World Newsletter
The best camera deals, reviews, product advice, and unmissable photography news, direct to your inbox!
The lead technique writer on Digital Camera Magazine, PhotoPlus: The Canon Magazine and N-Photo: The Nikon Magazine, James is a fantastic general practice photographer with an enviable array of skills across every genre of photography.
Whether it's flash photography techniques like stroboscopic portraits, astrophotography projects like photographing the Northern Lights, or turning sound into art by making paint dance on a set of speakers, James' tutorials and projects are as creative as they are enjoyable.
He's also a wizard at the dark arts of Photoshop, Lightroom and Affinity Photo, and is capable of some genuine black magic in the digital darkroom, making him one of the leading authorities on photo editing software and techniques.


