Usually photographers work hard to avoid lens flare. It can be distracting, causing metering issues and introducing specular highlights. Sometimes, however, you can take advantage of it.
To make creative use of lens flare
Time needed: One hour
Skill level: Beginner
Kit needed: DSLR, older zoom lens (if you have one), reflector
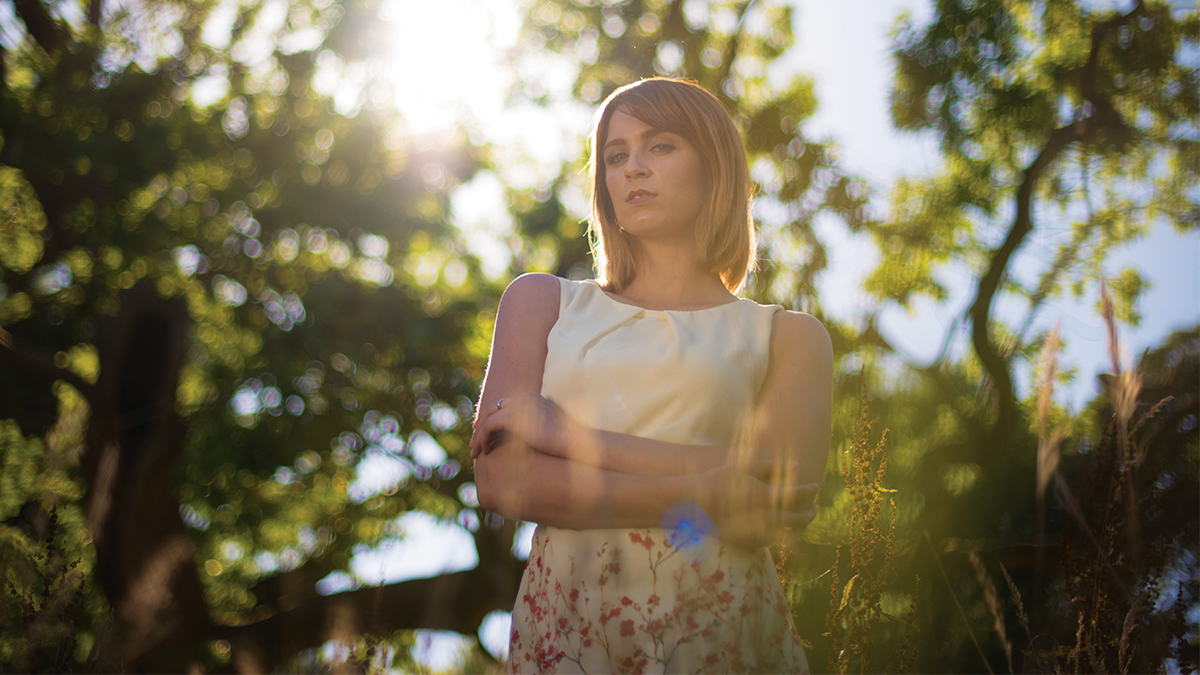
For this technique to work, the sun needs to be near the edges of the frame, so check the forecast before you head out, and shoot early or late in the day when the sun is close to the horizon. Position your model between the camera and the sun; the low sun will backlight the subject and give you some great flare. Don’t look directly at the sun through the viewfinder, though; if you’re concerned about this, use Live View to compose your shot.
Most manuals tell you to “keep your lens free from dust” – well, break the rules this time! Specks of dust on your lens or filter will light up and create interesting textures. Just take care when taking any dust off, particularly if it’s on the front element of your lens rather than a filter. Finally, don’t just stick to one position – move around to change the perspective. Just be sure to keep your model between yourself and the sun.
Step-by-step guide: Shoot into the sun

1. Broaden your horizons
On a sunny evening, find an open location, as for this technique to work the sun needs to be near the horizon, with a direct line of sight to your camera. To see when and where the sun will set in your location, visit http://suncalc.net/

2. Get down low
If the sun is still a little high, try getting down low. We laid down in some tall grass to place the sun behind the model, and allowed the grass to intrude in front of the lens to add spots of blurry highlights and enhance that intimate mood.
The best camera deals, reviews, product advice, and unmissable photography news, direct to your inbox!

The properties of your lens and the image sensor of your camera body effect how much lens flare you will get. Typically, those with modern coatings will reduce flare, while older lenses without such coatings will struggle to keep it down.
3. Watch the background
Place the model between your camera and sun. The flare will wash over your model. Be aware of the background, too: we also used an oak tree to help illuminate the background, as the backlight on the leaves was particularly pretty.

Zoom lenses with multiple glass elements tend to produce more flare as they increase the scattering of the light. Older lenses often flare more; we used an older M42-mount Tessar f/2.8 50mm Carl Zeiss Jena lens for a different look.
4. Bound the light
Set your camera to aperture-priority mode. If you expose for the sunlight, the model will be too dark. Set some positive exposure compensation to brighten the model, and bounce light in using a reflector so you have a balanced exposure.

5. Add haze
So-called veiling flare is the haze that seeps into the frame from the sides. Allow it to fade as it reaches your subject so you have a clear view of them. It can and should overlap your subject, but ensure you can still see them through the haze.

6. Step aside
If the flare obscures your subject, move the light source to the edge of the frame by stepping to one side. By moving slightly, the ghostings are pushed to the opposite side of the frame, but, again, make sure you don’t cover up faces.
Read more: How to chart the position of the sun
N-Photo: The Nikon Magazine is a monthly publication that's entirely dedicated to Nikon users. As a 100% independent magazine, you can be assured of unbiased opinion from a trustworthy team of devoted photography experts including editor Adam Waring and Deputy Editor Mike Harris.
Aimed at all users, from camera newcomers to working pros, every issue is packed with practical, Nikon-specific advice for taking better photos, in-depth reviews of Nikon-compatible gear, and inspiring projects and exciting video lessons for mastering camera, lens and Photoshop techniques.
Written by Nikon users for Nikon users, N-Photo is your one-stop shop for everything to do with cameras, lenses, tripods, bags, tips, tricks and techniques to get the most out of your photography.

