Canon Digital Photo Professional tutorials: How to use Canon DPP 4 editing software
Part 1: Learn to use the free RAW image organizing, editing and sharing software – Canon Digital Photo Professional 4
Watch video: How to import and sort your RAW images using Canon Digital Photo Professional 4
Canon Digital Photo Professional 4 is free RAW editing software that's available to every Canon EOS camera user – and is designed to help you import, organize, edit and share your photographs. This series of Canon Digital Photo Professional tutorials will help you get the best from this photo editor.
Part 1: Canon Digital Photo Professional tutorials
Part 2: Boost your tonal range
Part 3: Controlling tonal range
Part 4: Rescuing highlights
Part 5: Correcting color casts
Part 6: Selective color adjustments
Part 7: Creative color effects
Part 8: Black & white with DPP
Part 9: Fixing image distortion
Part 10: Sharpen images and smooth noise
Although you might be a Canon enthusiast, you may also be a diehard Adobe Photoshop user when it comes to processing your pictures. However, since Digital Photo Professional 4 is designed by Canon to be compatible with Canon RAW files, it’s well worth giving the latest incarnation a closer look, especially with its slick redesign and range of new tools and features.
Canon Digital Photo Professional 4 now features tools that Photoshop CC users are familiar with, such as the ability to make selective hue, saturation and luminance adjustments for a range of individual colors.
Here we’ll show you how to use the software to access and import RAW images that are already stored on your computer. Your photographs may be stored chronologically in various folders on your computer. This can make it a time-consuming task to locate a specific image. DPP 4 enables you to separate the wheat from the chaff by using labelling tools, such as check marks and ratings.
You can also group shots into themed collections, as we’ll now explain…
01 Rate a file
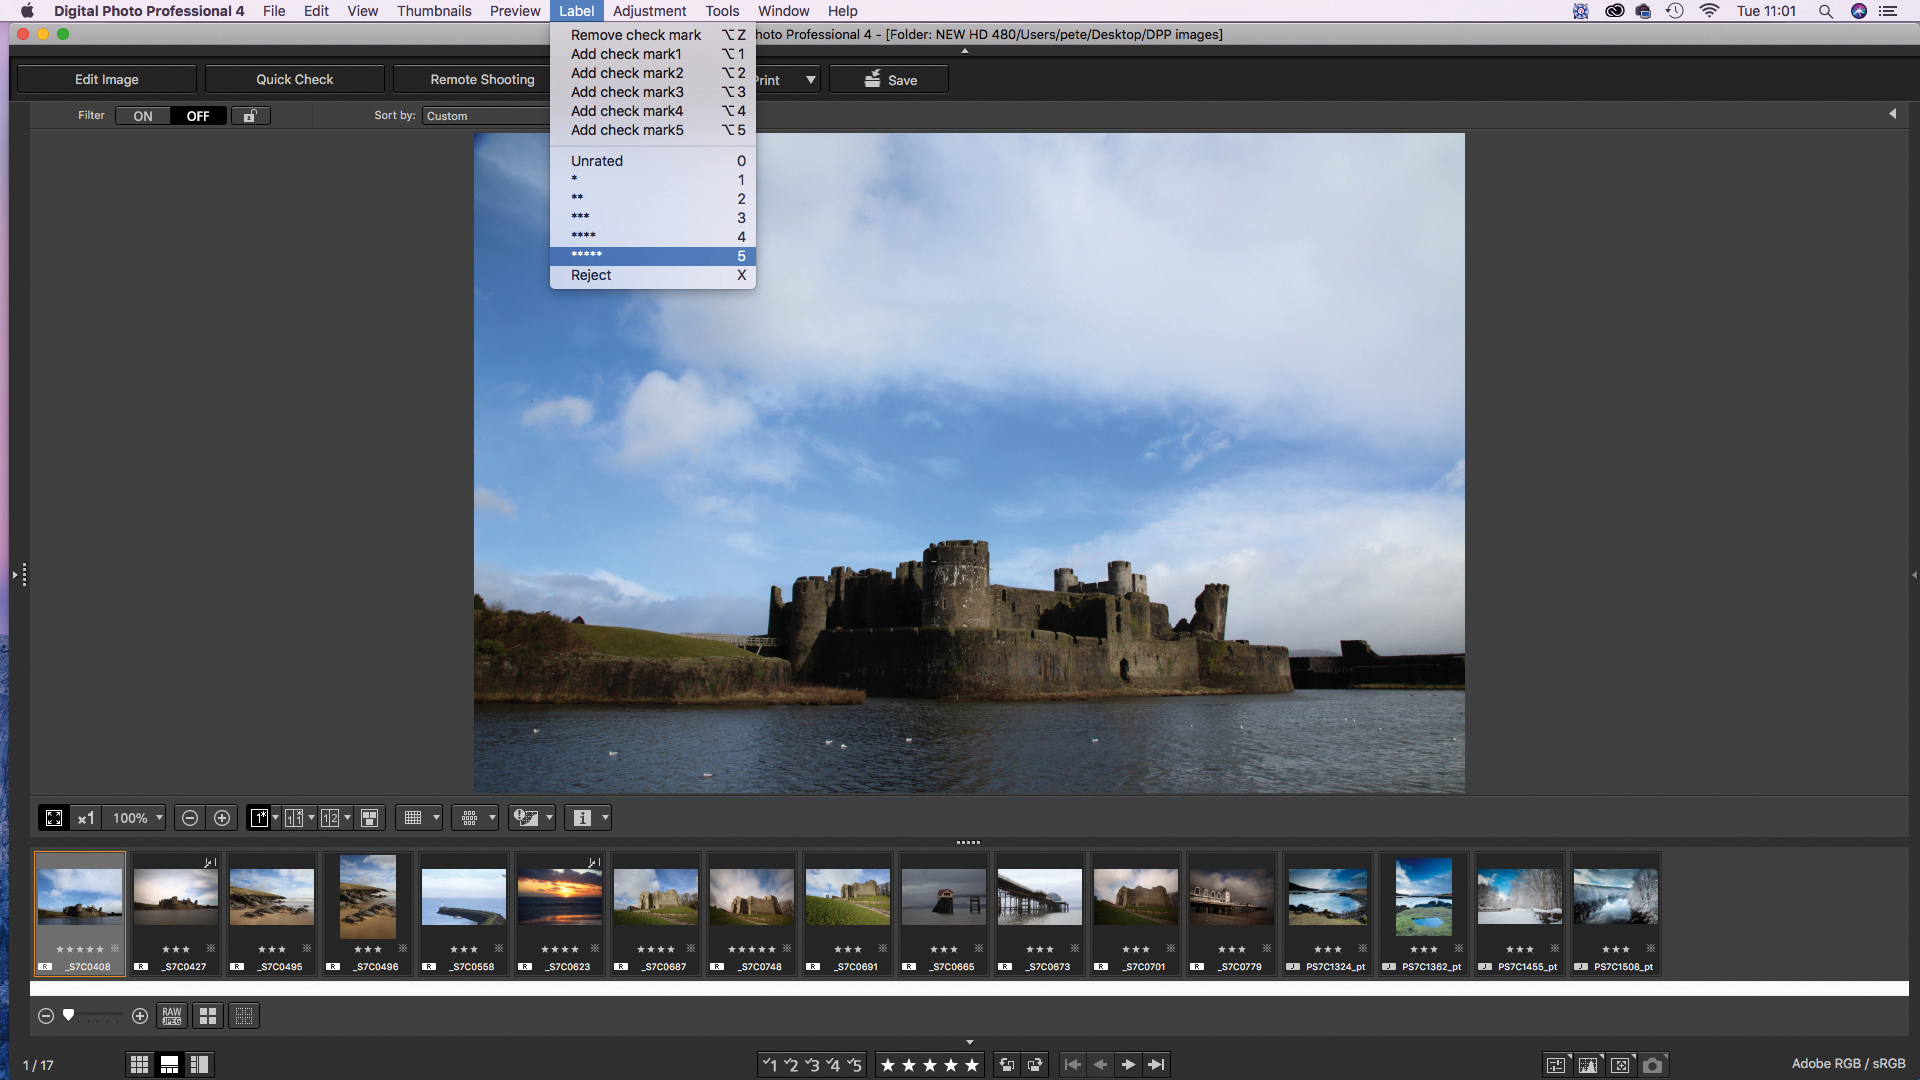
You can add a rating or check mark to a selected thumbnail by clicking the icons at the base of the workspace. Alternatively, tap any of the number keys between 1-5, or go to Label and select the star rating you’re after.
The best camera deals, reviews, product advice, and unmissable photography news, direct to your inbox!
02 Create a collection
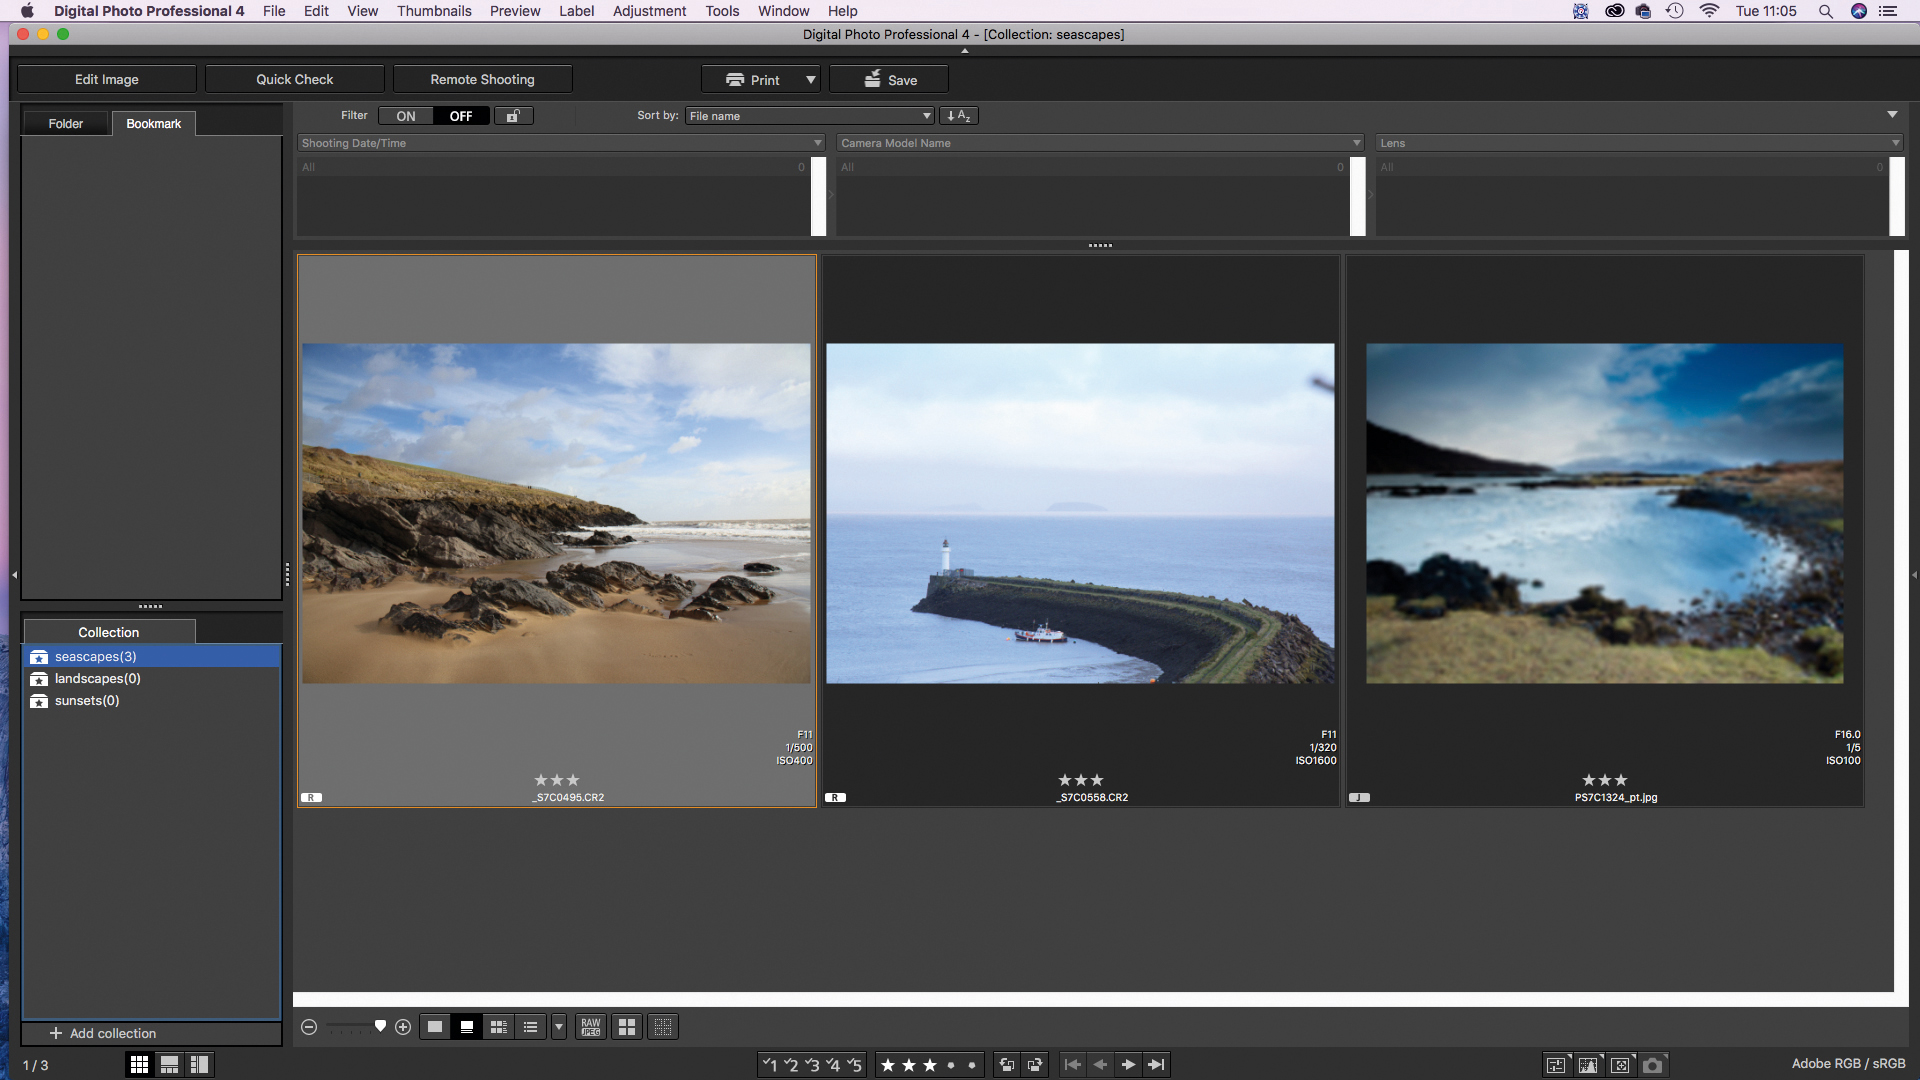
Go to the Collections pane and click the Add Collection icon. Label your collection to make it easy to identify. Drag thumbnails to the collection to add them to it. Click on the collection label to display its contents in the workspace.
03 Quick Check
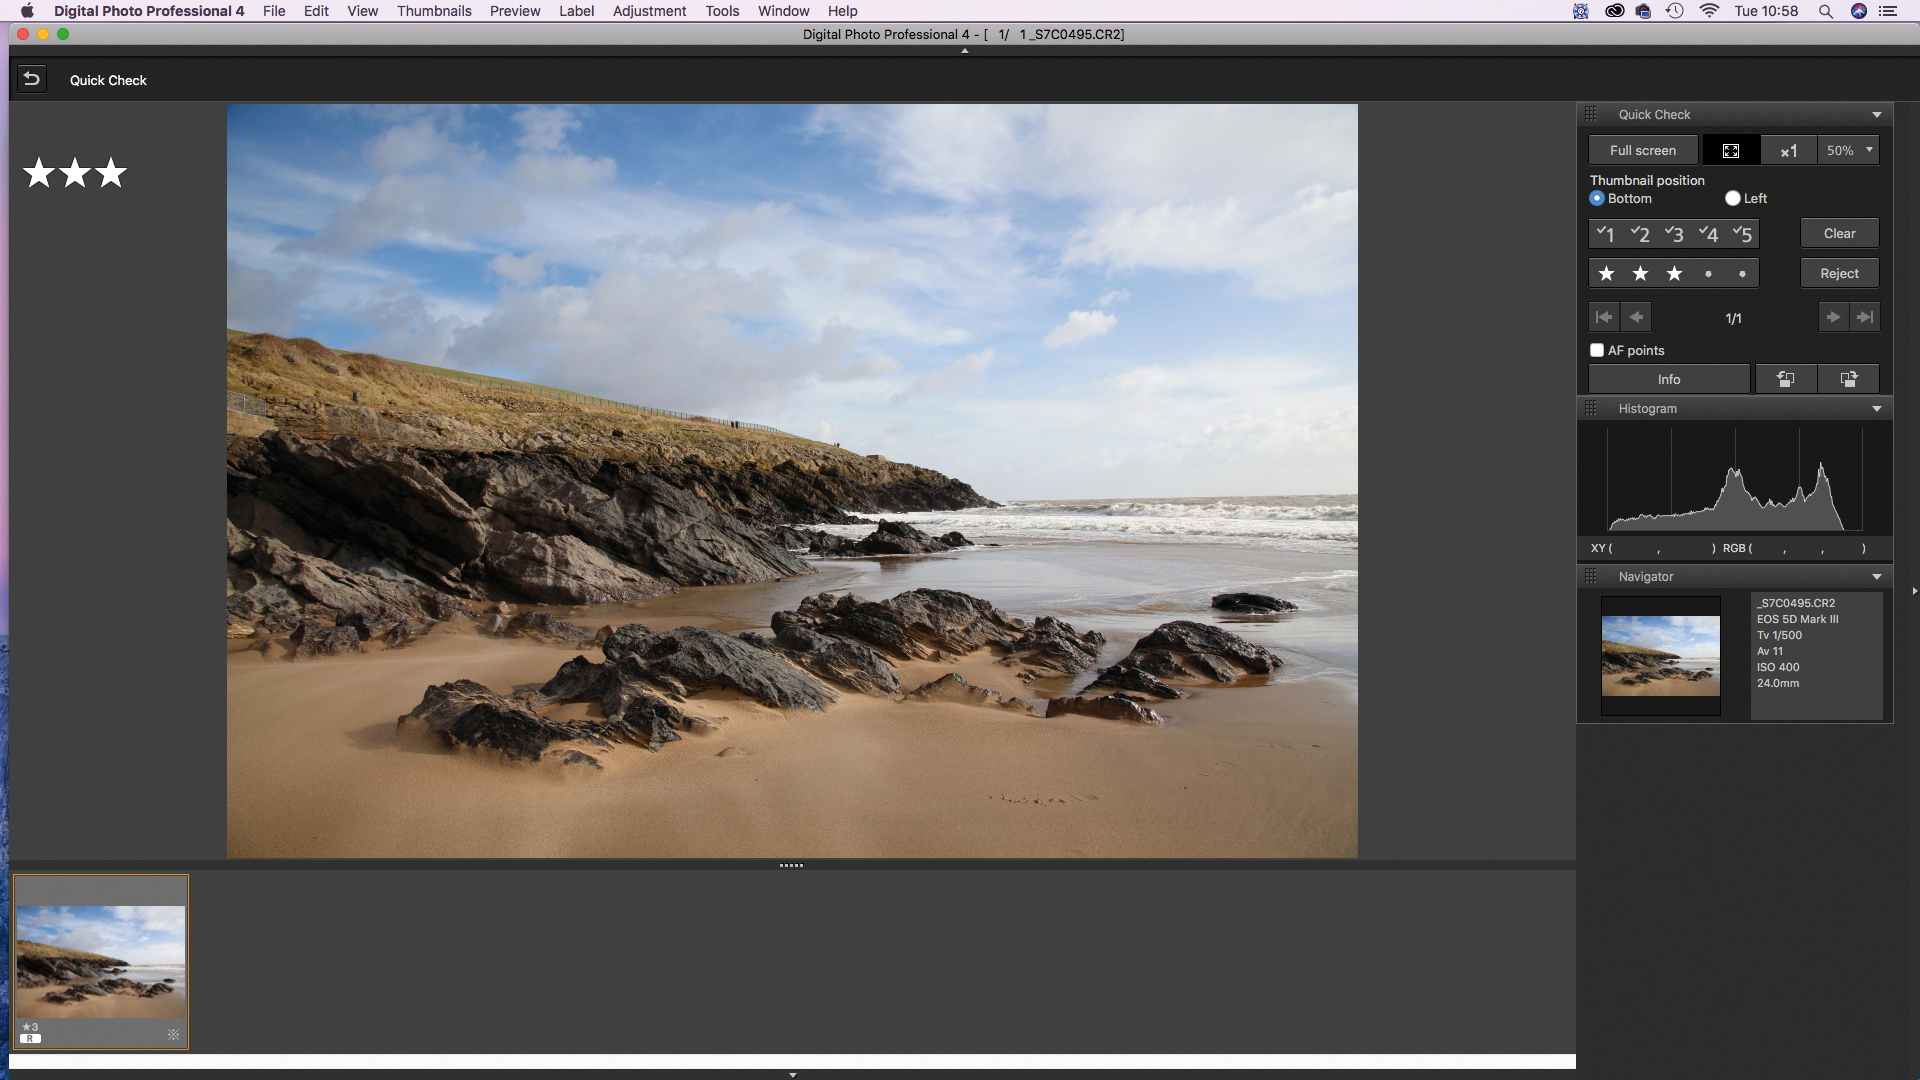
By clicking the Quick Check icon at the top of the workspace you can enlarge a thumbnail for a better look and easier access to all the rating and check mark-
assigning icons. You can also see which AF point was used to capture the image.
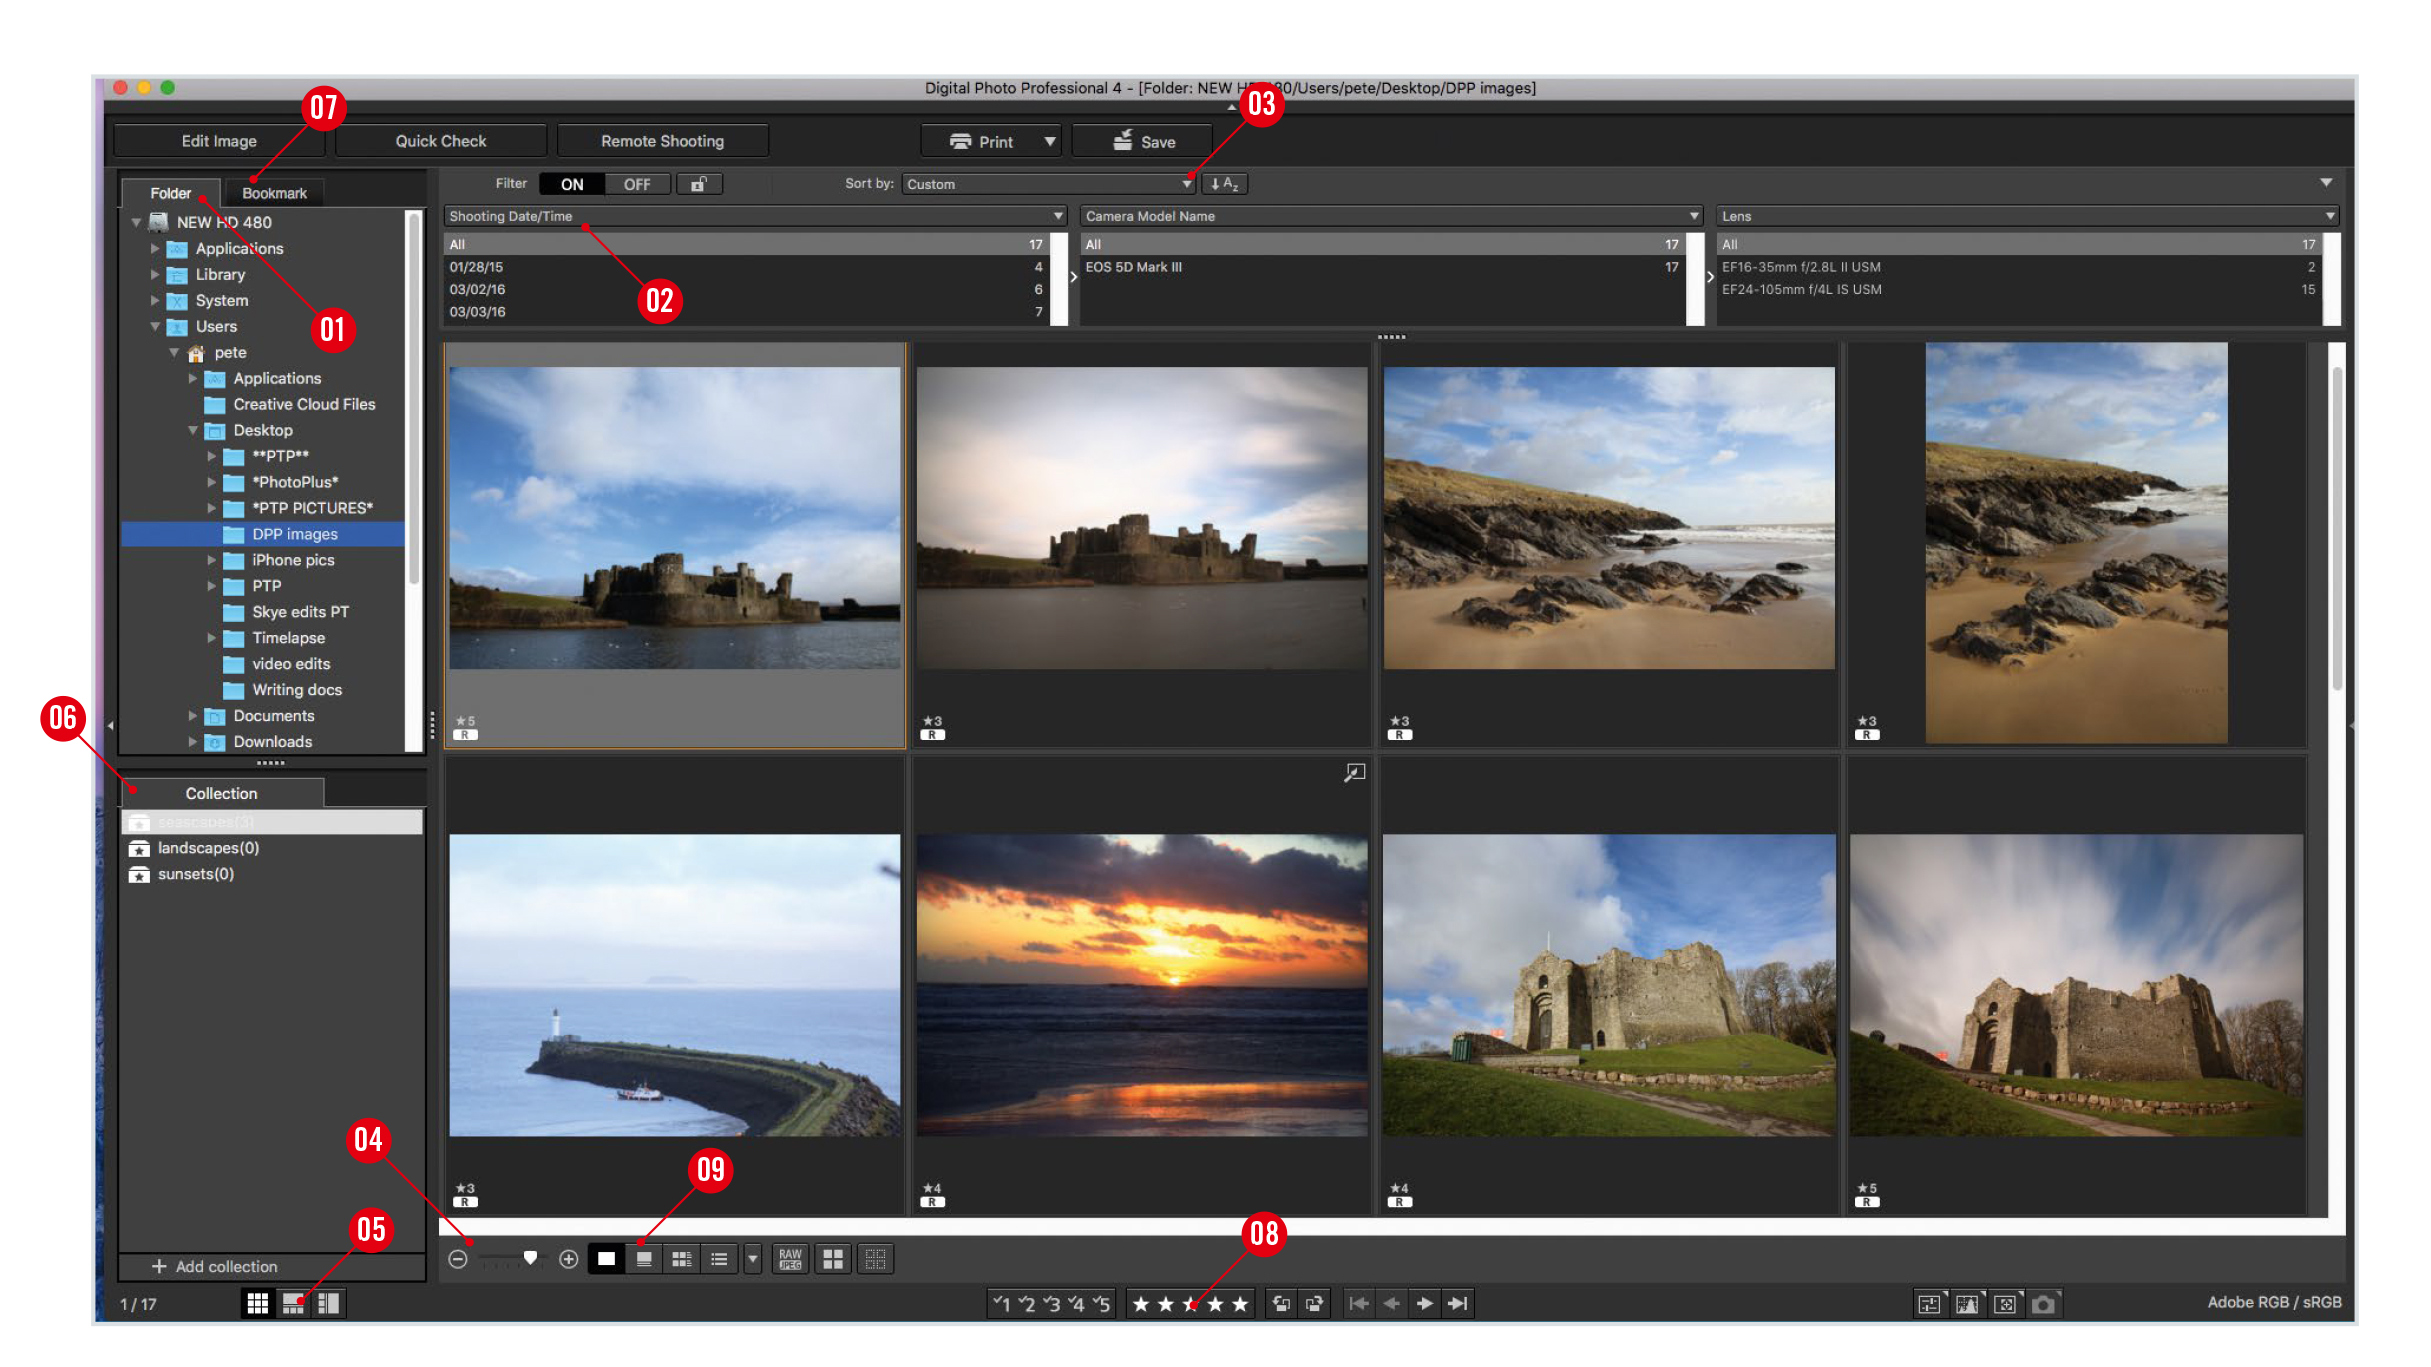
Canon Digital Professional workspace
1. Folder
Click on a folder to display thumbnails of its contents in DPP 4’s workspace. You can drag one folder into another to rearrange them. Folders of imported photos tend to be stored chronologically, but there’s lots you can do to find files faster…
2. Filter settings
You can filter the contents of a folder to display files that meet a specific criteria. For example, to only display RAW files that have been rated with 5 stars, or those displaying a particular check mark. Click on Filter at the top of then choose from the three drop-down menus.
3. Sort
To help you find files more easily you can change the way that thumbnails are displayed in DPP 4. You could choose to display the newest files at the top by choosing Shooting Date/Time and setting the secondary dropdown menu to Descending. In our example we’ve decided to display the highest-rated images at the top, descending to lower rated or unrated images at the bottom. You can sort your files by a wide range of criteria.
4. Size
To get a better look at the contents of an image, increase its thumbnail size by dragging this slider to the right.
5. Views
Our annotated image is in grid view. To take a closer look at a particular image, click here for a multi-layout view that displays thumbnails along the bottom, with a larger version of the selected image at the top.
6. Collection
Here you can create new collection folders based on any theme and then access specific files with ease. This helps you gather photos together as you might do in an analogue photo album, making it much easier to find specific or favorite images.
7. Bookmark
You can store your favorite folders in this pane, so you don’t have to wade through dozens of folders or sub-folders in the Folder pane.
8. Check marks & ratings
You can use these icons to add check marks or ratings to the currently selected thumbnail. You can then filter or sort the files according to check marks or ratings. Press X to mark a selected file for rejection.
9. Thumbnails
These buttons enable you to change the way thumbnails are displayed and add extra information, such as the active autofocus point used to capture each image.
Get the latest Canon DPP software
Canon's DPP 4.12.60 is the latest version (released 9 July 2020) and available for most current Canon EOS DSLR owners – eg EOS 2000D, 800D, 90D, 7D Mk II, 6D Mk II, 5D Mk IV and 1D X Mk III. As well as Canon EOS R-system mirrorless cameras eg EOS R, RP, R5 and R6.
You can download this version of Canon's Digital Photo Professional software from Camon's site here Get Canon's DPP software but you’ll need your EOS camera's serial number. Check the website to see if your Canon EOS camera is compatible with the latest DPP.
PhotoPlus: The Canon Magazine is the world's only monthly newsstand title that's 100% devoted to Canon, so you can be sure the magazine is completely relevant to your system.
Read more:
Best photo editing software: image editors for novices through to pros
Best photo-editing laptops: top laptops for photographers
Best online photography courses – from beginner guides to masterclasses
Best recovery software for photos
Best password manager
The former editor of PhotoPlus: The Canon Magazine, Peter has 18 years of experience as both a journalist and professional photographer. He is a hands-on photographer with a passion and expertise for sharing his practical shooting skills. Equally adept at turning his hand to portraits, landscapes, sports and wildlife, he has a fantastic knowledge of camera technique and principles.
He is the author of several published photography books including Portrait Photographer's Style Guide, and The Complete Guide to Organising and Styling Professional Photo Shoots with fellow portrait pro Brett Harkness.
Peter remains a devout Canon user and can often be found reeling off shots with his Canon EOS DSLR and EOS R mirrorless gear. He runs Peter Travers Photography, and contributes to Digital Camera magazine.
