How to use Canon Digital Photo Professional – Canon DPP part 5
Learn to correct color casts using free RAW image-editing software – Canon Digital Photo Professional 4
Watch video: How to counteract color casts and tints caused by different colour temperature light sources using Canon Digital Photo Professional 4
Canon Digital Photo Professional 4 is free RAW editing software that's available to every Canon EOS camera user – and is designed to help you import, organize, edit and share your photographs. This series of Canon Digital Photo Professional tutorials will help you get the best from this photo editor.
Part 1: Canon Digital Photo Professional tutorials
Part 2: Boost your tonal range
Part 3: Controlling tonal range
Part 4: Rescuing highlights
Part 5: Correcting color casts
Part 6: Selective color adjustments
Part 7: Creative color effects
Part 8: Black & white with DPP
Part 9: Fixing image distortion
Part 10: Sharpen images and smooth noise
Occasionally a photograph might suffer from a blue color cast, making the subject look cold. Alternatively the colors may be too warm, causing skin tones to look orange. These colour-related problems occur because different light sources produce different colour temperatures. To put it simply, daylight can add a blue colour cast, while indoor artificial light can add a wash of orange. The colour temperature of daylight also changes due to the time of day and with varying weather conditions.
When your camera is set to Auto White Balance (AWB), it looks for objects that should be white (or a neutral grey). If these areas have a cold colour cast, the camera warms them up to create a tint-free white. This will also create tint-free colors in the rest of the scene. If the whites feature a warm colour cast then the camera will cool them down until they are neutral, cooling down all the colors in the frame in the process. As the AWB mode doesn’t always get it spot on, you can give your camera a helping hand and set its white balance mode to an appropriate preset, such as Tungsten or Shade.
If you shoot in Raw quality mode then you can easily correct colour casts in Digital Photo Professional 4. It boasts the same manual and automatic white balance presets as your camera, so you can experiment with different settings in a few clicks to get the correct white balance.
You can also perform custom white balance operations to ensure that your images show their true colors every time, whatever the weather or light source.
01 CHECK WB PRESET
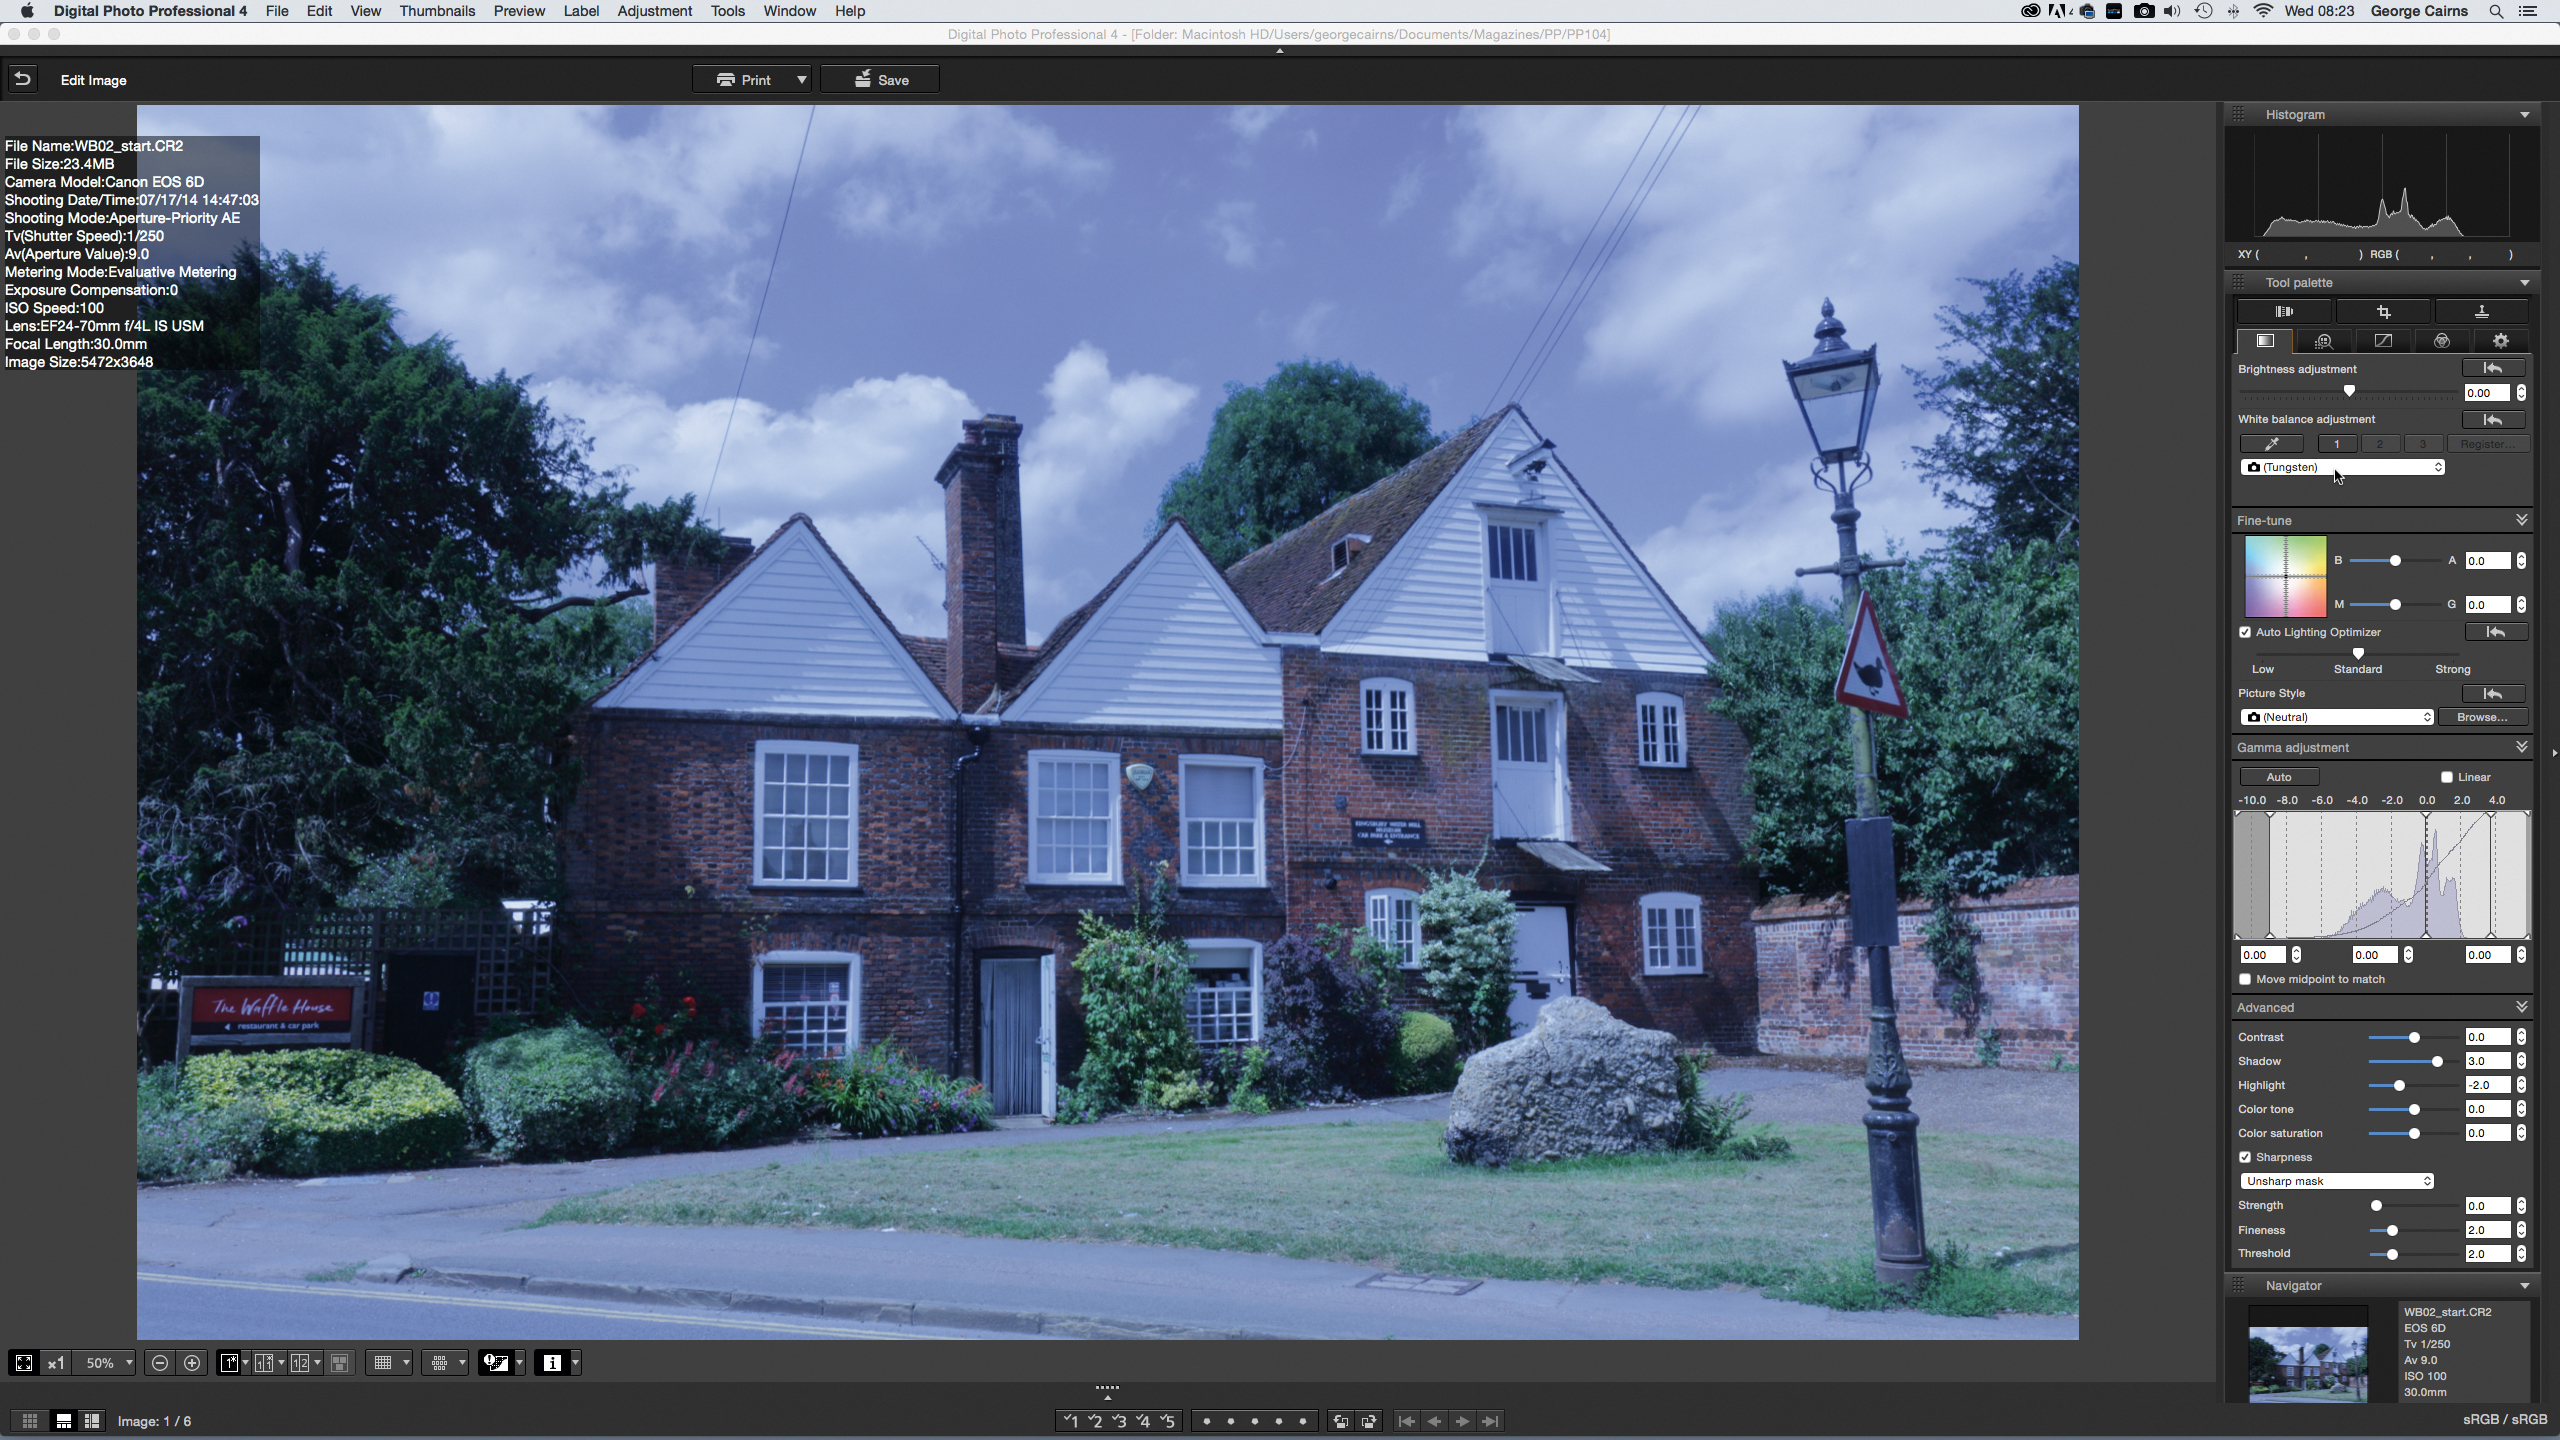
Looking at our .CR2 Raw image in DPP4, we click the Edit Image button, then the Basic panel’s tab. The White Balance drop-down menu shows this image was captured using the Tungsten preset, causing the daylight to look very blue.
02 TRY A PRESET
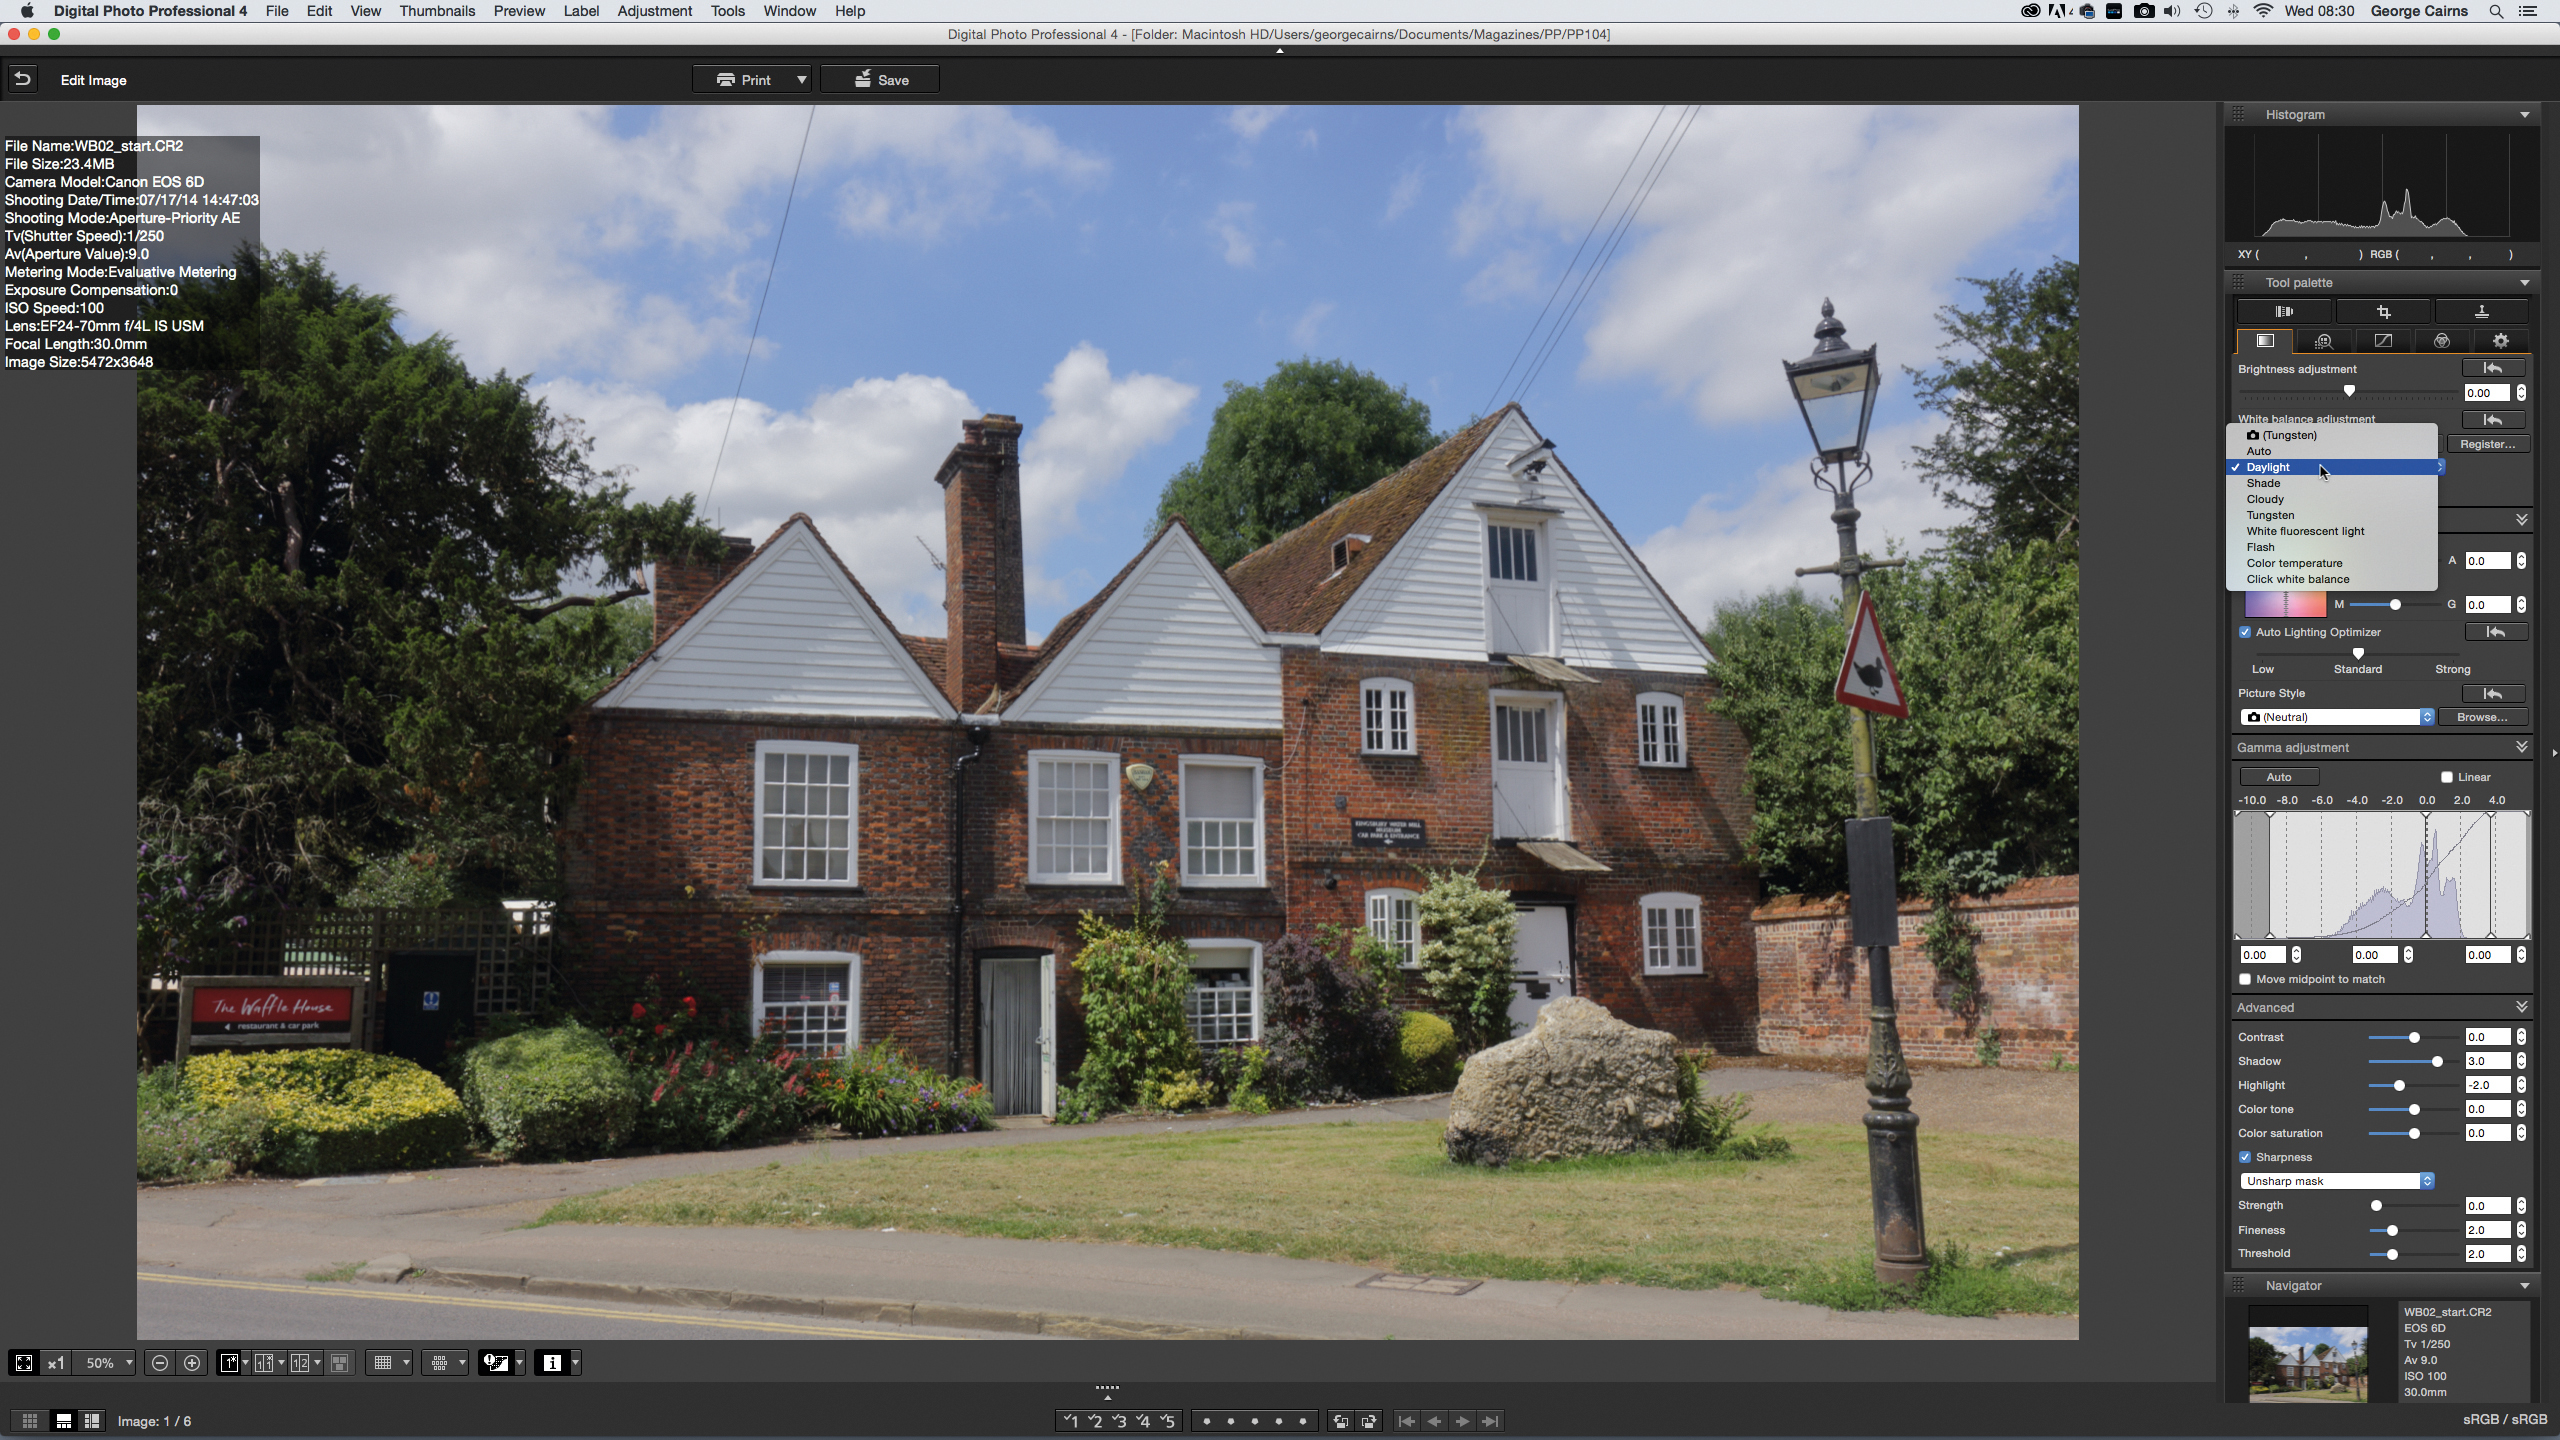
As this is a Raw file you can quickly correct the mistake by changing the White Balance drop-down menu to something more suitable, such as Daylight or Cloudy. Each outdoor preset produces slightly different results.
03 CUSTOM SETTING
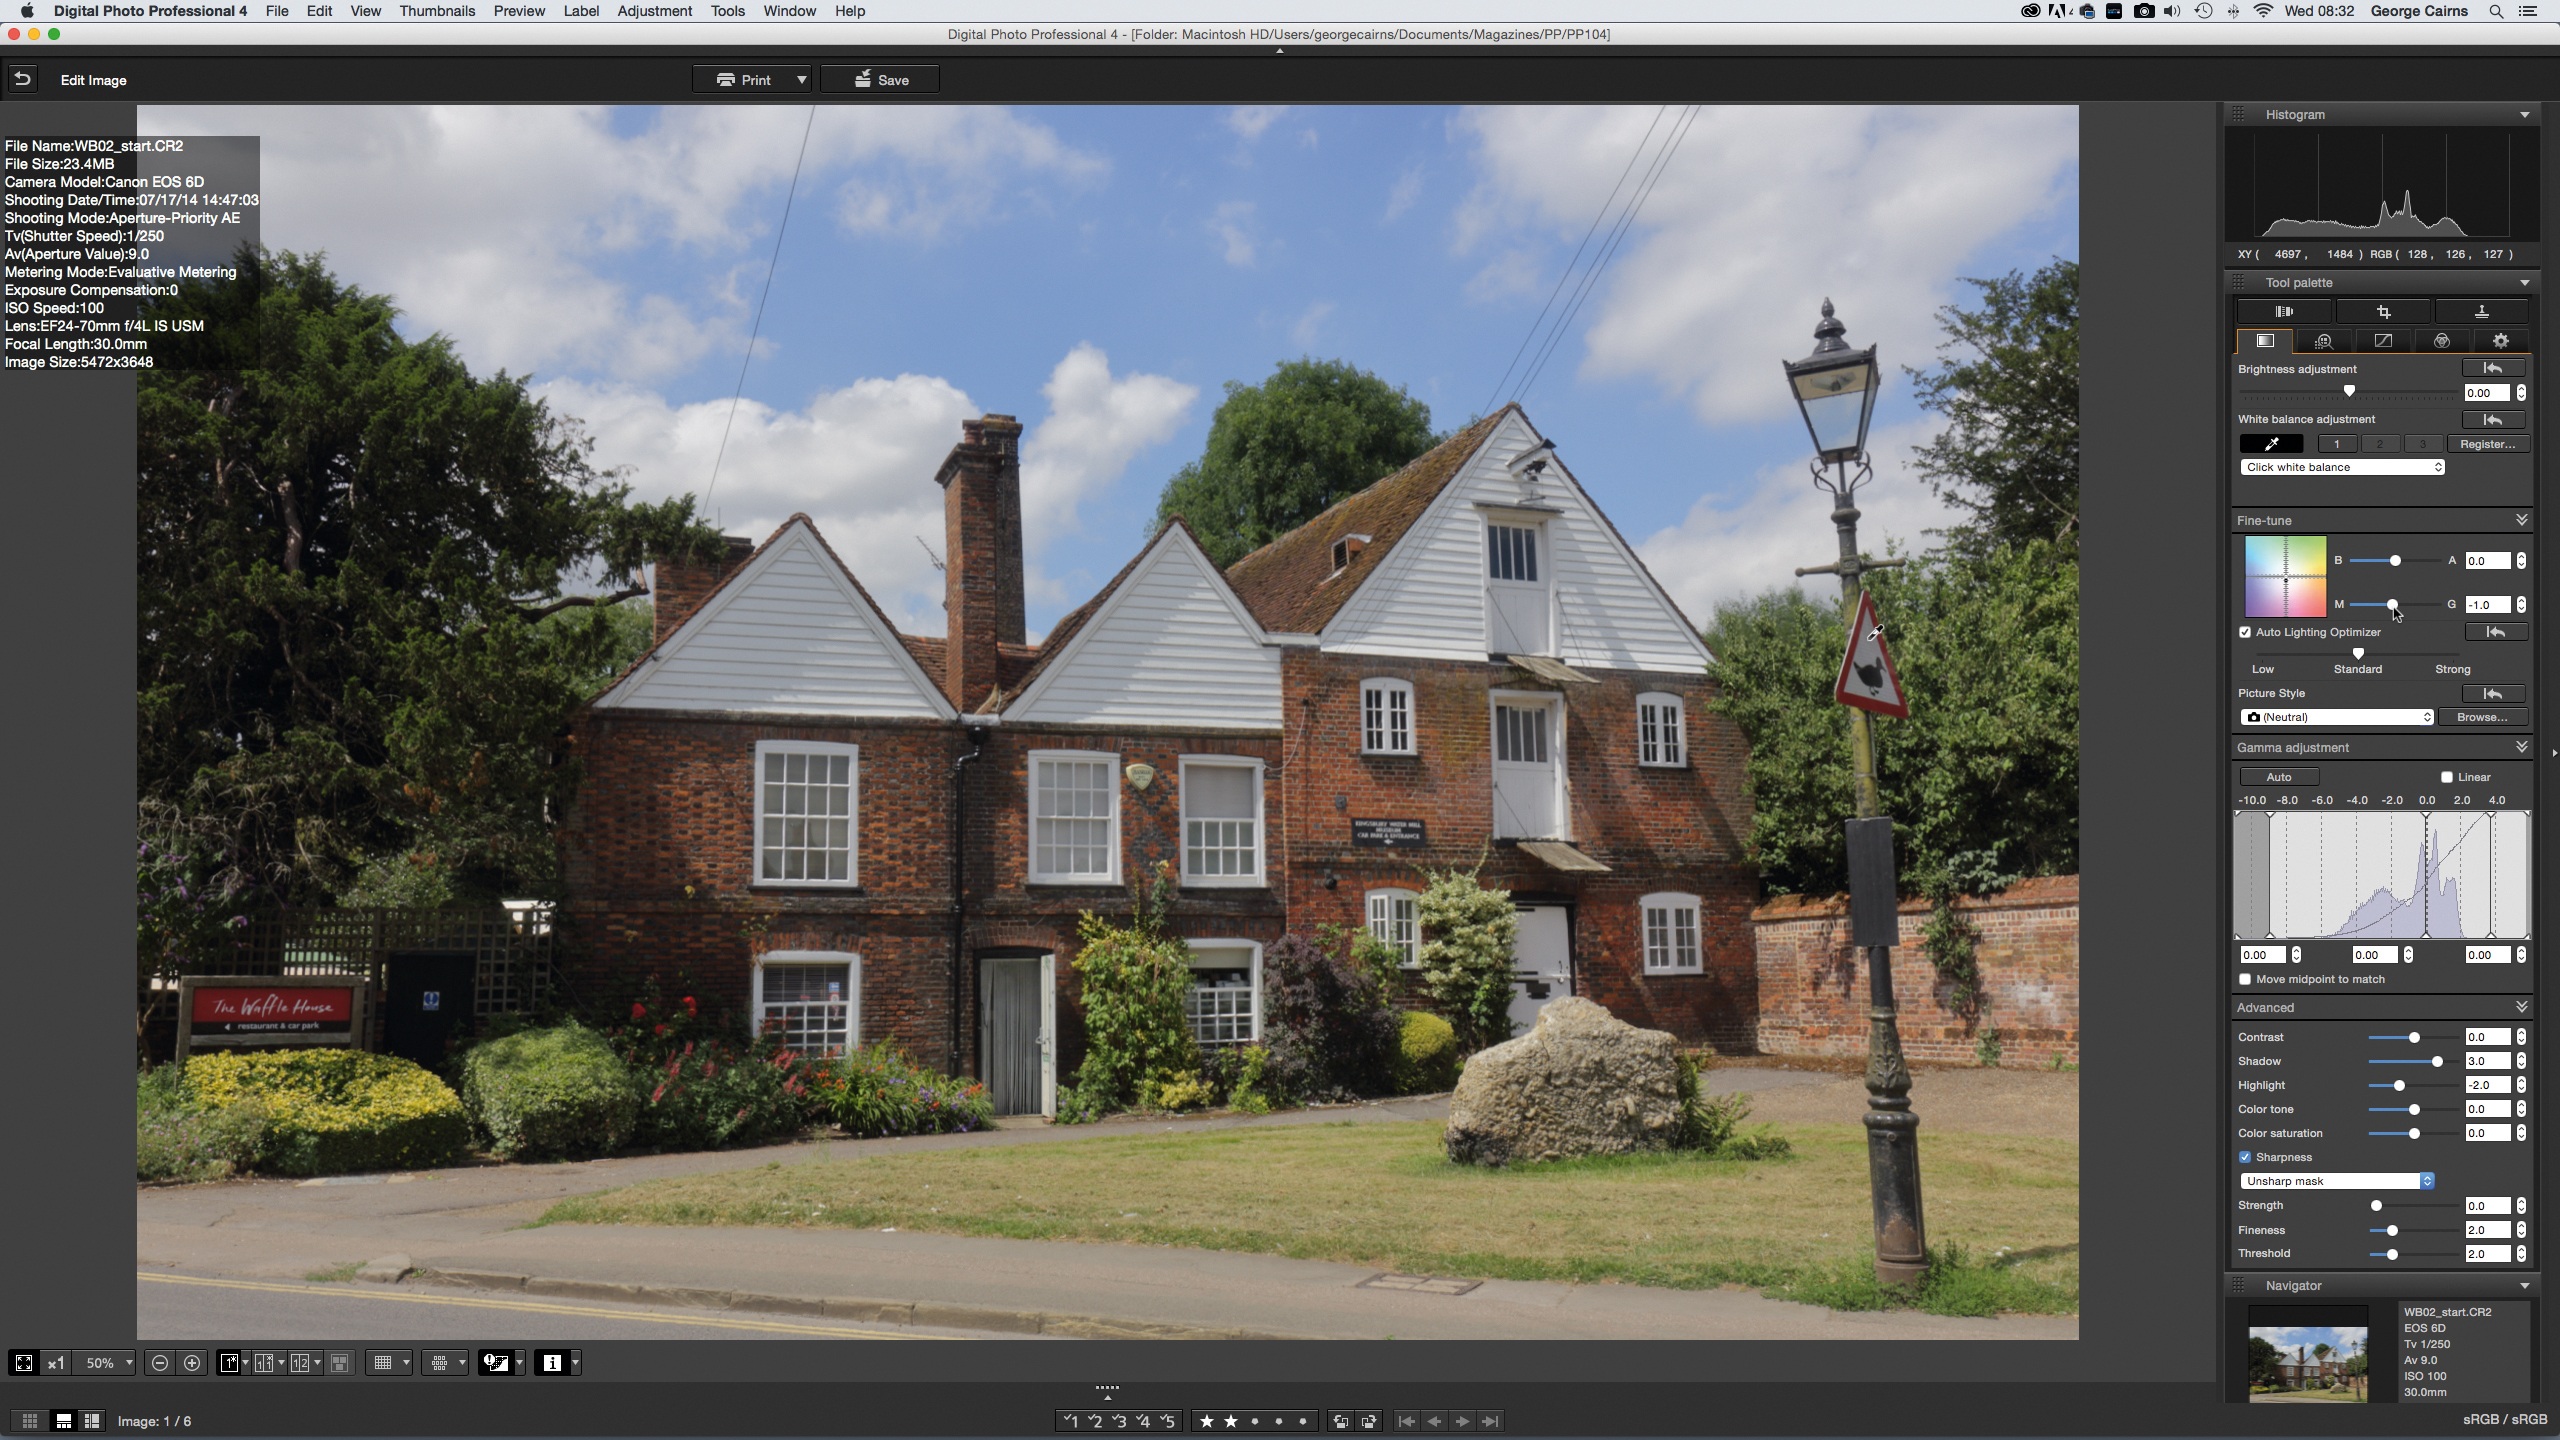
To tailor the WB, click the eyedropper icon and sample an area that should be white or grey (such as the duck sign). This warms the image up a little but adds a green hue. Drag the M-G slider left to -1 to remove the green tint.
Canon Digital Professional workspace
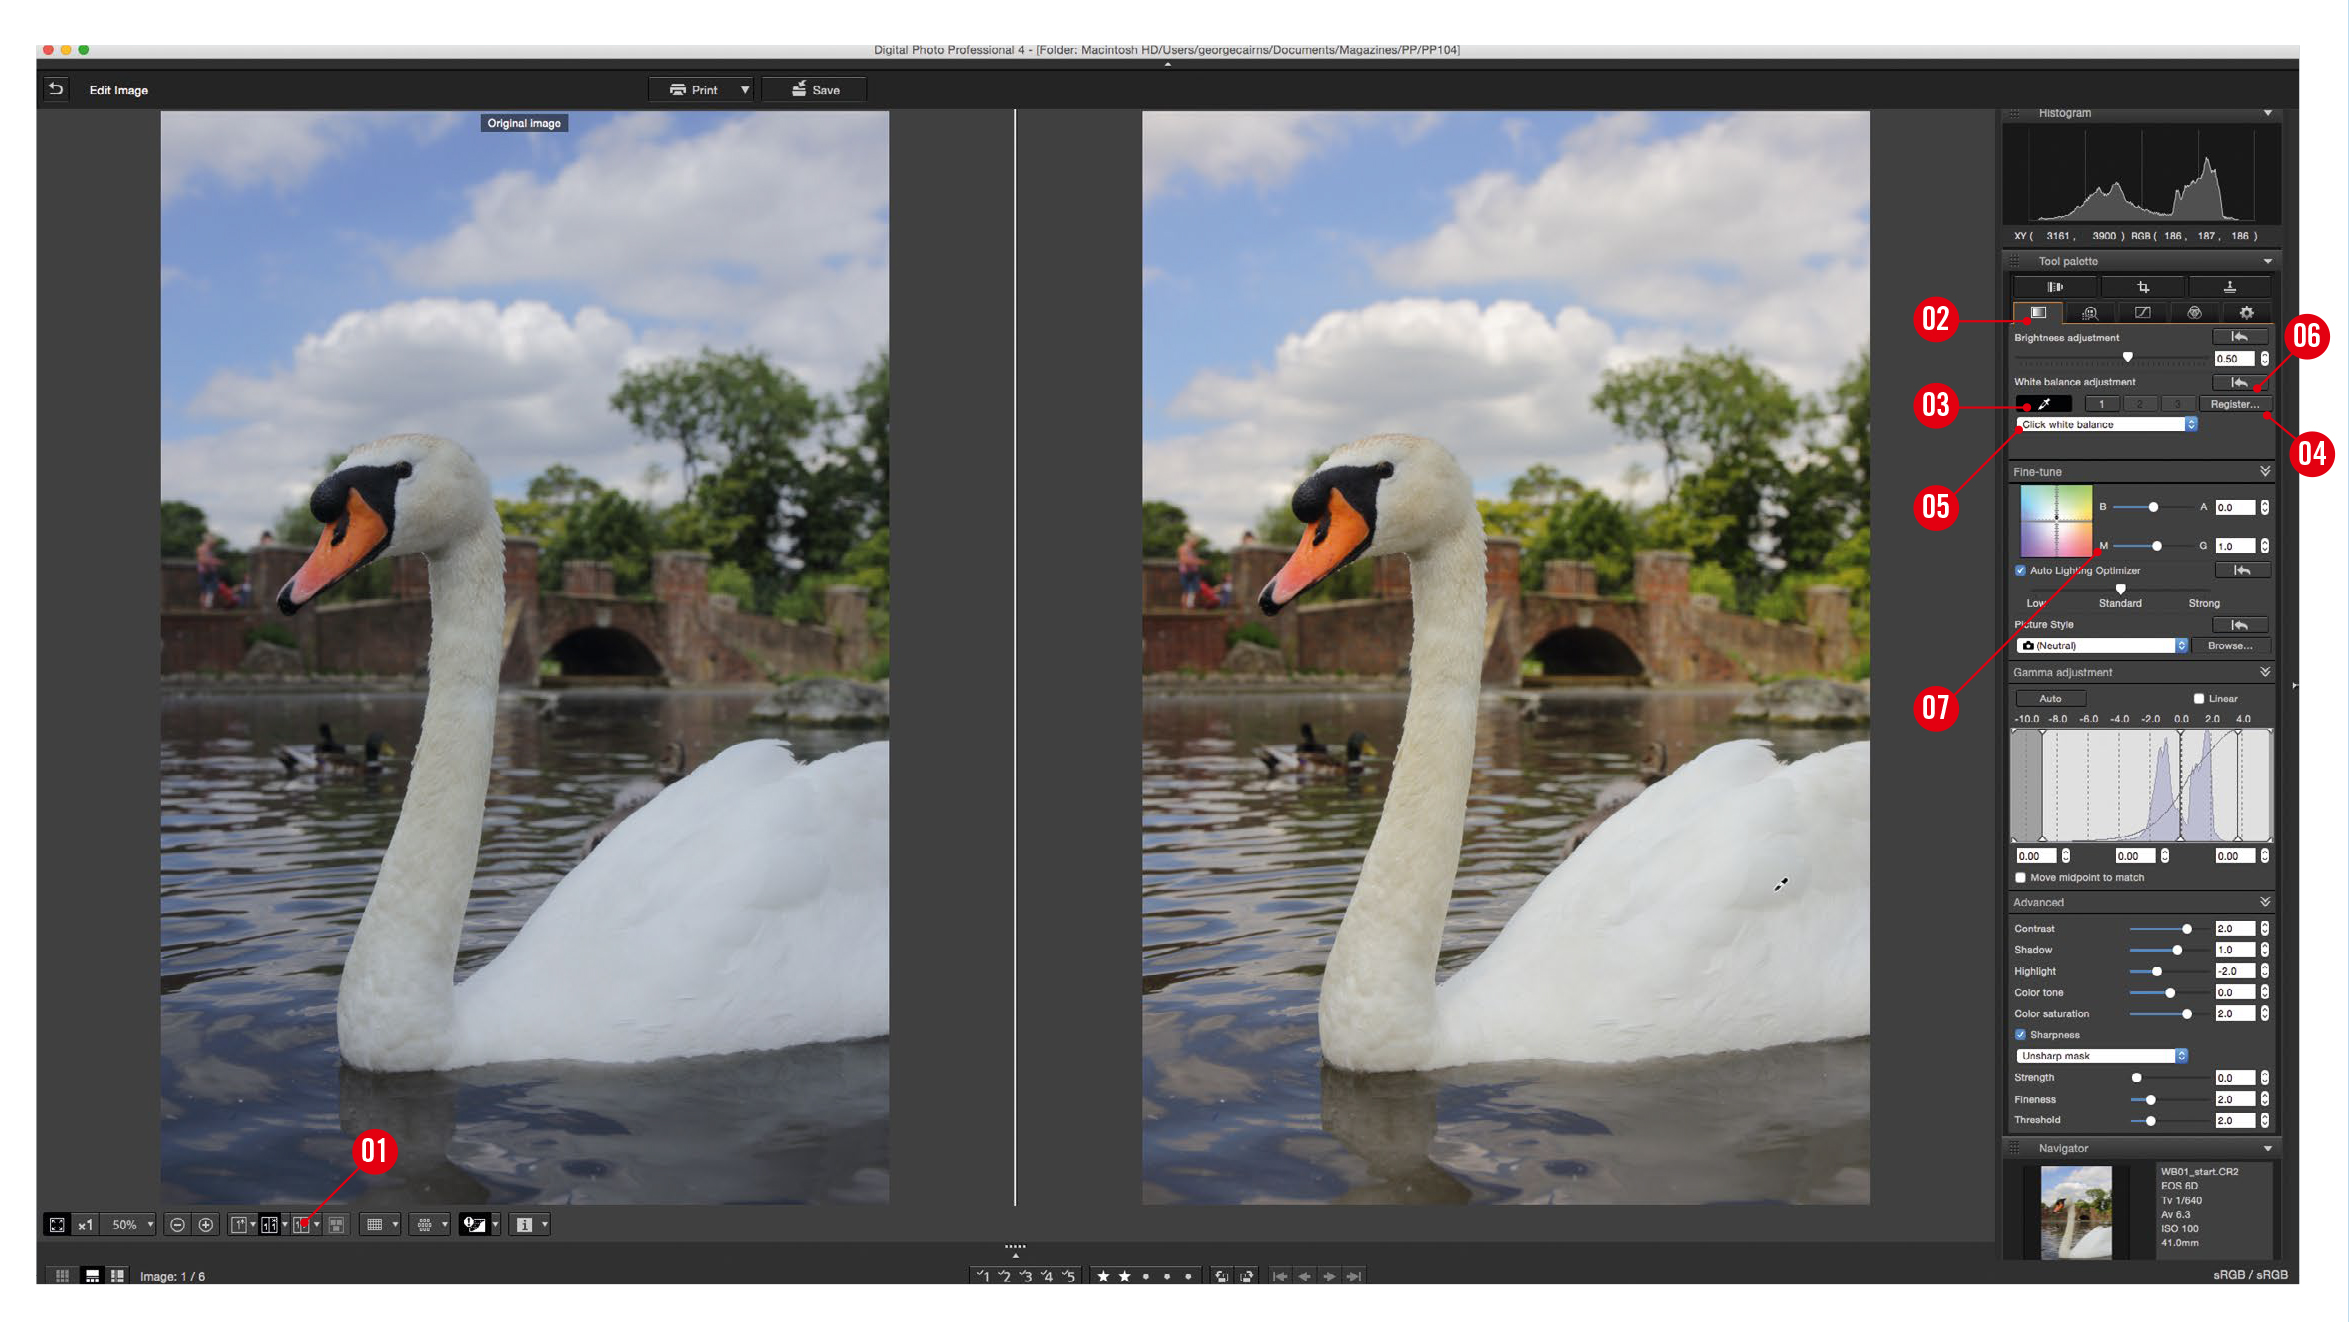
1. TOO COOL
Although this photo was captured on a sunny day, our start image looks a little too cool due to an ineffective Daylight white balance preset. The edited version features warmer colors and looks more summery. By clicking on this Before/After icon you can display both the start image and edited version, to help you see how your colour correction is looking.
2. BACK TO BASICS
The Basic image adjustment panel has all the tools you need to counteract colour casts and tints, courtesy of white balance presets and Custom white balance tools.
3. EYE DROPPER
Click on this icon and the Preset drop-down menu changes to Click White Balance. You can then click on an area that should be a neutral white or grey to warm it up or cool it down.
4. REGISTER
After performing each Custom white balance operation you can record the results by clicking the Register button and assigning it to one of the three adjacent buttons. This helps you quickly apply different Custom white balance settings to shots that suffer from similar colour casts.
5. PRESETS
This drop-down menu contains a collection of white balance presets that are similar to those on your camera. The camera icon indicates the white balance preset used to capture the image in-camera (Daylight in this instance).
6. RESET
All of the adjustments that you make to your image in DPP 4 are non-destructive. By clicking here you can restore the shot to its original look. This means that you’re free to experiment with different white balance settings without worrying about making mistakes.
7. FINE-TUNE
As well as blue or orange colour casts, the photo may also suffer from magenta or green tints. Toggle open this panel to tackle any colour tints. If there is a hint of magenta, for example, drag this slider towards G (green) to remove the magenta tint. Drag the same slider left towards M (magenta) to remove a green tint. You can also counteract blue or amber tints using the B-A slider.
Get the latest Canon DPP software
Canon's DPP 4.12.60 is the latest version (released 9 July 2020) and available for most current Canon EOS DSLR owners – eg EOS 2000D, 800D, 90D, 7D Mk II, 6D Mk II, 5D Mk IV and 1D X Mk III. As well as Canon EOS R-system mirrorless cameras eg EOS R, RP, R5 and R6.
You can download this version of Canon's Digital Photo Professional software from Camon's site here Get Canon's DPP software but you’ll need your EOS camera's serial number. Check the website to see if your Canon EOS camera is compatible with the latest DPP.
PhotoPlus: The Canon Magazine is the world's only monthly newsstand title that's 100% devoted to Canon, so you can be sure the magazine is completely relevant to your system.
Read more:
Best photo editing software: image editors for novices through to pros
Best photo-editing laptops: top laptops for photographers
Best online photography courses – from beginner guides to masterclasses
Get the Digital Camera World Newsletter
The best camera deals, reviews, product advice, and unmissable photography news, direct to your inbox!
The editor of PhotoPlus: The Canon Magazine, Peter 14 years of experience as both a journalist and professional photographer. He is a hands-on photographer with a passion and expertise for sharing his practical shooting skills. Equally adept at turning his hand to portraits, landscape, sports and wildlife, he has a fantastic knowledge of camera technique and principles. As you'd expect of the editor of a Canon publication, Peter is a devout Canon user and can often be found reeling off shots with his EOS 5D Mark IV DSLR.


