How to use Canon Digital Photo Professional – Canon DPP part 9
Quickly fix image distortion in DPP 4 using free editing software – Canon Digital Photo Professional 4
Watch video: Quickly fix distortions such as barrelling, vignetting and chromatic aberration of your RAW images using Canon Digital Photo Professional 4
Canon Digital Photo Professional 4 is free RAW editing software that's available to every Canon EOS camera user – and is designed to help you import, organize, edit and share your photographs. This series of Canon Digital Photo Professional tutorials will help you get the best from this photo editor.
Part 1: Canon Digital Photo Professional tutorials
Part 2: Boost your tonal range
Part 3: Controlling tonal range
Part 4: Rescuing highlights
Part 5: Correcting color casts
Part 6: Selective color adjustments
Part 7: Creative color effects
Part 8: Black & white with DPP
Part 9: Fixing image distortion
Part 10: Sharpen images and smooth noise
What you see through your Canon EOS camera’s viewfinder isn’t always what you get when you view the photo you’ve taken of the same scene. This is partly due to artefacts that are introduced by the lens you’re using.
When light enters a lens it’s focused onto the imaging sensor. In some cases different wavelengths of light aren’t quite focused on the same spot, causing fringes of colour to cling to contrasting edges – the technical term for this is chromatic aberration. The lens can also cause light to be bent, resulting in a subject’s horizontal and vertical lines bulging outwards (barrel distortion) or being ‘pinched’ inwards (pincushion distortion). These geometric distortions affect most images; in many cases they’re barely noticeable, but they can be a problem in architectural shots or other images containing prominent straight lines.
Most lenses are designed so that the maximum amount of light is captured in the central area of the image, with the light falling off towards the edges of the frame. At wide apertures in particular this can result in peripheral illumination, or vignetting, with the edges of the frame appearing darker than the rest of the image – this can spoil at shot with a blue sky like ours.
Newer EOS cameras enable you to correct lens distortions in-camera and you’ll find similar options in Digital Photo Professional 4. Below we show you the key tools for fixing distortions in DPP 4, and below we’ll show you how to use a lens profile to banish multiple distortions.
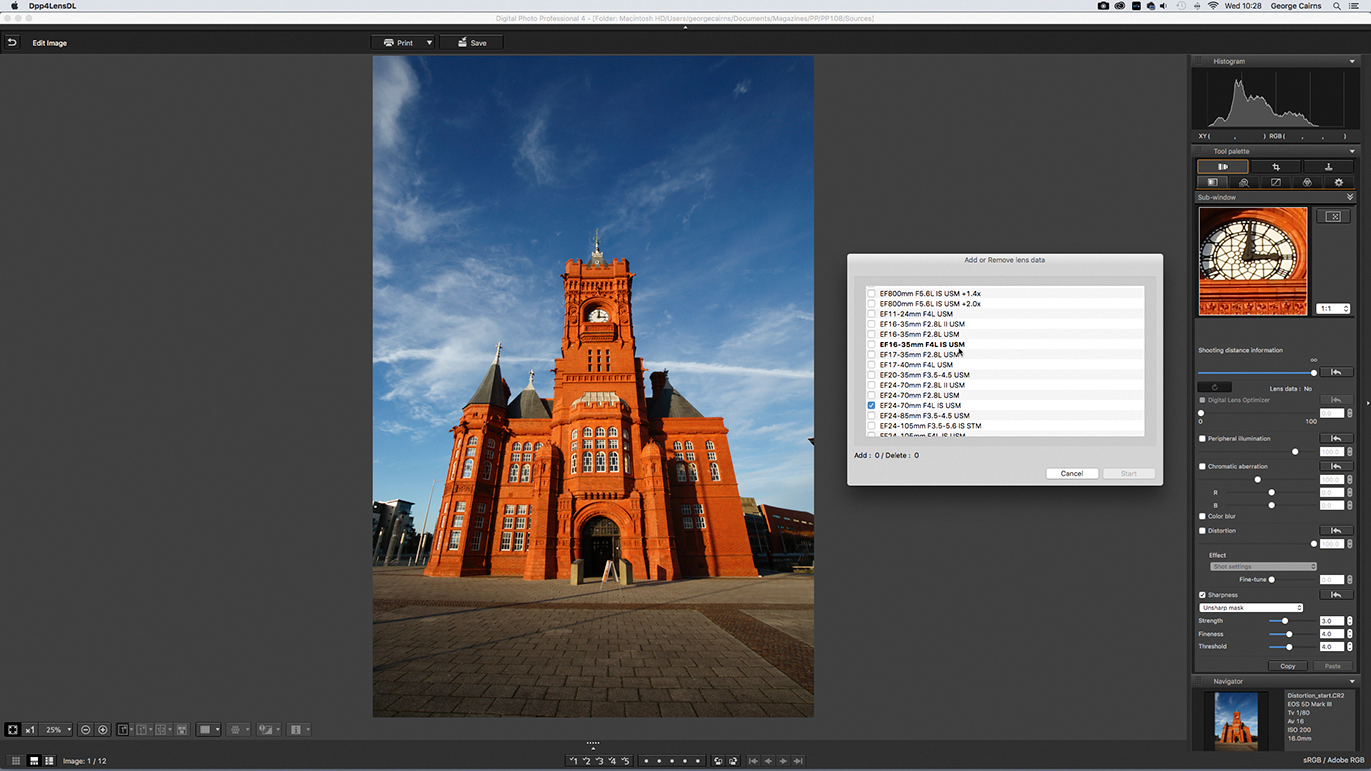
01 Search for your lens
Open your RAW .CR2 image in Canon DPP4 and click Edit Image. Click the Perform Image Lens Correction tab, then click Add Lens Data. DPP checks the metadata to see which lens was used to capture the image – it’ll be highlighted in bold.
The best camera deals, reviews, product advice, and unmissable photography news, direct to your inbox!
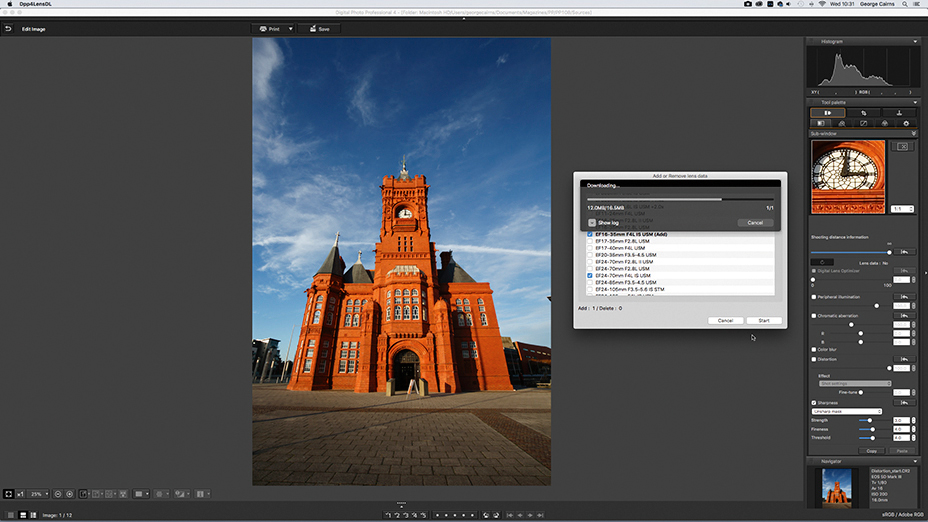
02 Download the lens profile
Tick the box next to the profile for that lens – the word Add will appear in brackets. Click the Start button. DPP 4 will download the lens profile – when the update is complete, click Close to dismiss the dialog.
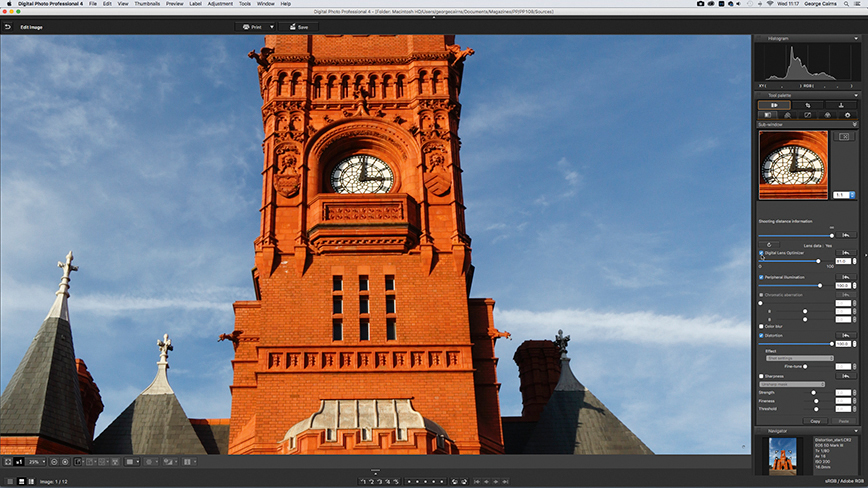
03 Apply the corrections
Click the Digital Lens Optimizer button to apply the profile. The shot will look sharper (even if you don’t tick the Sharpness box). Tick Distortion to fix the barrelling, and tick Peripheral Illumination to correct the vignetting.
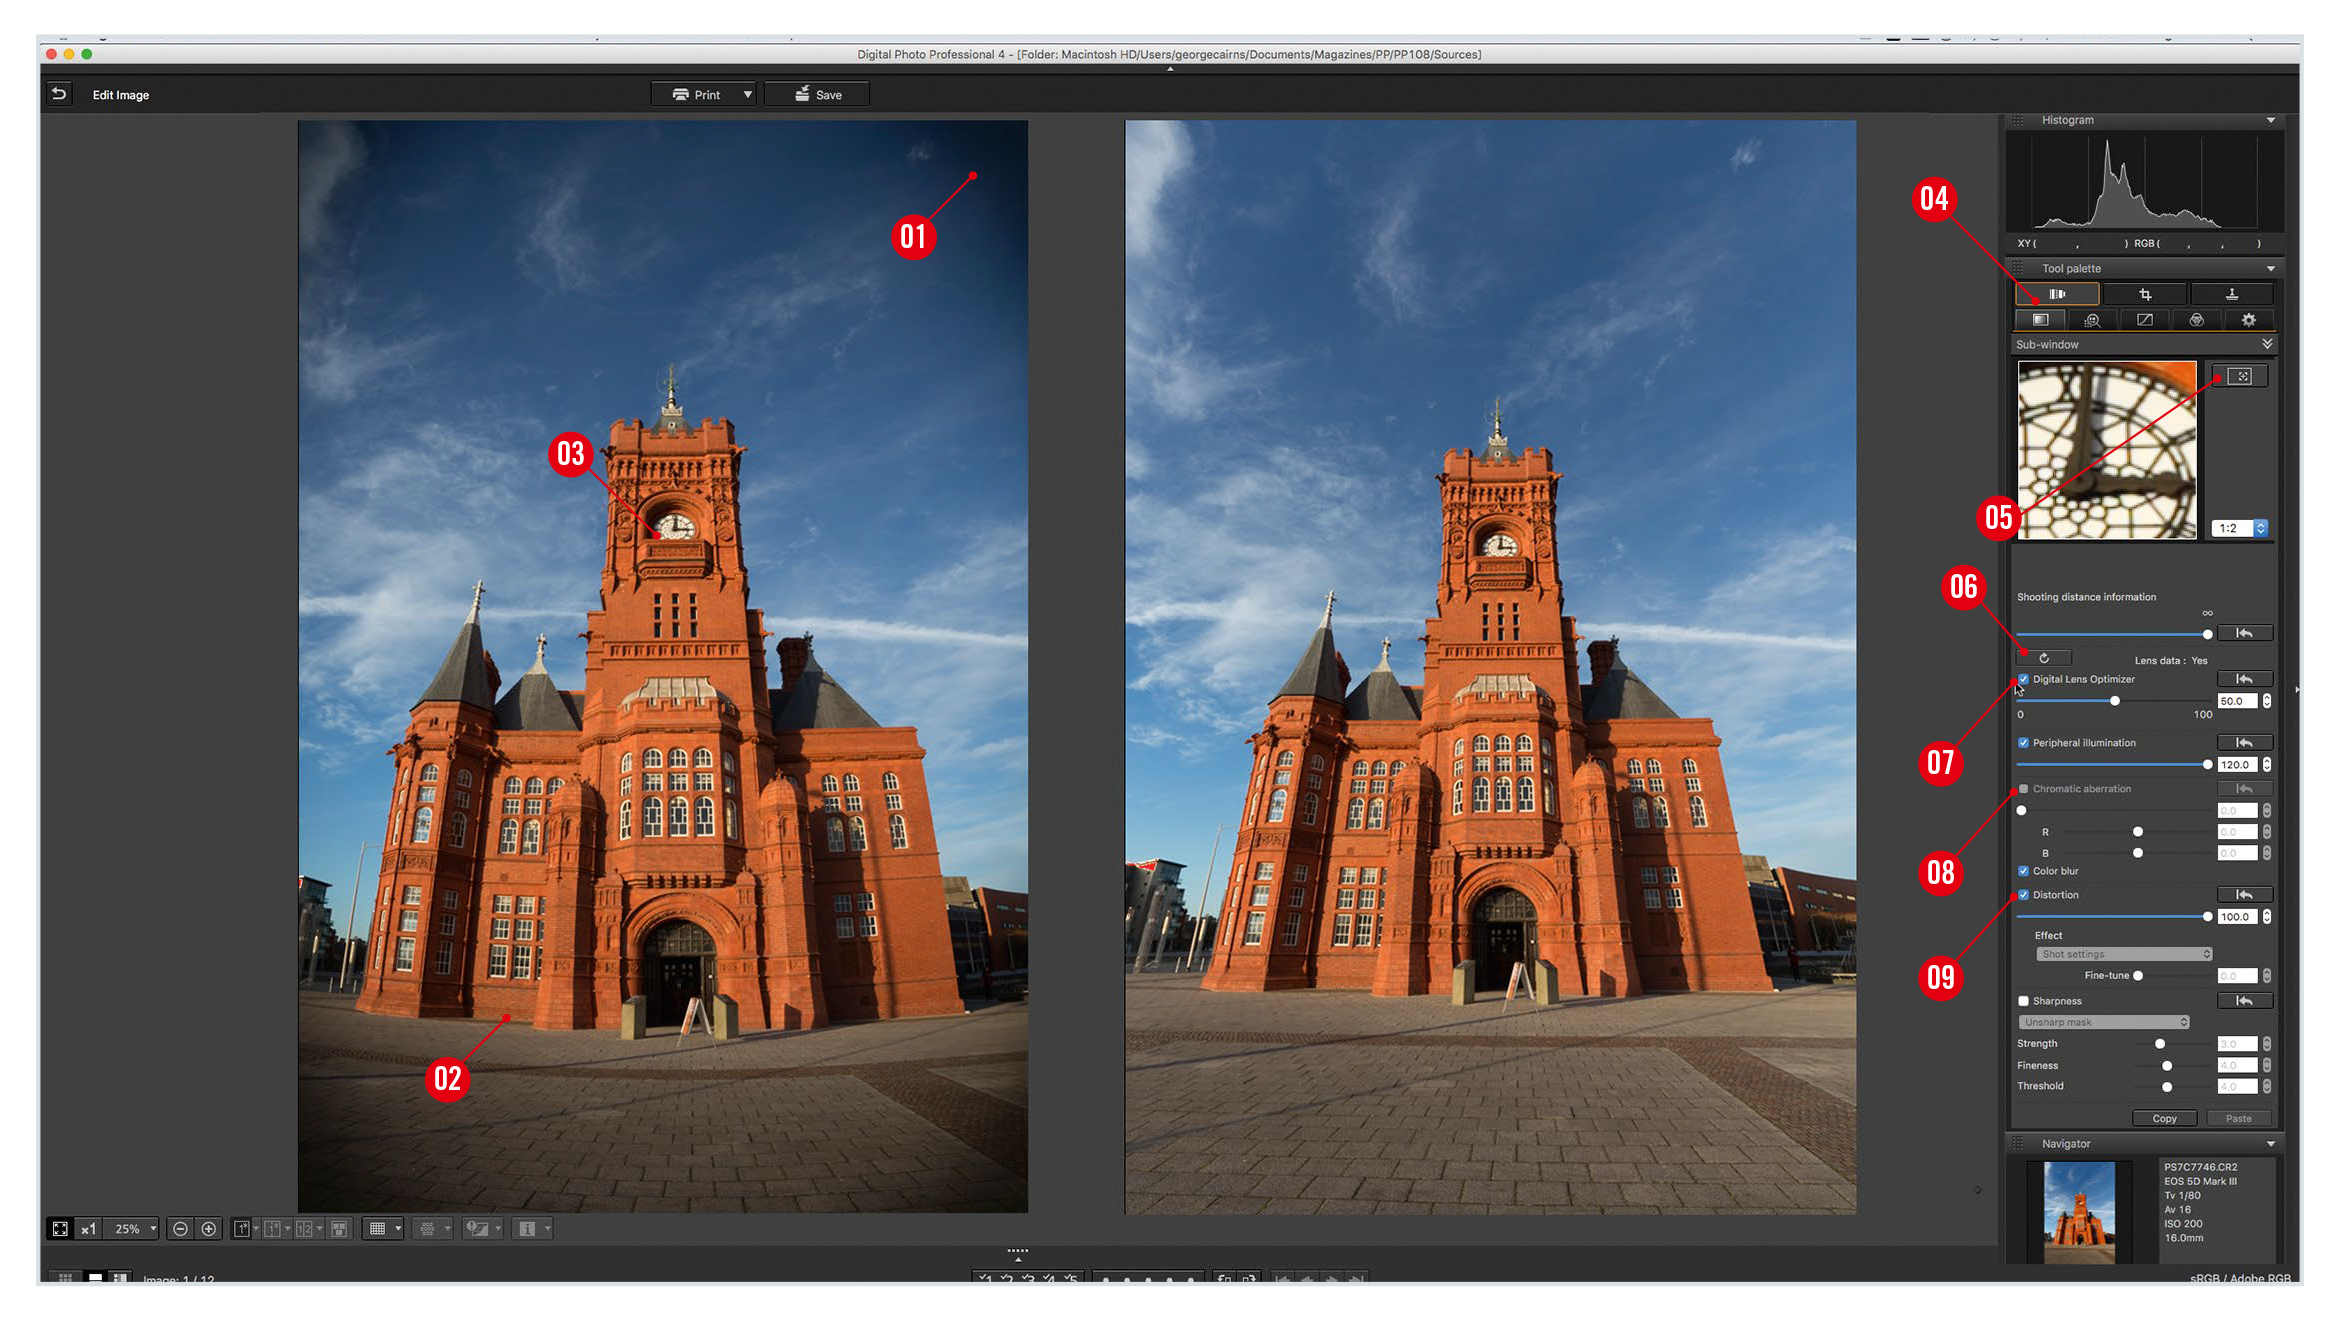
Canon Digital Professional workspace
1. VIGNETTING
Peripheral illumination distortion, or vignetting, appears as darkening at the edges of the frame. It’s especially noticeable in images that contain large areas of even tones, such as the sky in this photograph.
2. GEOMETRIC DISTORTIONS
Some lenses can cause straight lines to appear curved. At shorter focal lengths the image will bulge outwards (barrel distortion), while at longer focal lengths the opposite effect can become apparent (pincushion distortion).
3. CHROMATIC ABERRATION
You may notice red, purple or blue fringes clinging to high-contrast edges in your shots. This is known as chromatic aberration, and it’s more of a problem with cheaper lenses.
4. LENS CORRECTIONS PANEL
This tab gives you access to a range of lens correction tools that are designed to quickly and easily help you counteract geometric distortion, vignetting and chromatic aberration.
5. SUB WINDOW
The sub window gives you a magnified look at any part of your picture. To choose which area you want to magnify, click this button. Move the cursor over the target area on the photo and click to select it. Here we’re viewing the targeted area at a magnification of 1:2 so that we can spot any colour fringes.
6. ADD LENS DATA
Click this button to import a lens profile that will enable DPP 4 to correct the distortions produced by a particular lens. See our walkthrough on the facing page for more info.
7. CORRECT VIGNETTING
Tick this box to correct vignetting by lightening darkened edges for an even exposure. You can use the adjacent slider to fine-tune the correction manually.
8. FIX COLOUR FRINGING
Drag the R or B sliders to the right to remove red or blue colour fringes, or chromatic aberration. If you apply a lens profile, as we’ve done in our example here, the Chromatic Aberration box and sliders will be unavailable – this is because the Digital Lens Optimizer has removed the fringing automatically, using the imported lens profile.
9. BANISH BARRELING
Tick this box to automatically correct barrel or pincushion distortion in shots of buildings. You can use the slider to fine-tune the amount of geometric correction that’s applied.
JARGON BUSTER!
PERSPECTIVE DISTORTION: This refers to the converging vertical lines produced when you shoot a tall building from low down. DPP 4 can’t correct this type of distortion.
GEOMETRIC DISTORTION: When light passes through a lens it is curved towards the camera’s sensor. This can cause straight lines to become warped.
Get the latest Canon DPP software
Canon's DPP 4.12.60 is the latest version (released 9 July 2020) and available for most current Canon EOS DSLR owners – eg EOS 2000D, 800D, 90D, 7D Mk II, 6D Mk II, 5D Mk IV and 1D X Mk III. As well as Canon EOS R-system mirrorless cameras eg EOS R, RP, R5 and R6.
You can download this version of Canon's Digital Photo Professional software from Camon's site here Get Canon's DPP software but you’ll need your EOS camera's serial number. Check the website to see if your Canon EOS camera is compatible with the latest DPP.
PhotoPlus: The Canon Magazine is the world's only monthly newsstand title that's 100% devoted to Canon, so you can be sure the magazine is completely relevant to your system.
Read more:
Best photo editing software: image editors for novices through to pros
Best photo-editing laptops: top laptops for photographers
Best online photography courses – from beginner guides to masterclasses
The former editor of PhotoPlus: The Canon Magazine, Peter has 18 years of experience as both a journalist and professional photographer. He is a hands-on photographer with a passion and expertise for sharing his practical shooting skills. Equally adept at turning his hand to portraits, landscapes, sports and wildlife, he has a fantastic knowledge of camera technique and principles.
He is the author of several published photography books including Portrait Photographer's Style Guide, and The Complete Guide to Organising and Styling Professional Photo Shoots with fellow portrait pro Brett Harkness.
Peter remains a devout Canon user and can often be found reeling off shots with his Canon EOS DSLR and EOS R mirrorless gear. He runs Peter Travers Photography, and contributes to Digital Camera magazine.
