I combine crafting and photography by conjuring up the magic of marbling

Marbling home project
(Image credit: Claire Gillo)

Marbling has been around for many years, and we see it in lots of different places – from pillars on old buildings to artworks, wrapping paper, book covers, and even tiled surfaces in the home. There are many different ways you can marble, and the fun and unique appeal of marbling is that no two effects are ever going to be the same.

The marbling technique we utilized in this tutorial uses a water solution and colored paint. We bought a Magic Marbling Kit, which you can find online for around £20/$24 – alternatively, you can improvise with household products including oil-based paints, food coloring, milk and even shaving foam.

(Image credit: Claire Gillo)

With our marbling kit, we were also able to lift and record our final marbled images onto paper; however, we opted to shoot the effect while it was still in the tray. We chose to do this so that we could shoot a sequence of images, but we also liked the 3D appeal of the paint floating on the surface of the liquid. 

Finally, as with any paint-based project, things can get a little messy. So make sure you have some kitchen roll to hand, and you may also want to put down a protective cloth before you begin.

Step by step: Shoot a home marbling project

(Image credit: Claire Gillo)

Get started

Following the instructions in our marbling kit, we made a solution around six hours in advance, mixing together 250ml of water with a sprinkle of powder (safe and non-toxic). To start, we placed the solution on an even surface and set up our camera overhead. This project is great fun to do with children.

(Image credit: Claire Gillo)

Dial in your camera settings

We took our images using natural light from a bird’s-eye view, which meant our camera needed to be mounted on a tripod. We set the ISO at 100 and the aperture to f/8 to keep everything sharp. Our shutter speed was reading around one second so, to ensure we had no camera shake, we used the self-timer to fire the shots.

Marbling home project

(Image credit: Claire Gillo)

Get creative and experiment

Once everything is set up, get creative. Our marbling kit came with some tools, but sticks and combs are effective too. We experimented with techniques and colors until we were happy with the results, but found it best to shoot throughout the different stages, so that if we overdid the marble effect, we still had our earlier efforts.

Marbling home project

(Image credit: Claire Gillo)

Record the results

If you are using a marbling kit, you can record your final images on paper. Place a piece of paper over the paint, carefully lift a corner and peel back. Leave your paper to dry for an hour before you move it and a few more hours to ensure it is dry. If you don’t want to use your camera, you could scan in your final marbled images instead.

Marbling home project

(Image credit: Claire Gillo)

Edit your images 

We used the basic controls in Lightroom to make our images pop, boosting the contrast and playing with the Black and White sliders. We also cleaned up any bubbles and other distracting elements in Photoshop using the Remove and Spot Healing tools. Finally, we experimented with different presentation ideas to combine the images.
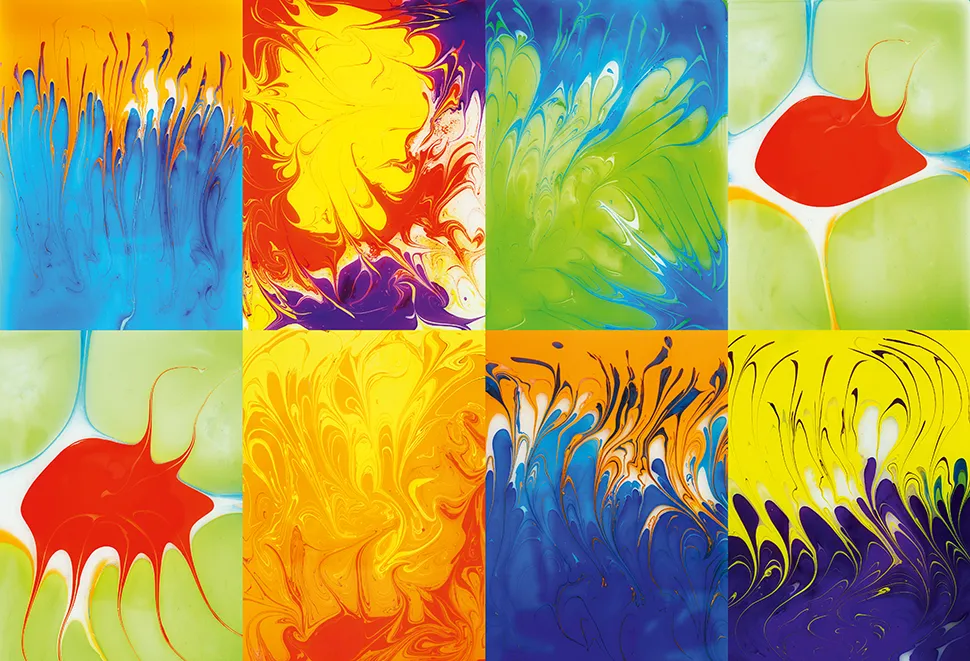
Marbling home project

(Image credit: Claire Gillo)

Think about color

To ensure that your marbling works wonders, think about the colors you are using and how they are going to blend together. For example, a warm and bright color such as yellow will provide a good contrast when paired with a cooler, darker color such as purple. Blue and orange will work well together, and green and red are also complementary colors.

You can introduce more than two colors if you want – but bear in mind that sometimes less is more, and it’s easy to go one step too far and have to start all over again! That is part of the experimental process, though, so embrace some failure along the way to discover what works best for you.

Home photography ideas: photo projects to try indoors

Claire Gillo

Claire is a professional photographer and writer, and lives by the the sea with her two young children, husband and cat in the southwest of the UK.

After graduating from The Bournemouth Arts Institute with a first-class degree in photography, Claire worked for a number of years in the publishing industry, including as Technique Editor for Digital Camera magazine.

She loves anything and everything to do with photography, from creating magazine articles to photographing ballerinas on the beach and newborn babies (but not at the same time). She mainly shoots with digital DSLRs, but does dust off her beloved Hasselblad medium-format film camera once in a while…

Read more
Use the light at the start or the end of the day to capture dramatic shadows and create fine-art photos without having to go outdoors
Have fun photographing shadows from the comfort of your own home
Light painting
I created these psychedlic silhouettes using this amazing in-camera photo technique
A close-up of a dew-covered spider web
Photographing spider webs on a cold morning is one of winter's big camera opportunities
Portrait of model in low light, with surrounded by heart-shaped bokeh
I turned boring bokeh into hearts with this simple DIY and I LOVE the results
Stroboscopic flash portraits with a tennis player in a studio
Game, set and flash! Capture sensational stroboscopic portrait photos in a home studio
Period portrait photography taken at a Session Days photography event
Want to take photos like this? You NEED to attend an organized portraiture event!
Latest in Photo Technique
Backing up data is so annoying that most would rather…scrub toilets!
A screenshot of the Adobe Stock Customize tool
Adobe Stock now enables you to mass-edit with AI – but is it a nail in the coffin for stock photography, or another way for creators to earn money?
AIarty Image Matting
Cut the chaos: AI-powered background removal + free giveaway for photographers!
Neurapix before and after of smiling bride holding bouquet of flowers
“Neurapix reduced my editing time by 50%” – why this AI Lightroom plug-in is taking wedding photography by storm
Image of a red motorbike split into two halves, the first half exhibits camera shake and the second half is sharp
Slow shutter speeds have created a camera shake crisis, and I reckon ISO and Instagram are largely to blame…
Front cover photograph of the Ultimate Photography Ideas Book, which contains more than 60 photo projects covering a wide range of genres, published by Ilex Press and on sale now
Digital Camera World photo projects book is on sale now!
Latest in Tutorials
Total lunar eclipse
How I’ll photograph the blood moon total lunar eclipse tonight, one of the best astrophotography events of the year
Wildlife portrait of a gannet in front of a clean green background
10 tips for wildlife photography from birds in flight to insect close-ups
Mountain valley during sunrise. Natural summer landscape
9 landscape photography tips I think every photographer should know
Bride and groom hold hands aloft backlit against the sun on their wedding day
Want to be a wedding photographer? Here are my 11 tips that will help you get there the RIGHT way
Colourful trees frame a small river, photographed with a long exposure
I love to shoot long exposures in the rain – here’s why I head to the woods!
What is ISO in photography?