Lightroom series part 5: How to correct perspective distortion with Lightroom
Discover the smart way to fix those tricky perspective issues that can ruin your beautiful architectural shots
Welcome to the fifth instalment of our Lightroom series, republished from the pages of Digital Camera magazine (see below for subscription offers) and just the thing to keep you occupied if you're under coronavirus quarantine!
If you are already a Lightroom user, you could discover some new tricks and processes you haven't tried yet. If you don't use Lightroom, then scroll down to the bottom where you'll discover how to get it and which Adobe Photography Plan is best.
Note: This article was written for Lightroom 6. The panels and control have changed since then, but the tools and the concepts are the same.
So last time we looked at lens corrections, but this time we'll look at something that sounds similar but is actually very different – perspective corrections.
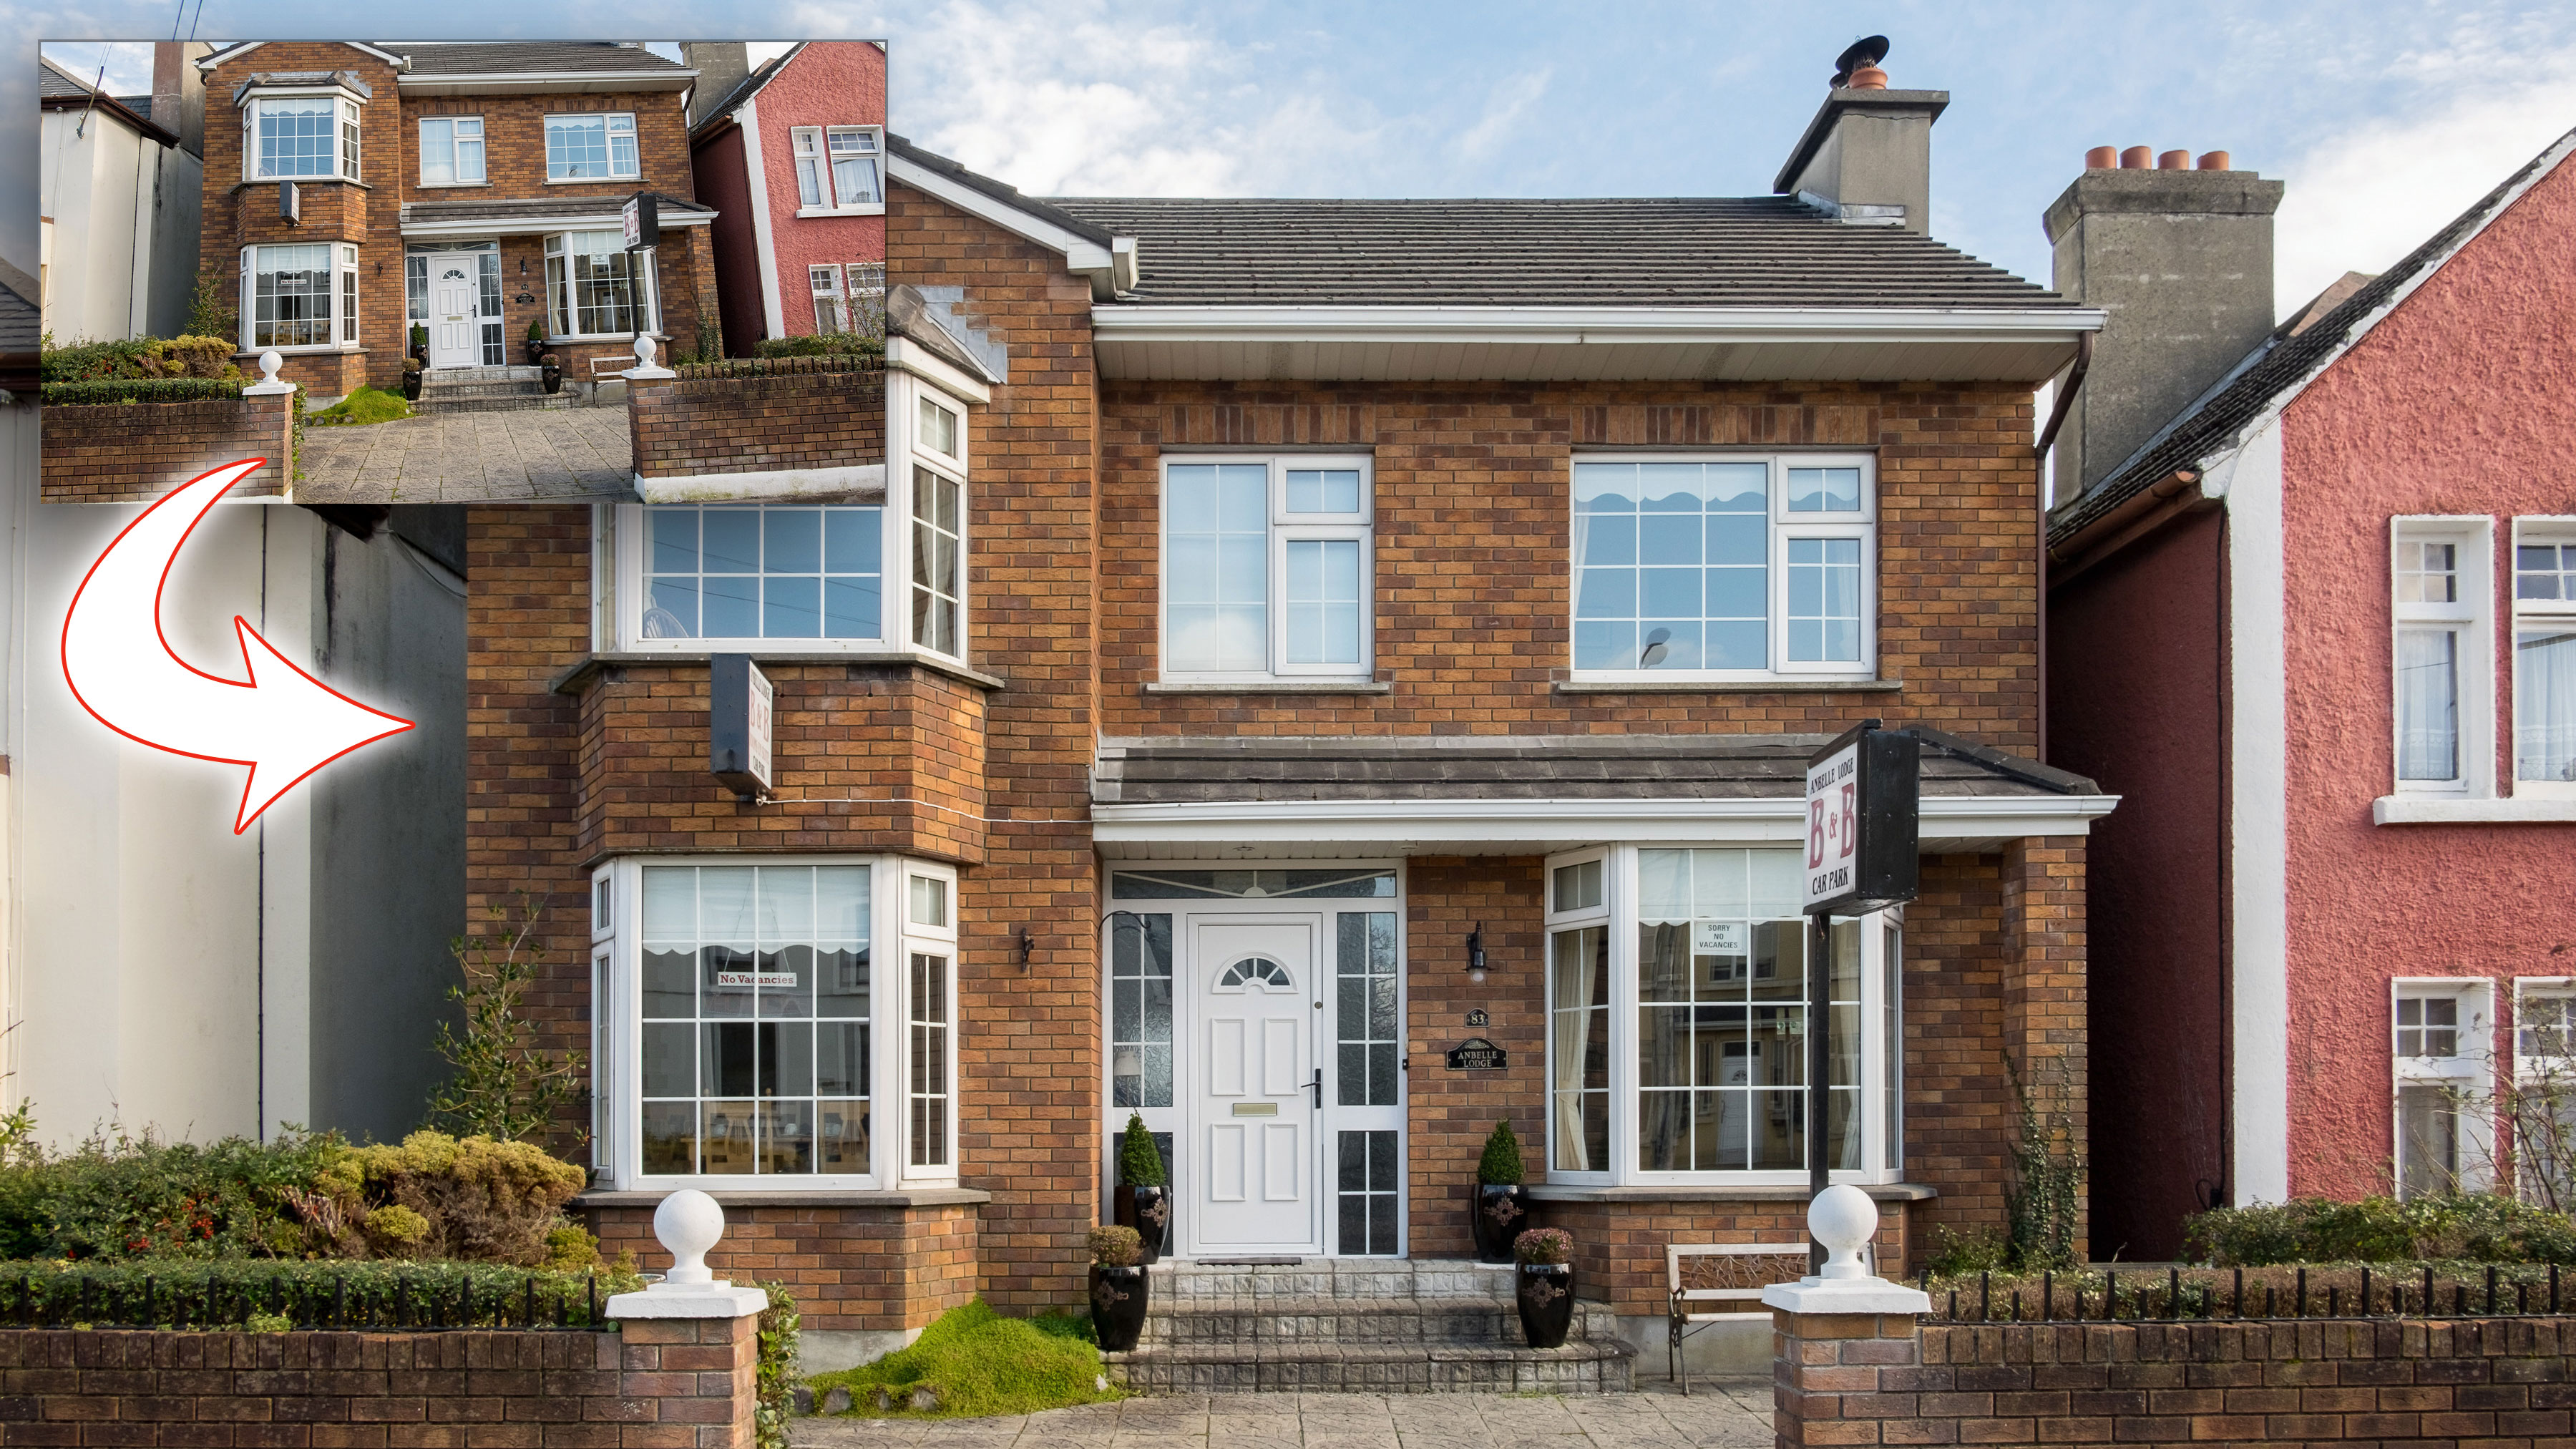
Our brains compensate for things as we view them. When we look at a building, our brains tell us the walls are straight, despite watching the vertical lines converge as we look up. When we look at a photo, though, the reality is there for us to see. If you’re shooting for an estate agent or hospitality company, your vertical lines need to be vertical.
Architectural photographers use tilt-and-shift lenses to get it right in-camera, but the cost of these lenses puts them out of reach of most. That’s where Lightroom’s Upright tool comes into play – it’s Lightroom’s automatic perspective control. This handy tool gets it right most of the time, but there are also manual controls so that you can work on the nitty-gritty details yourself.
• See more Lightroom tutorials
Do lens profile corrections first
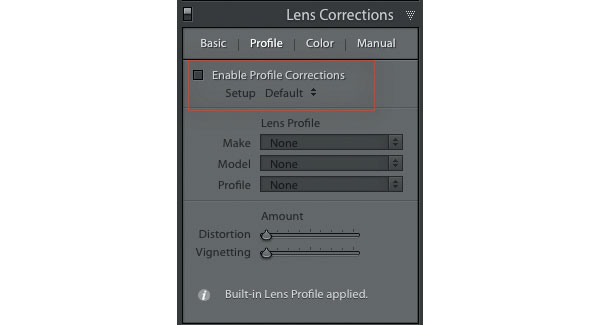
Before you use the Upright controls, click Enable Profile Corrections. This gives Lightroom a better chance of applying an automatic Upright correction. If you apply the Lens Profile after using Upright, click Reanalyze.
Upright options
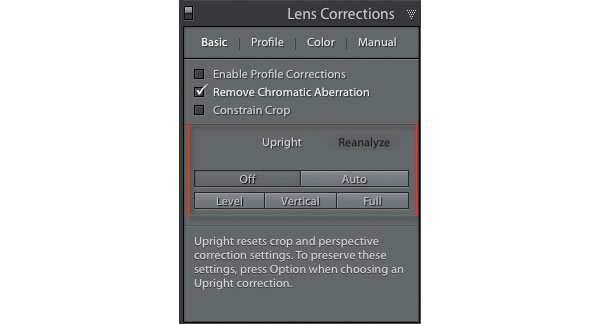
In the Basic tab there are five buttons: Off, Auto, Level, Vertical and Full. Each applies a different type of correction. Try each to see which looks best for your image.
Level the image
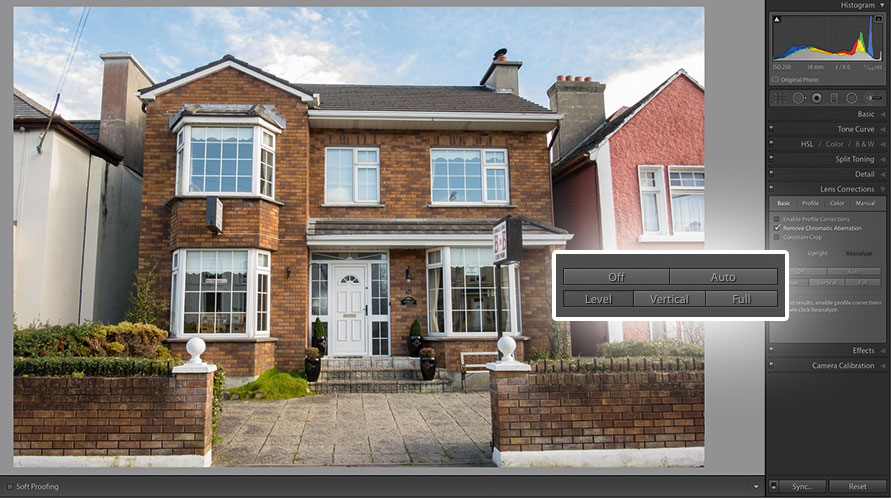
Level is the most basic correction. Here Lightroom attempts to find the horizon and straighten the image. This tool is also part of the Crop Tool with the Auto button in Crop.
Vertical correction

When you aim the camera up at a building, the walls will converge at the top. Equally, aiming down from a higher angle can make walls diverge. The Vertical button tries to straighten these issues automatically.
Aspect ratio fix
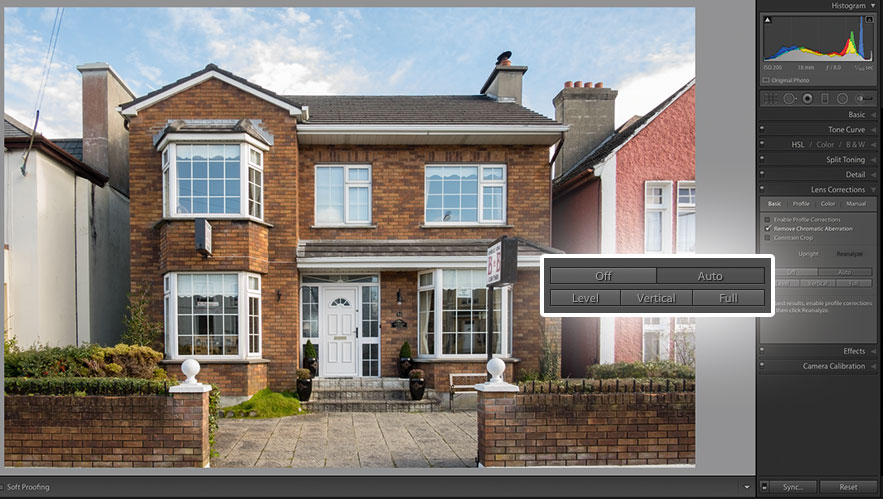
Auto will straighten the image and fix all perspective distortion – then apply a fix to the aspect ratio, because applying perspective correction can often make an image look squashed.
Combine the elements
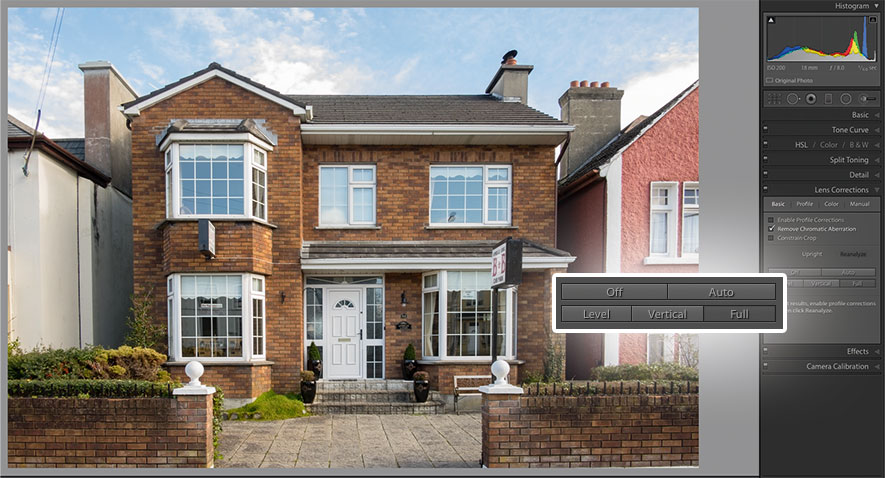
Full applies the combination of Auto, Level and Vertical. If you’ve shot into a corner, though, it will attempt to make one of the walls rectangular, so it’s most useful when you’ve shot square-on to the subject.
Go manual for precise correction
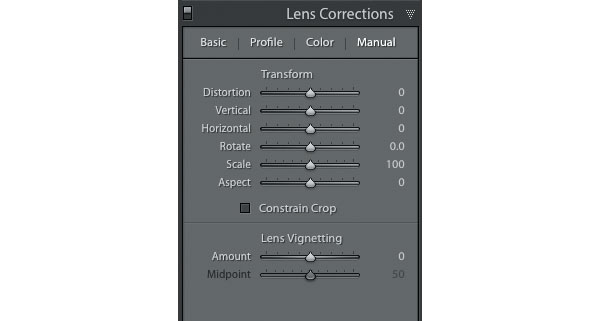
Upright is great when it works, but it does depend on the image having enough internal clues to guess the correct result. When it fails, though, all is not
lost – because there are manual tools as well, found under the Manual tab.
Distortion corrects pincushion distortion when moved left, and barrel distortion when moved right. Vertical corrects for converging verticals. Horizontal
allows you to fix sideways convergence, which happens when you’re shooting no-quite-straight-on to a wall, but the sensor isn’t exactly parallel to the wall.
Rotate will swivel the image around the original image centre, rather than the post-corrected centre. Scale allows you to zoom in and out to reveal less or more of the corrected image. Areas outside the original image show as white, but these are actually transparent.
Aspect enables you to correct the pixel aspect ratio. Often, correcting perspective can squish the image, so this allow you to correct that issue. Finally, the Constrain Crop checkbox will force the current crop aspect ratio onto the image so all of the transparent areas are hidden.
About Digital Camera magazine
This tutorial originally appeared in Digital Camera Magazine, the monthly newsstand magazine for all photographers. Why not subscribe to a print edition, and have the magazine delivered direct to your door every month?
Alternatively, we have a number of different digital options available, including:
• Apple app (for iPad or iPhone)
• Zinio app (multi-platform app for desktop or smartphone)
• PocketMags (multi-platform app ideal for Android devices)
• Readly (all-you-can-eat digital magazine subscription service)
If you wanted a printed version of any of our most recent issues we have a selection of back issues to choose from in our online store.
How to get Adobe Lightroom
Adobe Lightroom is available in two versions: the regular Adobe Lightroom Classic CC designed for desktop users, which is what we cover in this series, and a new cloud-based Adobe Lightroom CC, which stores your files online and offers a similar but reduced set of features. For regular desktop users we recommend Adobe Lightroom Classic CC.
Adobe offers three subscription based Photography Plans which you can click on below. We recommend either the regular Photography Plan, or the Photography Plan (1TB) which costs more but comes with 1TB online storage in case you decide to go with Lightroom CC.
For this set of tutorials and for anyone who likes to work on a single main computer, we recommend the regular Creative Cloud Photography Plan. This is the cheapest way to get started AND it comes with Photoshop CC too.
Read more:
• This is the best photo-editing software today
• These are the best laptops for photographers right now
• We help you choose the best desktop computers for photo editing
Get the Digital Camera World Newsletter
The best camera deals, reviews, product advice, and unmissable photography news, direct to your inbox!
Sean McCormack is a commercial, and editorial photographer, book author, and regular contributor to Digital Camera magazine based in Galway, Ireland. He has extensive experience with Lightroom, dating back to its original beta version, and has tried out just about every plugin and preset available. His latest book is Essential Development 3: 25 Tips for Lightroom Classic’s Develop Module.

