Make the colors in your landscape photography sing, with Photoshop CC
Master targeted Curves edits in Photoshop CC for an array of powerful landscape photography-boosting tricks
Watch video: Make the colors in your landscape photography sing
At first glance a freshly shot landscape may appear more muted than you expected, but there’s often a whole heap of color info in there just waiting to be teased out. In this tutorial we’ll look at how to make the colors in your landscape images sing – but rather than applying a uniform saturation boost to the scene, we’ll instead make a series of targeted edits that are tailored to specific areas.
We can make use of Photoshop CC’s array of intelligent selection tools, not least of which is the Select Sky command, which isolates the sky for us. Once done, we’ll use the Curves command to boost tones and colors. Not only can we use Curves to add punch, we can also target the red, green or blue channels and use them to subtly shift the colors in the scene.
This is where Adjustment Layers come in. When we add an Adjustment Layer the active selection is converted to a layer mask, which enables us to make a local adjustment. It’s this combo of Adjustment Layers and Masks that makes editing landscapes in Photoshop such a joy, as we have complete control over the changes we make.
At any time we can change the area that’s affected by altering the layer mask, or change the strength of the tonal change by tweaking the Adjustment Layer settings. Get to grips with this workflow and you’ll be able to make precise, targeted color enhancements to your landscapes, whatever the scene.
01 Target the sky
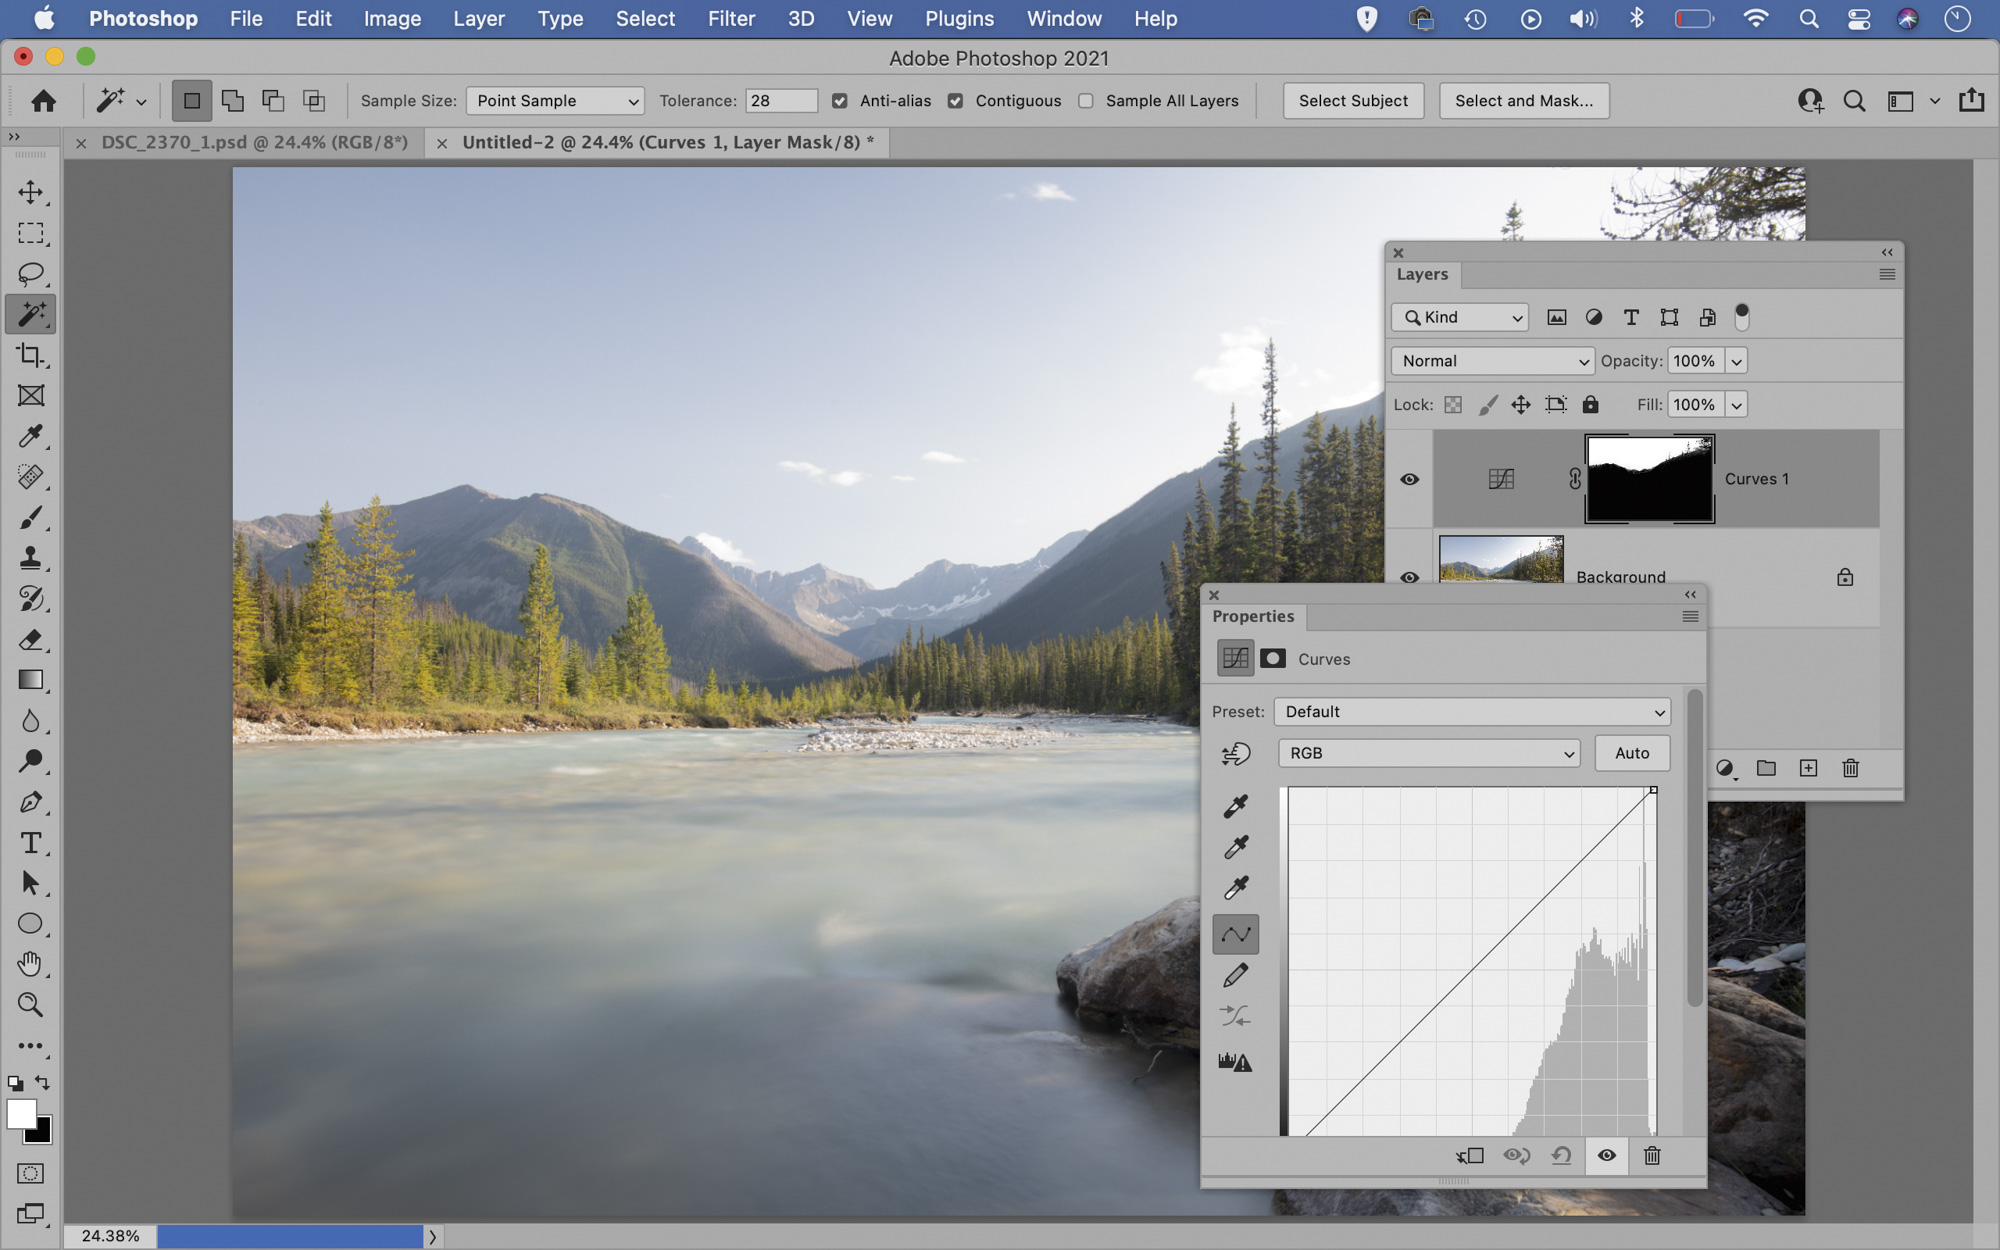
Open the landscape_before.jpg image, then go to Select > Sky. Go to the Layers panel, click the Create Adjustment Layer icon and choose Curves. We can drag the curve line up or down to change brightness or alter color channels. The Red channel controls the red / cyan shift, Green shifts green / magenta, Blue shifts blue / yellow.
02 Add a Curves layer
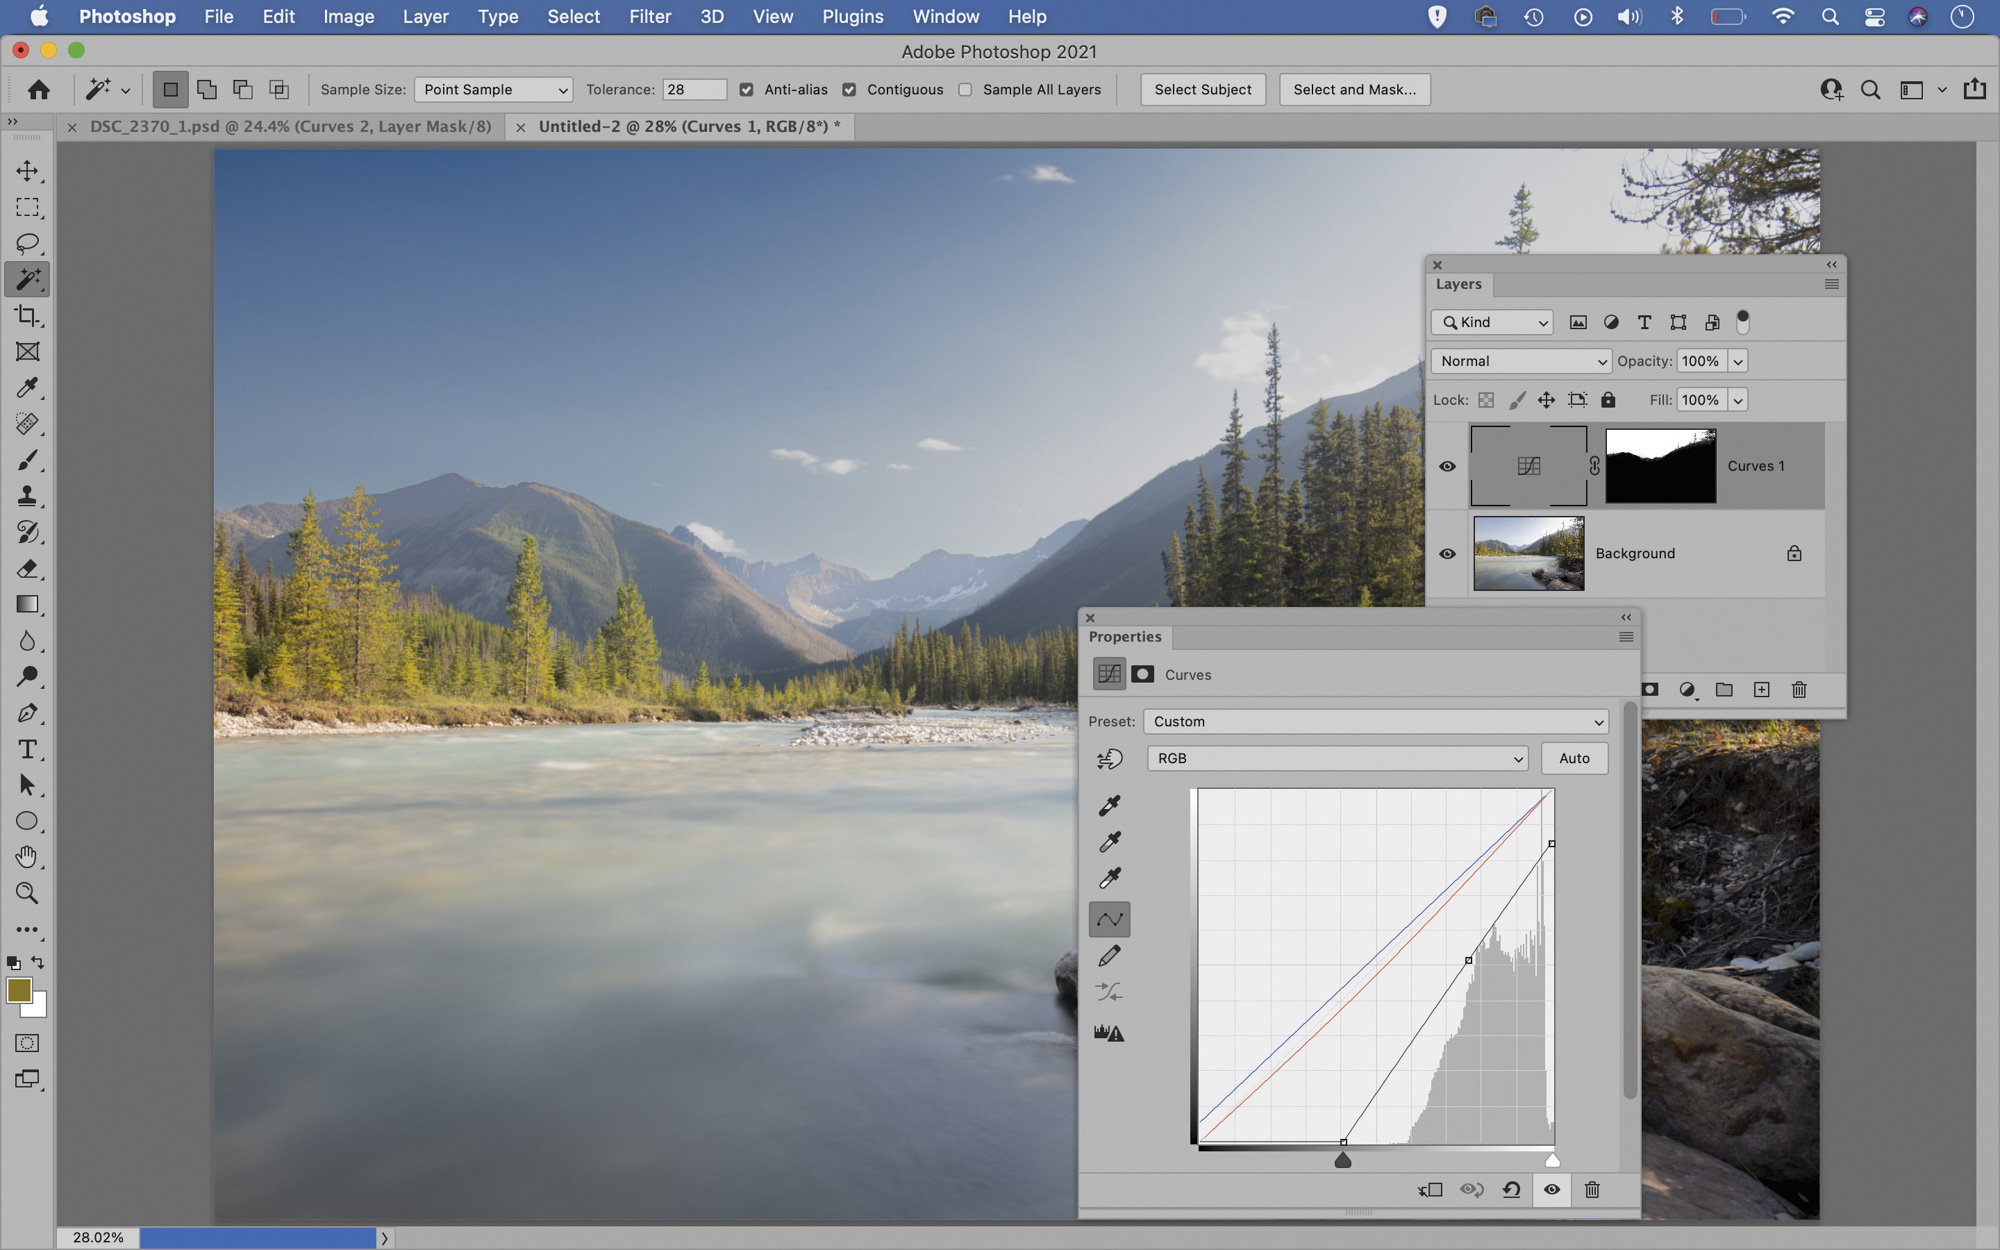
Drag the bottom left point on the curve line inwards as shown to darken the sky. Next, go to the RGB channel dropdown. Select Red, then drag down on the red line slightly to add cyan to the sky. Then you want to target the Blue channel. Drag the bottom left point upwards to intensify the blues in the sky.
03 Enhance the tree line
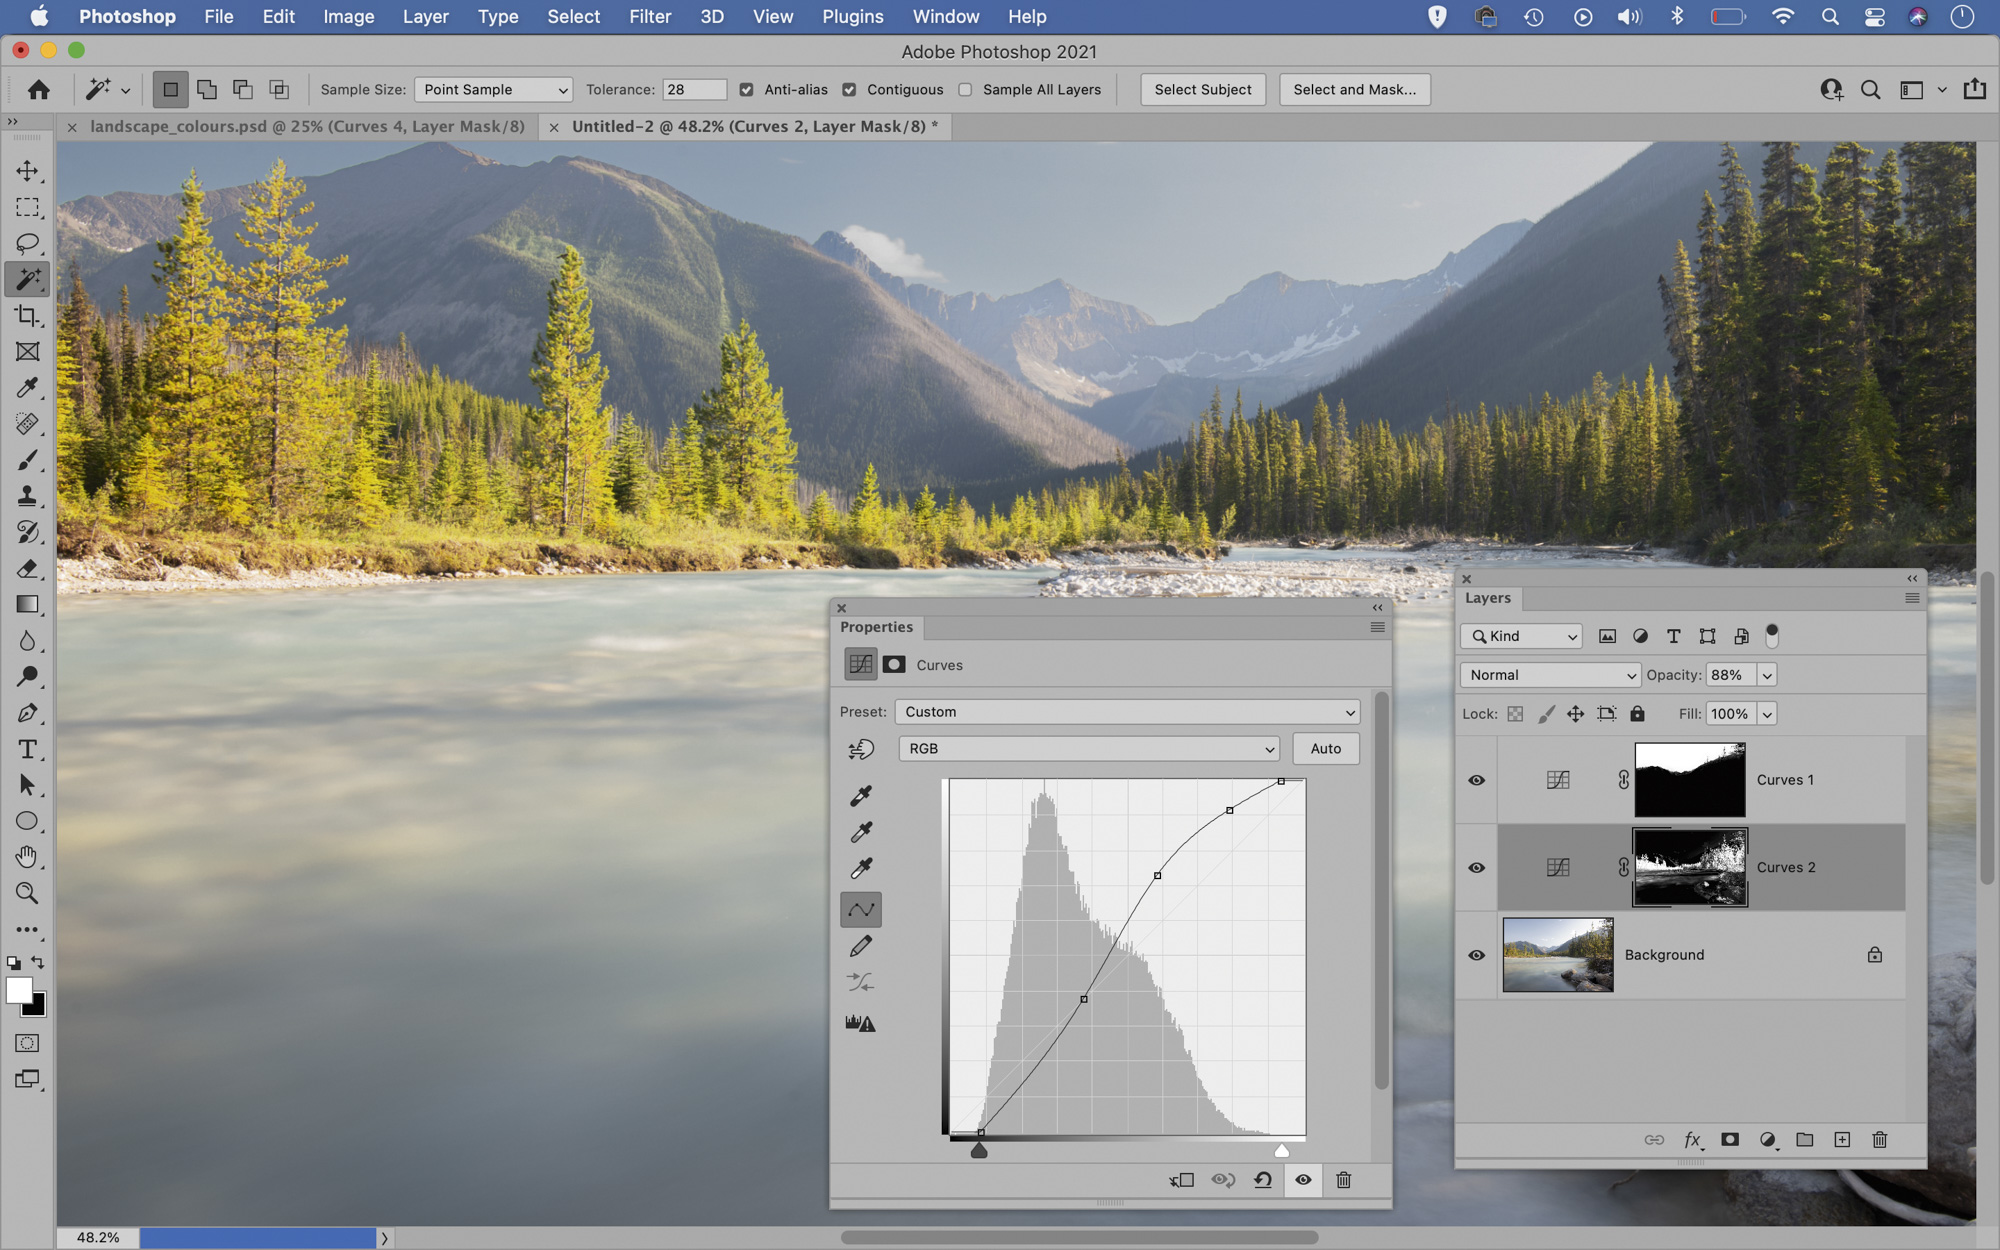
Highlight the bottom layer, then go to Select > Color Range. Use the eyedropper to sample the yellows in the trees, then adjust fuzziness until you have a precise selection of the trees. Once done, add another Curves layer. This time plot an S-shaped curve to boost contrast and saturation in the tree line.
04 Boost the water
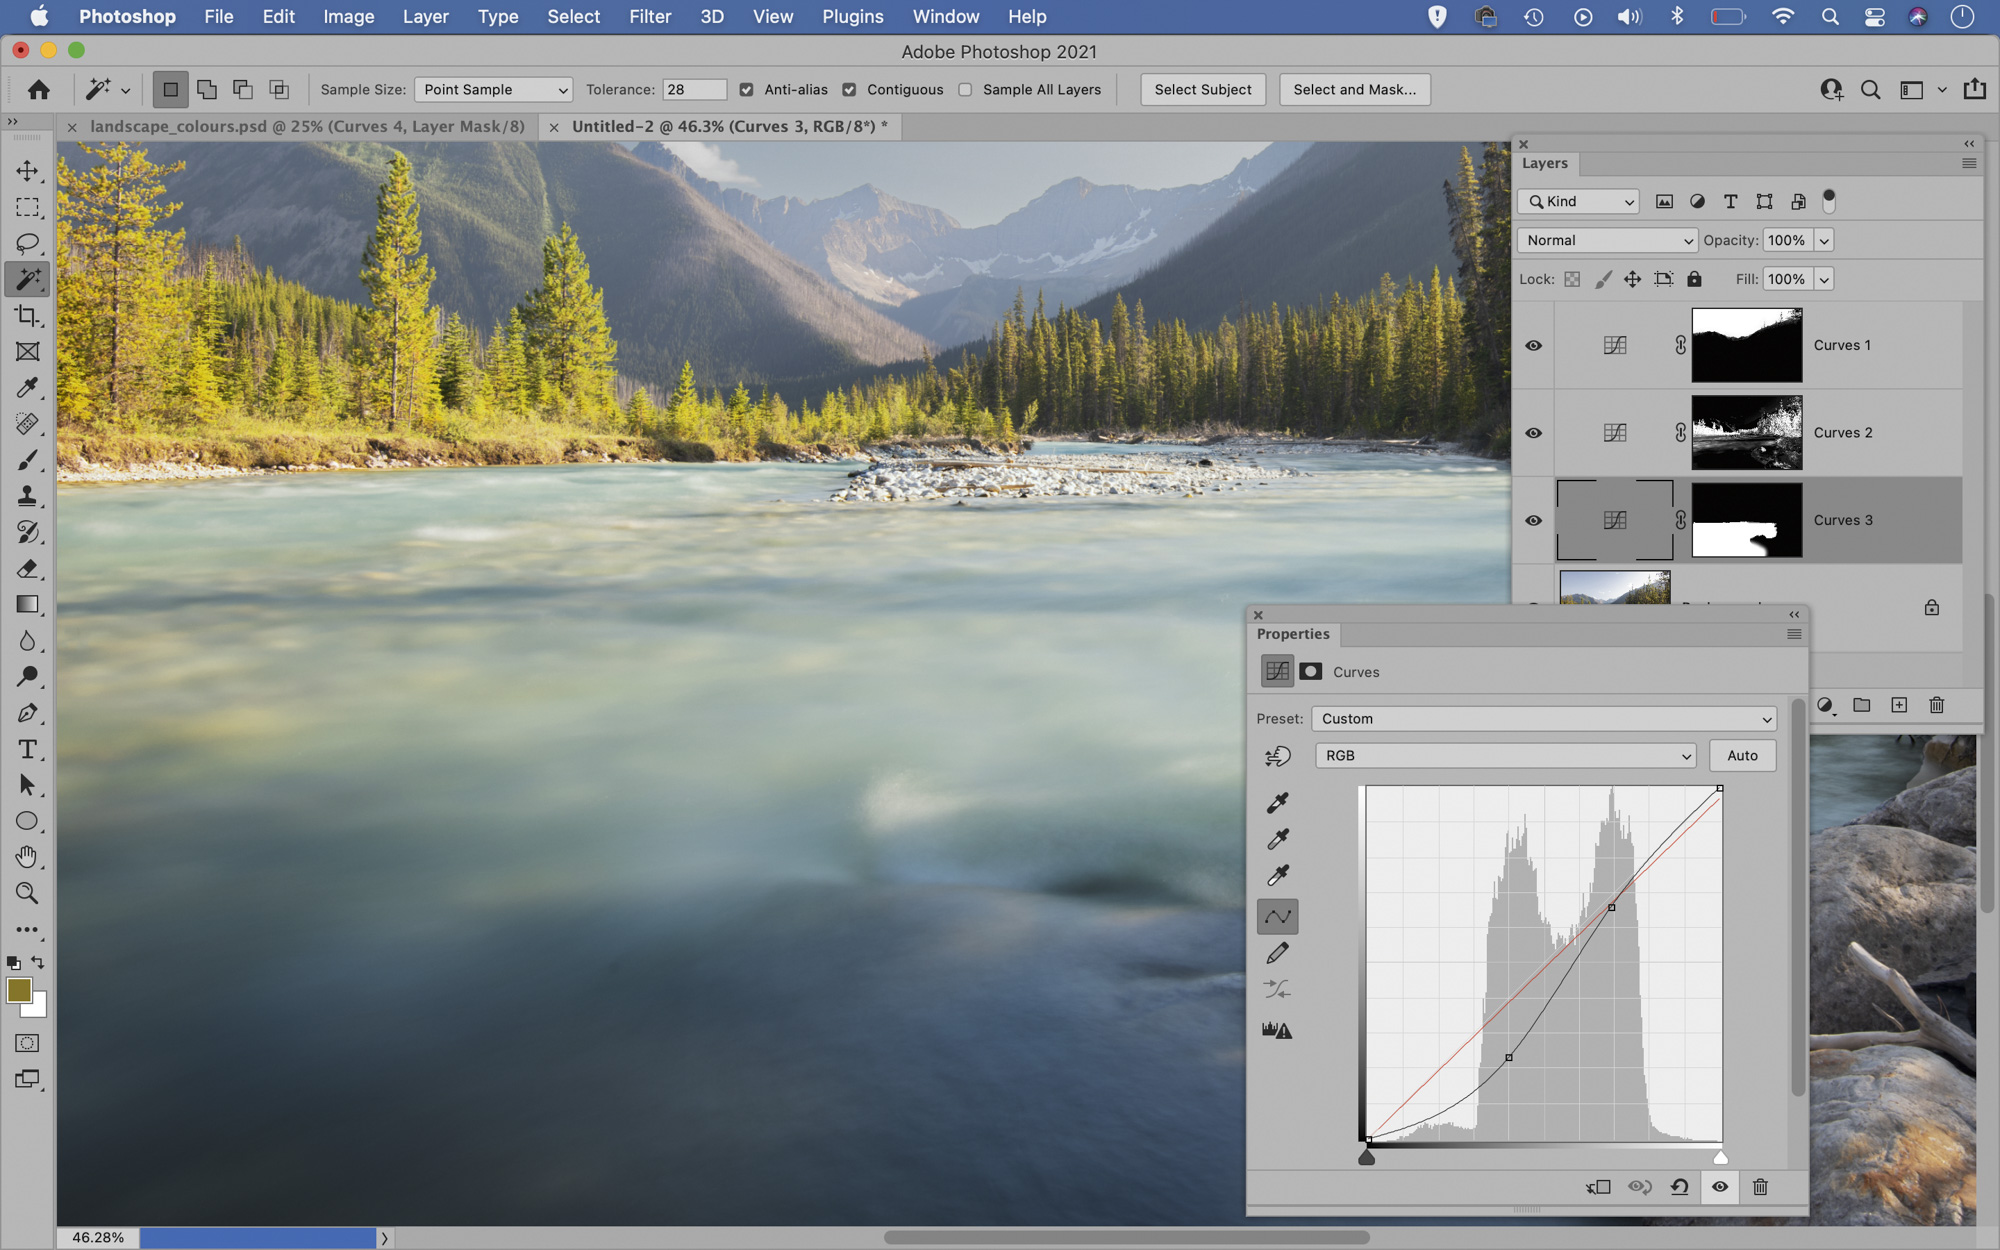
Highlight the bottom layer again, then grab the Object Selection tool from the toolbar. Drag a box over the water to select it. Add a Curves layer and plot a bottom-heavy S-shaped curve line, as shown, to boost contrast and deepen shadows. Target the Red channel, then drag the top right point down to add cyan.
05 Reduce the haze

Grab the Quick Selection tool and paint over the mountains to select them. Use the Select and Mask command to improve the selection edge if needed, then add a Curves layer. Make another S-curve as shown, then go to the Blue channel and drag the bottom left point inwards to reduce blue in the shadows.
06 Give the rocks some punch
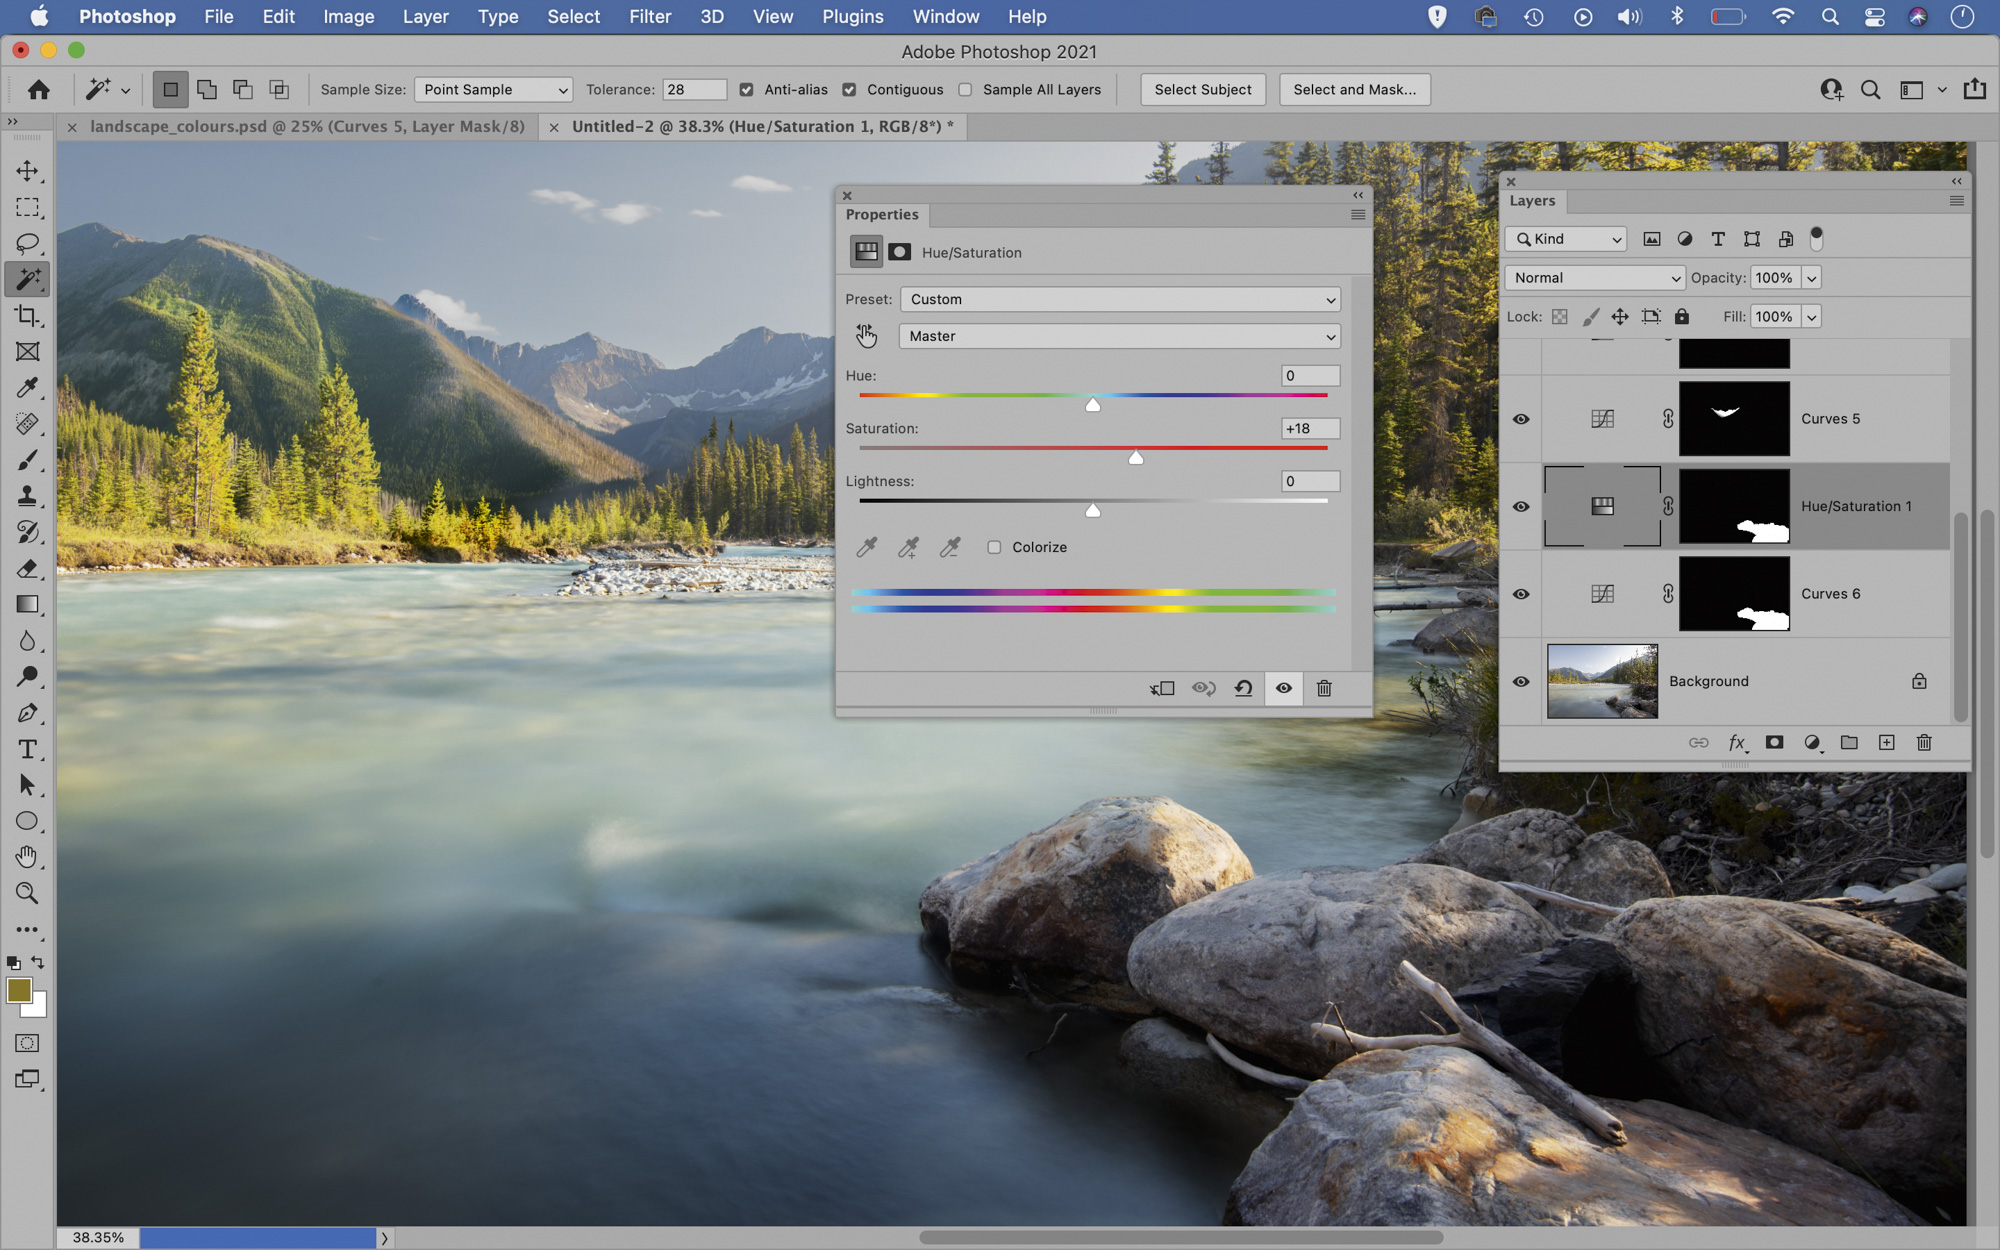
Select the rocks in the foreground with the Object Selection tool, then add a Curves layer and plot an S-curve to boost contrast. Next, add a Hue / Saturation Adjustment Layer. Hold Alt and drag the mask from the curves layer below onto the new layer to copy it over. Increase Saturation to boost the rocks.
PhotoPlus: The Canon Magazine is the world's only monthly newsstand title that's 100% devoted to Canon, so you can be sure the magazine is completely relevant to your system.
Read more:
The best photo editing software: image editors for novices through to pros
The best photo-editing laptops: top laptops for photographers
10 best online photography courses – from beginner guides to masterclasses
Get the Digital Camera World Newsletter
The best camera deals, reviews, product advice, and unmissable photography news, direct to your inbox!
The lead technique writer on Digital Camera Magazine, PhotoPlus: The Canon Magazine and N-Photo: The Nikon Magazine, James is a fantastic general practice photographer with an enviable array of skills across every genre of photography.
Whether it's flash photography techniques like stroboscopic portraits, astrophotography projects like photographing the Northern Lights, or turning sound into art by making paint dance on a set of speakers, James' tutorials and projects are as creative as they are enjoyable.
He's also a wizard at the dark arts of Photoshop, Lightroom and Affinity Photo, and is capable of some genuine black magic in the digital darkroom, making him one of the leading authorities on photo editing software and techniques.


