Portrait photography retouching workshop: retouch skin in Photoshop

Portrait retouching workshop I: Skin retouching
(Image credit: Paula Stopka)

Skin retouching plays an important part in the editing process of portrait photography. It enhances the subject’s look and gets rid of any imperfections, such as blemishes or uneven skin tone. There are different retouching techniques we can use and they often vary among photographers, as each has its unique style and approach. 

In this tutorial, we will focus on one of the techniques, frequency separation, using Photoshop. This method allows us to separate the image into high and low frequency layers so that we can retouch any imperfections while still preserving the natural texture and tone of the skin. It’s a great tool; however, it should be used cautiously. One common mistake is to overdo the retouching and smooth the skin out too much, which results in an unnatural, almost plastic-like appearance. Finding that sweet spot can be a challenge but with practice, it becomes intuitive. Our main goal is to preserve a natural appearance, so we’ll begin our tutorial by learning how to set up frequency separation layers and then carry out skin retouching using different tools.

Retained character Skin texture is one of a person’s defining features and so, even when retouching is requested, it is important to retain some detail so that the editing is almost invisible (Image credit: Paula Stopka)

Editing steps

Incorporate frequency separation into your skin retouching workflow 

1. Create two copies 

(Image credit: Paula Stopka)

After loading your photo to Adobe Photoshop, duplicate the image twice. You can do that by using the keyboard shortcut Ctrl+J (or Cmd+J on a Mac) or by right-clicking on the background layer and selecting the Duplicate layer option.

2. Rename and Group

(Image credit: Paula Stopka)

Change the top layer name to High Frequency (for texture details) and the middle to Low Frequency (colour and tone information). Group layers by selecting them and pressing Ctrl/Cmd+G. Now, name the folder Frequency Separation.

3. Set up Low-frequency

(Image credit: Paula Stopka)

Layer Expand the group folder, turn off visibility for ‘High Frequency’ and select the ‘Low Frequency’ layer. Go to Filters > Blur > Gaussian Blur. In the box, adjust the radius to 5-10 pixels until the image looks blurred yet retains its shape.

4. Set up High-frequency

(Image credit: Paula Stopka)

Turn the visibility on for the ‘High Frequency’ layer and select it. Go to Image > Apply Image and ensure your settings match those in the screenshot. Press, OK. Next, change the Layer Blending mode from Normal to Linear light.

5. Remove any imperfections

(Image credit: Paula Stopka)

Starting with the High-Frequency layer, select the Healing Brush, hold down the Alt or Option key (Mac users) and click on the area close to the blemish. Then, simply brush over it. Adjust brush size and opacity for precision.

6. Smooth out the skin

(Image credit: Paula Stopka)

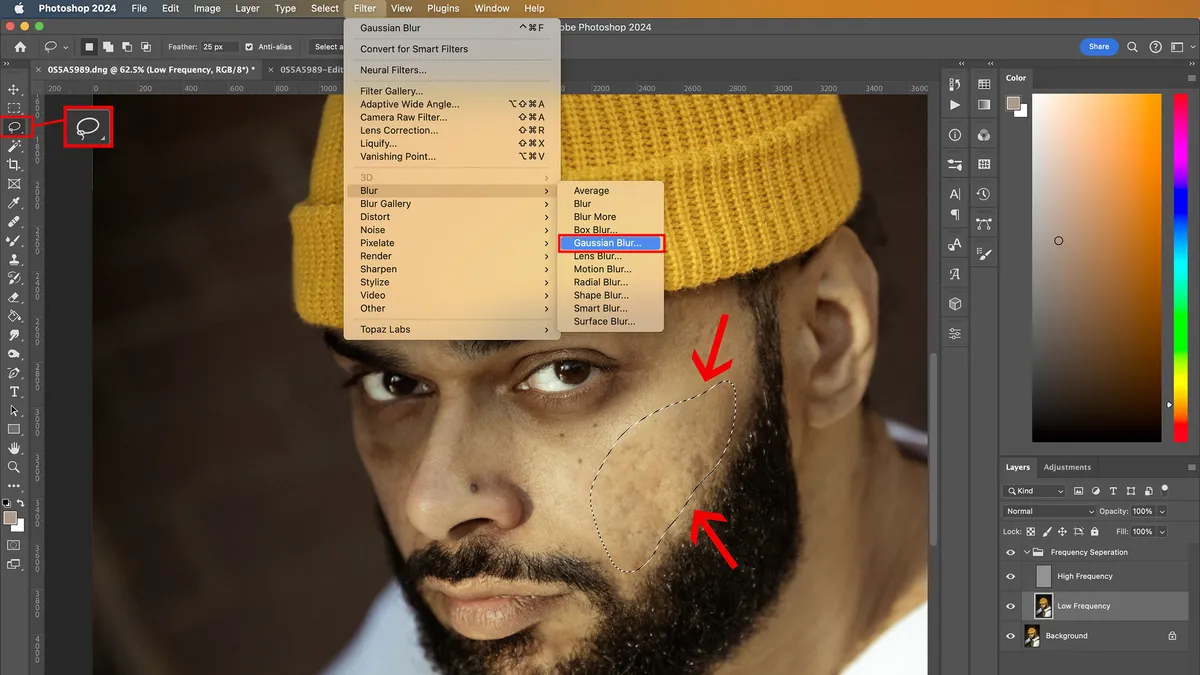
Select the Lasso Tool and set feathering to 22-25px. Select the Low-Frequency layer, then choose an area of skin to work on. Go to Filter > Blur > Gaussian Blur. Increase the blur until you get the desired smoothness but don’t overdo it.

7. Dodge and Burn

(Image credit: Paula Stopka)

On the Low Frequency layer, select Dodge and Burn Tools. Adjust their exposure and apply gently to highlight areas such as the forehead with Dodge. Use the Burn Tool for shadows, such as on the nose. Both tools help shape the facial features. 

8. Flatten the image

Portrait retouching workshop I: Skin retouching

(Image credit: Paula Stopka)

Once you’re satisfied with the depth and dimensions of the subject and that the retouch looks natural, you can flatten the layers. Go to Layer > Flatten Image and save your photo. Compare the edit with the original for context.

Before and After

Portrait retouching workshop I: Skin retouching

Before (Image credit: Paula Stopka)

Portrait retouching workshop I: Skin retouching

After (Image credit: Paula Stopka)

Paula's Favourite Tool

Remove tool

This tool is a game changer for me. It uses AI technology to remove unwanted objects. It can speed up your editing process and save you a lot of time. It’s not perfect all the time and sometimes it fails, but it’s truly a lifesaver for those tiny spots, or remove flyaway hair from a model’s face.

Portrait retouching workshop I: Skin retouching
Paula Stopka

Born and raised in Krakow, Poland, Paula is a London based graphic designer and photographer. Having been an enthusiastic photographer since her teenage years, Paula is now a full-time working pro, blending two of her passions in image creation and graphic design. Her photography covers a variety of genres from fashion portraiture to landscapes and architecture.

paulastopka.com


More tutorials 

Image

This article originally appeared in Digital Photographer, a monthly magazine, and the kitbag essential for pros, enthusiasts, and amateurs alike!

Inside, you'll find practical guides, shooting tips, and techniques from working photographers, plus all the latest industry news.

Digital Photographer

Digital Photographer is the ultimate monthly photography magazine for enthusiasts and pros in today’s digital marketplace.

Every issue readers are treated to interviews with leading expert photographers, cutting-edge imagery, practical shooting advice and the very latest high-end digital news and equipment reviews. The team includes seasoned journalists and passionate photographers such as the Editor Peter Fenech, who are well positioned to bring you authoritative reviews and tutorials on cameras, lenses, lighting, gimbals and more.

Whether you’re a part-time amateur or a full-time pro, Digital Photographer aims to challenge, motivate and inspire you to take your best shot and get the most out of your kit, whether you’re a hobbyist or a seasoned shooter. 

Read more
Side by side before edit and after of Ariane Sherine selfie
What headshot clients say they want VS what they actually want – old school and new!
Photoshop Elements 2025
What's new in Photoshop Elements 2025? We share our favorite new features
Stroboscopic flash portraits with a tennis player in a studio
Game, set and flash! Capture sensational stroboscopic portrait photos in a home studio
AIarty Image Matting
Cut the chaos: AI-powered background removal + free giveaway for photographers!
Use the light at the start or the end of the day to capture dramatic shadows and create fine-art photos without having to go outdoors
Have fun photographing shadows from the comfort of your own home
Three different portrait shots, showing a strobe effect, high contrast and film-noir style style
"For a more dramatic look, I add more lights to create high contrast and a dynamic that is hard to beat"
Latest in Photo Editing
Backing up data is so annoying that most would rather…scrub toilets!
A screenshot of the Adobe Stock Customize tool
Adobe Stock now enables you to mass-edit with AI – but is it a nail in the coffin for stock photography, or another way for creators to earn money?
AIarty Image Matting
Cut the chaos: AI-powered background removal + free giveaway for photographers!
Neurapix before and after of smiling bride holding bouquet of flowers
“Neurapix reduced my editing time by 50%” – why this AI Lightroom plug-in is taking wedding photography by storm
Close-up image of a bird flapping its wings edited in DxO PureRAW 5 showing before and after sharpening, demosaicing, and noise reduction
DxO PureRAW 5 gets local adjustments, DeepPRIME 3, and more support for Fujifilm photographers
Three black-and-white images of modern architecture in London
I find black-and-white photography freeing in a world of color-graded imagery
Latest in Tutorials
Total lunar eclipse
How I’ll photograph the blood moon total lunar eclipse tonight, one of the best astrophotography events of the year
Wildlife portrait of a gannet in front of a clean green background
10 tips for wildlife photography from birds in flight to insect close-ups
Mountain valley during sunrise. Natural summer landscape
9 landscape photography tips I think every photographer should know
Bride and groom hold hands aloft backlit against the sun on their wedding day
Want to be a wedding photographer? Here are my 11 tips that will help you get there the RIGHT way
Colourful trees frame a small river, photographed with a long exposure
I love to shoot long exposures in the rain – here’s why I head to the woods!
What is ISO in photography?