Replace a lacklustre sky in Affinity Photo: how to transform your landscape shots
How to composite photos together in Affinity Photo with essential selection and masking skills
Start here
• Affinity Photo tutorials
The tutorials
1. Affinity Photo vs Photoshop
2. RAW editing with Affinity Photo
3. Focus merge with Affinity Photo
4. Replace a sky in Affinity Photo
5. Moody mono in Affinity Photo
6. Six Affinity Photo landscape tips
7. Color correction in Affinity Photo
8. Live Filters in Affinity Photo
9. Create a classic wet plate look
10. Remove objects in Affinity Photo
11. Paint an abstract portrait
12. Enhance skintones in Affinity Photo
13. Create HDR in Affinity Photo
14. Replace a sky in Affinity Photo
15. Affinity Photo double exposures
16. Affinity Photo Denoise tool
Watch video: How to replace a sky in Affinity Photo
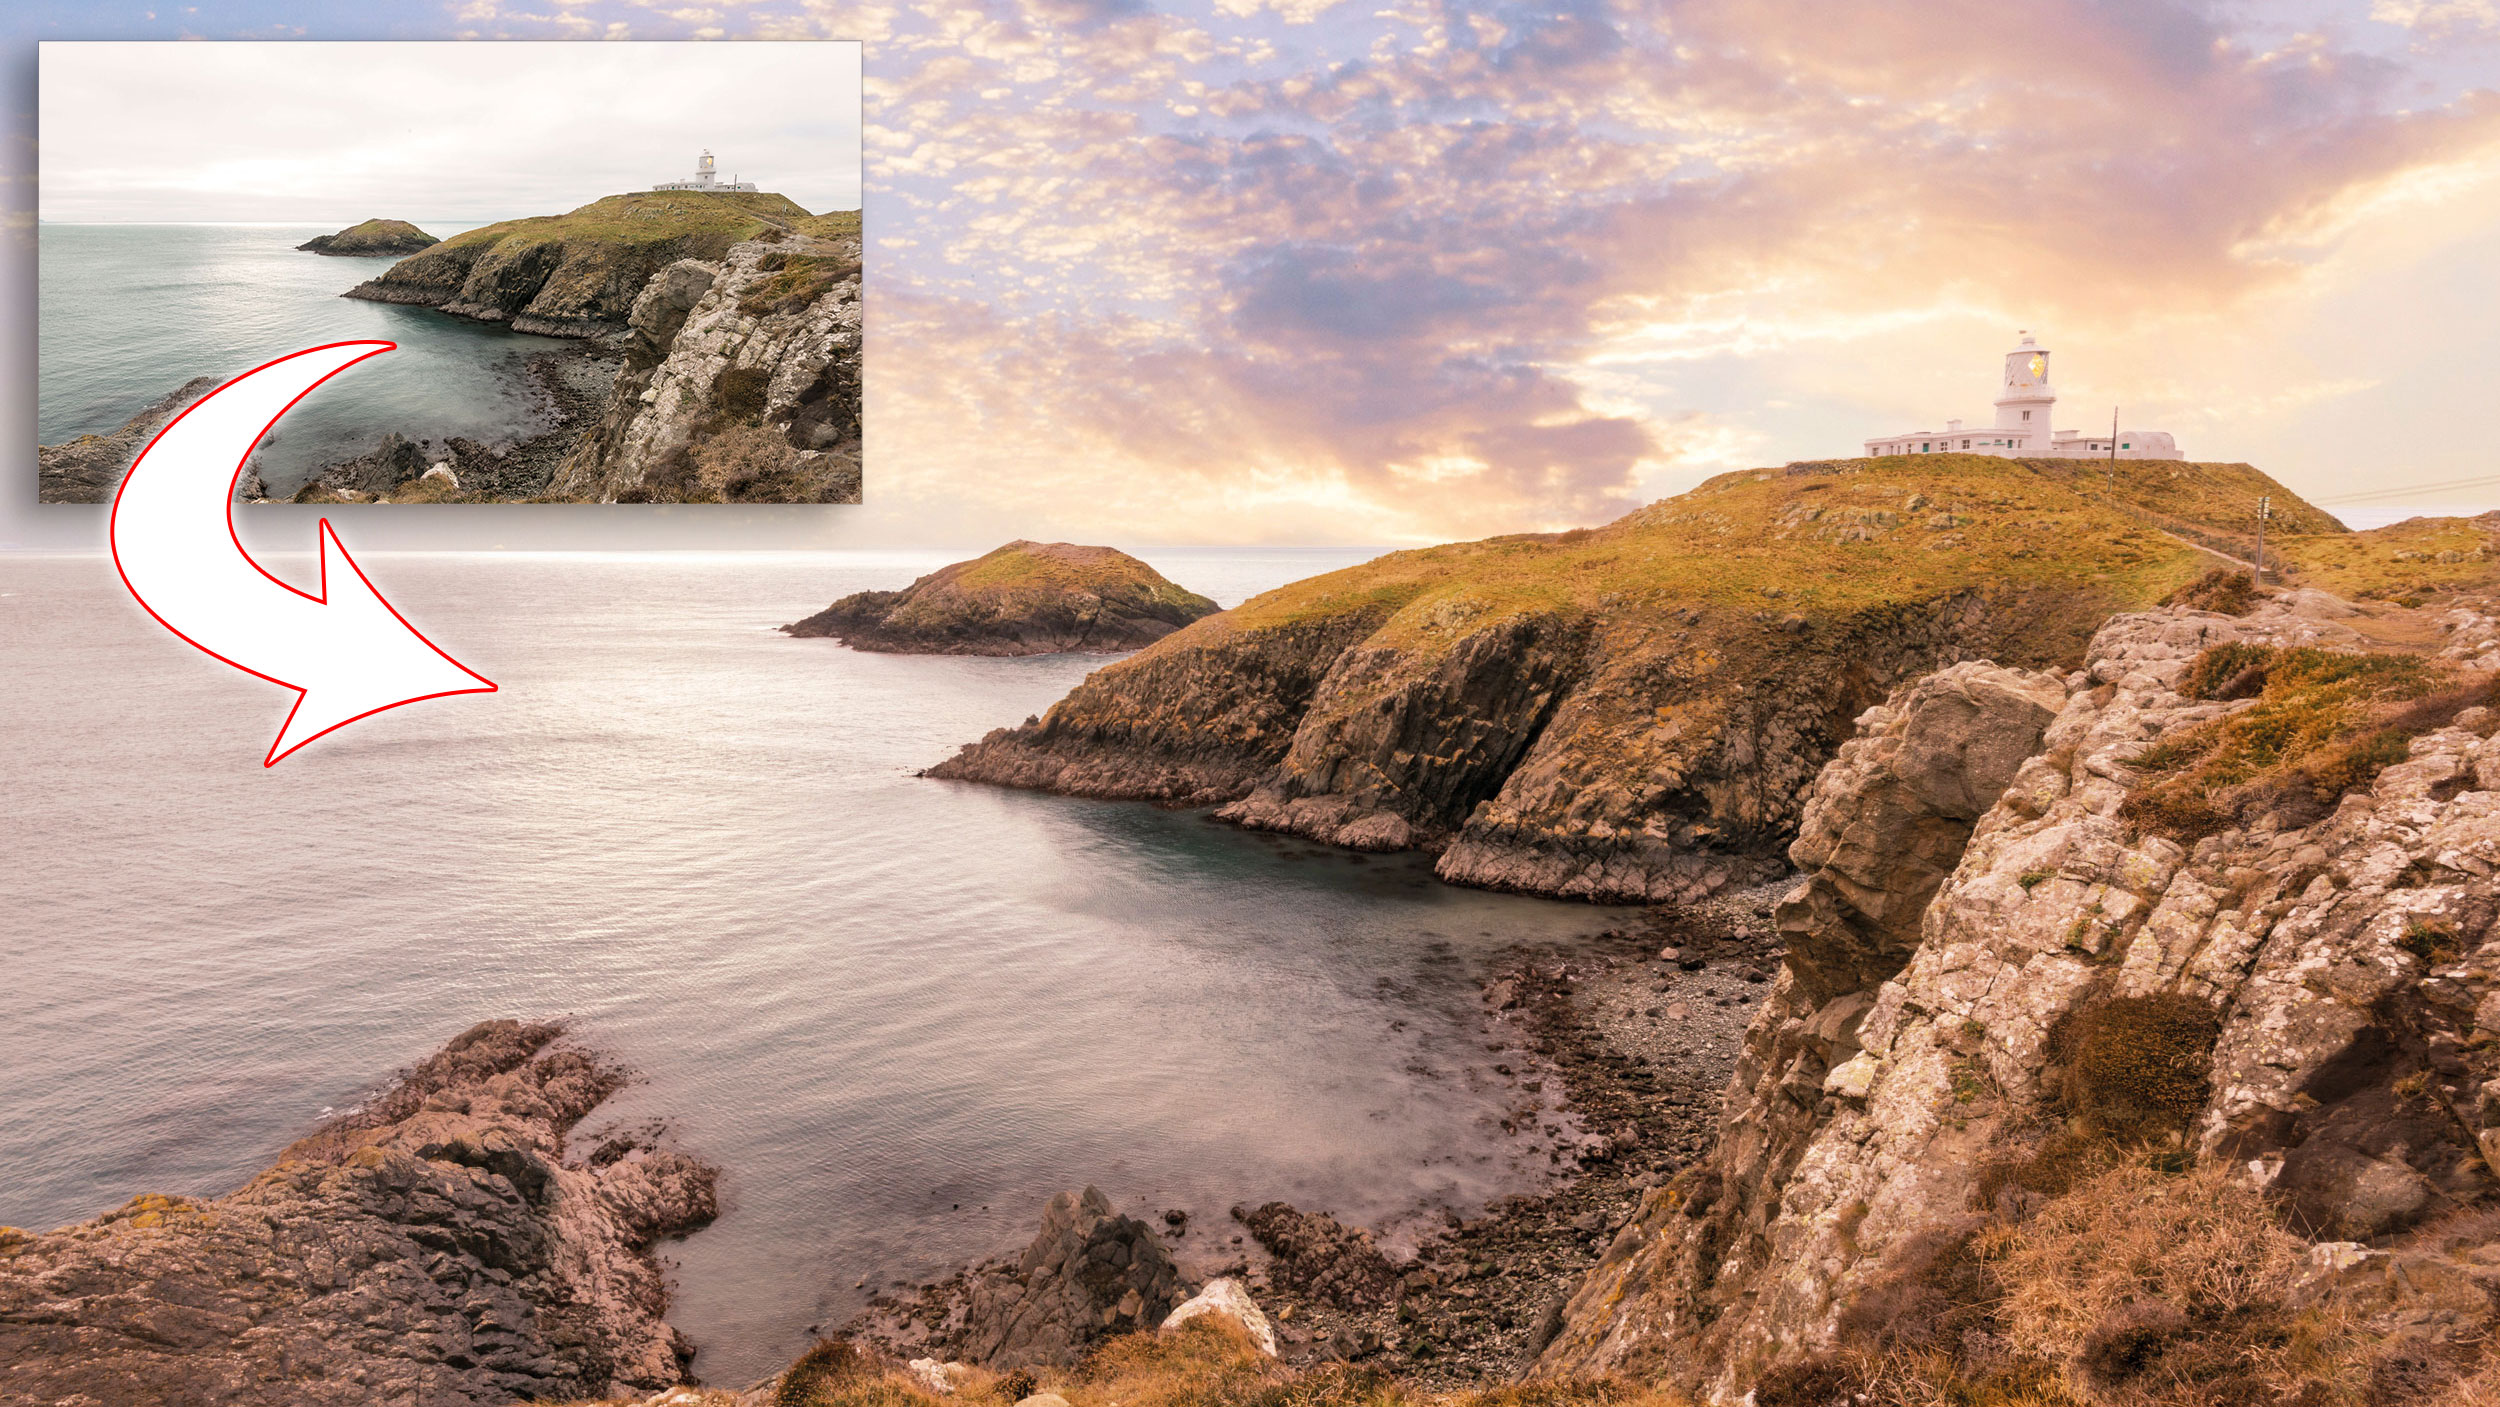
Whether you want to drop in a new sky to improve a landscape or blend two shots, Affinity has excellent tools for compositing images. The first stage in any compositing project is to isolate part of an image, like our sky. This is a complicated shape, and selecting it freehand could take hours. But, thankfully, Affinity has a tool that does it in seconds.
The Selection Brush has a ‘Snap to edges’ feature that helps it seek out changes in colour or contrast. So, by painting the sky here with the tool, it’ll snap on to the edges of the horizon.
Once the area is isolated, the next step is to improve the selection. Initially it’ll be hard and jagged, but if we run the Refine command we can get a neater, more precise edge, one that picks out the gaps and bits of sky that we may have missed along the horizon (see box).
After this, we can use the command to convert the selection to a layer mask. A mask will hide everything outside of the selected area, so the original sky gets hidden. But the great thing about masks is that they’re editable, so we can zoom in close and fine-tune the edges by painting with black or white over the image. Finally, all we have to do is drop in the new sky to complete our scene.
Read more:
Step 1: Select the land
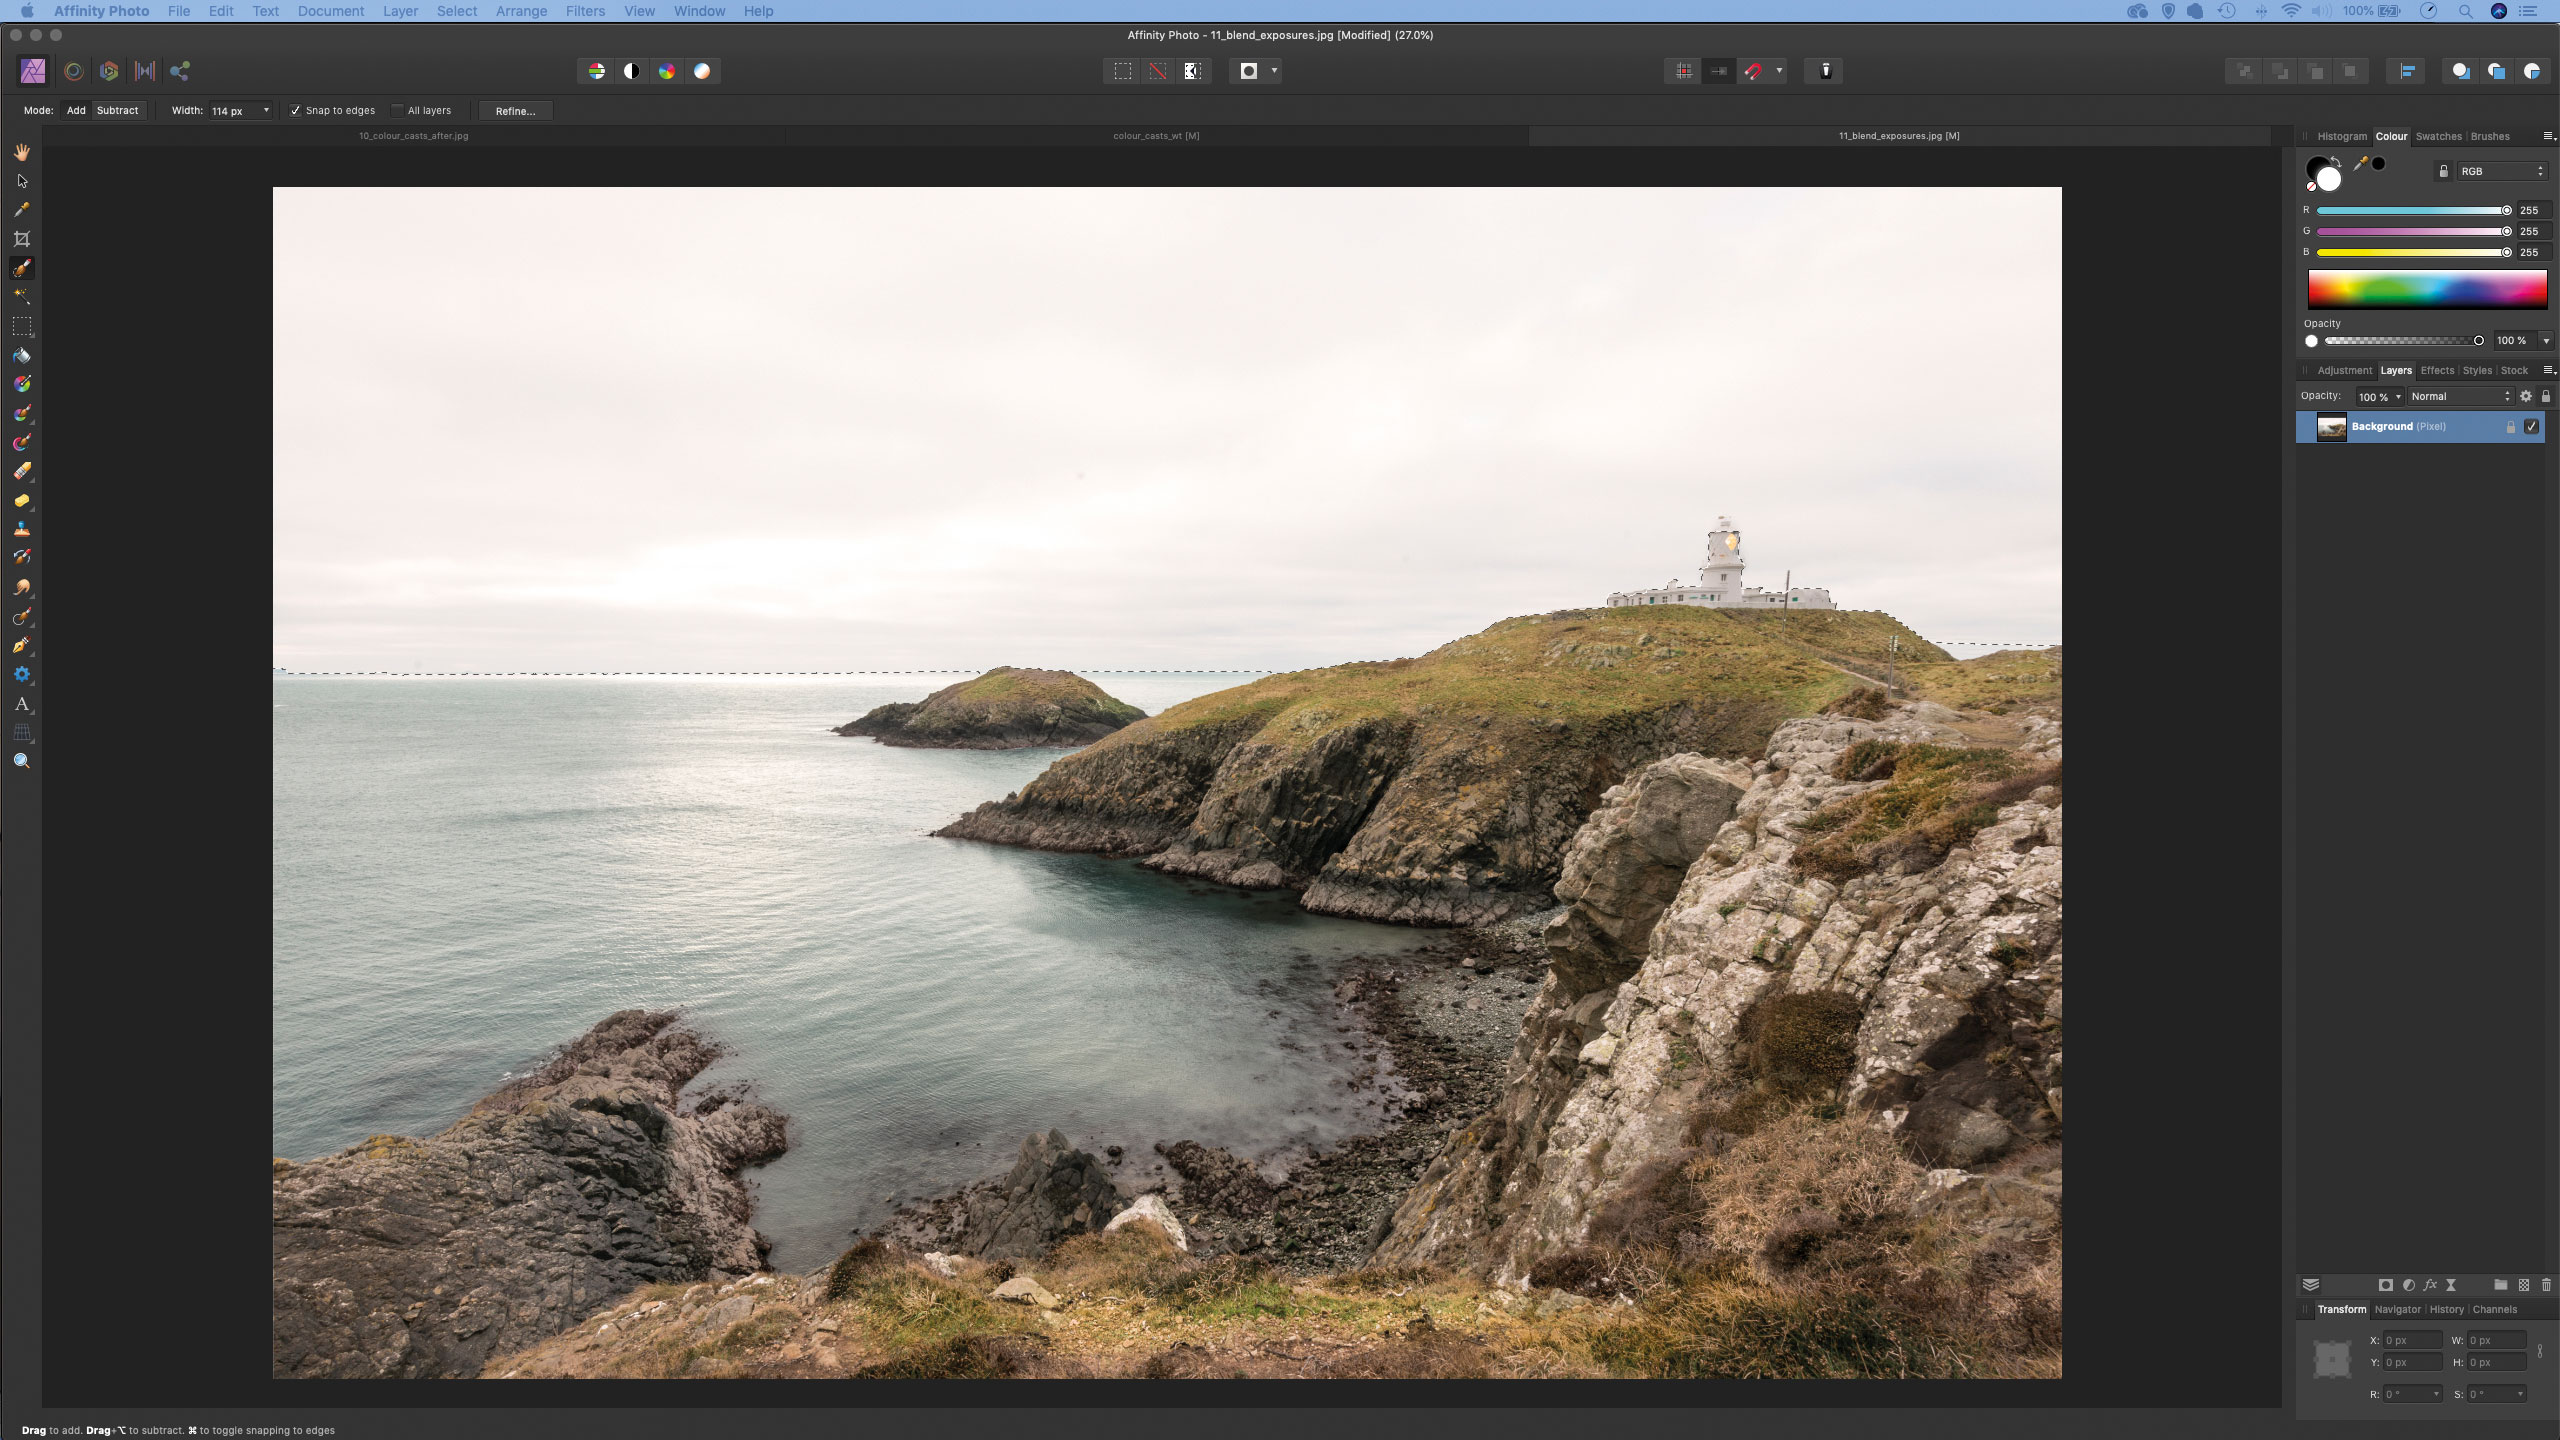
Start by open your landscape shot into Affinity Photo. Grab the Selection Brush from the toolbar and check ‘Snap to edges’ in the options at the top. Paint over the land (not the sky) to select it. If the selection includes unwanted areas, check Subtract at top left and paint to remove them. You can resize the brush tip with the ] and [ keys as you paint.
Step 2: Refine the edge
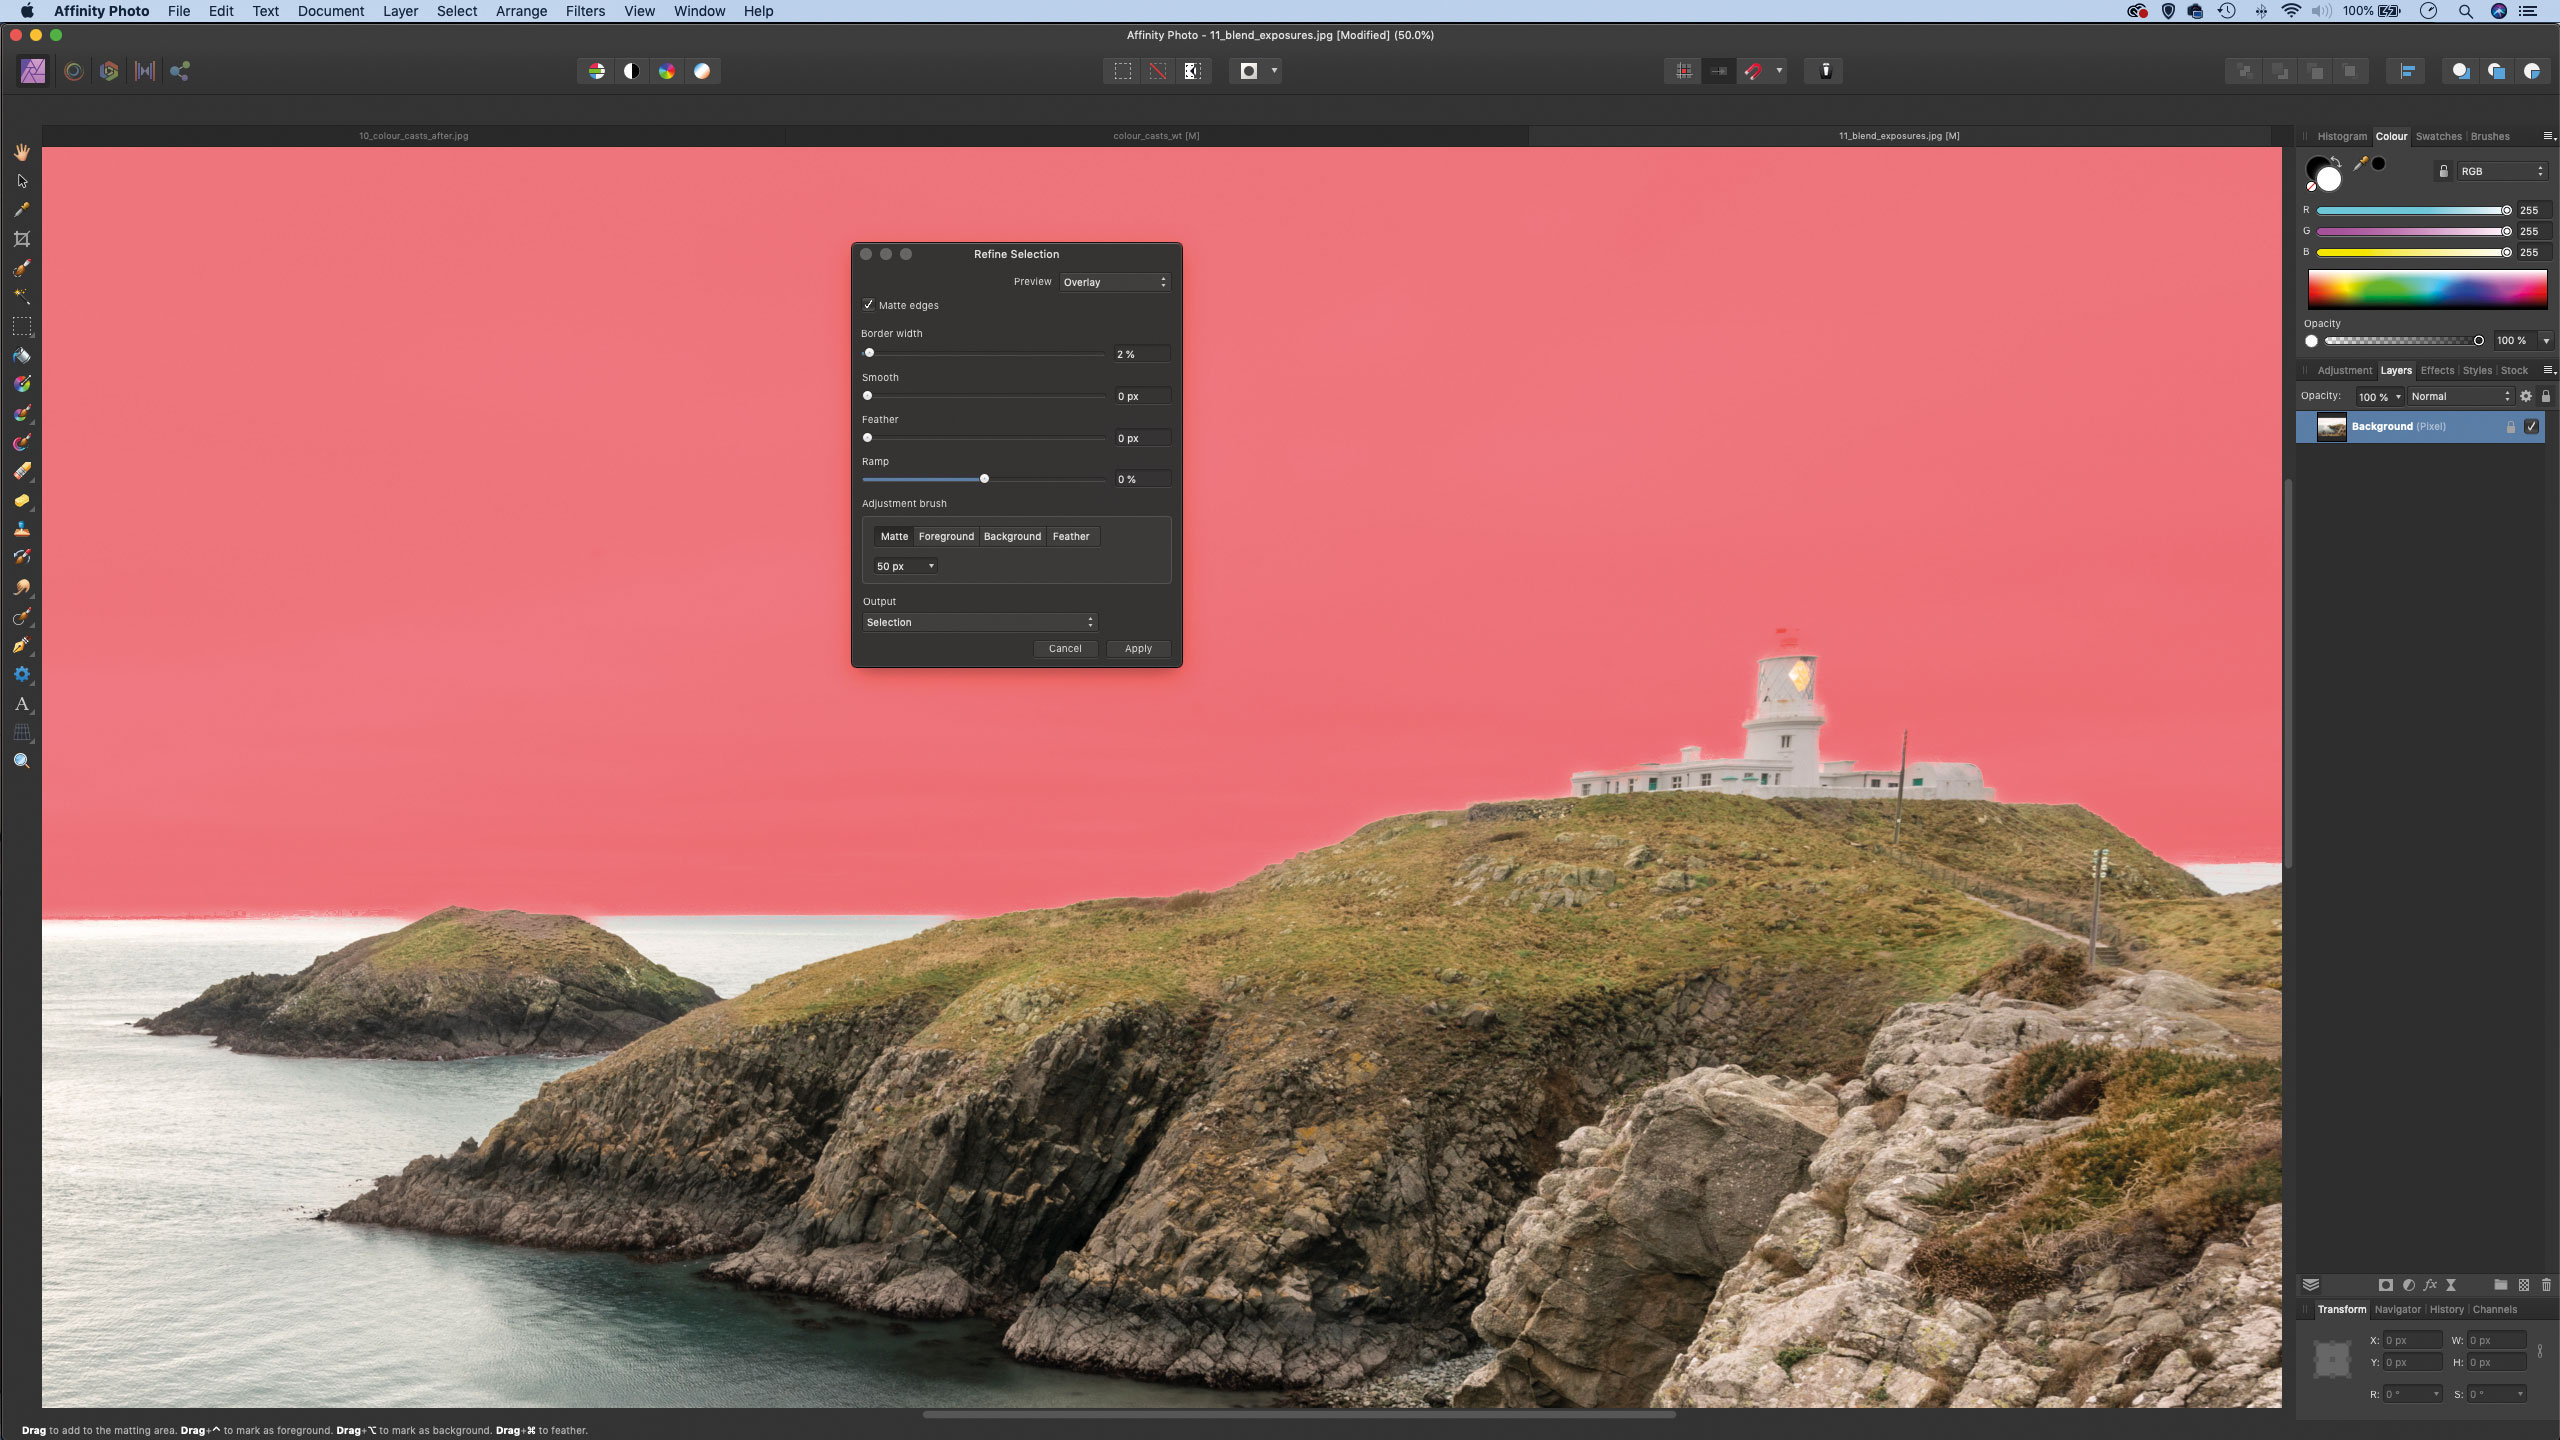
Click the Refine button at the top. Set Border Width to about 2% to control the area of refinement along the edge (this will depend on your photo). Using the Adjustment Brush within the command, paint over any areas of your photo on the horizon line to direct the command to parts of the edge that need that little bit more refinement.
Step 3: Improve the selection
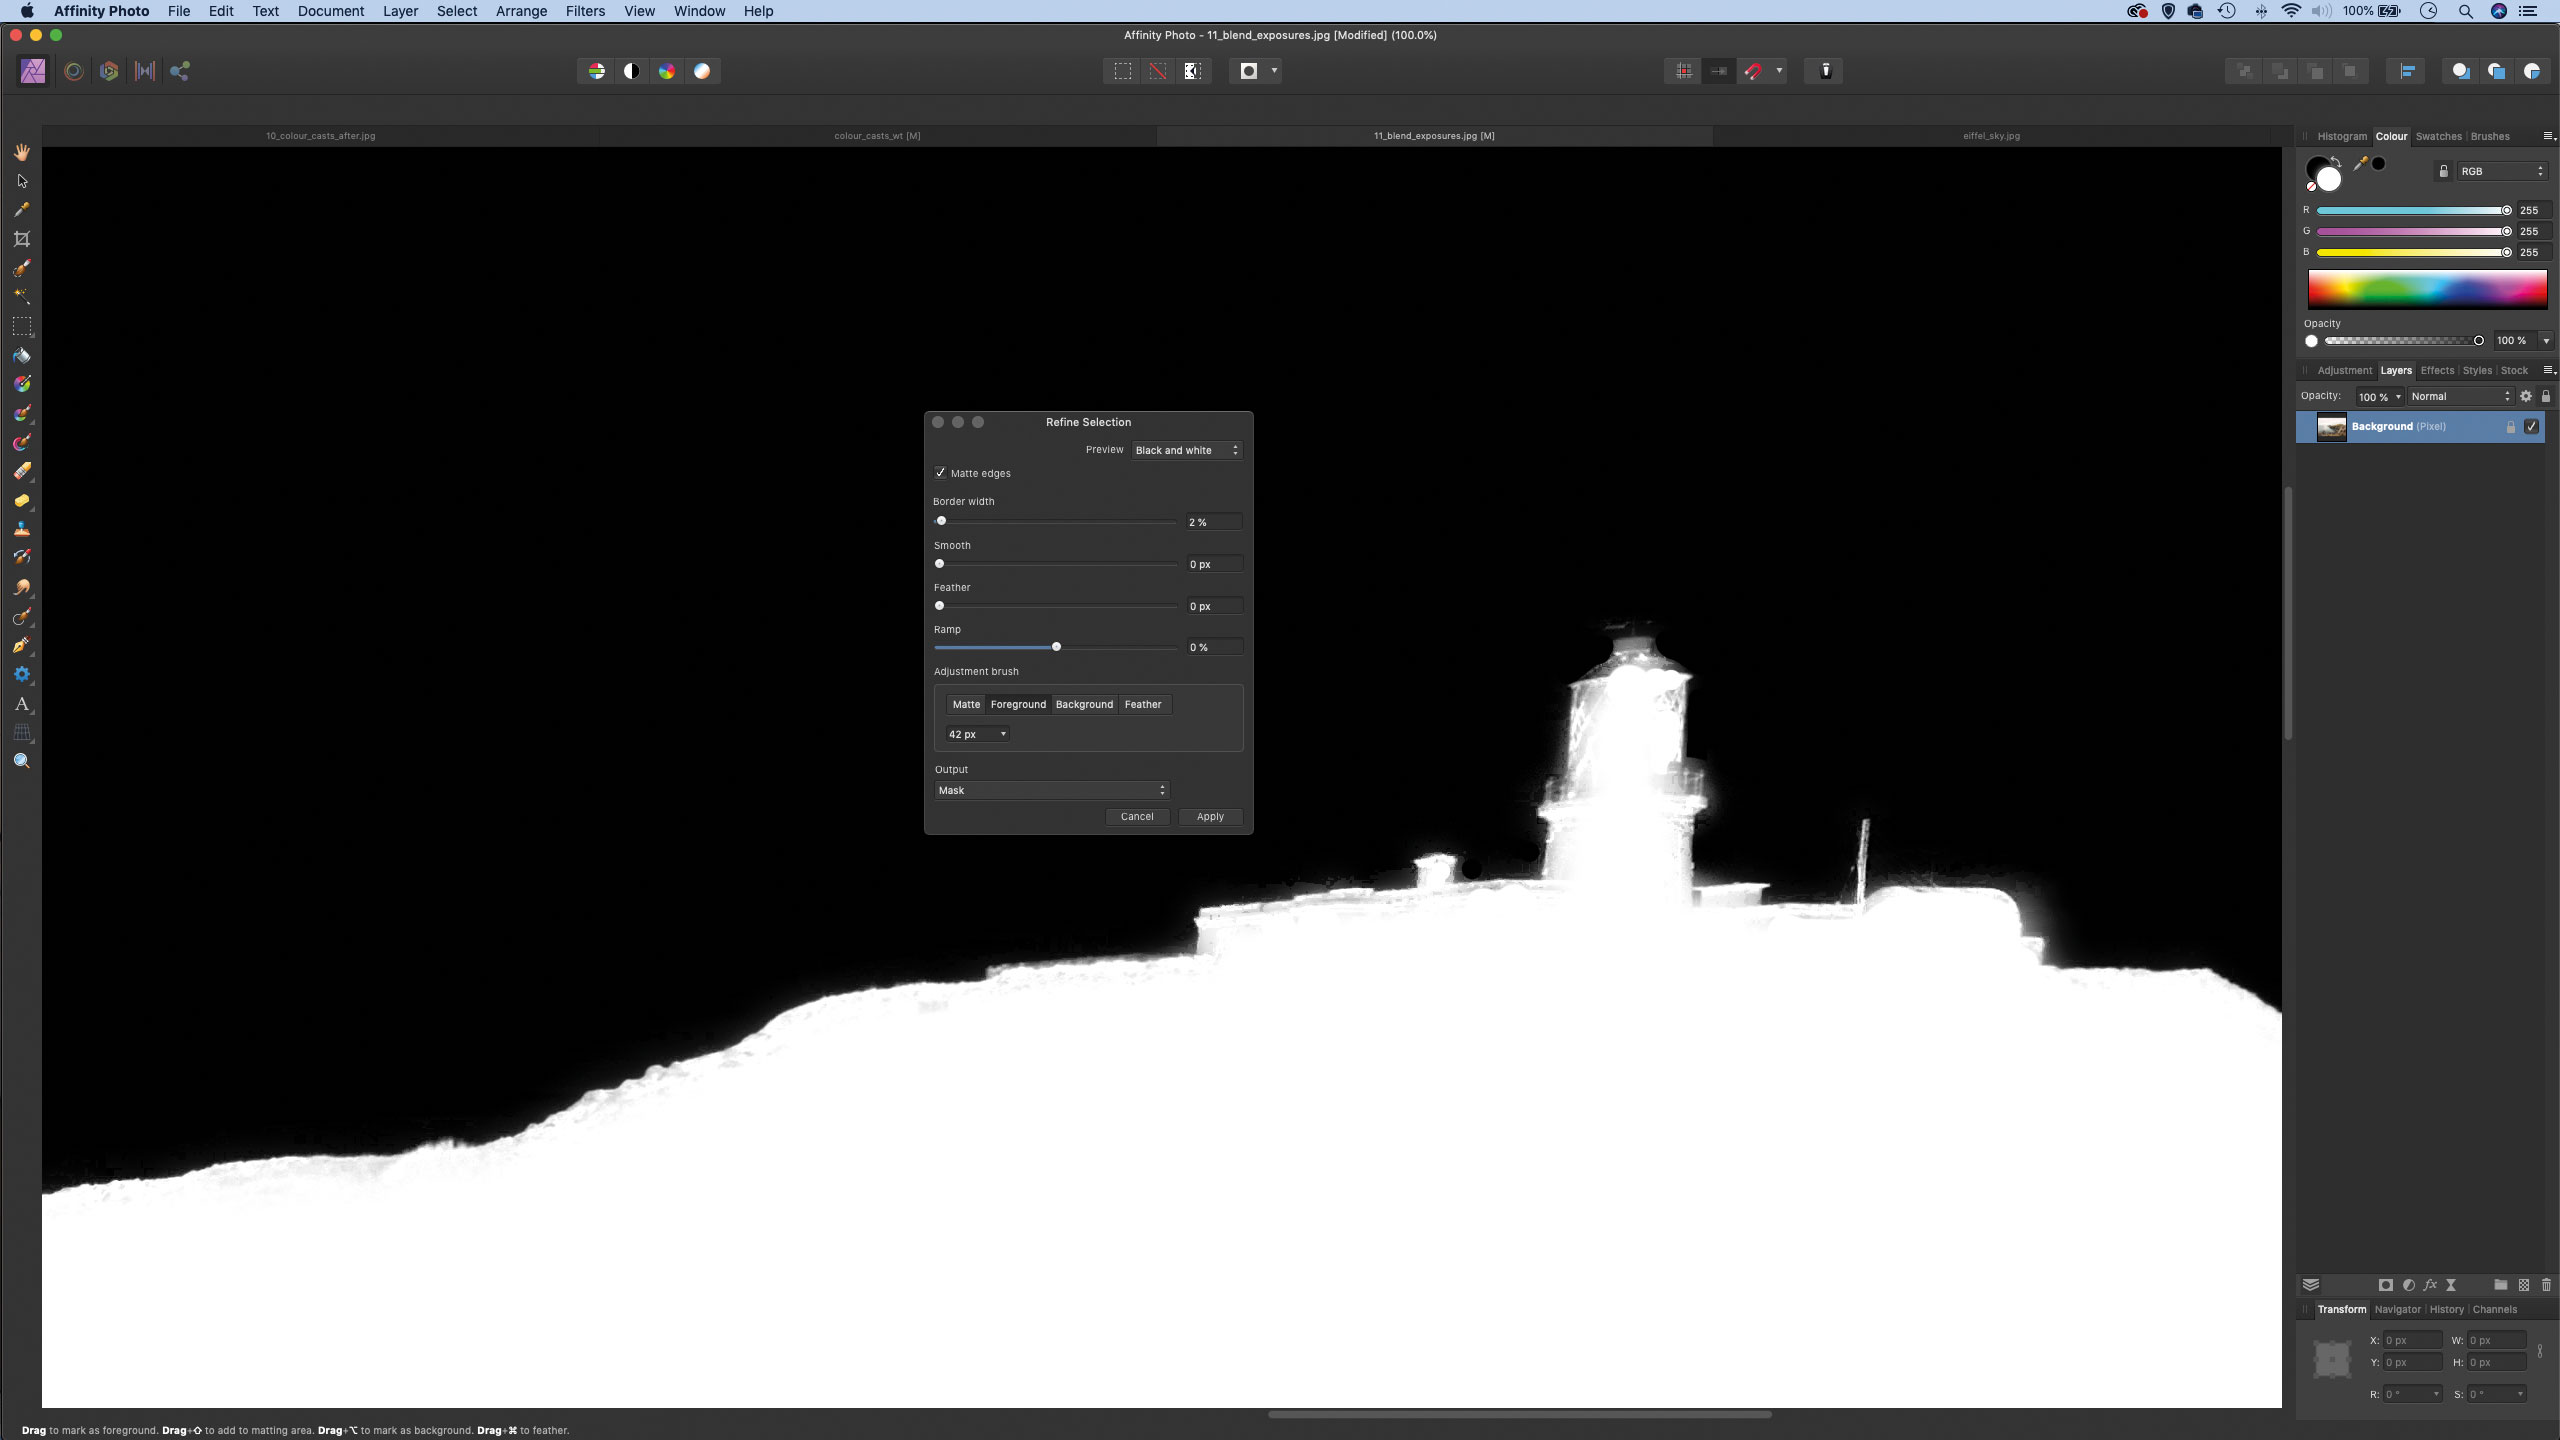
The Adjustment Brush in the Refine command has buttons for Foreground and Background. These let you fine-tune edges by telling the command what is foreground (the land ) and which is the background (the sky). Use the brush to paint over parts of the edge that aren’t perfect. You might want to experiment with different overlays.
Step 4: Drop in a sky
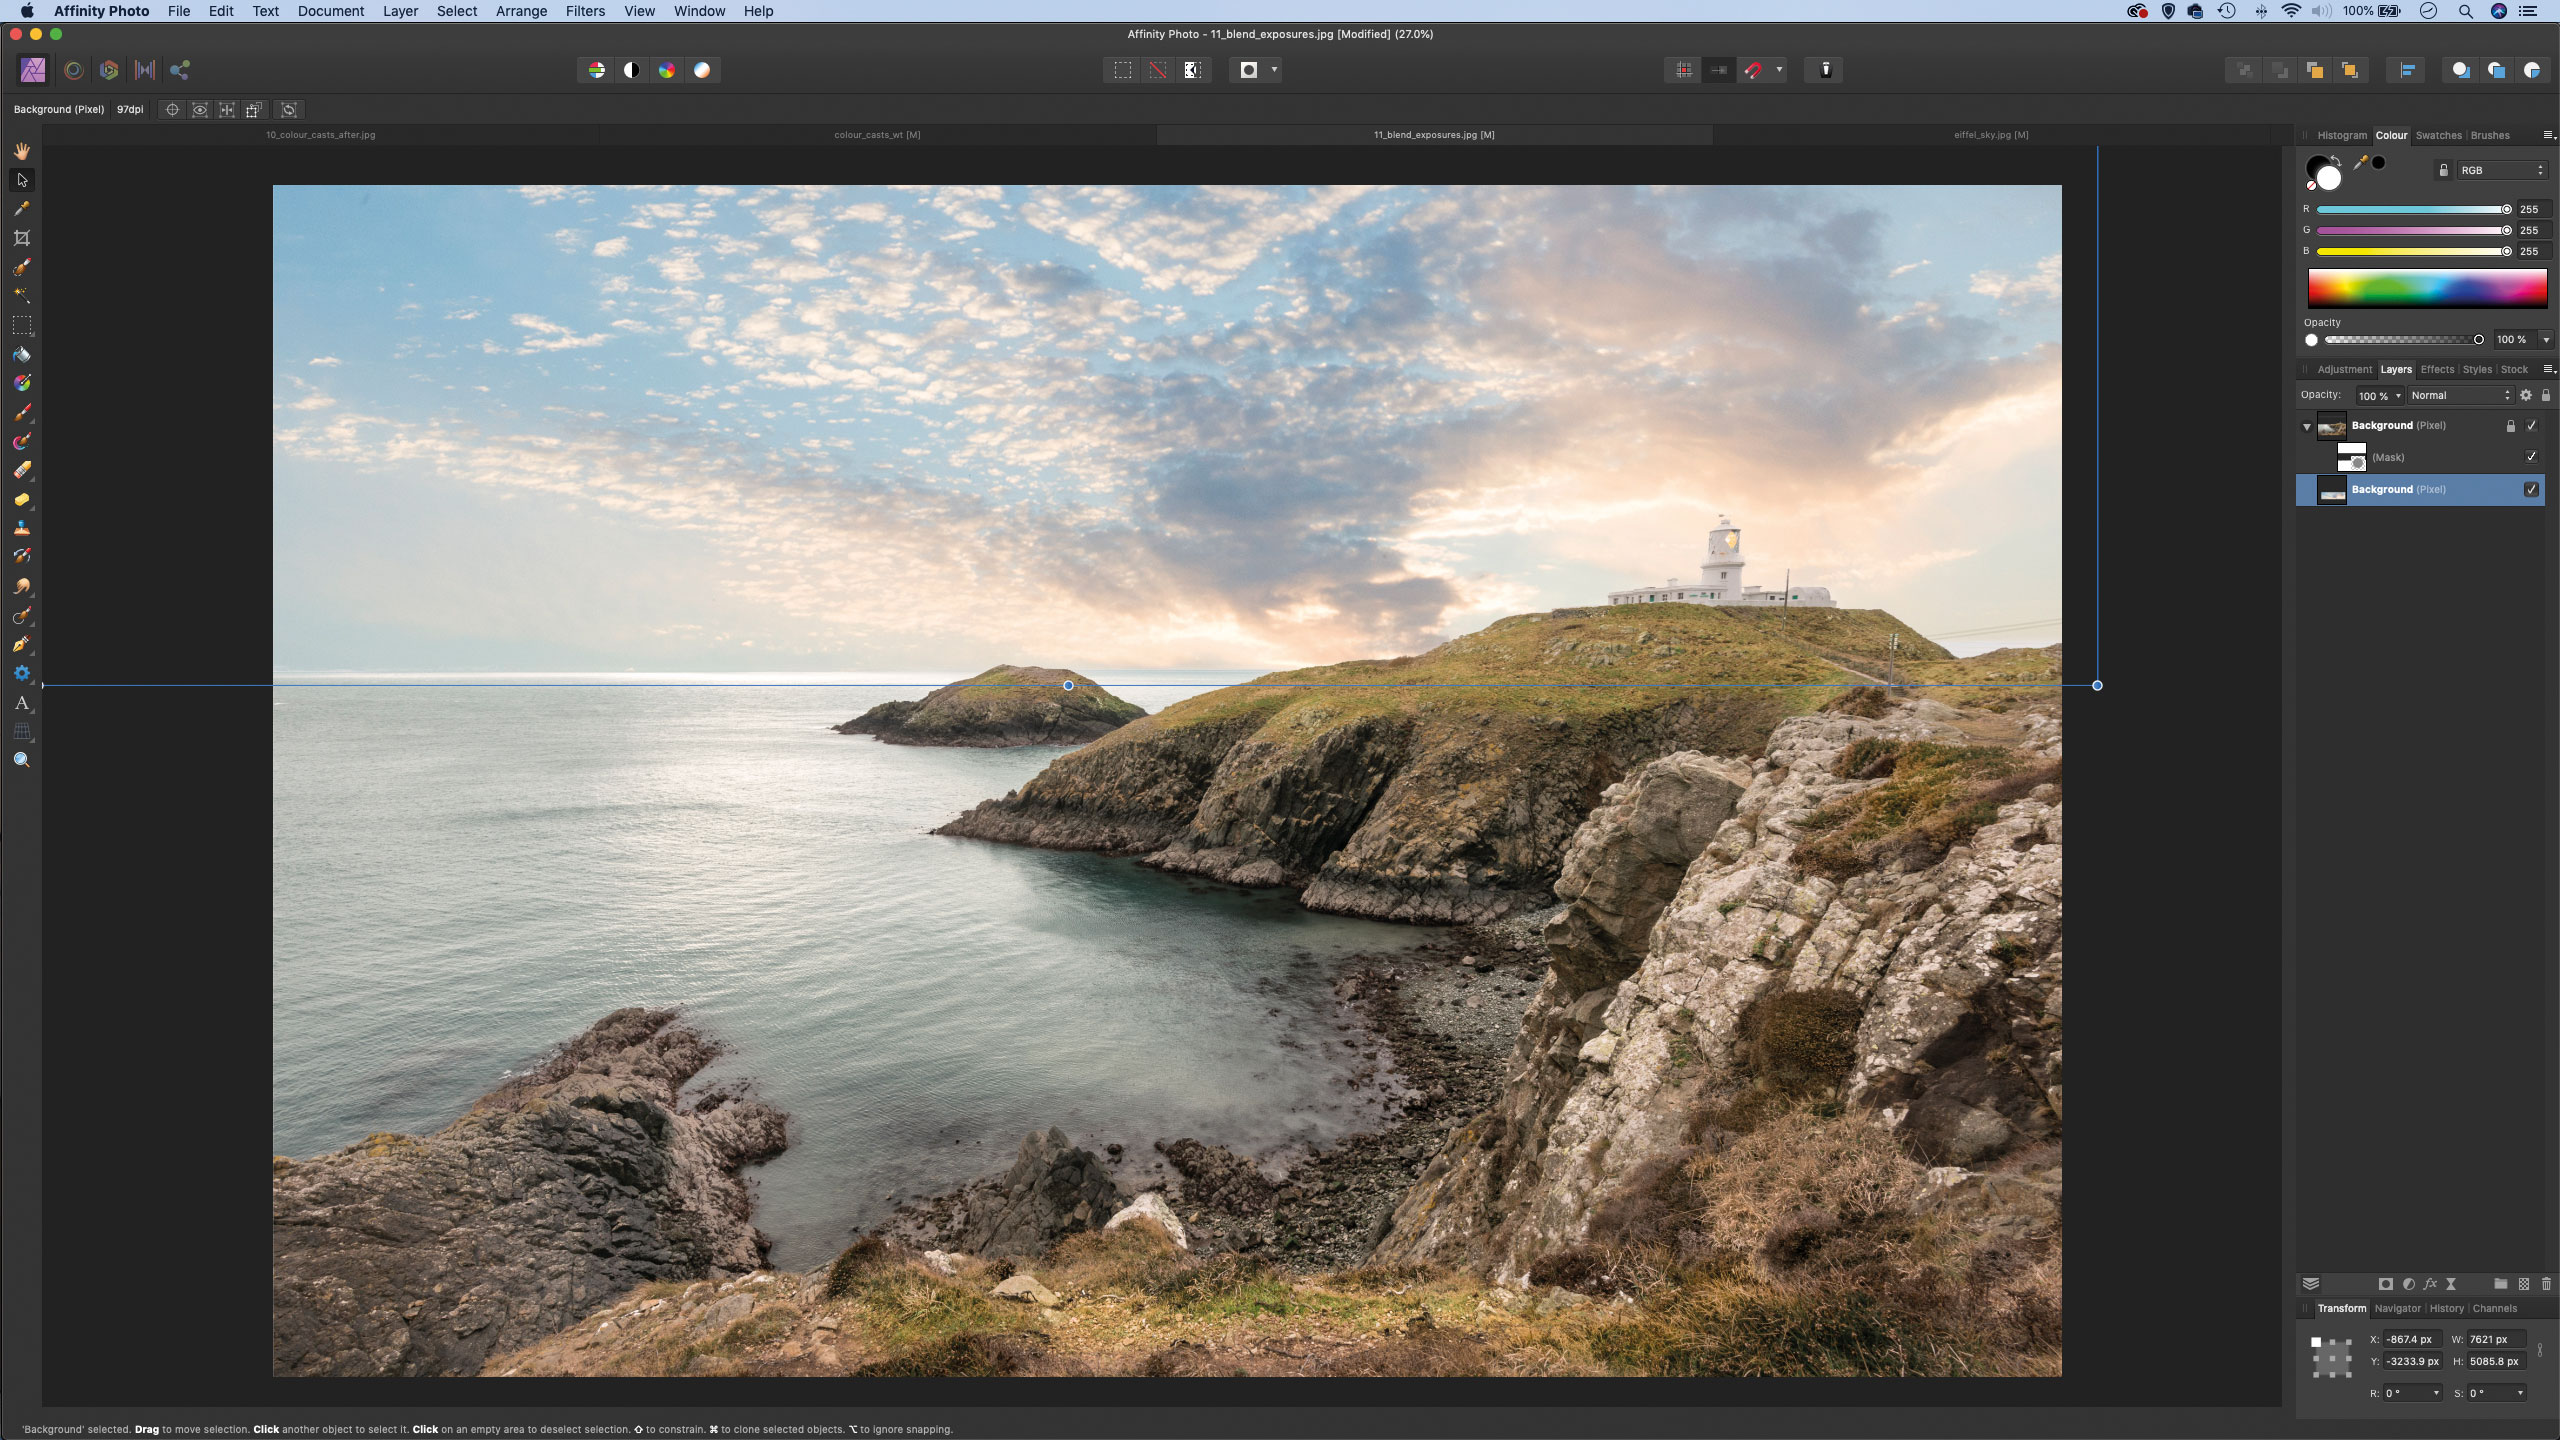
Now set Output: Mask and hit Apply. Choose a 'sky' image you want to drop in, then press Cmd/Ctrl+A to Select All, Cmd/Ctrl+C to copy, then go to the other image and press Cmd/Ctrl+V to paste. Go to the Layers panel and drag the sky layer below the other. Grab the Move tool and position and resize the sky to fit.
Step 5: Perfect the mask
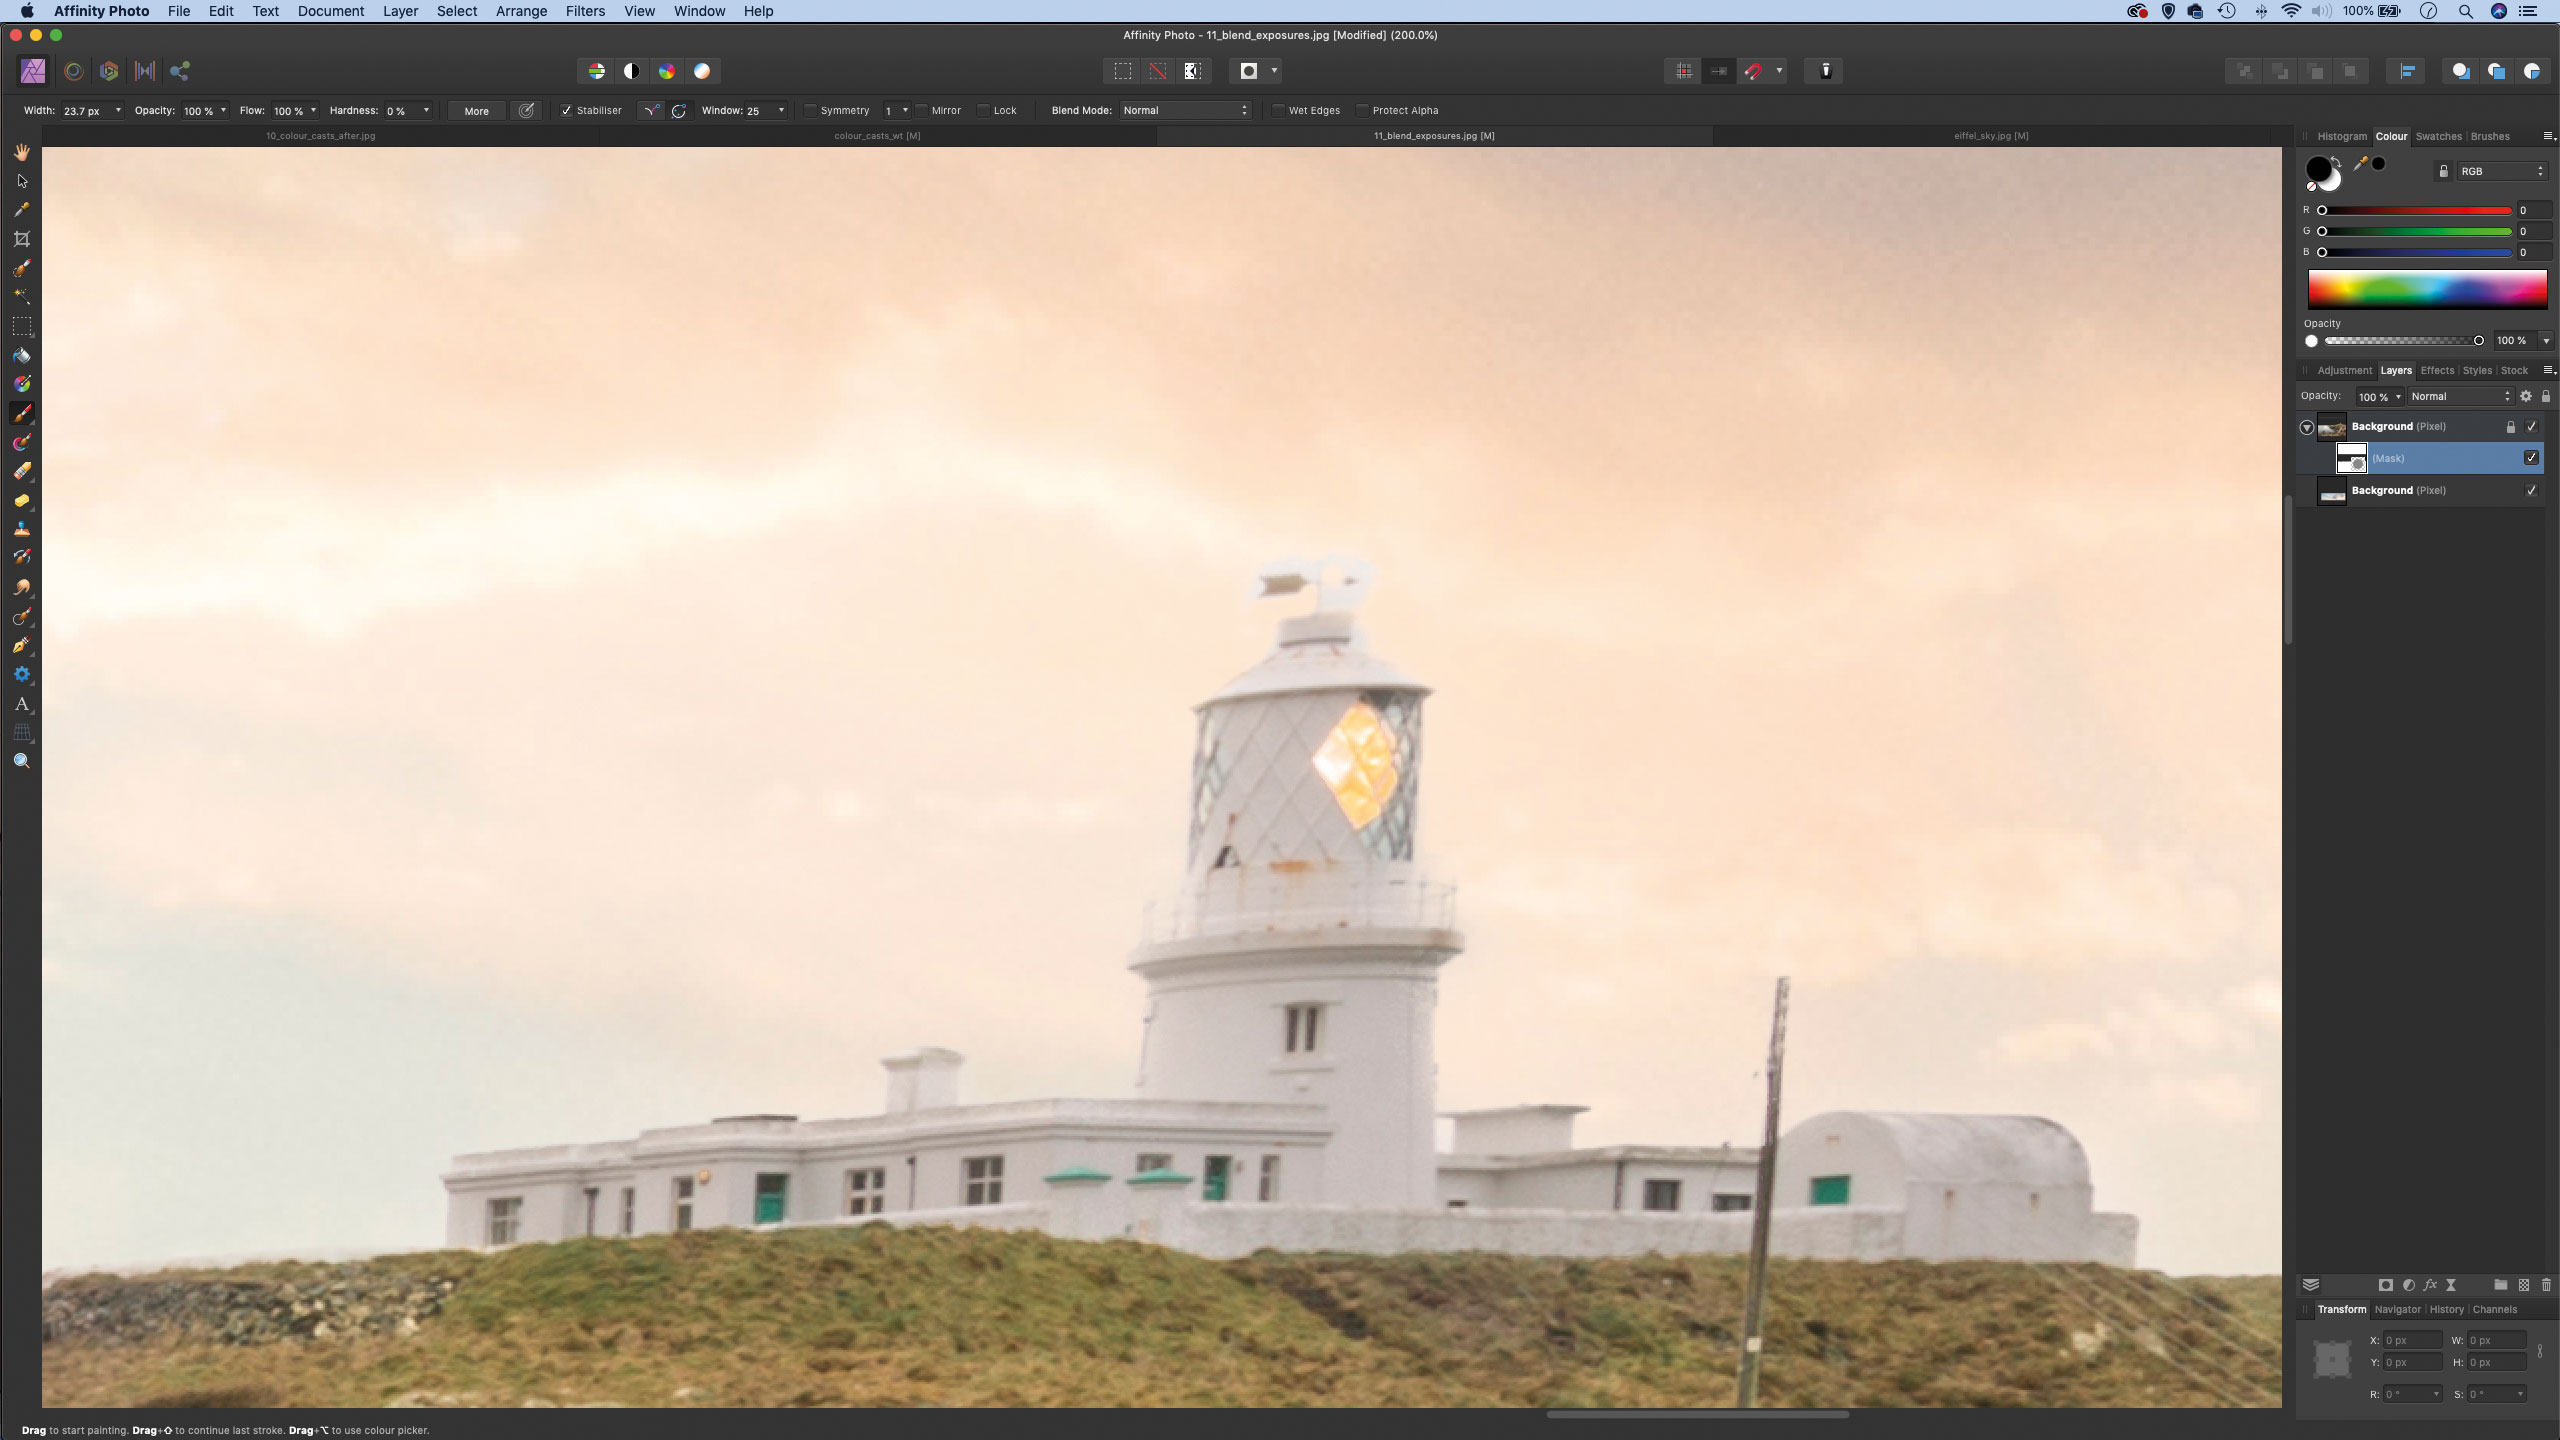
Highlight the mask on the top layer, then zoom in close to the horizon to check that the edge is perfect. Grab the Brush tool and, if needed, paint with black to hide parts of the layer, or white to reveal hidden areas (you can press X to switch between black and white while painting).
Step 6: Tonal tweaks
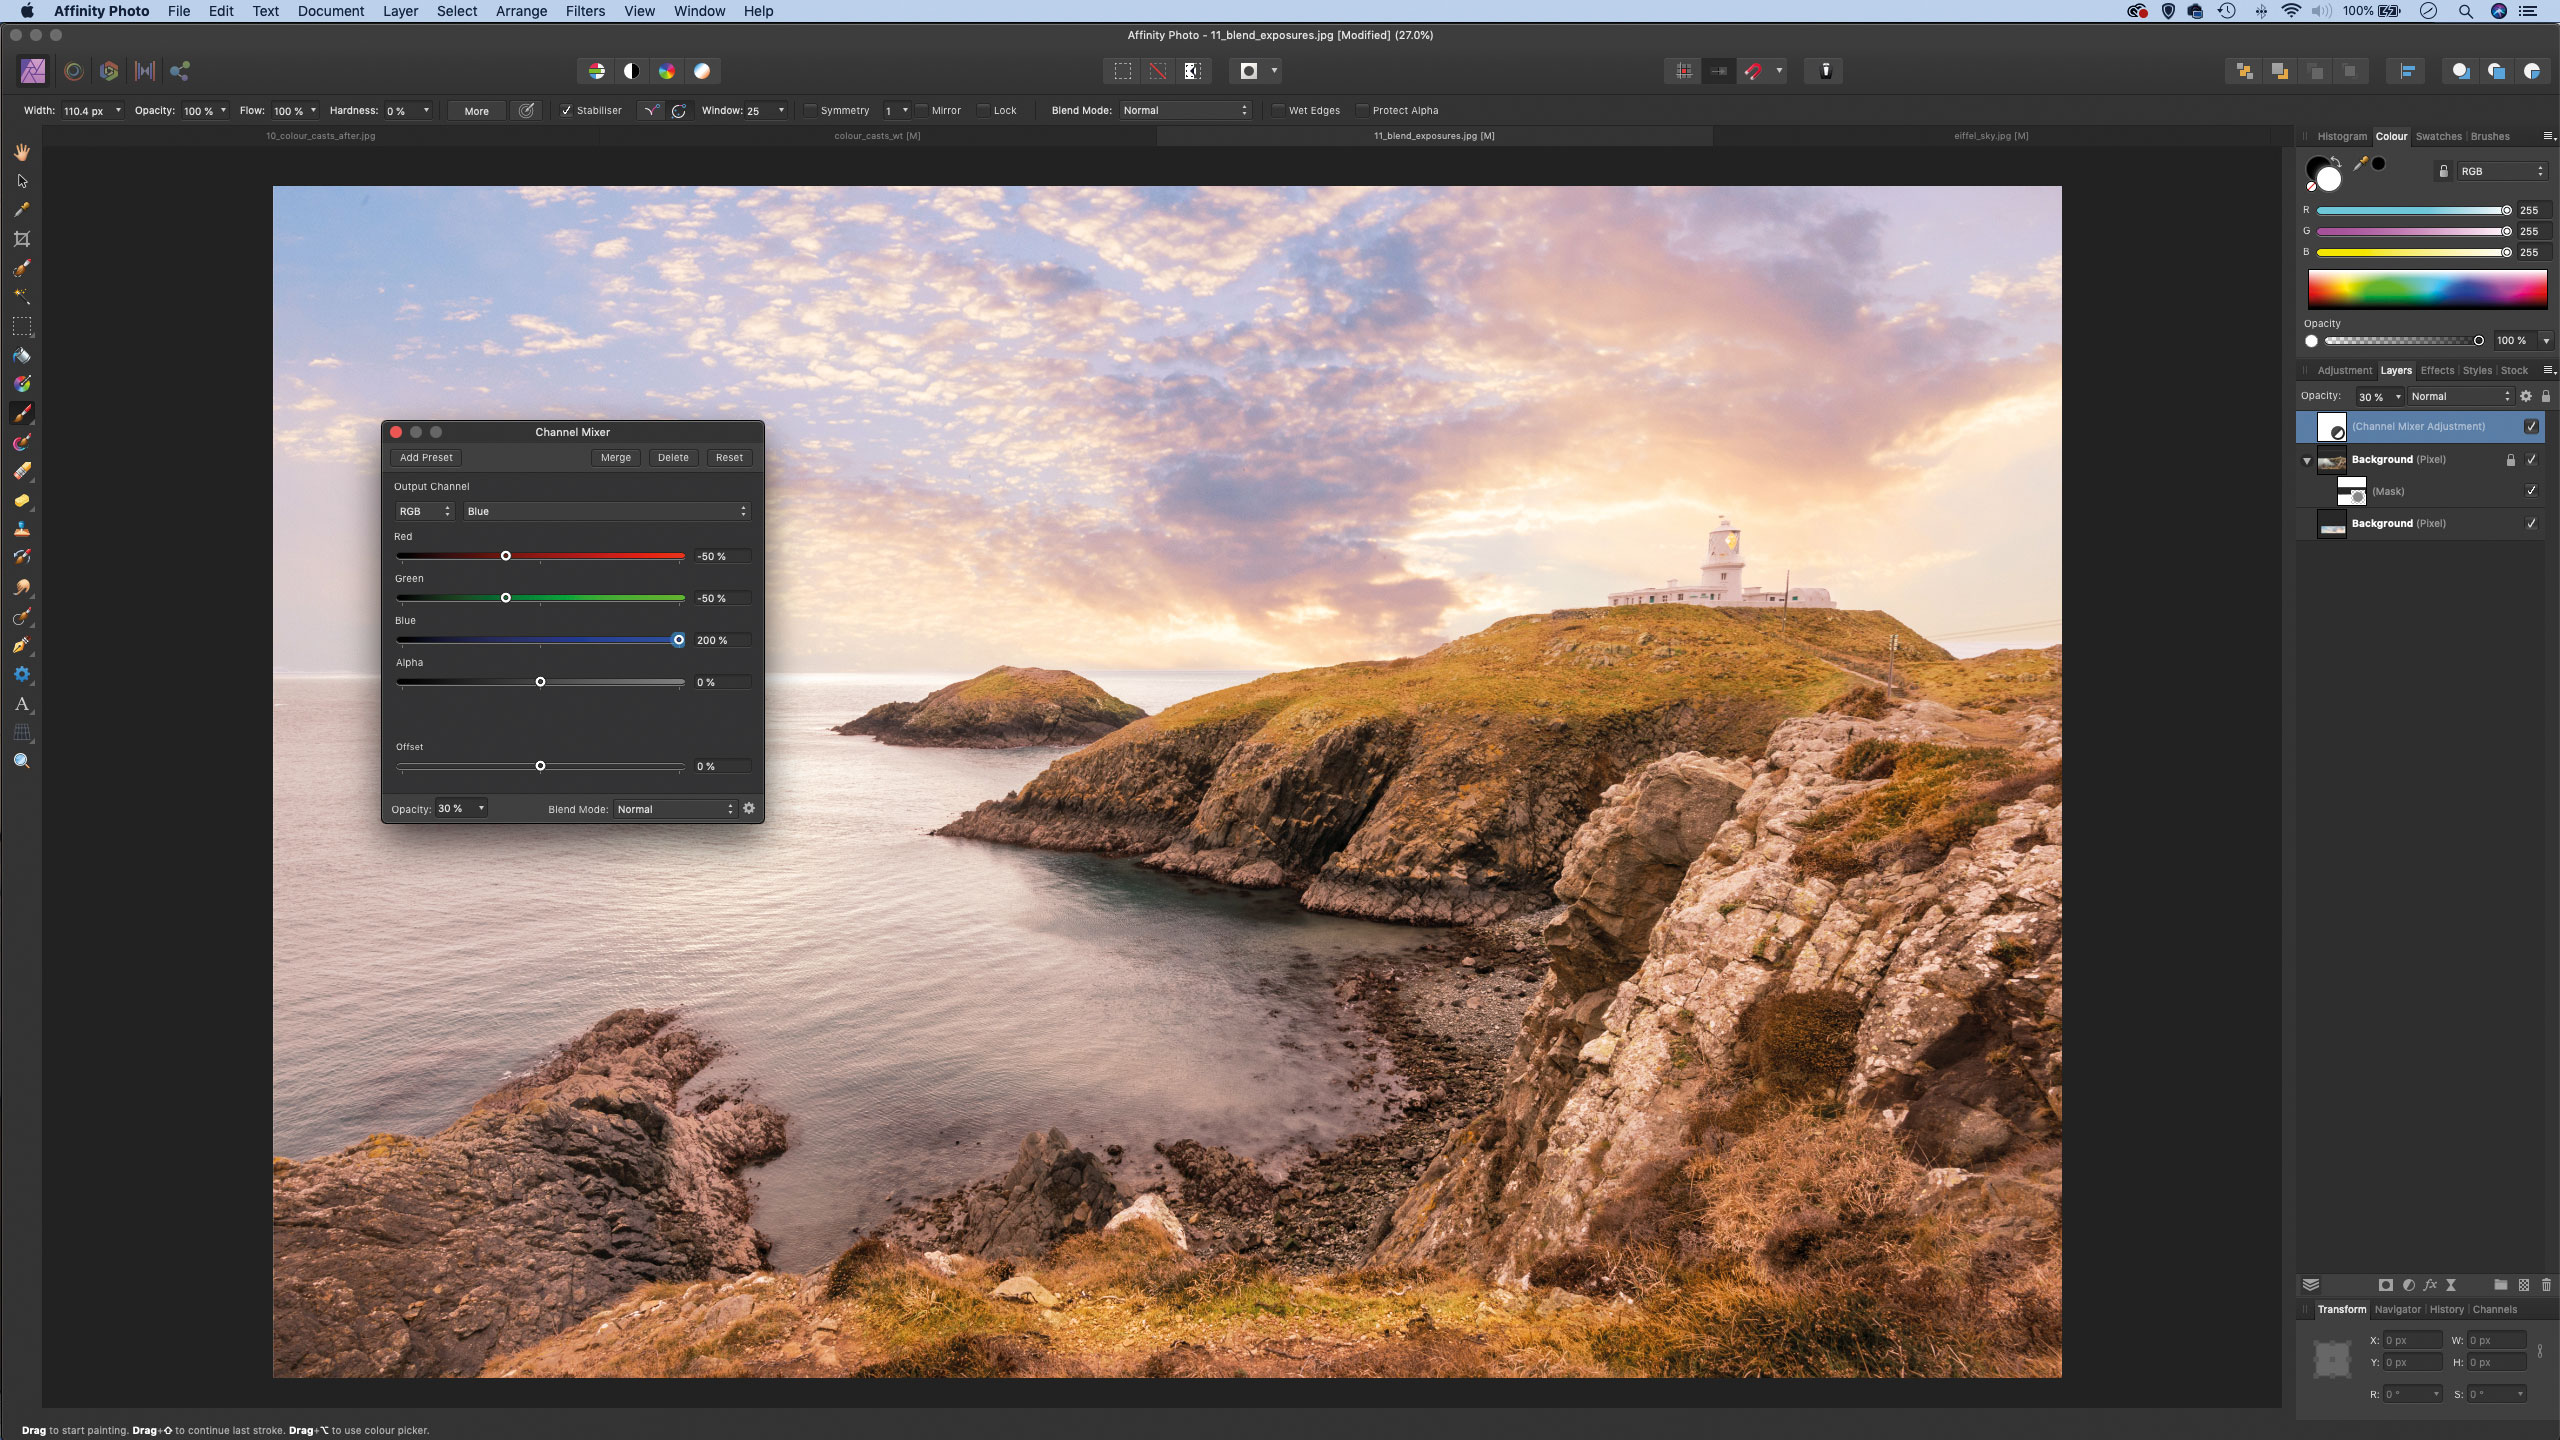
Finally, we’ll add a tonal tweak to bring everything together in our photo. We go to the Layers panel, click the Adjustment Layer icon and choose Channel Mixer. Now we select the Red channel and set Red +200, Blue -50, Green -50. Then we select the Blue channel and set Blue +200, Red -50, Green -50. Lower layer opacity to 30%.
Quick tip
The Refine command is essential for improving the edge of complex selections. The key feature here is Border Width, which expands the search area along the edge in which the tool seeks out similar pixels to those already included. As such, it’s ideal when we need to select tricky edges like areas of hair, fur or foliage. We can also paint over tricky areas with the dedicated Adjustment Brush set to Matte, then fine-tune by using the Foreground and Background buttons to tell the command what should be included (foreground), or left out (background).
About N-Photo magazine
This tutorial originally appeared in N-Photo, the monthly newsstand magazine for Nikon photographers. Why not subscribe to a print edition, and have the magazine delivered direct to your door every month?
Alternatively, we have a number of different digital options available, including:
• Apple app (for iPad or iPhone)
• Zinio app (multi-platform app for desktop or smartphone)
• PocketMags (multi-platform app ideal for Android devices)
• Readly (all-you-can-eat digital magazine subscription service)
If you wanted a printed version of any of our most recent issues we have a selection of back issues to choose from in our online store.
Read more:
• Photography tips and tutorial videos
• The best photo editing tools and accessories
• The best desktop computers for photo editing
• The best photo-editing laptops right now
• The best photo editing software today
Get the Digital Camera World Newsletter
The best camera deals, reviews, product advice, and unmissable photography news, direct to your inbox!
N-Photo: The Nikon Magazine is a monthly publication that's entirely dedicated to Nikon users. As a 100% independent magazine, you can be assured of unbiased opinion from a trustworthy team of devoted photography experts including editor Adam Waring and Deputy Editor Mike Harris.
Aimed at all users, from camera newcomers to working pros, every issue is packed with practical, Nikon-specific advice for taking better photos, in-depth reviews of Nikon-compatible gear, and inspiring projects and exciting video lessons for mastering camera, lens and Photoshop techniques.
Written by Nikon users for Nikon users, N-Photo is your one-stop shop for everything to do with cameras, lenses, tripods, bags, tips, tricks and techniques to get the most out of your photography.

